Tile materials for interior work are presented on the construction market in a huge range. Each type of demanded raw material has its own characteristics and performance characteristics. The variety of textures, sizes, and manufacturing technologies allows you to use many ways to lay tiles on the floor. Some manufacturers mass-produce whole fragments of companions, which makes it possible to decorate surfaces with an identical pattern. In order to successfully update the interior and carry out high-quality tile installation, you need to understand the types of materials and follow certain rules when carrying out repair work.
Types of floor tiles
All material offered by manufacturers can be divided into two types. These are extruded and pressed options. Separation by manufacturing principle is necessary to select the appropriate material for installation in certain conditions. Floor tiles can also have a glazed finish or remain natural.
You can make any room comfortable and unique using the following types of tile products:
- Simple ceramic tiles. Due to the colored glass coating, the elements receive additional hardness. Available unglazed and with an additional layer of enamel. It has many shades and excellent water resistance.
- Porous. Produced by single firing. Due to the high degree of moisture absorption, it is used only indoors.
- Porcelain tiles. A product with a homogeneous structure based on kaolin and quartz. The outer coating has a glass luster and durable structure. High impact strength and resistance to intense loads allow it to be used for installation in industrial enterprises.
- Metlakhskaya. Unglazed elements are produced by pressing after one firing. A material with high performance properties is used for street and home masonry. The incredible durability of the design is explained by the painting technology - each brick is soaked through with paint.
- Cotto. Dense, effective material, up to 3 cm thick. Enameling is not provided, so the tiles require constant maintenance. To reduce porosity, after installation it is treated with hydrophobic compounds and mastic.
- Clinker room. They are made from several types of clay, binders and dyes. The durable product easily contacts chemical irritants and any natural factors. The universal finish has a uniform texture and unlimited service life.
- Monoccotura. They are often used for decorative finishing and laying out certain patterns, despite the low degree of moisture absorption and dense structure. Monoccotura elements are subject to shrinkage and may differ in size in different batches.
Methods of laying tiles on the floor - technology and features
Laying floor tiles is one of the most popular and rational solutions for renovations. Thanks to the variety of types, sizes, patterns, you can update the floors in any room, on the veranda, in the garage. The material can be laid in different ways. But it is worth considering that working with each type of product has its own nuances. Difficulties may arise in adjusting the elements, their pattern, preparing the base, and the adhesive composition. It is better for novice craftsmen to do the styling according to a simple, standard pattern.
Traditional way
The most common type of laying products on the floor involves their parallel arrangement relative to the base. The elements are tightly packed in even rows. You can create a perfectly even pattern from square or rectangular tiles.
To give the masonry an original look, use tiles of different colors. When carrying out work, it is necessary to lay out long or short parts as evenly as possible, since even the slightest defects will be evident. The traditional method is suitable for seamless ceramics; it is used when laying out coatings in the bathroom, toilet, and kitchen.
With an offset or in a running start
The installation method looks like brickwork. It is often used when decorating indoor floors. Plain rectangular elements laid out with a slight offset will look especially good. This is a great way to disguise floor defects and avoid overall monotony.
Interspersed tile laying will create a historical atmosphere in the house. By experimenting when preparing a diagram with dimensions, you can achieve a special pattern that suits a specific room design. Floor tiles are laid only in horizontal rows. Each middle of the elements from the next strip should lie on the junction of the square from the previous row.
To achieve real aesthetic pleasure from the result, offset laying must be done with strict adherence to the thickness of the seams. In the corridor or on the terrace, diagonal masonry will look original. In this case, the tiles are distributed on the surface at an angle of 45 degrees relative to the wall.
Before you start laying tiles, you must determine the floor level. To do this, lay lighthouse slabs in the corners and make a screed. If necessary, level the tiles using a rubber hammer.
Herringbone laying
Rectangular elements of various lengths are suitable for work. The method is quite complicated to implement, but the end result will surprise you with its originality. Herringbone tiles can be laid in two ways. The first will externally resemble parquet; for the second, mosaic inserts or cut pieces of elements of a different color will be additionally used.
The herringbone laying technique involves joining the narrow side of the material to the wide side of another tile to form 90 degree angles. By choosing the right pattern, you can make a durable tiled floor that imitates the pattern of laminate or parquet. This method is used to decorate irregularly shaped rooms, since the pattern creates an optical illusion and smoothes out the difference in the size of the room.
The laying pattern can be single - each new tile touches the adjacent one, double - two rectangular tiles in a row, triple - reminiscent of weaving, each row consists of 3 fragments. Arranging the parts diagonally on the floor not only creates a stunning pattern, but also minimizes waste during work.
Modular installation
A simple method is the best option for training in working with floor tiles. A design made from several modules of different sizes looks interesting and original. It will look great in small rooms.
First of all, the installation scheme, module size and pattern are selected. When creating a drawing, it is important to take into account the thickness of the seams, otherwise the entire work will be ruined. To simplify the task, you can immediately purchase a set of tiles with a ready-made map for a certain quadrature.
The basic principle of the modular laying method is a repeatedly repeating heterogeneous pattern. The elements must belong to the same series, but be of different sizes. More often, products are chosen with the same texture, but it is possible to use tiles of different colors. Products marked “modulare” are suitable for modular display.
The "labyrinth" method
The laying method is an artistic one, creating a complex pattern on a ceramic floor. The intricate weave formed gives the appearance of a square center being enveloped by several oblong bricks. To enhance the effect, the tiles in the middle should be different in color. Provided that the shades are correctly selected to match the color scheme of the interior, the surface design will look more than good.
To correctly determine the material, it is necessary to lay out one tile pattern at the point of sale, and on the spot calculate the required number of elements. To choose a combination of flooring shades, you need to take into account certain rules when choosing a material. In darkened rooms without windows, a dark center and a light edge will look better. A pattern formed in this way in the hallway will visually highlight areas of the floor.
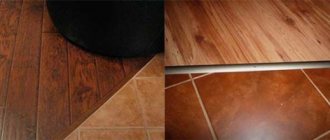
Masonry "deck"
For installation, elongated rectangular tiles with a pattern imitating the texture of deck boards are used. Thanks to the variety of ceramic products that are as similar as possible to wood materials, any parquet layout can be used. This particular method involves straight laying with a slight offset.
When installing tiles, the shear length along the entire plane must be maintained the same. Such tiles will look as natural as possible. Layout technology differs from the offset method in the distance of the offset itself. The element from the next row goes to the side not by half of the previous one, but by only a few centimeters, leaving most of the module.
To make the floor visually look like wood, you need to choose rectangular tiles with a structured pattern of natural material. The absence of a glazed surface will make the resemblance as accurate as possible.
Laying using the "carpet" method
A patterned tile carpet is a rather complex way of laying out, despite the existence of simple patterns and ornaments. To ensure that the result of the work does not disappoint, it is necessary to carefully select all the elements, their color, size, and quantity. Laying using the carpet technique involves a lot of trimming.
To create a tile pattern, use at least three colors. First a sketch is created. If all dimensions coincide in area with the room, transfer it to transparent pattern paper and mark the prepared surface. Then the tiled cladding is assembled directly on the floor from many simple and shaped parts.
It is better to implement such projects in large areas. Any room will be suitable. But a tiled carpet will look better if it is not cluttered with furniture, rugs, flowers, or various floor decor.
Laying method "kaleidoscope"
A great way to create a medieval atmosphere or hide an unsightly slope in a room. The “kaleidoscope” pattern involves elements of the same size, but different in color. If the plane is large, it is better to choose shades from one spectrum; at most you can grab the neighboring ones. The main thing is that the contrast is soft. It is necessary that the proportional quantitative ratio of all tiles be the same. To do this, the total number of participating modules is divided by the number of colors.
For small and medium-sized tiles, another layout option using the kaleidoscope technique is used. You will need to purchase a ready-made tile panel and lay it on the floor. Then the elements from the outermost 3 rows on all sides are swapped and rotated 180 degrees. The edge blur effect will be more noticeable in a small room.
The tiles are scattered
The staggered pattern is an installation of rectangular elements with every second row offset by half the width of the tile. The result will be a beautiful pattern, similar to brickwork. For original design solutions, the square shape of the elements can be used, which will create an unusual visual effect.
Laying tiles in staggered patterns is recommended for high-traffic areas of the apartment - kitchens and hallways. With this method, tiles are laid out only horizontally. The pattern with imitation brickwork creates a special atmosphere in the interiors. Glossy rectangular elements laid out staggered are suitable for rooms decorated in retro style. Brown tiles with scuffs are used in country style designs.
Features of laying tiles on different surfaces
Before you start tiling the floor, you need to study the basic rules and possible combinations of tiles with different surfaces. To lay out ceramics even using the simplest technique, you must have the necessary tools, considerable theoretical knowledge, and skill in working with adhesive mixtures. It is also necessary to provide for all possible negative reactions of the tile and surface upon contact, and options for eliminating errors.
Laying rules and preparation on a concrete base
A concrete surface is an excellent base for tiles. It has a durable, rough structure with high adhesion. But concrete floors can be different, so before starting work you should determine their type. The quality of installation will depend on this. Foam concrete, expanded clay concrete, and polystyrene concrete are taken as the concrete base. Each type of material has its own properties and characteristics. To a greater extent, the final result is influenced by the strength of the base.
Floor tiles should only be laid on a clean and level concrete base. If the subfloor has bulges and depressions, laying a cement-sand screed will be required. Working with a defective surface will significantly increase glue consumption. To improve the adhesion of materials, the finished base must be treated with primer. Also, using special solutions, you can protect concrete from mold damage.
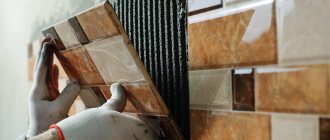
Before laying tiles on a concrete base, it is necessary to apply waterproofing, especially if the room will be exposed to moisture. This can be a roll of self-adhesive film or bitumen mastic. The process of laying tiles takes place using special plastic crosses for the seams. The finished adhesive is applied to the concrete and to the lining itself with a notched trowel, the materials are joined and lightly pressed down.
Rules for laying and preparing a wooden base
The only explanation for laying tiles on natural wood is ease of maintenance. Due to the significant difference in the service life of the connecting materials, such a floor can crack within 5 years. If the installation option is unavoidable, you must carefully select the facing material. These should be elements with a minimum amount of chemical additives.
Preparing the base from the boards consists of leveling it. Leaky wooden elements must be replaced. It is very important to treat the surface so that the subfloor is not mobile and susceptible to temperature changes. A special flooring must be installed over the moving wooden base using the dry leveling method. Installation of waterproofing and reinforcement is also required.
Tiles can only be laid on a flat and solid base. If the back of the tile has grooves or other grooved patterns, such as boar tiles, the adhesive strips from the notched trowel should be perpendicular. You can start grouting the joints 3 days after installation.
Linen carpet
Masonry in the style of “canvas carpet” is the design of part of the room using color schemes and a combination of elements. This creates an accent in the desired part of the house. The scheme will look impressive in spacious halls.
The laying pattern involves a combination of cladding of different sizes and colors. For a linen carpet, elements with a pattern are also used. A very important stage in the implementation of technology is creating a project on paper. Then the finished diagram is transferred to the surface using markings. For complex compositions, it is better to consult a designer. You can also use ready-made kits, which come with instructions and drawings.
Selection of adhesive mixture
Compositions for gluing floor tiles can be purchased dry or ready-made. Bulk mixtures require subsequent dilution with water right before laying the material. They are sold in bags and packages. You need to prepare glue at home according to the instructions, strictly observing the proportions. The advantage of using dry mass is the ability to dilute only the required amount of substance for installation, and an affordable price.
Ready-made mixtures are produced in plastic buckets or canisters. They are ready for application and begin to harden upon contact with air. Due to their high cost, they are purchased only if it is necessary to lay tiles over a small area, for repair work on an already finished coating. With certain skills, any adhesive mixture can be replaced with cement-sand mortar.
Product replacement
If the product does not comply with the standards established by law, the buyer has the right to return it. Typically, stores accommodate the customer halfway, agreeing to replace the tiles. For this reason, you should always purchase products only from trusted organizations and keep all receipts until the repair is completed.
With a certain skill, tiles of different sizes can be laid out properly. It is enough to apply one of the presented solutions to the problem. If you lack the necessary skills, it is recommended to seek help from professionals.
How to calculate the required quantity
Any construction or renovation work begins with the choice of design, selection of material and calculation of its quantity. A large assortment of tiles, their colors, textures makes it difficult to solve such a problem, especially if the floor has non-standard geometry. When making calculations, it is important to know the future size and pattern of the elements.
You can determine the required number of tiles for one room in the following ways:
- By room area. Suitable for single-color, one-dimensional elements. First, determine the area of the room and add 10% to the resulting value to create a supply of material. The final figure is divided by the area of one tile. This method of online calculation is available on many websites of ceramic manufacturers and in special programs.
- When laying diagonally. This installation technique increases the consumption of tiles, so 15% is added to the area of the room.
- By the number of rows. Determine the width, length of the room and the parameters of one tiled part. Then the length of the room is divided by the length of the tile, and the width is dealt with accordingly. The resulting figure is rounded up and a margin is added.
- Piece counting method. They are used when laying floors with expensive coatings and elements of complex panels, since the method gives a minimal error in calculations. Determine the parameters of the room, one tile instance. Then the number of rows and tiles in each is calculated.
Glue
The cladding is always attached to the base with tile adhesive. However, the technology has five varieties:
- glue is applied only to the base with a “comb”;
- the adhesive is applied exclusively to the tiles with a notched trowel;
- in addition to the first option, the tile is puttied with a regular spatula on the back side;
- Options 1 and 2 are combined (preferred, but time-consuming method);
- The glue is applied to the base with a smooth spatula, onto the tiles either by rubbing or with a comb.
The latter method is currently used extremely rarely, except perhaps on top of underfloor heating elements.
The most labor-intensive is the third method, when the mortar is leveled with a comb on both the base and the cladding. Therefore, it is used for large uneven screeds.
The first option is considered the most technologically advanced and least labor-intensive. The glue is leveled with a notched trowel under several tiles or rows at once, which dramatically increases productivity and reduces finishing time.
In the third method, the back rough side of the porcelain stoneware is puttied with a spatula. The technology is called “rubbing” and is used for cladding with non-ideal geometry.
For example, if the tile is large, its edges may be slightly bent inward, and the middle, accordingly, bulges in the opposite direction. In this case, the thickness of the product is the same in all areas, and the angles can be absolutely even 90°.
Therefore, the cells on the back side of the cladding are filled with glue, since during normal installation there is a high probability that the surface in this place will not come into contact with the adhesive layer.
More details about these technologies in the video:
We wrote in detail how to choose glue here.
How to cut tiles correctly
When laying tiles on the floor, it is often necessary to trim them. To obtain elements of a non-standard shape, to make curly cuts, to reduce the material, they resort to dividing it into parts in various ways. When working with electrical appliances, you must wear a protective apron and gloves. At home, you can cut floor tiles with the following tools:
- Manual tile cutter. Makes straight cuts;
- Electric. Creates holes with straight lines quickly and accurately;
- Jigsaw. Cuts dense tiles into complex trajectories;
- Bulgarian. Creates straight cuts and rectangular holes;
- Manual glass cutter. Copes with thin, porous elements;
- Drill. Special drills and attachments simplify the work of even cutting and making shaped products.
Preparing the base for laying porcelain stoneware
Tile adhesive is applied to the base and tiles with a notched trowel positioned at right angles to its surface. Therefore, the better the concrete screed is leveled, the easier and faster the porcelain tiles will be laid and leveled.
Leveling the base with tile adhesive is, firstly, expensive, secondly, inconvenient, and thirdly, long.
To properly prepare the base of the floor for finishing with porcelain tiles, you need to additionally cover it with a layer of deep penetration primer. This will reduce the consumption of glue and the absorption of moisture from it by the screed, increasing the adhesion and durability of the coating.
At the same stage, TP elements are installed - film mats, water pipes, SIP cable.
Selecting a mixture for grouting
The cladding will acquire a finished aesthetic appearance if its seams are properly sealed. The final stage of finishing the floor will help hide the resulting defects and protect the cracks from the penetration of dust and moisture. When carrying out grouting work, it is necessary to strictly follow the technology. The choice of material will depend on the size of the gaps.
If the seams between the elements are wide, more than 5 mm, it is better to choose a resin-based mastic for grouting. A small space at the joints must be sealed with moisture-resistant cement-based compounds. Places in contact with the wall must be treated with silicone sealant.
Grouting joints performs not only practical, but also decorative functions. The material of the desired shade can be purchased ready-made or made with your own hands. Pure white grout is used if it is necessary to hide unevenness during installation and other defects. With ideal installation, the design of the seams in contrasting colors will look beautiful.
cutting
Unlike tiles, porcelain tiles are fired in a kiln twice, at a higher temperature. There is a hardened layer inside the material, which makes it difficult to cut using conventional methods.
For example, after cutting a line with a regular roller tile cutter, the corners often break off spontaneously. In addition, the size of the floor cladding reaches large values; it may simply not fit into the tile cutter. Therefore, the following cutting methods are used:
- Angle grinder - available in the arsenal of most home craftsmen;
- dry electric tile cutter - portable machine;
- “wet” network tile cutter is expensive, used only by professionals.
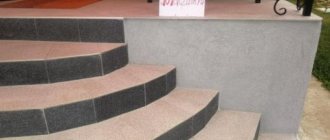
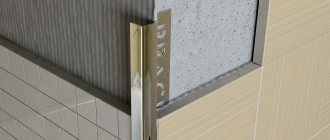
By analogy with walls, external corners can be found on the floor. Most often, they occur at the junctions with the balcony steps. Here, cutting the edges of two facing elements at an angle of 45° is usually used.
For the “grinder” you will need a special device. Dry, "wet" type machines usually have the ability to cut at an angle.
Learn more about cutting porcelain tiles here.
Required materials and tools
Installing tiles will not be difficult even for a beginner if you work with high-quality materials. First of all, they calculate the number of elements and buy the cladding. For the kitchen or living rooms, you can take tiles with minimal moisture resistance; for the bathroom, swimming pool, or outdoor terrace, you need an option with improved characteristics. You will also need the following tools for installation:
- Level;
- Notched trowel, trowel;
- Wire cutters;
- Suitable tile cutter;
- Special crosses for tiles;
- Rule;
- Bulgarian;
- Rubber spatula;
- Tile hammer;
- Roulette;
- Nylon sponge.
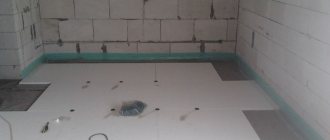
Base preparation and marking
Laying of floor tiles is carried out on an exceptionally level base. First, the old floor is removed, construction debris and dust are removed. Then they check the serviceability of communications. If there are old concrete baseboards, you should get rid of them.
Before starting work, you must make sure that the surface meets all the specified requirements. If unevenness is found, they can be leveled with a screed. At the next stage, primer treatment is carried out. You can choose any penetrating composition suitable for the type of base.
Experts recommend starting laying tiles from the center, and not from the walls, as this can minimize the likelihood of errors. To mark the floor, it is better to use a laser level. With its help, you can draw fairly accurate lines without moving the device.
The axis line is drawn first, then the central points of the two walls are determined - with the entrance door and the opposite one. Connect them with a straight line. Then a perpendicular line is drawn through the center. Now you can make support transfers to the remaining sectors of the floor. Before installing the elements with glue, a test laying is done.
Preparation of the adhesive composition
Correctly selected and diluted composition is a guarantee of high-quality installation, eliminating displacement. First of all, good adhesion depends on proper kneading. An insufficiently mixed, thick mixture is difficult to distribute over the surface, it will take more time to finish, and the glue will dry unevenly.
To mix dry mixture at home, you will need two buckets - one empty, the other with water, dry tile adhesive, and a construction mixer. Pour 2 liters of water into an empty container, add the amount of dry glue corresponding to the instructions, lower the mixer into the mixture and mix at the lowest speed. You can achieve the required consistency by adding liquid or powder mixture. For the solution to become homogeneous and plastic, it needs to stand for 10-15 minutes.
Laying process and working with crosses
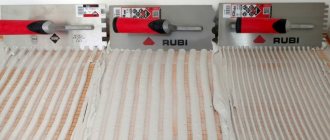
When the surface is prepared and the adhesive solution has settled, you can begin laying the tiles on the floor. The glue is applied to the base and smoothed well with a notched trowel. The size of the grater for making grooves is selected in accordance with the parameters of the tile. If installation is carried out according to markings, it is better to apply a lot of glue at once so as not to cover the drawn lines. In the same way, a paste-like composition is applied to the tile elements. But straightening with a notched trowel should be perpendicular to the pattern on the base. This will allow no air voids to be left during docking.
In order for the tile to hold better when applied to the base, it is pressed and simultaneously moved in different directions. If necessary, ceramic parts can be tapped with a rubber hammer. It is necessary to continuously monitor the level of coverage, especially when adding new elements.
During tiling work, plastic crosses are placed in each tile floor. They are clamped between the dies to maintain an identical distance between them. They will remain there until the glue dries completely.
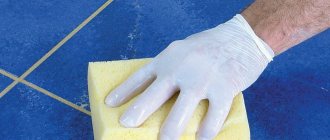
Grouting joints - technique for applying the mixture
To give the new tiled surface a finished appearance and protect the concrete base from the influence of external factors, the joints are grouted. To do this, use special mixtures intended for finishing tiled surfaces.
The voids between the elements can be filled with white, gray or multi-colored material. Powdered mixtures are diluted with water, and a bright pigment is added if necessary. Then the mixture is well kneaded and applied with a small rubber spatula, trying to completely fill the entire gap. The excess mass must be removed immediately before it dries out. If grouting is carried out over a large area, it is better to use a special trowel to distribute the thick mass.
Final cleaning of tiles before use
After all installation and grouting work, the floor tiles can be prepared for use. The mixture for finishing joints must be removed no later than 30 minutes after its application, otherwise it will harden and you will have to use a spatula or aggressive chemicals to remove it.
After the grout has hardened, a final wash can be applied. If the mixture was liquid, you need to wait for it to dry completely. You can remove dust and small splashes of the solution with a damp sponge or a simple dry cloth. Thoroughly mopping a newly laid floor is not recommended. You can move the elements and increase the drying time of the glue.
Useful tips from experts
When choosing a material, you must carefully study the characteristics of each type of tile. They must meet the needs of the owners. It is necessary to take into account the degree of strength, thickness, and the need for a glazed coating.
The texture of floor tiles should be moderate. Slight ribbing will prevent slipping. If the patterns and grooves protrude too much, this may make cleaning difficult. The gloss will highlight even the slightest dirt.
It is better to dilute the adhesive composition for installing tiles in small portions. If unforeseen circumstances arise and the installation process slows down, it will not be able to dry. Only cold water is used for mixing. Hot liquid will deteriorate the quality of the adhesive solution.
The material can only be laid on a flat, clean floor; door frames and baseboards must be removed. It's easier to work along guide lines. The resulting gap between the outer row of tiles and the wall can be hidden with a plinth or you will have to glue a ceramic strip.
Porcelain tiles 600x600 mm: application
You can order blue, black (absolutely any) porcelain tiles for finishing interior walls from companies based in Moscow.
The functionality of tiles is usually determined by their shapes. The dimensions of the coating are of great importance, and 60*60cm porcelain stoneware is most in demand, because its dimensions allow it to cover any area.
Tiles 600x600 mm are found in the following cases:
- facing the facade of the house;
- lining staircases, covering floors that are subject to significant loads;
- finishing of internal walls.
Square porcelain tiles with a side of 60 centimeters are used for any purpose in construction. The color range of tiles is varied. This size greatly increases productivity, and the surface covered with such tiles will appear holistic. This type of cladding will look especially great on large façade surfaces or in public halls.
Porcelain tiles 600x600 are quite difficult to cut, so in order not to complicate the installation process, buy additional smaller tiles, which are used together with porcelain tiles for a 60 by 60 cm floor.
To ensure a seamless surface during the laying process, cuts are made along the edges of the tiles with a diamond blade. This process is called rectification.