Wood can be called the most beautiful building material that nature has created. However, wood is not only beautiful, but also capricious. Artificial materials have a uniform structure, but wood has a heterogeneous structure. When working with timber, you need to get used to its heterogeneity and learn to work with it.
Since timber consists of many fibers that are arranged vertically, and a much smaller number of horizontal fibers, the craftsman must learn to think through sawing wood in order to carry out a quality cut. In this article we will talk about longitudinal cutting.
How to do something yourself, with your own hands - home craftsman website
And a little magic
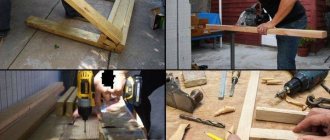
When all verification operations are completed, it is time to begin the project itself. While rummaging through my lumber stash, I found a piece of wood with a fascinating grain pattern that I thought would look amazing as 6mm wide panels on the doors of a jewelry storage cabinet.
I set the guide 8mm from the saw blade (6mm plus 1.5mm for the next sanding) and started loosening. I chose the feeding speed taking into account the density of the workpiece (it was amber wood) and its width (approximately 18 cm). Checking the first sawn piece showed that the saw settings were correct - and I sawed off the second piece. The resulting pair of front panels (photo below) is a good example of how beautiful boards sawn in this manner can be.
After gluing the veneer to the substrate, the front side must be sanded. Multilayer plywood or MDF sheet are perfectly suitable for the substrate, since they are virtually not subject to expansion and contraction when humidity changes.
These freshly sawn pieces still needed to adjust to the humidity level in the workshop, so I stacked them with slats for a day or two to keep them from warping (photo above left). After which I glued them together and planed them to a final thickness of 6 mm.
If I needed to obtain veneer from a blank, my actions would differ in the most insignificant way. I would adjust the guide to cut sheets 3 mm wide, and before each new cut I would plan or sand the workpiece. This technique allows you to get one smooth and even side on each veneer sheet, suitable for gluing. You see, have you ever thought that a band saw is only suitable for cutting curved lines!
TOOLS FOR HOME AND GARDEN, HANDCRAFTS, ETC. PRICES VERY LOW
Take a canvas with a more brutal cut. A blade with 3 teeth per inch and larger grooves between them better removes sawdust, which can cause the cutting blade to bend and twist. Keep the workpiece firmly pressed against the guide and the table. A special pusher transmits the required pressing force to the guide and allows your hands to be at a safe distance from the canvas when it is unraveled.
Once the band saw is perfectly tuned, you need to pay extra attention to the saw blade. Sawing wide boards requires a blade that moderately passes through the entire thickness of the workpiece, while removing a huge amount of sawdust. The wider the blade, the straighter the cut, so try to use the widest blade that will fit your saw.
Place the square 6mm from the saw blade (you may need to lift the guard to position it) and press down on the middle of the blade with your finger. Using medium pressure, the blade should touch the square. In this photo, the saw blade is very much shifted backwards on the upper drive wheel: therefore, the cut deviates towards the guide. If the blade is very much shifted towards the front edge of the wheel, this leads to the opposite result.
Most band saws work very little with 12mm blades, and many with even wider ones. Typically, a wide blade with 3 teeth per inch of length (3 tpi) offers the perfect combination of brutal yet smooth cuts with active sawdust removal, which is what you want when dissolving wood. Finally, let's talk about guides. The workpiece to be cut should be less than twice the height of the guide. So, for example, a 100 mm guide is suitable for cutting a board 200 mm wide. If you require greater height, use homemade additional guides.
DISSOLVING A TREE: TO THE START, ATTENTION, MARCH!
Start by assigning a rectangular shape to your workpiece and cutting wood of a similar size. With it, you can check how flat it lies on the saw table and how tightly it fits into the guide, and also adjust the band saw options. Secure the guide according to the desired cutting thickness and slowly feed the workpiece under the saw blade. At the same time, the saw motor should rotate moderately, without jamming. At the end of the cut, advance the workpiece using a pusher. Then inspect the sawn piece.
Move the guide to the angle required to align the cut. The guide adjusting bolt simplifies this problem. You can also use magnetic guides (for example, Carter Magnafence: carterproducts.com) - they significantly simplify such temporary adjustment.
If it turns out to be thicker at the top or bottom, check that the saw table is set exactly at 90° to the saw blade and adjust it as necessary.
If there is a depression or unevenness in the material, the problem may consist of insufficient saw blade tension. On many saws, the integrated tension controls are not very accurate.
Here is a perfect example of a symmetrical grain pattern. Such panels will make any furniture look even more attractive than two ordinary thick panels made from different boards.
A properly tensioned blade or blade should deviate less than 6 mm when pressed in the center (photo above left).
A very high speed of feeding material under the blade, the use of narrow blades with very frequent teeth or dull blades can also cause similar curvatures when cutting. If one end of the sawn part turns out to be thicker than the other, the problem lies in the displacement of the blade, in other words, the blade deviates from parallel relative to the guide.
If the blade is sharp, the guides are installed correctly, the feed speed is selected correctly, but the problem is still not resolved, try adjusting the tilt of the upper drive wheel so that the saw blade passes exactly in the center of both wheels (photo above right).
If this does not bring the expected result, adjust the position of the guide to compensate for the deviation of the blade. Oh, that's how it's done. Saw a block of wood into a rectangle, similar in thickness and density to the wood that you plan to saw, and draw a line on it with a pencil, parallel to the edge.
To prevent the workpieces from moving (to restore the moisture balance), it is best to lay them with slats. In this case, scraps of plywood were used as slats. They need to be positioned symmetrically, and pressed down with a weight on top to prevent the panels from bending during drying.
Without securing the fence in place, saw the block along the marked mowing line, holding it with your hands. Just before you reach the end of the cut, turn off the saw and, without moving the workpiece, run a pencil along the edge of the cut on the saw table. Set the stop exactly parallel to this mowing line (photo on the left) - as a rule, this allows you to perfectly compensate for the mixing.
In general, every time I change the saw blade, I check everything again and, if necessary, adjust the saw settings again.
READ Longitudinal Or Transverse Electric Saw Motor Positioning
Longitudinal cutting of boards on circular saws
For longitudinal cutting of boards, circular saws with manual and mechanical feed of material are used. In production, a machine with manual supply of material is often called a circular machine, while a machine with a mechanical feed is called an automatic machine.
Circular saw for longitudinal sawing with manual feed. The main parts of the machine: bed, work table, saw shaft, saw blade, drive.
Spare parts include: a screw for lifting the table, a guide fence, a protective cap over the saw, sectors or brake claws, a riving knife, a saw guard from below, a drive guard.
The work table is liftable, which allows you to adjust the cutting height depending on the thickness of the material being cut.
The table has a slot for a saw with a width of 75 to 100 mm, which also helps to change the saw. After installing the saw, the slot is partially covered with an iron liner with a block of wood facing the saw.
There are machines in which the front end of the table can be raised almost vertically. This makes the drinking shift more ergonomic.
On the surface of the work table, parallel to the saw slot, there are one or two trapezoidal grooves. These grooves help to connect various stops, devices, and carriages to the table.
Cutting the bars to a given width is done using a guide ruler. The ruler is reinforced with bolts parallel to the plane of the saw at the required distance from it.
There are special slots in the work table for bolts.
An essential accessory of the machine is a riving knife. Its purpose is to move the sides of the cut apart and thus prevent the saw from clamping.
Its thickness is 1 mm greater than the width of the cut.
The riving knife can be moved depending on the size of the saw. Attach the knife to the frame in the plane of the saw at a distance of no more than 10 mm from the tops of the teeth.
Rice. 1. Circular saw for longitudinal sawing with manual feed: a - non-specialized type; 6 - diagram; I - desktop; 2 - saw blade; 3 — riving knife; 4 — cap (casing); 5 — guide ruler; 6 - bed; 7 — exhauster receiver
The top of the drink is covered with a protective iron cap. At the front, the cap is raised by the material being cut; after the cut is completed, it is automatically lowered.
Rice. 2. Saw blade guard on top: 1 - riving knife: 2 - brake claws (sectors);
3 - hinge; 4 — mechanically lowering cap; 5 - sawn block
The so-called brake claws are hung on the same axis with the cap - details in the form of sectors with teeth on the convex side (Fig. 2).
The teeth of the sectors are directed in the direction of movement of the material being cut. The purpose of the brake claws is to prevent the sawn board from flying back or up in cases when the ascending half of the saw touches the edge of the cut with its teeth.
The saw blade also has an iron guard at the bottom. This fence at one point is the receiver of the exhauster, which is a set of pipes through which shavings, sawdust and dust are sucked out from the places of their formation.
In carpentry production, a machine from the Dnepropetrovsk Woodworking Machines Plant is actively used. Its characteristics: saw diameter 500 mm, shaft revolutions 2000 per 60 seconds, cutting height 165 mm, electric motor power 4.5 kW, machine weight 700 kg.
Techniques for working on the machine. When cutting longitudinally, the edge of an unedged board is first sawed off by eye.
Subsequent cuts are made by pressing the cut edge against the guide ruler.
The first couple of bars must be controlled in width. If the width does not meet the specified width, move the guide ruler to the required distance.
Diagnosis of the width of the bars is done a couple of times during the shift. The material is fed onto the saw so that its entire face lies on the work table of the machine. The warped sections are placed on the table with the convex side up. The feed should be uniform.
You need to make sure that the cut is straight.
Unacceptable wood defects are removed. For this purpose, another cut is made on the eye in such a way as to remove the defect.
If it is possible to cut a narrow block down to the defective part, a cut is made using a backfill.
For the best use of wood, you should prepare at one time bars of two or three sizes in width. Then, from the remaining wide cuts, which are insufficient for a bar of the main size, it is possible to cut out narrow bars using bookmarks.
The guide ruler is installed on the main, larger size of the bars, and bookmarks are used to cut out narrower bars. its position and the appearance of the bookmark when cutting are shown in Fig.
40. When using bookmarks, there is no need to rearrange the guide ruler.
A machine operator with one assistant works on a machine for longitudinal sawing with manual feed. The assistant helps move the material through the saw, returns the remaining part of the board section to the machine operator for the upcoming cutting, lays the prepared bars and removes waste.
In Fig. Figure 4 shows a diagram of the organization of the workplace at the machine.
Rice. 3. Using a bookmark for longitudinal cutting (the width of the workpiece is reduced by the width of the bookmark): 1 - guide ruler; 2 - bookmark
You must work very carefully and cautiously on this machine. If the upper protective cap does not lower automatically, it is necessary to complete the supply of material to the saw using a pusher at all times.
Adaptations for a machine with manual feed. Nechunaev's guide ruler.
Installing a guide ruler, which is secured with bolts, is painstaking and time-consuming work. B.K. Nechunaev designed a different type of guide ruler, imagining an iron hinged frame in the shape of a parallelogram.
Rice. 4. Scheme of the rational organization of the workplace at a circular saw machine for longitudinal sawing: 1 - the machine operator’s place; 2 - stack of blanks; 3 — extension of the work table; 4 - place of an auxiliary worker; 5—cuts; 6 - uncut sections
One side of the frame forms a guide ruler. The side parallel to it is the base of the entire device.
The base is attached to the work table without movement, strictly parallel to the plane of the saw. By transforming the height of the parallelogram using a special screw with a handle, the ruler is either brought closer to the saw or removed from it.
Along with this, the parallelism of the ruler to the fixed base and to the plane of the saw is maintained. To set the ruler absolutely correctly to a given size, there is a millimeter scale.
Nechunaev's ruler can be made folding on hinges. When cutting according to markings or cutting wide material, for example pages of plywood, such a ruler is folded back so that it does not interfere with the work.
Roller stands. When cutting long boards, roller stands are used to serve as a support for the ends of the boards hanging from the table.
The top line of the stand roller should be level with the desktop.
Rice. 5. Pusher with iron fuse
Rice. 6. Guide line designed by Nechunaev:
Rice. 7. Metamorphoses of the design of the Nechunaev guide ruler: a - ruler with a bar instead of a screw; 1 - clamping screw; 2 — strip with a longitudinal slot: b — ruler with a screw clamp; c - ruler with lever installation on a sector scale 1 - fixed bar; 2 - nut and bearing; 3 - screw; 4 - nut; 5 — connecting strip; 6 - rivet; 7 - saw blade; 8 — guide ruler
Circular saws with mechanical feed. The material feeding mechanism on machines for longitudinal sawing of wood can be roller, disk, chain or tracked, and mixed.
At the moment, the machine tool industry produces a single-saw CA machine with a roller-disc material feeding mechanism. The feed discs and rollers rotate from the saw shaft using belt, chain and gear drives.
In front of the saw there is a grooved feed roller at the bottom and a toothed disk at the top. Behind the saw there is a grooved roller at the bottom, and a disk of enormous diameter at the top.
The surface of the rim of this disk is corrugated; in the middle of its width along the entire circumference there is a roller, which plays the role of a riving knife when the machine is operating. Brake stops (thrust comb) are suspended in front of the front toothed disk, the purpose of which is to prevent the material being cut from being thrown out of the machine.
Rice. 8. Circular saw machine UA: 1 - lower feed grooved rollers; 2 — rear feed disk with a riving knife; 3 - saw blade; 4 — front toothed feed disk; 5 — brake stops; 6 - guide ruler
The productivity of a machine with mechanical feed is many times higher than that of a machine with manual feed; better quality of work. The use of computer time on them reaches 90%.
When working on a machine with a mechanical feed, the rapid return of the cut material for repeated cuts is of enormous importance for labor productivity. This is especially important when cutting small sections, which pass through the saw in just one and a half to two seconds.
It is necessary that the speed of returning the sections for their secondary feeding into the machine does not lag behind the cutting speed. Such a lag inevitably leads to large losses of machine time: the machine will work idle quite often.
When cutting long materials, the productivity of the machine is consistently higher.
Carriage for longitudinal cutting of logs
You read the article, but didn't read the magazine...
- Cross cutting of boards on circular saws (lengthwise)
- Machines for longitudinal cutting of lumber
- Machines for cutting sheet materials
- Universal circular saw machine ts-6
WHY DISMISS THE WOOD?
The simplest answer is to get the most out of your workpiece. For example, instead of planing a 25 mm thick board to 10 mm, cutting it apart will allow you to get two boards of the same size from one board. As an added benefit, each of these boards will have nearly the same grain pattern, allowing them to be used on furniture (photo at right). And if you cut a 2-5 mm board of expensive wood into 3 mm thick veneer sheets, this will allow you to profit even more.
How to easily open a wide board along the width
It is not always possible to predict how symmetrical the sawn panels will be in pattern. Basically, any wood grain pattern has the potential to create a beautiful pattern, but choosing a piece with a particularly interesting pattern often produces the best results. Look what was hidden inside the nondescript board I used to test the adjustment of the bandsaw.
Note. Dissolution is the cutting of wood along the grain, parallel to the face.
The first time I saw a cabinet with a symmetrical design on the doors was in a museum, at an exhibition of furniture from the 17th-18th centuries. When I looked at these almost identical panels with a mirror grain pattern, I was blown away by them. Back in the day, I had an old Craftsman bandsaw in my small basement workshop. Its one-size-fits-all blade made acceptable curved cuts, but was not at all suitable for accurately cutting lumber along the grain, which is what I now planned to do.
And, frankly, for accurate and stable operation, that saw needed more than just a new blade. I subsequently learned many lessons about how to handle any band saw. To set it up correctly, first of all, you need to set the table strictly perpendicular to the saw blade, get the maximum benefit from the guides and make sure that the cut is in the correct direction.
How to cut a board straight: from a circular saw to a hacksaw
Greetings to all readers and subscribers of my blog. Today I, Andrey Noak, want to talk about how to cut a board straight. Wood is rightfully considered one of the highest quality and environmentally friendly materials for construction.
Introduction
Wood has found application in a wide variety of industries. This raw material has always been popular due to its versatility, ease of extraction and processing. Furniture, interior items and even entire houses are made from wood.
Any craftsman encounters this material, but, as practice shows, not everyone is able to accurately cut a board. Tools often leave chips or nicks on the cut, which does not add beauty to your product. So what’s better, cut it yourself or order it?
Many companies offer to cut your boards when purchasing, and the price for this service is not too high. In production, boards are cut by a qualified craftsman using precision equipment, which allows you to obtain high-quality workpieces of the desired size and shape.
You, of course, can acquire expensive equipment yourself, but is there any point in this if you need to cut several boards? It’s up to you to choose, but if you still decide to cut boards at home, then I’ll tell you how and why it’s more convenient to do it.
Circular saw
This is the most convenient tool for sawing boards. Compared to some other power tools, it has better performance. But it is worth remembering that circular saws differ in characteristics and scope of application.
Before buying a saw, decide for what purpose you will use it. The main use of circular saws is cutting or cutting boards.
When choosing a saw, you need to consider the depth of the saw. There are circular saws on sale with cutting depths from 30 to 130 mm. You need to find out what thickness of boards you will be sawing and, based on this, give preference to one saw or another.
It is also worth taking a responsible approach to choosing a blade for your circular saw. If you need to make a neat cut, you should choose a saw blade with a higher tooth frequency.
If the teeth on the disk are sparsely spaced, the work will be faster, but much rougher. It is important that when working with a circular saw, the cuts are smooth and practically without chips. This is discussed in more detail in my book.
More details about it in the “BOOKS” section.
To start working with a circular saw, set the depth of cut equal to the thickness of your board. Thanks to this, you can make the most beautiful cut on almost any surface without leaving marks.
But it is worth remembering that if you make a cut at 90 degrees, the cutting depth will be the same, but for a 45-degree cut the cutting depth will be much greater. Then check that nothing interferes with the protective casing, otherwise it simply will not open.
Fix the board so that it does not slide on the table during work; this requires a stop along and at the end of the workpiece. By the way, some saws are equipped with a thumbscrew that allows you to set the cutting angle. Typically, circular saws have a range from 90 to just under 45 degrees, allowing you to make neat, angled cuts.
Don't forget about safety precautions when working with a circular saw. Always wear safety glasses or, better yet, a full-face mask. Remember that almost all tools are designed for right-handed use, which means that all sawdust and other debris will fly out from under the saw on the left side, so left-handers should be more careful about eye and respiratory safety.
Angle grinder or grinder
Some craftsmen advise using an angle grinder if you have a large amount of work and low quality requirements.
Do not try this method under any circumstances. The grinder is designed to give a beautiful look to a welding seam or to cut bricks, and you simply can’t do it without a saw. Cutting boards with a grinder is dangerous.
When cutting boards with this tool, craftsmen advise placing a notched disk for a circular saw on it.
Imagine that while working, the grinder caught a piece of wood in one of the notches, you immediately release the power button (those who worked with it know that after turning off the disk will make a few more revolutions) and it is not known where you will find your tool after that, on the floor a couple of meters away from you or in your body.
Or, for example, the disk got hot and burst, which is also quite possible; pieces of the hot cutting wheel scatter over the entire area, and some of them may land on you. Other craftsmen use a disk with a victorium solder, which can also easily end up in your foot.
Therefore, it is better not to take risks, but to use a tool specially adapted for this work.
Hacksaw
In order to make an even cut with a hacksaw, first you need to draw a cutting line with a pencil on the board, then position the workpiece so that it is convenient for you to work with it, and secure it in this position. The next step is to set the hacksaw at a position of approximately 60 degrees to the product, guide the saw with your thumb so that it runs exactly along the cutting line.
Start cutting as soon as your cut is so deep that the saw can easily “walk” in it without losing its mark, you can turn it to a position that is convenient for you, usually 90 degrees, and continue cutting until you achieve the desired result. If the wood is damp and soft, the hacksaw teeth will get stuck in it, making the job more tedious and time-consuming.
To make your work easier, lubricate the tool with soap, which will make your task much easier. For a novice craftsman, the first cuts are not very even, so it is better to use a block that will serve as a guide.
If you need to make a cut at an angle, use a miter box. It has pre-made grooves for a hacksaw. All you have to do is attach it to the workbench, place the part in a special groove and cut along the angle you need. The cut will be smooth, with virtually no chips.
In order to cut the boards beautifully, it is better to use the help of a qualified craftsman; if you think that you are able to cope with this work yourself, then under no circumstances make cuts with a grinder; it is better to use a hacksaw. For clean cuts along the board, the best tool is a circular or circular saw.
An important point in cutting boards is accuracy and precision; this is painstaking and labor-intensive work. The main thing is to never forget that any hand tool, and even more so a power tool, can cause harm to you, never neglect the safety rules, it’s better to be safe, because health is the most important thing.
More videos on the topic
I wish you good luck in all your endeavors. and stay up to date with all the interesting materials on my blog. Don't forget to recommend them on social networks.
Source: https://andreynoak.ru/pervichnaya-derevoobrabotka/kak-otpilit-dosku-rovno/
Design of various attachments for longitudinal sawing of logs
Let's start with something simple, with the design of a gas cutter. Visually, it resembles a bearing assembly, complemented by a pulley and a movable shaft (performs rotational movements). This device is driven by a belt drive. The unit is equipped with a special mechanism designed to fix the disks. The latter must be selected from an assortment designed for cutting metal, wood, and stones. With the help of such discs and attachments, transforming a gasoline saw into a multi-tool is not difficult.
An alternative version of the device for longitudinal cutting is a debarker. This is popular not only because of its ability to increase the efficiency of making boards, but also due to its ability to remove bark from logs. In addition, it can be used to cut grooves in the material being processed. These are just a few examples of the purpose for which a debarker is used. Such nozzles are found in two varieties:
They differ from each other mainly in functionality.
There are other devices for longitudinal cutting of logs. Most of them are developed by large companies, but you can also see homemade devices on the Internet. They differ from those manufactured at factories of famous brands mainly in their design features.
In this regard, homemade nozzles are much simpler. The most common version of these is a manual sawmill. The basis of such a small sawmill is a gasoline chain saw, supplemented not only with guide elements, but also with wheels designed for moving along the log (in order to reduce the resistance indicator). This device has no more than 2 wheels, one on each side of the workpiece.
A manual sawmill is a simple and convenient device. With its help, you can produce a large number of smooth and neat boards without much effort. The only essential condition is the correct installation of the chainsaw. It should be positioned horizontally (unless the operator requires an oblique cut).
How to cut a board straight with a circular saw?
All photos from the article
Very often, when carrying out various works in construction, the need arises to carry out such an operation as cutting wood into boards. In this review, we will tell you how you can organize the work process depending on the conditions and specifics of a particular operation, since sometimes you need to cut only one element along the length, and sometimes you need to cut a whole log or timber.
In the photo: special equipment allows you to open the board at different angles, but only those who do professional woodworking have such installations, since their price is very high
Types of equipment used
We will look at some options for doing the work yourself and tell you about the devices used; you will have to choose the solution that will be best for you in a given situation.
How to cut a board with a chainsaw: attachments for cutting logs and methods
Until recently, gasoline chain saws were used exclusively for cross-cutting logs. Other methods of processing the material were simply not available. However, modern operators know how to cut a board with a chainsaw, a common universal tool used not only by professional builders, but also by amateurs, summer residents, and homeowners in the private sector within the city.
In order to get neat boards, just use a special attachment. There are many of these on the market. You've probably heard of at least one of them. The most popular option is a petrol cutter attachment. However, not only with its help you can turn a gasoline chain saw into an angle grinder. Just one addition can radically change the functionality of the device and significantly expand it.
Cutting technology
To cut a log into boards, it is not enough to use one attachment frame. An additional support will be required. You can’t do without it, especially in cases where you need to cut down the upper part of the material, the one that is close to the bark. In other words, a stop is needed to turn a log into a beam. The necessary device is usually made from boards in the amount of 2 pieces.
Each board must be at least 40 mm thick, but not more than 50 mm. They are fastened together by first placing both in a perpendicular plane. Afterwards, the boards are fixed to the log using self-tapping screws. Stops need to be placed on the sides, which requires the same devices made from boards.
Much attention is paid to the fastening procedure. It is extremely important that the top end of the vertical board is in relation to the top edge of the log below. The distance between these two points should correspond to the thickness of the piece of material being cut.
Upon completion of the preparatory stage, the chainsaw is installed directly. Part (only one) of its frame should rest against a board installed across it. It will then be obvious to the operator why the installed plank fixtures are called supports. The base of the frame literally rests on it, on its vertical part.
After that, just start the tool and start making longitudinal cuts, focusing on the gap between the end of the vertical board and the upper edges of the log. An important point is that you don’t need to put a lot of pressure on the gasoline saw with your hands. There is no need to push the device; the cut will be smooth and precise. Upon completion, it is enough to dismantle the device from the boards. After this, the log is turned over (90 degrees), and the supports are reinstalled in the same way as described above.
If we are talking about cutting logs into regular boards, you can do without a wooden stop. But when cutting slabs, it is necessary to install it. Once the material has been converted into timber, the plank fixture can be set aside. By “timber” we mean lumber with a rectangular cross-section (with 4 smooth outer surfaces, which themselves will serve as a support for a gasoline chain saw with an attachment). The technology for working with such a tool (with frame) is simple:
- The frame is pressed against one rectangular section.
- The operating device is advanced along the workpiece, thereby cutting the timber.
In order to change the thickness of the board being cut, it is enough to use a stop element placed perpendicular to the entire structure (it is simply moved across the cut).
Cutting boards: choosing a cutting method and types of equipment used
All photos from the article
Very often, when carrying out various works in construction, the need arises to carry out such an operation as cutting wood into boards. In this review, we will tell you how you can organize the work process depending on the conditions and specifics of a particular operation, since sometimes you need to cut only one element along the length, and sometimes you need to cut a whole log or timber.
In the photo: special equipment allows you to open the board at different angles, but only those who do professional woodworking have such installations, since their price is very high
What criteria should be taken into account when choosing a cutting method?
All of the options we'll discuss below will get the job done, but each of them is suitable for certain conditions, so you need to decide on several factors in advance:
| Scope of work | Naturally, if you need to cut one board, then you can use the simplest devices, but if you have to process a certain volume, then you should approach the choice of the method of carrying out the work more responsibly, since if you make the wrong decision, you can spend more time and effort on cutting than on everything else other events |
| Quality | Sometimes this factor is unimportant, but sometimes the reliability of the structure being constructed and the attractiveness of the building depend on how accurately and efficiently the cutting is carried out. Therefore, it is important to achieve exactly the result that will be optimal for your object and at the same time spend a minimum of money |
| Nature of processing | Naturally, sawing logs into boards will be different from cutting boards and will require the use of completely different equipment. The choice also depends on the thickness of the elements being processed. |
| Wood type | It is no secret that different types of wood have different hardness, and sawing the same pine is much easier than oak or beech; in addition, as hardness increases, much more power is required to carry out the same work. Also, do not forget about equipment wear and tear. |
Important! Sometimes the best solution may be to purchase a ready-made board, especially if the amount of work is large.
A special machine for sawing boards lengthwise is an ideal solution for those who carry out longitudinal cutting constantly and in large volumes
We will look at some options for doing the work yourself and tell you about the devices used; you will have to choose the solution that will be best for you in a given situation.
Sawing boards
This type of work, such as longitudinal cutting of boards to size, can be done in several ways:
- If the amount of work is small, then you can use a hand saw, although you will need a special version for longitudinal sawing, which differs in the shape of the tooth. The instructions for carrying out the work are as follows: it is necessary to carefully mark using a square and a tape measure, then draw a clear line, then the element is carefully secured so that the board does not move during the work;
The longer the board is, the more difficult it is to carry out the process efficiently
Important! When processing manually, pay special attention to the vertical position of the cutting blade, otherwise the edges will turn out to be nervous.
- The second option is to use a jigsaw for wood, but it is also suitable for small amounts of work, and the thickness of the board is limited; the marking process is similar to that described above. The work is easier to carry out, since there is no need to apply physical force and monitor the verticality of the cutting - the sole in the equipment ensures that the right angle is maintained;
- Now let’s look at how to evenly saw a board lengthwise using a circular saw; there are two options for carrying out the work: if the edges of the element are uneven, then a line is first drawn along which the cutting is made (most often this is done with unedged lumber), if one edge is smooth, then the stop is pre-set to a certain distance, and you simply guide the tool, pressing the stop part against the end;
When working, do everything in accordance with the operating instructions for the power tool.
- Of course, the simplest solution to the question of how to cut a board lengthwise is a circular saw, and both full-fledged installations and compact options can be used. This option is very suitable for cutting a large number of elements to one size; you can set a stop or attach it and not waste time on marking and fixing; in addition, this type of equipment has the highest productivity;
Having secured the stop, you don’t have to worry about compliance with the parameters
Log sawing
A more complex option for carrying out work, which requires more powerful equipment. Of course, purchasing a full-fledged sawmill is not the best option, so sawing logs into boards in the field is done using a chainsaw and a special Timberjig kit.
Let's talk about this system in more detail:
- You will need a standard chainsaw, preferably one with fairly high power;
- It is also necessary to purchase a set consisting of a guide and a stop; it is sold with a set of the required fasteners, so no additional elements are required;
Design fits all standard chainsaws
- Next, a device for sawing logs into boards is assembled; for this, first of all, a stop is made of two boards, one of which is attached at the end to the middle of the other, a very strong T-shaped element is obtained, which will serve as a guide during the work process;
- The log is placed on a flat base, after which stops are screwed to its ends, which are made from a board connected by an angle; it is important to control their level and position them evenly, the quality of the work depends on this;
- Now you need to attach the guide to the stops; it is aligned along the line of the future cut, taking into account the fact that the chainsaw bar will run 10 mm above the top edge of the guide. Fixation is done using clamps, which are also included in the kit;
- The saw is located on the frame; the frame allows it to occupy the same position throughout the entire work. To ensure convenience, we recommend that after fastening, lift the log so that the chainsaw is positioned at an angle, this will make it much more convenient for you to work. The photo shows the structure in operation.
This is what the assembled system looks like
Conclusion
Slitting wood is a complex process that requires the use of appropriate equipment and tools, but if done correctly the results will meet the highest standards. This article will talk about some of the described processes in more detail and detail.
Source: https://rubankom.com/materialy/pilomaterialy/doski/1493-raspil-dosok
How to cut a log with your own hands
It is not necessary to purchase a device for sawing boards with a chainsaw. You can make it yourself. The simplest option is a device made of metal profiles. Such a nozzle will not only be convenient, but also stable, durable, and reliable. Are you planning to make the most functional frame possible? Use mechanical gearboxes.
With them, the device will turn into a kind of machine for longitudinal cutting of logs. Mechanical gearboxes are necessary to simplify the process of moving the chainsaw along the trunk. There is no need to exert force (pressure on the tool manually) to process the material. All you need to do is turn the gear handle. As for adjusting the thickness of the boards, it is convenient to adjust this indicator by using an attachment made of metal profiles, lifting the workpiece itself, and not moving the gasoline saw in relation to it.
READ What can be made from a two-handed saw
At home, you can also make a device that will cut a log not in a horizontal, but in a vertical plane. The only significant nuance is that it is more difficult to work with compared to the previous frame (despite the fact that its design is simpler).
The difficulty lies in the fact that the operator has to put effort into moving the tool along the workpiece. In addition to the chainsaw and attachment, you will have to use an addition made of boards and metal. This kind of support is attached to a log.
Important! Only experienced operators should make this kind of attachment and support, since its operation is partly dangerous due to the fact that the board remains unfixed.
An alternative option is a carriage installation. To create such a frame structure, you will need a pair of wheels and a profile pipe. This device differs from others in its mobility (ease of movement along the workpiece). In addition, the wheels will simultaneously serve as stops for the chainsaw, which means that additional devices will not be needed. The only thing that is needed in addition to these parts and a profile pipe is an aluminum ladder (it will play the role of a guide element).
You need to select a ladder taking into account its width, which should coincide with the distance between the wheels of the frame structure, which will be placed directly at its ends. The best option is to attach it to the log being cut using self-tapping screws, clamps or nails. The created device for cutting boards with a chainsaw with your own hands is placed horizontally.
It should lie as flat as possible. You can make sure that it is placed correctly using a building level. It’s easy to level a ladder with a log, using boards (pieces) of different thicknesses. As for the tool itself with the nozzle, it is installed on the ladder, moving the working saw along the workpiece, applying pressure on it with your hands.
Longitudinal sawing of logs
A log is a tree trunk from which all branches, twigs, as well as the thin upper part of the crown are removed. Logs can be used as an independent building material (poles, piles, masts), as well as raw materials for the production of lumber.
Sawing logs can be done in several ways:
- manually, using a saw tool
- using a sawmill
- using woodworking machines or specialized lines.
The cost of lumber largely depends on the thickness of the log and the amount of production waste. The main task of a woodworking enterprise is to obtain a high-quality product with minimal waste. The better the master cuts the log, the higher the yield of high-quality material. Smooth, large-diameter trunks produce the most valuable lumber. Before you start sawing, you need to decide on the thickness of the resulting boards. This will also make it possible to make maximum use of the available volume of logs and reduce costs. When sawing logs into thick beams, a smaller volume of waste is generated, which means that the price of the final product depends on proper cutting.
For a more rational use of available raw materials and proper sawing of logs, the woodworking industry uses special sawing schemes, which make it possible to reduce the percentage of waste and, therefore, reduce the cost of the final product. For this reason, before starting the process of sawing a log with your own hands, it is worth searching for similar diagrams on the Internet and studying them in detail.
The following longitudinal sawing machines can be used for sawing logs:
- a chainsaw and a simple hand saw help to obtain a small amount of lumber
- A sawmill is a device in which you can cut logs and beams, for which there are frame saws in the sawmill. Such devices can be used to cut workpieces with a diameter of 14 to 80 cm and a length of 3 to 7 meters.
- circular saws. In such a device, wood is cut using a circular saw. Machines with one saw are called single-saw machines, and machines with two saws are called multi-saw machines. Single-saw devices are used in small shops and workshops. Multi-saw machines are used in large enterprises for cutting large volumes of workpieces. On such devices, manual feeding of the workpiece is prohibited. Circular saws are dangerous due to the possibility of ejection of the sawn material and cuts by the saw in the direction opposite to the feed. Therefore, on such machines the control is located outside the zone of possible material ejection. In addition, circular saws have riving knives and special mechanisms that are designed to keep material from being thrown out
- Band saws are used for cutting logs, with the band blade mounted on pulleys. They allow for longitudinal and mixed cutting of wood, as well as various wood materials. Such equipment is used in carpentry shops and workshops and is characterized by a large frame overhang, significant cutting height with small dimensions
- Log sawing lines allow you to obtain high quality surfaces of the final product, precise lines, and high productivity. They are used in large enterprises.
To obtain a quality product, it is necessary to use good raw materials. If during sawing you use logs of the required and correct dimensions, then you can create high-quality materials from them.
The best materials are obtained from freshly cut wood. It is very difficult to obtain good lumber from a knotted and bent trunk. Therefore, before sawing, it is imperative to sort the logs according to their quality characteristics, and only after that use equipment for sawing timber.
There are no absolutely round logs; for this reason, it is generally accepted that a log has 4 sides, each of which consists of a quarter of a circle and occupies its full length. Neither of these faces overlaps with the other. There is a concept of a “clean edge”; the higher it is, the more valuable the wood. This edge does not have any flaws, for example, cracks, scars, branches, chips, rot.
At Russian sawmills, sawmill frames are most often used for longitudinal sawing of logs. However, in world practice there is a tendency to use machines based on dual and quad band saws, which are characterized by high productivity.
Yield of boards when sawing round timber
| Diameter, cm | Yield of premium grades, % |
| 12 — 16 | first grade yield 40% |
| 18 — 22 | on average 50% |
| 24 — 26 | about 50% |
| 28 — 40 | log timber, during the production of timber you can get indicators of about 70% |
| 42 — 60 | about 60 - 70% |
Saw the boards
A circular saw is one of the basic woodworking tools. There are three main operations that are performed on a circular saw: Spread the boards into blanks in width, saw off along the length (trimming) and sawing at an angle. The latter method is used if the circular saw is adjustable not only in height, but also in the installation angle. There is another necessary, although intermediate, operation, sawing the board to thickness. For example, you have a block 70 mm thick. and it must be divided into three boards 18-20 mm thick. Or, what I have to do most often, I cut boards 45-50 mm thick into planks 18-20 mm thick, which I use in making furniture.
What you will need for this:
Firstly, it is very desirable that the circular saw has a variable saw height. Materials such as beech, oak, birch can be difficult to immediately cut to the full height of the saw. Therefore, sometimes you have to do this in two or three passes, gradually increasing the height of the cut.
Secondly, you can only work in this way with a planed board. If the workpiece is fairly even, then it is often enough to go through the face and edge of the board on the jointer once.
The third thing that also needs to be paid attention to is that the board should not be too short. If the saw jams and the board plays, you can be left without fingers. This is not a joke, I know similar cases.
We spread the boards into thin strips.
Here, a planed block 50 mm thick unfolds into three slats 12 mm thick. When calculating, do not forget the width of the cut, that is, the thickness of the saw at the extreme points of the cut. Please also note that after sawing, the finished planks will need to be planed on a jointer, or even better, on a planer. Therefore, you need a margin of at least a couple of millimeters in thickness.
In this case, we get approximately the following calculation: Set the saw to 14 mm. from the guide ruler, only three planks will turn out to be 141414 = 42 mm Plus, there are two cutting widths, here the saw spread is 3.5 mm That is, all dimensions are at the limit, so you need to work carefully.
The width of the board is 120 mm, but these dimensions refer specifically to this workpiece. We will cut on both sides on the edges. To cut a board in two passes, the height of the saw should be slightly more than half the width of the board. In this case, the height of the saw from the circular table is 65 mm
One more thing, the guide ruler must be of sufficient height, for example 70-80 mm, so that the board does not fall over when sawing.
We carefully make the first cut, while your hands should always be higher than the saw. Never push the part under the saw from the end with your hands; use wooden pushers.
Then we turn the board over in a vertical plane and make an oncoming cut. The first strip is 14 mm thick. ready.
Next, we place the rest of the board with the planed side facing the guide ruler and make the next cut. We turn the workpiece over again and saw through the depth from the reverse side.
When working, do not relax for a second, listen to the sound of the saw. If it starts to jam, reduce the feed speed. When cutting at the exit, the board may close. If the saw is not sharp enough, or the gap is small, the material will burn. When it doesn't burn very well, the saw overheats and can be driven, and the smell is extremely unpleasant. Article. how to cut plywood.
That’s why I wrote at the beginning of the article that if the material is difficult to move, then it makes sense to go through the part twice in height on each side. And never forget, a circular saw is a dangerous tool. Therefore, use all the protective and clamping devices that are available.
How to saw off a beam or board smoothly. Article about proper wood processing
For carpenters, boards and beams are the most common blanks, from which crafts and wood products are subsequently produced.
And the first thing the material undergoes is sawing into pieces of the required length.
At the same time, you should know how to saw off a board evenly, because performing this operation incorrectly can ruin the workpiece or significantly affect the appearance, and not for the better.
At large enterprises, the problem of how to saw off a beam or board evenly does not arise. Any serious production facility has high-precision equipment that performs this type of work.
At home you have to make do with what you have on hand.
At the same time, you still need to be able to use the tool or equipment correctly in order to saw off the board correctly, and the cut turns out without flaws.
Note that many enterprises that sell boards and timber provide cutting services. And for this they use the same specialized equipment, so the purchased material will be cut with high quality. But it is not always possible to use such a service, and it often happens that only one piece needs to be cut.
Cutting boards at home
You can cut a board at home using the following tools and equipment:
- a circular saw;
- hand saw;
- angle grinder (“grinder”).
Each of these options has its own specifics, which are important to consider before starting work, that is, you need to know how to cut a beam or board with one or another tool so that the quality of the cut is acceptable.
Circular saw – high performance and ease of use
A circular saw is the best option for performing the work. It has excellent productivity and allows you to cut a considerable number of workpieces in a relatively short time, and with high quality. In addition, such a saw allows you to make a longitudinal cut of the material, but you need to know how to cut the board straight along.
One of the most important criteria when choosing a circular saw is the maximum depth of cut. There are devices on the market that cut materials with a thickness of 30 to 130 mm. That is, you can choose a machine both for cutting only thin boards and for sawing bars.
It is also worth paying attention to the cutting tool itself. Discs with a large number of teeth will provide a neat, high-quality cut, while the cutting speed will be low. But discs with a small number of teeth will provide high productivity, but the quality of the cut will also be worse.
Now let's talk about how to cut smoothly with a circular saw. One of the conditions for high-quality performance of work is reliable fixation of the workpiece. If the material is loosely secured, the board may “move” when cutting, and the cut will be uneven.
If the circular saw is hand-held, then all work should be performed on a workbench equipped with stops and guides for workpieces. You can make such a device yourself, using any table as a basis.
Before starting sawing, it is important to set the cutting depth correctly. Some hand saws have an adjustable side guide that can be used to make rip cuts in material. If there is no such device, then use the same workbench.
More convenient in terms of work is a tabletop circular saw, which is already equipped with everything necessary - guides, clamps. Often, such equipment allows you to cut workpieces at an angle.
During the sawing process, it is important not to exceed the force on the tool, otherwise the quality of the cut will be poor, and the increased load on the saw will lead to rapid dulling of the cutting blade.
Do not forget about safety precautions when using such equipment. Work should be carried out only after checking the serviceability of the saw and the correct fastening of the workpiece. Also, do not neglect protective equipment - masks, goggles.
Hacksaw - simplicity and safety
A hacksaw is a simple tool that is quite suitable for the job. And although the cutting speed is low and considerable physical effort is required, such a saw is the most acceptable option for home use.
It is not difficult to cut wood correctly with a hacksaw. The main condition for a high-quality cut of the material is to make the cut correctly. To simplify the task, you can use a regular flat block, which is used as a guide.
The question often arises of how to cut a board smoothly with a hacksaw at an angle. For this purpose, a special carpentry device is used - a miter box. Moreover, it will help not only to make a cut at the desired angle, but will also allow any beginner to cut the board smoothly.
You can also saw off the timber with a hacksaw. The only problem when working with such a workpiece is that you have to put in a lot of effort.
The last option is to use an angle grinder with a wheel with teeth installed for the work. But since the “grinder” is not intended for cutting wood, this method can only be used as a last resort: attempts to cut a board can result in serious consequences. It’s better to use a hacksaw - it’s labor-intensive, but safe.
Source: https://www.enerteh.ru/about/news/kak-rovno-otpilit-dosku/
Setting the stop
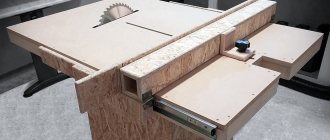
To accurately guide the board when sawing, we prefer to use a rip fence, which allows us to saw thin sheets of the same thickness over and over again. If your machine was not equipped with such a stop, you can purchase it separately, make it yourself according to the drawings, or simply attach a straight board with a height of at least 75 mm to the saw table with clamps.
By setting the stop parallel to the saw blade and perpendicular to the edge of the saw table, make sure that there is no so-called drift, when the cut deviates to one side or the other from the intended direction. To do this, run a straight line in the middle of the cutting board parallel to the left edge. Pressing the left edge against the longitudinal stop, cut the trim lengthwise , starting to cut along the mowing line.
If the saw blade tends to drift, the fence will need to be adjusted to compensate for the drift, as shown in the pictures below, to achieve clean cuts. Once you adjust the rip fence to compensate for drift, you won't have to do it again until the next saw blade change.
Five Reasons to Dissolve
Release the board. means cutting it along its thickness, cutting along the edge. Mastering this technique opens up many new opportunities for you.
Effective use of boards made from rare or expensive exotic species. You can make more parts for your project from one piece of valuable wood. For example, when making doors from bubingo, birdseye maple, or Karelian birch, instead of making panels entirely from boards, simply saw one board into several thin sheets and glue them onto an inexpensive plywood or MDF backing. The edges of the panels will be hidden in the frame, and nothing will spoil the impression of your work.
READ How to Cut a Thick Board with a Circular Saw
Less material loss during thicknessing. Let's say your project requires parts that are 6mm thick. Blanks for them cannot be found on sale, and you only have 20 mm boards. Instead of turning more than 2/3 of the material into chips using a planer, simply cut the boards in two and then finish them to 6mm thickness.
Planing knives will last longer. Replacing and sharpening dull or serrated planer knives takes much longer than replacing a worn band saw blade, so it makes sense to reduce wear on expensive knives if possible. Flatten thick workpieces into plates slightly thicker than required, and then calibrate them in one or two passes to the final size on a planer.
Obtaining blanks with a symmetrical pattern. Many panel projects, from cabinet doors to box lids, can be achieved by simply unraveling the board and arranging the two panels to create a symmetrical book-like design (left photo above). In this way, you can cut boards and glue the resulting blanks into panels, which will look great as the side wall of a body or lid.
Curvilinear parts are easier to glue than to bend. Without resorting to steam bending, you can glue them together from several thin strips (usually about 3 mm thick). Such gluing, as a rule, bends less. Cut the board into strips, sharpen or sand them, and then glue them together by pressing them against the template. How this is done is described in the article “Chair with a footrest.”
To dissolve, you need to set up the machine correctly
To make this operation easy and safe, set up your bandsaw for maximum performance. Here's what it takes.
■ Cleanliness comes first. With the saw blade (and table if necessary) removed, carefully remove any sawdust, dust, or adhered resin particles from the belts, pulleys, and guide assemblies. Any contamination of these machine elements reduces operating efficiency.
■ Install a suitable and sharp saw blade. As a rule, a saw blade with sparser teeth cuts faster, as it better clears the sawdust from the cut. At the same time, it heats up less, and the teeth remain sharp longer. For best results, use the widest three or four teeth per inch (tpi) saw blade suitable for your machine. These blades cut faster, but produce a rougher cut surface than six-tooth-per-inch blades.
For slicing, we prefer Wood Slicer blades from Highland Hardware. They have variable tooth pitch and produce a finer cut than most other saw blades. With these belts, the surface is cleaner and you will have to sand the resulting workpieces less. They also have a drawback. They dull faster than most other tapes we use and cost almost twice as much as standard tapes, so we only use them for unraveling.
■ Adjustment of guide units. Lift the top guide assembly, lightly tension the saw blade to keep it from slipping off the pulleys, and rotate the top pulley. The saw blade should run in the middle of the pulley rim or slightly closer to its front edge. If not, adjust the pulleys as described in your machine manual.
■ Correct saw blade tension. Tension the tape by rotating the tensioning mechanism handwheel (right photo below on p. 62). A weak blade will produce an uneven cut, and you will have to straighten the resulting workpieces longer, losing more material. Excessive tension increases the load on the machine bearings and the saw blade itself.
■ Installation of the saw table at right angles to the blade. To ensure that the cutting plane is parallel to the edges of the board being cut, adjust the position of the table, achieving an angle of 90° with maximum accuracy.
■ Adjustment of guide units. It doesn't matter what the guiding elements are. crackers or bearings. are used in your band saw. Install them directly behind the saw blade teeth as shown in the left photo. Then adjust the rear support bearing so that the gap between it and the rear edge of the belt is minimal.
■ Lower the top guide assembly. Set it up as shown in the right photo.
■ Connect the dust extraction hose. The removal of generated sawdust and dust facilitates the operation of the band saw, improving the cooling of the saw band and extending service life, as well as reducing wear on the guide units and tires on the machine pulleys.
How to use a hand saw
The saw needs to be driven, otherwise it will start “walking”. This must be taken literally. Wood is a living material, and its behavior is unpredictable. Hard growth rings, knots, cracks, high humidity and high resin content can seriously complicate sawing.
For this reason, there is no universal tool that can take into account all the vagaries of wood, but there are many different special saws. The shape and order of alternation of their teeth are determined not by the material from which the saw blade is made, but by its purpose. Some tools can only be cut in a straight line, while others, on the contrary, are better able to cut in a circle.
When sawing, only the saw moves; the workpiece must be securely fastened. Therefore, you will need stable support. For example, a workbench or sawhorses. The workpiece is secured with a clamp or held by hand, and especially large ones - additionally with a knee.
Sawing begins and ends with repeated light pulling of the saw in the opposite direction, that is, a “trace” is laid. At the end of sawing, you must hold the remainder firmly so that it does not break off along with the piece of main wood.
Sawing is one of the most common processes in wood processing. A clean, even cut is not a problem if you choose the right tool and know how to use it.
hand saws
In the photo (from top to bottom): large and small hacksaws; saw with a “back”; saw with a narrow blade. Next to the left is a saw for finishing cutting.
Each workpiece has its own saw
The hacksaw cuts quickly, but the wide spacing of the teeth leaves a rough mark in the soft material. On the other hand, it would be difficult to cut thick timber with a finishing saw.
In short, the material and the tool must fit together. Only then can you count on high-quality work and obtaining a smooth, defect-free part.
We offer brief instructions: which wood should be processed with which saw.
How to protect your saw from damage
Any saw (especially its cutting edge) should not come into contact with other tools during storage. Such proximity can quickly cause it to fail.
If the saw does not have a cover, then a simple method will help protect its teeth from damage. A slot of the required length is made in a piece of hose, after which the hose is placed on the saw blade. A rigid hose covered with fabric on the inside is best suited for this purpose. It holds tightly to the saw blade even after repeated use.
If longitudinal sawing is carried out in large volumes, then it is better to purchase a circular saw. Doing this with a handsaw will get you dirty. This is the first, and second: the information that can be gleaned from the texts in the frame is incomprehensible for a beginner, and useless for a professional.
Basic hand saws
Any home workshop should have at least three to four saws of different types.
- Hacksaw with a wide blade for rough cutting of large parts and workpieces. The longer the canvas, the faster the work goes. However, for the same reason, the mobility of the blade itself increases, which is why the saw, as they say, is pulled to the side. Therefore, it is important to carefully monitor the cutting line, preventing it from deviating from the markings. A new product in recent years is a Teflon coating on the hacksaw blade, which makes sawing fresh wood much easier and also protects the saw from rust.
- A saw with a “back” differs from a regular hacksaw not only in that it has a rigid attachment that “damps” vibrations of the blade, but also in smaller, closely spaced teeth. This saw allows you to make clean and thin cuts.
- The finishing saw provides an even and neat cut.
- A narrow blade saw is designed for cutting rounded parts and large holes. The basic rule for caring for any saw: its blade should always be dry and clean. Saw teeth - even hardened ones - should be sharpened regularly.
How to saw correctly
You should always cut from the cutting side, close to the marking line. This applies to both rough cuts with a hacksaw and precise cuts with a fine-toothed saw.
Next, it is very important that the workpiece being processed has a stable support in the form of a workbench table top or a regular work table. For large-sized workpieces, it is better to use sawhorses.
During the sawing process, the part must be held firmly with your hand at all times (large-sized workpieces should also be held with your knee) - in other words, only the saw should move.
Sawing begins with the first short movements at an angle of 30 to 45 degrees. Only after the saw blade has entered the wood and is fixed in it, you can start working with the saw along the entire length of the blade.
At the edge of the cut, cut only in short, sharp strokes. This will avoid breakages on the underside of the workpiece.
Cutting along the wood fibers is always a “critical” situation, especially if the wood has a large grain. Saw naturally wants to follow the path of least resistance, and if it is not restrained, it will begin to “walk.” That is, in such cases you have to press the saw harder than usual, which, in turn, requires the most stable position of the workpiece.
When making large cross cuts, a regular hacksaw can jam. In such cases, it is better to use a rip saw with widely spaced teeth. You just need to take into account that the cut strip will be much thicker than the saw blade.
preparing the saw for work
Cutting fresh or damp wood will be easier if you lubricate the saw blade with wax or soap.
hacksaw for longitudinal cutting of wood
The workpieces are pressed tightly against the lintel, its right edge guides the saw.
Tsulaga
When processing small workpieces, the tsulaga shown in the pictures below can be of great help.
To make it, you will need a piece of wood slab approximately 20 x 30 cm in size and 2 mm thick, as well as two planed strips, which must be fixed to the slab as shown in the figure. To prevent the slab from bending and breaking, the planks must be positioned transverse to the direction of its core layer.
How to work with a circular saw
The lower bar of the tsulaga rests against the edge of the tabletop and thus sets the correct direction for the cut; the shortened upper bar ensures good centering of the saw.
If you have to saw long boards or planks, then a second tsulaga will not hurt, which will serve as a stop for the other end of the workpiece.
A piece of wood slab and two pieces of plank are enough to make a practical tsulagi.
Before starting sawing, the saw placed at an angle must be pulled towards you several times.
Teeth and their shape
The capabilities of the saw depend on its shape and size of the teeth. A large number of teeth on a given length of blade means a fine cut but slow forward progress. A small number of teeth produces a rough cut.
Wood is made up of fibres, and when sawed they separate. This creates sawdust that needs to be removed. The finer the teeth, the faster the cut and the cutting edge of the saw become clogged with small sawdust - saw flour.
The teeth can no longer grip wood to its full height. Sawing is becoming more and more tedious and, most importantly, unproductive.
But large teeth almost never get clogged due to the greater distance between their tips and each other.
Almost any saw has teeth that are set apart, that is, their tips alternately deviate to the left and then to the right. The greater the angle of inclination, the wider the cut strip, and therefore it becomes less clogged with sawdust, and the saw jams less.
Over time, saw teeth become dull and need to be sharpened. In this case, the damaged wiring must be restored. Even for a specialist this is not an easy job. Therefore, we recommend purchasing saws with hardened teeth. They don't get dull as quickly, and they are easier to sharpen than the teeth of a regular saw.
You just need to put the saw blade on the table and use a sharpening stone to run it twice along the cutting edge from the end to the handle, then turn the blade over. The saw is sharpened, you can start working.
Steep teeth for rip sawing
This is how the teeth are positioned on almost all hand saws, including hacksaws and back saws.
The cutting edge of the teeth is located vertically. Suitable for longitudinal cuts.
rip sawing with a hand saw
When cutting longitudinally, the workpiece should protrude sufficiently beyond the workbench - this makes sawing easier.
The marking below the gap indicates where the saw deviates.
Bevels
Joining two pieces of wood at right angles, such as picture frames, is often done using a glue line at a 45-degree angle to the edge. The cut at this angle must be done very accurately. Even a slight deviation will not allow the parts to fit tightly.
A miter box will help you cut the plank accurately and accurately at an angle of 45 degrees. This device, made of hardwood, is a block with two parallel sides, oblique slots in which provide the saw with the desired position. Moreover, in three positions, that is, the saw can divide the plank obliquely to the left or right, or at a right angle.
The plank must lie tightly in the miter box: any displacement of it can lead to a change in the cutting angle.
It is best to secure the part with a clamp. Well, if the miter box itself is fixed to the workbench or at least has a stable position with a stop. Sawing on a miter box with a saw with a “back” or a saw for finishing sawing.
If you use a miter box frequently, its sides may become damaged, which will inevitably lead to distortion of the cutting angle. This miter box will have to be replaced.
There are also expensive metal miter boxes. They do not wear out and last a long time.
how to cut timber at 45 degrees
A miter box will help you carefully cut the plank at an angle of 45 and 90 degrees.
6473
Source: https://www.remontiruemlegko.ru/kak-rabotat-ruchnoj-piloj.html
You might prefer working with a rod stop
Instead of fiddling with adjusting the rip fence to compensate for drift, some craftsmen prefer to manually guide the boards using a rip fence (top photo). This method saves time by avoiding long setup times, especially when you only need to make one or two cuts. In this case, the surfaces of the boards usually turn out to be rougher, which will require additional work to level them on planing and thicknessing machines.
Some rip fences come with a removable rod attached to the side (bottom photo) or a semicircular trim, but they are not difficult to make yourself. To use the rod stop, install it at a distance from the saw blade equal to the thickness of the future plates and adding another 1.2 mm.
Place a longitudinal line on the workpiece. Pressing the workpiece against the fence, feed it forward, making sure that the cut follows the cutting line, and manually correct the deviations.
Now everything is ready for dissolution
Using a planer and thicknesser, make the sides of the boards parallel and one edge straight and perpendicular. Estimate how many lamella plates you can get from one board, taking into account the width of the cut (1.5-2 mm) and the allowance for removing saw marks (1.5-3 mm). For example, from a 19 mm thick board you can only make two 6 mm plates.
Once you start sawing, press the board firmly against the fence and machine table, trying to maintain a uniform feed rate. Slow down the feed if the board gets stuck or the saw blade starts to move out of the way. If you are going to cut a board into three or more slices, plan the remainder of the board after each pass.
Then each sawn plate will have a flat base surface, necessary for final thickness calibration in a thickness planer. Finally, remove all sawing marks using a thicknesser or drum sander and give all the plates the same thickness.
Cut-off jig for circular saw
A simple template tool helps you accurately cut the boards according to the markings. The movable jaw is securely fixed with a screw so that the device does not move when sawing.
The fixture shown in the picture is made for my circular saw, which has a blade located on the left; The 38 mm dimension to the right of the guide bar indicates the distance from the edge of the power tool sole to the saw blade.
For circular saws with the blade on the right, this distance will be greater. In any case, when making the device, you should leave a small allowance, which is removed during the first pass, after which the sawn edge will begin to act as an anti-splinter pad.
To make a precise right angle cut, simply line up the right edge of the jig with the marking line and run the circular saw along the fence guide.
Sources:
https://101benzopila.ru/kak-raspilit-dosku-benzopiloj-nasadki-dlya-raspila-brevna-i-metody/ https://mastervdome.ru/instrumentyi-i-prisposobleniya/raspilit-doski/ https:// blackseaplus.com/sdelay-sam/111-uchimsya-s-pomoschyu-lentochnoy-pily-raspilivat-doski-na-tonkie-plastiny-i-shpon.html