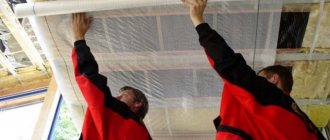
When the main construction and roofing work has already been completed, the time passes to decorate the house with small details that reflect your style, mood, and personality. To make your home stand out against the backdrop of dull buildings, you can decorate it with an original weather vane. This amusing device, set in motion by the slightest breath of wind, is not only a decorative element, it is also a symbol of good luck and prosperity. Today’s article will tell you how to make a weather vane with your own hands, what materials to use and how to attach it to the roof.
Traditional windmill in the shape of a rooster
Windmill in the shape of a cat
Functions
A roof weather vane is a device used to determine the direction and speed of air flows. The windmill is powered by gusts of wind: when the air acts on the wind vanes, it begins to spin, indicating where it is blowing. The direction is determined by the wind rose, which is an indicator of the cardinal directions.
The force of the wind is shown by the suspended part, deviating from the vertical position under the influence of air masses. They are installed on the roof ridge of a house, on a chimney pipe, even on specially installed poles. They perform the following functions:
- Show the direction and speed of wind gusts . It may seem that at present this information cannot be useful, however, these indicators are taken into account when performing some agricultural operations (spraying plants with fertilizers and pesticides, when sowing small-seeded crops), when swimming in the open sea, during hang gliding.
- Decorates the horse . A cat weathervane, an angel weathervane or windmills in the form of other animals and birds contribute to the unique image of the house, making it unique and original. If you order a copper windmill from a craftsman and develop the sketches yourself, it can become a new family coat of arms and talisman of the house.
- Scares away birds . The rotating parts of windmills in motion reflect light and sparkle, driving away flocks of annoying birds that are not averse to profiting from berries and fruits from the garden. Shiny weather vanes made of unpainted metal are well suited for scaring away birds. The copper rooster windmill copes well with this task.
- Repels moles and shrews . The invasion of moles and shrews, which dig long passages underground, destroying root crops, becomes a real disaster for gardeners. To scare away pests, it is enough to install a wind vane, a windmill with rotors, directly into the ground, which produces sounds and vibrations when rotating.
- Protects the chimney pipe from moisture . A weather vane deflector perfectly replaces a protective umbrella installed on a chimney or ventilation pipe, and a cockerel, cat or owl decorates this element of the roof.
Wind mechanism in the shape of a rooster
Do two
To reflect light you need a mirror surface. The cheapest surface CD, DVD discs. Of course, you don’t have to run to the store to get them. If anyone has problems purchasing discs, go to the forums. Experience in operating wind turbines forced us to find alternative sources of mirror surfaces - pancakes from hard drives. How to extract them is a separate topic. So we have
and you need to fix them on the wheel. Again about safety precautions. If you don’t have experience, we buy disposable gloves. We put on gloves and, without putting much effort (you don’t need to be pumped up with steroids for this), slightly rocking the disk, insert it into the cut. This must be done carefully, without bending the disk. Did it work? Is the disk cracked? Throw it away. Next. Let’s assemble the wind wheel - the turbine and Let's take it apart a couple of times. Do you have the skill? We disassemble the wheel. Now we need to firmly install the blades.
Hot melt adhesive
Molecular glue
Glue moment
We will do this with glue. Experience has shown that Moment glue in all modifications, instant second adhesives, rubber glue and hot-melt adhesive do not provide reliable fastening of the blade to the wheel, and molecular glue also damages the disc creating a zone of fragility at the fastening boundary. The record for the survivability of wind wheels was shown by the method of fastening using epoxy resin. We accept this glue as the most reliable.
Disc is inserted
Apply the edge of the disc
Epoxy adhesive
It is better to glue in air. Cover the work surface with newspaper or magazine. The fumes from the glue won't lead to insanity, but they won't add health either, they will only take away. According to the instructions, we dilute the glue components. Spread the edge of the disc at the point of contact with the wheel. You should not apply a lot of glue; the contact is tight and excess glue will drip onto your hands and clothes. Be careful not to get glue on the bearings. Insert the coated edge of the disc into the cut. Try to keep the center of the disk in the plane of symmetry of the wheel. We do the same with other blades. Carefully apply glue to all the voids from the cuts. Alternating the mirror side and the non-mirror side will increase the chances of the device operating when the windmill is unfavorably positioned relative to the sun, that is, the sun will be reflected when the turbine is illuminated both from the front and from the back. In the end it should work
.
Glued wind wheel
Five-bladed wheel
Two-bladed wheel
Three-bladed wheel
We place the turbine on the table and carefully adjust the blades. The wheel should be parallel to the surface of the table and all blades should touch the surface. It turned out great. If it doesn’t work, don’t care, it will still spin, albeit with vibrations. Place the wind wheel in a safe place to dry. Carefully! Excess glue may drip from the wheel. The drying time of the glue depends on the temperature. My glue only hardened on the second day. On that hot summer day it was +14°. The photographs show photographs of wheels with a different number of blades. I managed to glue an eight-bladed wheel.
Weather vane device
Initially, weather vanes were installed on the roofs of houses in coastal cities so that, upon leaving the house, one could find out where and with what force the wind was blowing. Nowadays, the device has lost its practical functions and has become more of a fun decorative element used to decorate country houses and country cottages. Any weather vane consists of the following parts:
Wind turbine design diagram
- Housings _ This is the base of the weather vane into which the axle is inserted. The housing is fixed to the roof or chimney pipe.
- Bearing _ The bearing is located in the housing; it ensures free rotation of the axis inserted into it under the influence of gusts of wind.
- Index of cardinal directions . It consists of two twigs crossed to form an angle of 90 degrees. At the end of each twig there is a letter designation of the direction of the world to which it points. A compass is required to correctly orient the pointer.
- Axis _ The axis is located vertically; it is inserted into the weather vane body through a bearing. To ensure that rotation does not impede anything, you need to select a bearing and an axis of the same diameter.
- Cap . This is a device in the form of a cone or circle on the axis of the weather vane, protecting the body from moisture penetration and performing restrictive functions.
- Checkbox . On the axis of the weather vane there is always a flag, a small blade driven by the force of the wind. The flag indicates which direction the wind is blowing. It is in this element of the weather vane that its decorative potential lies. A skilled craftsman can give a flag any shape - animals, vehicles, birds.
- Counterweight . This is a part located on the opposite side of the flag, necessary for balancing it.
Before making a weather vane, you need to understand what it consists of in order to select suitable materials and draw up a detailed drawing with dimensions. In the hands of an experienced craftsman, a weather vane can turn into an intricate mechanism with moving parts, acting out a scene with a specific plot and main characters. But to make it yourself, simpler models and affordable inexpensive materials are suitable.
Do it once
We mark the wheel to make slots for the blades. For complex markings, I attach stencil files (
,,
).
Making a cut in the wheel
Wheel in a vice
Marking a wheel for four blades
We make marks on the wheel, for example, with a ballpoint pen. If this is your first windmill, then it is better to start with two or four blades. So, we marked it out. Wheel designs are different, if there are removable bearing linings, then we dismantle them and put them in a safe place. Then it is better to adhere to the given technology; for this you will need a vice and a hacksaw. If you suggest another reasonable way to make cuts, I will publish it. We clamp the wheel in a vice, it is better to clamp it so that rubber sawdust does not fall on the bearings. In the photo, sawdust gets on the bearing! It is not right! We select the angle of inclination of the hacksaw blade (30-45°) and begin sawing from the top point of the wheel. We saw slowly and carefully with a metal saw. If you are in a hurry, you may end up with broken hacksaw blades. We cut to a depth of half to two-thirds of the thickness of the rubber, in my case to the steel pads.
The cut is done
Result of work Marking the wheel
Having made the first cut, we re-clamp the wheel in a vice and make a second cut, and so on. The result should be something like this. If you are left-handed, you can saw with your left hand in a different direction.
Making a weather vane with your own hands
Before you make a weather vane with your own hands, you need to choose a material that will withstand the effects of precipitation. Wood, even if coated with paint, will lose its aesthetic appearance and darken within a year.
To create a more durable weather vane, you need to use galvanized metal. Before starting work, you must make a schematic drawing, showing the height of the weather vane, the shape and dimensions of the flag. The work is performed in the following order :
- To make the body, take a metal pipe with a diameter of 13-15 mm and a length of 130 mm. A bearing of suitable diameter is inserted into the upper part of the pipe.
- Take two narrow strips of stainless steel and fasten them crosswise in the middle to make a compass rose. If your skills in working with metal are sufficient, then you can cut out letters indicating the cardinal directions. Or you can paint the tips of the signs in a symbolic light: north - blue, south - red. The position of the winds is attached to the body by welding, checking with the compass.
- You need to cut a flag from a sheet of galvanized steel or copper. To make this easier, you need to transfer the drawing onto tracing paper with the correct dimensions. This pattern is applied to a sheet of metal and traced using a marker. The flag is cut along the contour using a hacksaw or metal scissors. You need to cut slowly, slowly, so that the edge of the figure comes out smooth, without jagged edges.
- The axis of the future weather vane is made from smooth reinforcement. In order to protect the bearing from moisture penetration, a cap or funnel made of stainless steel is welded to the axle. Some people prefer to use a rubber seal for this purpose.
- A flag is fixed to the top of the axle using several screws and nuts. In order for the flag to be positioned horizontally, it must be balanced so that its weight to the right and left of the attachment point is approximately the same.
- Then you need to lubricate the bearing with grease to facilitate the movement of the axis, and assemble all the parts of the weather vane together.
Standard ridge mount for wind turbine
If you are an advanced craftsman, you can complicate the design of the weather vane with the help of vertical propellers that set the figures on the flag in motion. To add volume to the weather vane, you can use embossing, because steel is a soft enough material to make its surface embossed.
Homemade windmill in the shape of a flying duck made of wood
DIY windmill in the shape of an airplane
After you have made the weather vane, all that remains is to secure it to the roof surface. The easiest way to do this is with metal corners or plates. The main thing is not to damage the waterproofing of the roof to prevent leaks.
If you install it on a ridge or chimney pipe, you can avoid unpleasant consequences. Please note that if the installation is performed poorly, the mechanism will resonate and create noise that scares away birds, but irritates others.
How to install a counterweight
At the end of the installation, a counterweight is installed. The weight of both the plate and the counterweight must be taken into account, otherwise the device will not function properly. If you have a drawing, installation is easier.
After the weather vane is fixed, it is painted with external paint or covered with enamel. Correctly performed installation requires relative rigidity - you should not overtighten the weather vane with fasteners. Otherwise, they will be highly susceptible to wind loads.
An original weather vane can be purchased at a building materials store, focusing on its functionality and symbolism.
Where can I buy
If there is a blacksmith shop in your city, you simply cannot think of a better place for such an order - blacksmith masters will not only fulfill your order as quickly as possible, but will also take into account all individual wishes.
But if you are not interested in the little things, and you just want to buy a high-quality weather vane at a good price, contact the appropriate stores.
In addition, with the advent of the Internet, it became possible to order a product you like from another city in case you were not satisfied with the selection in the store.
Briefly about the main thing
The weather vane interacts with the air flow and shows its direction. When connected to a sensor, it is also capable of measuring its speed. Depending on the purpose and design, there are the following varieties:
- Decorative.
- Meteorological.
- Protective for chimney pipes.
- Generating electric current.
- Repels rodents and birds.
In the standard version, it includes a flag, a boom, a counterweight, a vertical axis with a block and fastening elements, a propeller and a protective cap. Its main most noticeable part - the weather vane - can be made in the form of various figures - a rooster, a cat, a lion, a horse, etc.
As a rule, wood, steel, copper, plastic and plywood are used as manufacturing materials. They all have characteristic pros and cons. When installing a weather vane, it is necessary to observe its orientation vertically and to parts of the world - in the presence of a wind rose. An elementary model can be made quite easily according to the instructions, but more complex and high-quality options are available only to professionals.
Materials used
Metal
There are no restrictions on the material for manufacturing. There are no rules and regulations regarding such products. It all depends on your own imagination and skills in handling household tools.
Materials differ in the following parameters:
- specific gravity;
- margin of safety;
- fastening method;
- the need for additional processing;
- lifetime;
- exposure to the influence of the external environment;
- presentableness.
Weather vane made from plastic bottles
Installing a weather vane on a roof with your own hands is a rather difficult and risky undertaking. You need to carefully think through and plan each stage. As a rule, installing a device is more difficult than manufacturing it. It is necessary to prepare fasteners and safety equipment. It must be taken into account that a strong gust of wind can knock down a structure and tear it out of its nest, which can lead to destruction of the roof, buildings and injuries to surrounding people.
The most common materials for weather vane:
- Metal. Sheet metal and stamping are distinguished by all the necessary qualities needed to manufacture a lightweight but durable device. You can use one of the available materials - stainless steel, brass, copper. All of them have sufficient ductility for bending and forging, a good margin of safety and resistance to corrosion. Here you need to take into account the methods of connecting parts. Steel requires welding, while non-ferrous metal can be soldered. But here there are restrictions on placement. Soldered products should not be placed above the chimney, as the high temperature may cause the solder to melt. Welded devices have no restrictions, but there are difficulties with assembly and subsequent polishing.
- Tree. Initially, all weathervanes were made of wood, until new technologies allowed the use of other materials, including waterproof plywood. Wood has a number of positive qualities, including lightness and ease of processing. Unfortunately, the resource of this material is limited to several seasons. Under the influence of humidity and ultraviolet radiation, wood darkens, becomes cracked and crumbles. If there is free access to the base of the structure, this disadvantage can be neglected, since making a new windmill will not be difficult.
- Ancillary items. In any home there will always be a lot of materials that are inherently consumable and cost nothing. These include plastic bottles, discs, and containers. Polymer products are lightweight, flexible, parts can be glued, stitched, and fastened with rivets and bolts. Since such products are not strong enough, it is not advisable to place them on the roof. It is better to use wooden poles or steel pipe supports as a stand. They will be enough for several days of work, and then the windmill can be removed and a new one, also disposable, can be put in its place.
Video description
This video shows how to make a weather vane from a stainless steel sheet:
- All elements are carefully verified before fixation so that there are no distortions in weight.
- The figurine is welded to a weather vane with a counterweight.
- A rotary axis is attached to it at the bottom.
- For it, in turn, a bracket is made in the form of two plates at an angle of the roof and a pipe coming out of the corner, into which a rotary axis with a ball will be inserted for better rotation.
- When all the elements are ready, they are assembled and tested for functionality.
- Next, the weather vane is painted, processed and brought to its final state.
- Finally, the device is installed on the roof with vertical alignment using a building level.
During manufacturing, it is important to maintain proportions, angles, balance and distance between all components - so that the weather vane works even from the slightest breath of wind
Installing the device on the roof
First of all, remember: the weather vane will perform its functions only if the installation is done correctly.
It is necessary to take into account all the recommendations described below:
- Installation is always carried out at the highest point, which is called the ridge of the roof. The ideal option would be to install a weather vane on the chimney.
- To correctly calculate the cardinal directions for a compass rose, use a compass.
- The figurine is directly attached to a steel pipe, which is placed on a rod located in a vertical position.
- In order for the weather vane to move freely in accordance with the blowing wind, it is necessary to install a bearing at its base.
Negligence can have disappointing consequences: one day the weather vane may simply stop.
Today, special technologies for rotating unit designs already exist.
Ideally, it is equipped with two bearings, which significantly increases its sensitivity to minor wind fluctuations and overall reliability.
Now let’s expand the functionality a little: you can make a lightning rod from a weather vane.
Attach the wire at one end to the pointer and ground the other - it will take about one and a half meters.
Here's another interesting move in using a weather vane.
Stages of creation
Making a weather vane is quite a responsible and troublesome task.
The incorrect shape of even one seemingly unimportant part will lead to the device not working properly. Therefore, it is better to entrust the production of such a device to real professionals.
For those who have some experience, you can offer an example of the following instructions on how to make a weather vane from a stainless steel sheet yourself:
- A drawing of the weather vane design is made.
- Draw the main figure in full scale on a large sheet of paper.
- Then the figure is cut out with scissors.
- The resulting stencil is applied on top of a suitable size stainless steel sheet about 2 mm thick.
- Draw the outlines of the figure with a marker/pencil/chalk.
- Then the sheet is clamped in the layout table.
- After this, using an electric jigsaw, the required figure is cut out exactly along the outlined contour.
- Next, burrs are removed from the edges, irregularities are removed, and corners are adjusted.
- The cut out contour is given elements of artistic processing - eyes, mouth, nose, mustache, etc. are made.
- After this, a weather vane is made from a metal rod with a counterweight.
Do six
An important stage . Wheel balancing. Due to different weights of the disks (if they are different), inaccurate installation (violation of the symmetry of the cuts, different depths of attachment of the blades), excess glue on any blade, the wheel becomes unbalanced. Imbalance is harmful due to the appearance of vibrations during rotation and the fastening units will suffer from it and strong mechanical noise may appear. If everything is balanced, then turning the wheel to any angle, it will not rotate further.
Windmill wheel
If the wheel, after any rotation, tends to return to its previous position, then the blade located below, after the rotation has calmed down, is heavier relative to the others. We eliminate this by gluing small weights to the edge of the opposite blade or blades. This work requires skill and the presence of a small amount of small metal or other rubbish. Sometimes it is enough to attach a piece of chewing gum to the edge of the blade. In my area it will never slip off the blade, but where it’s hotter, I don’t guarantee anything. The balancing was successful - good. If it doesn’t work out, it doesn’t matter. It will rotate. In strong winds, a broken windmill operates on one blade!
Do four
secret-mastera.ru
Screeds
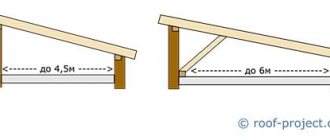
Now you need to decide where the device will be installed. This is an important moment to achieve your goal. The sun should fall on the windmill, and it, in turn, should send bunnies into places where there is no sun. It is rational to place the windmill on the north side (if you live in the northern hemisphere). The figure shows an example of windmill placement. So, we decided on the place. It is necessary to find a blank for mounting the windmill. This can be a pole 2-6 meters long if it is intended to be installed on the ground, or the remainder of a mop handle for mounting on a balcony, roof ridge or pole, etc. In my conditions, the windmill was installed on a pole. The upper end of the pole should have an even cut, and we will also drill a hole in the center of the cut. Let's take care of the method of attaching the pole to the surface or to the tree. Examples of fastening poles are shown in the photographs. There is no need to secure it tightly. The windmill requires maintenance. Screeds or improvised materials are good for fastening.
Pole attachment
Pole attachment
Pole attachment
Do seven
Drilling the rocker
Looking for the center of gravity
Also an important step . We take a rocker arm with a fixed wind wheel and a tail blade and look for the center of gravity on the rocker arm, the point on which, when supported, our structure will take a horizontal position, without tilting forward or backward. Perform alignment carefully; slipping from the support can lead to breakage of the blades. To do this, we place a thin block, a pencil, a fountain pen under the rocker and try to find the desired position.
found place. Next we drill the rocker arm. The diameter of the drill should be slightly larger (2-3mm) than the diameter of the neck of the screw. For fastening, I use this self-tapping screw; it has the advantage of having no threads on the neck. It’s not worth adjusting exactly if the rocker arm is made of wood (in the rain
Type of self-tapping screw
Rocker arm attached
the wood will get wet and swell, making it difficult for the windmill to track the direction of the wind). The drilling axis must be parallel to the plane of the tail! Drilled - great. Are the disks broken yet? Fine. To attach the rocker to the pole, you need to select several washers. I used one nut. We insert a self-tapping screw into the hole in the rocker arm, install nuts (washers) and attach the rocker arm to the pole. Screw the self-tapping screw into the pole with the entire threaded part. The rocker arm should rotate freely on the axis. The result is in the photo.
Do eight
The device in action
We install the pole in a pre-selected place. First, replay the climb in your mind and evaluate your capabilities. We lift it carefully, the main thing is not to destroy the windmill by hitting foreign objects. After installation, securely fasten the pole. Hooray! Ready. The house, the dacha are protected from dark forces ;)! Video of a wind turbine in operation. Bunnies video.
According to Feng Shui, evil forces are concentrated in dark corners; a windmill, when installed correctly, can throw sunbeams into the most unexpected places in dark corners and rooms. About the positive impact of the design in protecting against dark forces