Are you planning to install a new roof or want to update an existing roof that has become unusable? Choose a PVC membrane that will reliably protect the building from leaks and will last 4 times longer compared to outdated bitumen coatings. For those who doubt their choice, we offer indisputable evidence of the economic feasibility of using modern waterproofing in numbers. Read below.
Types of membrane coating
Membrane roofing is a type of seamless coating for the roofs of buildings of various purposes. As a result of laying this film material with a thickness of about two millimeters, a monolithic surface is formed with excellent waterproofing characteristics and resistance to ultraviolet radiation.
There are three main types of membrane polymer roofing:
Soft PVC membrane is the cheapest and most popular type of such roof coverings. It is made from reinforcing glass fiber, plasticizers and polyvinyl chloride. This production technology allows us to obtain both durable and flexible roofing material.
However, the low cost of PVC comes at the price of low resistance of the membrane to acids and other aggressive liquids. If oils and solvents come into contact with such a membrane covering laid on a roof, it will inevitably be damaged.
Soft roofing made of EPDM (Ethylene Propylene Diene Monomers) is more resistant to fire, acids and frost than its polyvinyl chloride counterpart. This material is made from synthetic rubber and polyester mesh intended for reinforcement. EPDM is already somewhat more expensive and requires glue to be installed on roofs.
EPDM membrane Carlisle
TPO membrane made of thermoplastic polyolefins is the most expensive and technologically advanced of the varieties under consideration. This roofing material contains olefins, stabilizers and fire retardants. And the same strong geogrid made of polyesters acts as a reinforcing base.
Firestone TPO membrane
TPO membrane roofing has the highest parameters among its opponents in terms of resistance to severe frosts (up to -60 C), durability (up to half a century) and strength. However, this roof covering has low elasticity, making installation difficult, and requires a hot air installation to heat the joints during installation.
Thickness
If roof waterproofing is done using membranes, their thickness is an important indicator of the reliability and durability of the coating. The thicker the waterproofing sheet, the greater the mechanical loads it can withstand without damage.
Manufacturers offer membranes with a thickness of 1.2 to 2 mm. The choice of a specific type depends on the object that requires waterproofing protection, the level of mechanical hazard and the risk of damage.
Advice! Do not skimp on the thickness of the membrane, on which the service life of the material depends - thickening by just 0.3 mm increases the service life of the membrane roof by several years.
Membrane roofing: advantages and disadvantages
There are a huge number of advantages and disadvantages of a polymer membrane roof:
High elasticity simplifies installation work;
Fire resistance due to the inclusion of fire-fighting components;
Low weight of membrane films and low loads on the supporting structures of the house;
Resistance to precipitation, UV and temperature fluctuations;
High vapor barrier properties;
Durability of the membrane coating with a service life of 20–60 years;
Low water absorption and increased waterproofing characteristics;
A simple installation technology that allows you to cover roofs with any slope.
Resistance to fungi and cracking on the surface;
Possibility of laying a new coating without first removing the old one.
Photo of membrane coating
There are only three disadvantages to membrane material intended for installation on the roof:
The presence of harmful volatile substances and instability to household chemicals (relevant for PVC membranes);
Low tensile strength of joints when laid using the adhesive method;
High overall cost of roofing including installation.
Types of roofing by purpose
When selecting a membrane roof, it is necessary to take into account what functionality will be assigned to it. We invite you to familiarize yourself with the types of roofing materials.
- Breathable. Protects the roof from the influence of precipitation and allows residual moisture and vapors to be removed outside.
- Anti-condensation. Absorbs moisture that accumulates in the roof. Then it takes it outside the structure, which protects the roof from excessive moisture. The base is polypropylene, the surface is moisture-resistant coating.
- Vapor barrier. Protects against internal fumes that penetrate the roof from the premises of the building. The base is polyethylene.
- Superdiffusive. The most resistant material to precipitation, ultraviolet radiation, wind and mechanical damage. It is distinguished by flexibility and increased strength, prevents physical diffusion (penetration of “extra” particles into the material), and removes accumulated moisture out.
- Polymer. Provides increased moisture protection to soft roofing and extends its service life. The base is polyvinyl chloride.
Membrane roof installation technology
Installing a roofing membrane is not difficult. It is possible to handle its flooring yourself without the involvement of roofers. There are four installation technologies: adhesive, ballast, mechanically fastened and using hot air.
A membrane-type soft roof is laid in the form of a pie of several layers:
Bottom – load-bearing base (roof made of concrete or covering made of wood or corrugated board).
Rigid insulation or durable OSB decking.
The top one is a polymer membrane.
Membrane roof installation
If the ballast installation method is used, then geotextiles are additionally spread on top and the entire roof surface is covered with fine river gravel or rounded crushed stone up to 20 mm in size. To prevent the ballast holding the membrane in place from tearing it, the underlying geotextile must have a density of at least 500 grams/meter.
The easiest way to install a roofing membrane is to use glue. It covers the underside of the mounted canvas at the joints, as well as in places of contact with ventilation pipes, antennas, etc. However, such a coating is the most short-lived.
The polymer membrane is not afraid of temperature changes and UV, but the adhesive composition begins to disintegrate over time. And the membrane laid using adhesive technology will sooner or later have to be glued.
Photo of installation and roofing cake
Mechanical fastening of the membrane sheet is recommended if the roof has a slope of more than 10–15 degrees. The fasteners must have wide heads and be fixed on the roof with a spacing of up to 20 cm. But the most reliable method of installation is in which the seams of the soft covering are welded with heated air at a temperature of 400–600 C. However, this requires a special apparatus; this is more an option for a professional team of roofers .
Roof pie device
Membrane roofing is a multi-layer “pie” in which each layer plays a specific role.
The standard design implies the following structure:
- The bottom layer is a vapor barrier. It protects the insulation and all coverings from the action of vapors rising upward from the room.
- Thermal insulation. Most often, this layer is made of mineral, glass or ecowool, as well as expanded polystyrene (foam). Insulation protects the room from cold currents outside.
- Separation (anti-migration) layer. It separates the membrane from the insulation, which prevents the migration of plasticizer, bitumen and other components. Typically, geotextile or fiberglass is used for it.
- The top layer is a roofing membrane of one of the types discussed above.
In turn, the membrane also has the shape of a pie. It consists of several layers. The most common 3-layer structure:
- The top layer is made of base plastic (rubber). It performs all the most important protective functions and also ensures the appearance of the roof (color).
- Reinforcing layer (element). It is designed to improve mechanical strength. It is usually made from polyester fibers or fiberglass.
- Bottom (auxiliary) layer. It can perform various additional functions. Usually the layer is made of a darker material, which makes it easy to notice damage to the lighter base layer and make timely repairs.
The multilayer design of the membrane roof ensures its reliability and increased durability. The total film thickness ranges from 0.7 to 3 mm. The membrane can be applied in 1-4 layers.
Roof membrane application
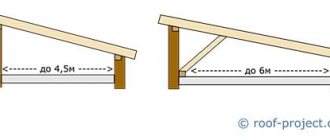
Most often, membrane roofs are chosen for installation on flat or slightly sloping roofs. But thanks to their plasticity and strength, they can also be mounted on the upper structures of buildings with steeper and more complex shapes. They cover even rounded domes without any problems.
It is repaired using special tapes with an adhesive base. Instead of conventional glue, a mixture is applied to them, which causes the polymers of the damaged surface to enter into a chemical reaction and combine into a single whole. As a result of using such patches, you again get a seamless coating with excellent waterproofing.
Flat roofs of industrial facilities
Almost all types of roofing membranes under consideration can be painted after installation. Particular care should be taken here only with the polyvinyl chloride modification. It is sensitive to the effects of many chemical compounds.
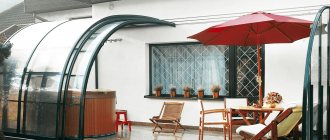
Flat areas of the roof of private houses
Should it be used as a roof?
A full estimate for installing a membrane roof can cause confusion with high figures. A square meter of canvas costs about 300–600 rubles. But among all other materials, this type of roofing is distinguished by its undoubted durability and high quality waterproofing. Only corrugated sheets or ceramic tiles can compete with it in terms of its totality of advantages.
Excellent waterproofing option
In Russia, such membranes are rarely seen on roofs due to their high cost and external similarity to bitumen roofing felt. And the latter, in turn, does not have a very good reputation due to its flammability and relatively short service life.
Welding the membrane with a welding machine
A welding machine relieves builders of difficult physical work and improves the quality of the seam. Before starting welding, you need to set the heating temperature of the air and the speed of the machine. The choice of modes depends on the membrane material and ambient temperature. After the data is entered on the control panel, you should wait a little until all elements of the machine warm up to the specified values.
Using a Welding Machine
Next you need to act in this order.
Photo of the installation process
While working with such a unit, the operator must constantly remain next to it, keep one hand on the handle and, if necessary, slightly adjust the direction of movement. It is necessary to achieve not only uniform and linear movement, but also complete pressing of the heated membrane by the rollers.
If you need to switch from automatic welding to manual welding, be sure to slightly undermine the seam you have made. Due to this, it will be possible not to leave gaps, the soldering iron nozzle will heat the welding line along its entire length without dead zones. At the same time, the strength of the entire seam will be checked; if problems are detected, they can be corrected in a timely manner.
Welding machine at work
Prices for machines for welding plastic and synthetic materials
Features of roofing material
The installation of membrane roofing is widely popular due to its ease of installation and long service life - the membrane covering is designed for 40 - 50 years of service, provided that all installation requirements are met.
The advantages of this type of roof include
:
- installation of the coating in one layer;
- no need for additional roof waterproofing;
- the possibility of laying the covering on roofs of any shape and with any slope angle;
- wide range of colors;
- affordable price;
- Suitable for installation over old roofing.
The technical characteristics of a membrane roof are determined by the properties of the polymer materials from which it is made. The membrane is highly flexible and elastic; this material can be used to create an almost monolithic coating with excellent waterproofing qualities. Today, this type of roofing is one of the most modern materials that meet the requirements of the time.
How to weld complex seams and elements
This need arises on all roofs; complex seams, reinforcements and linings require special technology.
Installation of the patch
Patches have to be installed both during the installation of a new membrane covering and when repairing the old one. They allow you to reliably eliminate detected problem areas; in addition, the technology recommends installing patches on the corner joints of the membranes.
Before starting work, you should measure the length of the seam, the patch is cut 15–20 more. This is done so that there is space left for welding around the entire perimeter of the patch. To improve the quality of welding, the corners are cut in a semicircle.
Step 1. Clean and degrease the surface of the membrane under the patch, place it on the welding site.
Step 2. Weld the patch in several places as far from the edges as possible, this should be done in order to prevent it from shifting during welding. Check the position of the patch and adjust if necessary. At this stage of work, it can still be torn off and re-fixed.
The patch is welded in several places
Step 3. Lift the patch and insert the nozzle of a hand-held soldering iron into the gap. The nozzle should be 2 cm in size; a very wide one will not allow you to create a high-quality seam.
Patch fixation process
Step 4. Constantly move the nozzle around the circumference of the patch and roll the membrane with the edge of the roller. Try to make the seam as wide as possible, this way the tightness of the connection increases. The roller passes must be tight; carefully monitor the welding process. Remember that the patch should not be glued, but welded, follow the recommended modes.
Try to make the seam as wide as possible
Repair completed, patch supplied
Strengthening the corner area
From the point of view of sealing reliability, these are the most difficult areas; to increase the strength of the roof covering in these places, it is recommended to make additional patches.
Construction of the internal corner of a flat roof (envelope)
Step 1. Cut a circle with a diameter of approximately 20 cm from the membrane. Cut it along the radius towards the center. Place the patch in a corner and bend the circle into a cone. At the same time, make sure that the outer edges of the cone fit tightly to the coating. Fix the position of the cut edges of the circle.
Step 2. Heat the narrow nozzle of the soldering iron and carefully weld the edges. To do this, use a narrow nozzle and a flat roller. Work carefully, weld thoroughly along the entire length. Prepare a second circle with a radius of approximately 3 cm from the membrane; it will need to be glued to the top of the cone.
Insert the small circle into the cone, making sure that the adhesive surfaces of the cone and the small circle must touch. Due to this position, the gluing process is simplified and the tightness of the weld seam is significantly improved.
Step 3. Glue the cut membrane to the top of the cone over the entire area, check the tightness. This is easy to do - pour water into the cone and wait a few minutes. If water does not leak, great, you can glue the prepared element in the corner of the roof. Place the cone in the corner of the roof and begin welding. Pay special attention to the upper vertical edge, this is where water most often gets under the membrane. Proceed to strengthen the corner zone only after the technology has been mastered well, all actions are controlled, and the heating temperature is determined intuitively. If you do not have such skills, then attempts to further seal and strengthen the corners may lead to the opposite result.
Strengthening the inner corner
In the corners, the membrane does not adhere tightly to solid bases; there are gaps in many places. This means that you cannot press the roller with great force - the risks of violating the integrity of the soft heated material increase. In order to obtain a high-quality weld with slight pressure on the surfaces, the heating temperature should be slightly increased. To what extent exactly – there is no universal advice. The master must navigate independently based on personal practical experience in roofing work.
Sealing a small diameter passage in the roof
And one last thing. What you need to worry about is not a large number of patches, but leaks . At the slightest suspicion, use patches; leaks must be prevented, not eliminated. The appearance of a membrane roof is not the most important characteristic of a building.
Video - Connecting to a parapet using PVC metal
Types of membrane coatings
Membrane roofing is constructed using special polymer materials, which are characterized by durability, strength, and a wide range of colors. The advantages and disadvantages of roofing membranes depend on the material they are made of. The PVC (polyvinyl chloride) membrane first appeared on the construction market, but today this material is competing with TPO (thermoplastic polyolefin) and EPDM (ethylene propylene diene monomer) membranes.
PVC membranes
.
The roofing material is made of plasticized polyvinyl chloride, which is reinforced with polyester mesh for strength. The high elasticity of the material is ensured by the addition of a significant amount of volatile plasticizers to polyvinyl chloride. The installation of a PVC membrane roof involves welding the sheets with hot air, for which special equipment is used. The advantages of roofing material include
:
- high strength of joints;
- membrane resistance to ultraviolet radiation;
- fire resistance.
The disadvantages of PVC membranes include
:
- fading of color coating in the sun;
- poor resistance of the material to oils, bitumen, solvents (must be taken into account during storage, transportation and installation);
- release of volatile compounds.
EPDM membranes
.
The basis for the manufacture of this material is synthetic rubber. The durability of the membrane is ensured by reinforcement with a mesh made of polyester threads. The advantage of EPDM membranes is
:
- at a relatively low cost;
- in the elasticity of the material;
- in the durability of the coating with high-quality installation.
This type of coating has the following disadvantage: special glue is required to join the panels. As a result, the joints may lose their tightness during the operation of the roof, which entails leaks and the need for repair work.
TPO membranes
. This type of coating is made using thermoplastic olefins. Available in both unreinforced fabric and reinforced with polyester or fiberglass. The installation technology consists of welding the edges of the sheets with hot air using special equipment. This method allows you to obtain a strong seam. The advantage of the material is the durability and high reliability of the roofing. The disadvantages include the lower elasticity of the membrane compared to other types of material, which increases the complexity of installation work.
When choosing a material for installing a membrane roof, you should take into account the ratio of price and durability of the coating, the complexity and cost of installation.
Further actions
Having prepared the base, a special separating layer is laid on it.
It is required to minimize the risk of roof damage. The role of the separating layer is taken on by geotextiles or fiberglass. The separating layer must be even across the entire plane of the roof. Kinks are excluded. Roll out the first roll of membrane . At the same time, the vertical elements of the roof are bent. The bend height is 10 cm. All folds of the material are aligned. If necessary, manually tighten it a little. Remove small waves formed due to long-term storage of membrane roofing. If the parapet is brick, you need to cover it with plaster. The surface should be as smooth as possible. The sand needs to be removed from it.
Fix the clamping strip to the vertical roof elements. It can be made from any metal profile. The selection of hardware for fastening is determined by the material used to manufacture the vertical lining. Most often, special self-tapping screws for concrete are used. They are screwed into holes; plastic elements are not used. Do not allow sudden kinks in the membrane. Microcracks may form in these areas after some time. When water freezes, these cracks expand and cause leaks .
The membrane covering is fixed to the base. There are two installation methods. This is fixation to a concrete base or extruded polystyrene foam. Usually the second method is used. It is less durable. Engineers explain this approach for three reasons.
Firstly, the loads on tearing off the coating are not so significant as to be taken into account when calculating strength. This pressure is caused by air masses and wind. But even their significant speed is not capable of creating a significant vacuum of the membrane above the surface. Secondly, this method is not so expensive; fixation is carried out quickly and without significant physical effort. Third, some types of concrete roof bases include additional materials for waterproofing. If they are damaged by dowels, the structure will be damaged, and this is unacceptable.
To fix the membranes, use special plastic hardware with an increased thread pitch. They should have a large head diameter. They are screwed in with an electric drill. There is no need to pre-drill holes. Next to the fixed membrane, the interlayer material is rolled out again. Any actions are similar to those described earlier.
A second roll of roofing material is rolled out on top of the layer with an overlap of approximately 5 cm from the fastening point. Make sure that the stripes are perfectly parallel. If distortions are detected, they must be corrected immediately. You should not allow a situation where there are four corners of the roll in one area. Their length needs to be changed.
The laying technology prohibits welding more than two ends at one point. The free ends of the membrane are fixed; the opposite ends will be digested in the future. The coating continues to be laid over the entire roof area in a similar manner. Do not make cuts in water drainage areas. The final work in these areas is carried out at the last stage of installation of the membrane roof.
Once the membrane is completely installed, a visual inspection of the roof surface is carried out. If everything is fine, start welding the overlaps.
Basic methods of installing membrane roofing
Ballast method
.
This is the simplest option for installing this type of coating. It is used if the slope of the membrane roof does not exceed 15 degrees. The process of fixing the membrane is carried out in several stages
:
- laying membranes on the prepared surface;
- welding or gluing joints of sheets;
- laying a layer of ballast (crushed stone, pebbles, etc.) at a rate of 50 kg per square meter.
If the ballast is broken stone or unrolled gravel, the membrane should be protected from damage from above with a non-woven fabric.
Mechanical method
.
It is used if the roof structure is not designed to withstand the loads associated with laying ballast, and it is also not possible to properly glue the membrane material. In this case, to a base made of wood, corrugated board, reinforced concrete, etc.
membranes are attached using :
- metal anchors with plastic umbrella caps (telescopic fasteners);
- anchors with disk holders (if the roof slope angle exceeds 10 degrees);
- edge strips equipped with a sealing layer (for installation on protruding roof elements).
The installation of a membrane roof using mechanical fasteners at the base of the roof requires protection of the membrane from damage - for this it is necessary to lay non-woven or geotextile material under it.
Pasting method
.
The gluing method is practiced less frequently than others due to its relatively high cost. In addition, fixing the membrane to the base with glue does not guarantee high strength of the coating. A connection using an adhesive mixture is used in situations where it is not possible to use other installation methods. The adhesive should be applied around the perimeter of the roof, in places where panels overlap, as well as in difficult places, which include
:
- valleys;
- ribs;
- places adjacent to chimneys and other vertical structures.
Heat welding method
. Installing a membrane roof using a welding machine makes it possible to install a solid, reliable, high-quality coating that successfully resists precipitation. A stream of air heated to 400-600 °C allows you to make sealed, tear-resistant seams. The width of the welded layer must be at least 20 mm.
When installing the covering, special attention is required to the components of the membrane roof - the junction of the membrane to various structures, corners and corner transitions, drains, etc.
These methods of installing roofing are successfully used in private construction during the construction of houses and outbuildings. The technology for installing a membrane roof may require the use of specialized equipment - this option ensures maximum reliability and durability of the coating. If you have some skills in working with such equipment, you can do the roofing membrane installation with your own hands.
Repair using membrane roofing
Membrane coating allows you to repair old roofs at no extra cost - there is no need to spend time and money on dismantling the outdated roofing covering. To do this, the roof must be cleared of debris and old metal elements. Then it is necessary to lay a double layer of geotextile (to avoid damage to the membrane). Next, the membrane is installed; it is recommended to use the heat-welding method, but you can also use mechanical fasteners.
Useful tips
Installing waterproofing is a simple process, but requires taking into account many nuances. Therefore, you need to follow certain rules:
- installation is carried out only in dry weather;
- if the roof has a small slope, it is recommended to lay the film in two layers;
- around the chimney the membrane is applied with a margin of 5–7 cm;
- the joints of the material are carefully sealed;
- for roofs with complex configurations, choose waterproofing with an adhesive layer;
- The film is applied to the valley sheets with an equal overlap;
- For fastening waterproofing, nails with wide heads are used.
The tightness of the waterproofing film depends not only on the correctness of the installation, but also on compliance with the production technology. Therefore, more attention should be paid to choosing a brand. Katepal roofing materials are thoroughly tested and meet European quality standards. Reliable Finnish waterproofing guarantees long-term protection of your home from leaks.
Roofing PVC membrane - device and installation technology
PVC roofing membrane is one of the most effective ways to protect the roof and under-roof space from moisture. Let's take a closer look at why this material deserves attention, what its advantages are, and also share the technology of its use.
Many people have heard about the new modern material for waterproofing, but few know how membrane roofing works, what it is, and why it is effective? PVC membrane is an elastic but durable film with a complex structure. Despite its elasticity and apparent fragility, the roofing membrane has high mechanical strength and a significant service life under fairly harsh operating conditions.
What it is?
Membrane roofing is a special coating made from modern polymers with a multilayer structure.
This is a highly flexible roll material designed for flat roofs and roofs with a slight slope . It has been used abroad for quite a long time, and recently it has been mastered by Russian construction companies.
Taking into account the high cost, the positive effect of using a membrane coating is noticeable when arranging large roof areas. This circumstance significantly hinders its use in private construction.
Structure of the roofing membrane
But not only does membrane roofing differ from conventional waterproofing in its physical characteristics - the installation technology of this material is very simple and affordable. And its composition attracts other important features:
- fire resistance corresponding to class G1/G2;
- resistance to solar radiation;
- complete impermeability to all types of precipitation;
- frost resistance;
- wonderful appearance.
Unlike films, PVC roofing membranes allow steam to pass through, which helps remove evaporated condensate from the roofing insulation layer. All this provides reliable protection for the roof and sub-roof structures.
PVC membrane - material for roof waterproofing
Moreover, PVC membranes successfully resist the germination of moss, lichens and mold - eternal problems of traditional waterproofing materials, including bitumen, resin, roofing felt and others. It is clear that such an impressive set of advantages could not but affect the price.
For example, TechnoNIKOL PVC membrane is more expensive than others. But guaranteed protection and, thanks to this, a very serious increase in the service life of the roof between repairs leads to fairly high savings in the operating costs of the building.
Leading membrane manufacturers
Roofing and under-roofing membranes are a sought-after material, which is why hundreds of companies around the world are engaged in their production. In our country, the products of the following brands are most widely represented: “Stroyplastpolymer”, “TechnoNIKOL”, “Tyvek”, “Strotex”.
"Stroyplastpolymer"
The joint-stock company "Stroyplastpolymer" was organized on the basis of a plant that has been operating since 1950. Located in Yekaterinburg. The company has a developed dealer network that allows you to purchase PVC membranes “from the manufacturer,” that is, without intermediary markups.
Two types of PVC membranes are available:
- "Roofing";
- "Plastfoil".
Plastfoil membranes have good waterproofing qualities.
The cost of a roll with dimensions of 2x20 m is 17.2–24 thousand rubles.
"TechnoNIKOL"
A large Russian concern, which has not only several factories, but also a research center. The latter is developing new technologies and materials. He created, for example, a unique “3-P” system, which increases the resistance of PVC to ultraviolet radiation. The technology is patented, the rights to it belong exclusively to the TechnoNIKOL concern.
produces membranes for regions with temperate, hot and cold climates
The company produces building materials in a very wide range, including several types of roofing membranes:
- Logicroof-Arctic. Reinforced PVC membrane for regions with cold climates. A 20-meter roll with a width of 2.1 m and a thickness of 1.5 mm costs 27,888 rubles.
- Logicproof VRP. Single-layer membrane with reinforcement. With a thickness of 1.2 mm, the cost of a roll measuring 2.05x25 m is 19 thousand rubles. A roll of 2.05x20 m (1.5 mm) costs 18.5 thousand rubles.
- Ecoplast VGR. The price of a roll 2.05x20 m (1.5 mm) is 13.5 thousand rubles.
- Plastroof VRP. With a thickness of 1.2 mm, the roll has dimensions of 2.05x25 m, the price is 14 thousand rubles. With a material thickness of 1.5 mm, the roll dimensions are 2.05x20 m, the cost is 14.3 thousand rubles.
Tyvek
The owner of the trademark is Dupont (USA). The manufacturer produces diffusion and superdiffusion membranes made of polyethylene. Product Features:
- has high strength with low weight;
- does not generate dust;
- has a smooth surface that does not interfere with water drainage.
Tyvek polyethylene membranes have a smooth surface that allows water to flow freely
Several types of under-roof diffusion membranes are offered:
- Soft. The membrane is single-layer, specific gravity is 80 g/m2. Elongation at break is more than 15%. Tensile strength of a 5 cm wide sample: 250 N. Operating temperature range: -73 to +100 °C. When exposed to ultraviolet radiation, the membrane retains its properties for 4 months. A roll (1.5 x 50 m) costs 4950 rubles.
- Solid. Membrane with reflective coating. Enhances the thermal insulation effect by reflecting infrared radiation. The price of a 50-meter roll with a width of 1.5 m is 6,500 rubles.
- AirGuard SD This membrane is used in attic roofs as a vapor barrier (laid under the rafters and insulation). Unlike conventional vapor barrier films, it allows steam to pass through, but to a limited extent, so that it is not enough for condensation in the insulation and on the rafters. The roof becomes “breathable”, which allows reducing the intensity of ventilation, and with it heat loss. Price - 9200 rub. per roll 1.5 x 50 m.
Strotex
Another manufacturer of diffusion and superdiffusion membranes is the Polish company Foliarex, owner of the Strotex trademark.
Strotex membranes are available in several versions - with increased, normal strength, and anti-condensation layer
Several varieties are offered:
- Strotex SL PP. The membrane is characterized by increased strength: the tensile strength of a sample 5 cm wide is 650–550 N. Stability under UV irradiation lasts 1 month.
- Strotex 110 PP. Membrane with normal strength - 300–250 N/5 cm. Stability period under UV radiation has been increased to 3 months.
- Strotex AC. Membrane with anti-condensation layer. The fleecy coating absorbs moisture, preventing it from flowing onto building structures. Then the water gradually evaporates, the steam is removed through a blown gap. This is the most durable representative of the line: tensile strength is 950–900 N/5 cm. UV resistance is also impressive: 6 months.
The average cost of Strotex products is 1000–2400 rubles/roll. (75 m2).
Scope and advantages of PVC membranes
Roofing membranes are predominantly installed on flat or slightly sloping roofs with large flat areas. These include mainly industrial and residential buildings, where the roof is made in the form of a flat concrete floor.
It is also possible to install the membrane on sloping roofs with a wooden rafter system. But in this case, you will need a continuous sheathing or the creation of a continuous surface by laying suitable wood (chipboard, fiberboard, MDF), metal (roofing iron, plaque) or plastic (polymer seamless lining, plastic sheets) sheet materials on the old sheathing.
Installation of PVC membrane roofing, installation technology
The convenience of using membranes of this type lies in the absence of the need to prepare a base for it. PVC roofing is laid and attached directly over old roofing felt, tar fill or even metal roofing. The only minor limitation is the presence of a dense and mechanically strong base into which the fasteners will be driven.
Since the PVC roofing membrane is waterproof, there is no need for additional waterproofing.
Benefits of use
Let's consider the advantages of PVC membrane in comparison with other sheet materials for roofing:
- high speed and ease of installation of the membrane on the roof;
- the possibility of using a membrane over an old roof and old waterproofing materials;
- during the installation process, the use of open fire is not required, as for resin and bitumen coatings;
- the possibility of installing a membrane roof in winter (after clearing the roof of snow);
- an unlikely and fairly uncomplicated repair of a membrane roof within the warranty period specified by the manufacturer.
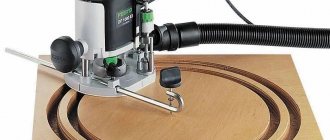
Application of Welding Machine
A welding machine eliminates hard physical labor and improves the quality of the seam.
Before starting work, you need to set the air heating temperature and the speed of the machine. The choice of modes is determined by the membrane material and ambient temperature. Once the data has been entered on the control panel, you need to wait a little. The tool elements must warm up to the specified marks. Further algorithm of actions:
Turns on the drive. The side surface of the guide roller should rest against the edge of the seam.
Source
Methods of attaching the membrane to the roof
There are several methods for attaching the membrane to the roof:
- bulk;
- mechanical fasteners;
- gluing.
Individual strips of material are hermetically connected to each other by heat soldering or gluing. According to experts, the welding method is much more reliable than gluing. The membrane is soldered using a special heat gun or semi-automatic soldering equipment. Let's consider these methods in more detail.
Bulk fastening method
The simplest and most proven method of laying membranes is bulk. The film is sprinkled on top with a gravel or expanded clay cushion. With its weight, the filling acts as a fastener. In particular, the filling method allows you to equip a green lawn or a place for relaxation on the roof.
Bulk membrane roofing for flat roofs
This method is used only on horizontal flat reinforced concrete roofs. When installing such a roof, you need to take care of the unimpeded drainage of rain and melt water.
Mechanical method
If filling is not possible, the roofing membrane is attached to the base using special dowels or screws (depending on the type of base). The mechanical fastening method is more labor-intensive, but its scope of application is much wider.
Thanks to the fasteners, the membrane can be mounted on horizontal and inclined roofs made of a wide variety of materials. The fasteners allow you to easily lay a PVC membrane on the roof of the most complex shape. However, in practice, the membrane is rarely used on steep roofs, since labor costs and the number of fasteners increase sharply there.
Gluing
If the surface of the base is dense and smooth, installation of the membrane roof can be done by gluing. The disadvantage of this method is the increased consumption of glue and the insufficiently fast pace of installation associated with its drying.
Manual welding
The membrane is heated by a stream of hot air.
It also removes sand from inside the overlaps. No open flame or glue is used. The device has a set of nozzles with different sizes. To get an even seam, you need to take nozzles with a width of 4 cm. Prepare manual equipment. You need to make sure that the nozzle is clean, level and free of mechanical damage. Only such a tool can do the job. It will guarantee the same heating temperature of the membrane along the entire plane of the seam. Set the heating temperature of the air flows. It must comply with the membrane manufacturer's recommendations. This indicator is determined by the material of manufacture. Experienced roofers adjust the temperature slightly, taking into account weather conditions. It is advisable to warm up the tool before starting work.
To improve the quality of welding, you need to make several test seams on sections. If the width of the nozzle is selected correctly, as well as the operating speed of the tool, air temperature, etc., the membrane will be able to be welded firmly. When stretched, it should break outside the welding zone. The strength of a double membrane is greater than a single one. If the temperature was chosen incorrectly, a rupture along the seam will be noted. If it is too low, the 2 pieces will be connected without affecting the surfaces.
To make the work easier, you need to grab the layers of the membrane at a distance of approximately 50 cm. This will prevent them from moving during the work. Insert the nozzle overlapping the canvases at an angle of approximately 45 degrees. Move along the joint at the same speed. At the same time they are rolled with a special silicone mat.
The welding mode is selected correctly if a small amount of white smoke appears during operation. Check the quality of welding. To do this, just use a metal hook with a sharp end. If you don't have one, a regular flathead screwdriver will do. Its tip should fit between the canvases. To improve the appearance of the seam and increase the tightness of the structure, it is recommended to glue the layers with silicone glue after cooling.
If you do not have sufficient experience to perform such work, you can make two welds. This point must be taken into account at the stage of laying the rolls. The overlap is increased to 10 cm. When welding the first seam, the tool is inserted deeper into the joints. Approximately 20 cm in length are passed in this way. After this, the welding machine is inserted into the remaining overlap width, and the process is carried out using standard technology.