What you need to lay floor tiles
Just three things:
- Floor tiles;
- Glue for installation and grout for seams;
- Tool.
And, of course, your desire. But in order to choose the right material, which is not only beautiful to look at, but also most suitable for operating conditions, you should immediately talk about its characteristics.
All tiles differ in size, color and patterns, physical properties and other components that characterize the area of its application.
How to create the perfect floor
If you decide to make the floor yourself, you will find my tips on laying it and a small master class useful.
Dramatic dark tones look stunning
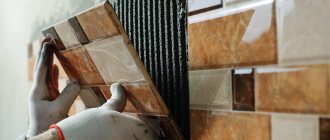
If you've done all the preparations like I did, it's time to install your new tile floor.
If you're new to ceramic installation, you may need a little professional help.
This guide will walk you through all the steps and I just want to help you complete your project as painlessly as possible while also ensuring it looks great in your home for a long time.
What you need to know about tiles
The main requirements for the entire tile series are:
- Frost resistance;
- Water absorption;
- Wear resistance (IV class);
- Resistance to chemically active substances;
- Fire resistance and fire resistance;
- Slip resistance.
Here are several criteria by which floor tiles should be selected for different rooms.
- Kitchen floor tiles. The floor in this room is constantly exposed to frequent contact with grease and oils. Therefore, it requires tiles with increased resistance to detergents. Plus, quite frequent visits to the kitchen by a person require a high wear resistance class of tiles (not lower than III).
- Floor tiles for the hallway. Darker tones of colors are desirable, because dirt on them is not so noticeable. In addition, the floor of this room will constantly be exposed to shoe soles and heels of women's shoes. Cases of exposure to heavy objects brought in from the street, for example, suitcases with metal legs, children's sleds, etc. are also not uncommon. Therefore, the degree of wear resistance of the coating must be at least class III.
- Bathroom floor tiles. Constant high humidity forces bathroom tiles to be laid in a manner that has a low degree of moisture absorption. Its textured surface will also be important, allowing it to provide good slip resistance.
Style decision
The design of the kitchen floor made of tiles should emphasize the chosen style.
It is better to entrust the design of a kitchen floor in a minimalist or high-tech style to plain tiles. As a last resort, you can use a neutral or as unobtrusive pattern as possible.
For classic styles, flooring that imitates marble or antique ornaments is suitable.
For ethnic styles, a good solution would be to use ceramic tiles under the Metlakh carpet or artificially aged elements.
Porcelain tiles for the kitchen
In addition, there is such a type of floor tile as porcelain stoneware. In its mechanical properties and appearance, it is very similar to natural granite.
In terms of wear resistance it has V, the highest class. With its help, both indoor floors can be perfectly decorated, tiles can be laid on steps outside the house, and the surfaces of open balconies and terraces can be tiled.
Tile adhesive
As has already become clear from the above, each tile has its own purpose. Therefore, the materials for its flooring must be suitable. Different manufacturers call adhesives differently.
Therefore, it is customary to roughly divide them into three types:
- Primary. Perfect for wall tiles and small floor tiles located in dry rooms;
- Reinforced. Used for laying large-format floor tiles and small porcelain tiles. Has a high degree of moisture resistance;
- For difficult surfaces. Designed for installation of any porcelain tile on concrete bases, old tiles and even glass. It can also be used for laying natural stone on the outside of a building or covering car showroom floor surfaces. Very durable. Not afraid of either moisture or frost.
Important! If floor tiles are being installed on a previous surface or on a surface with a large number of joints, then the top tiles should overlap the old seams.
Before you start
It is important to prepare your existing floor, calculate the correct quantities, purchase and place key elements.
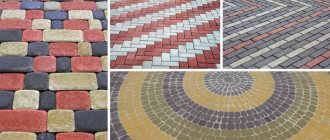
The color range is very large
This planning guide tells you everything you need to know. So, read on to learn how to plan.
We plan with taste
Required tools and materials:
- floor tiles;
- for the floor. Choose a high-strength, specialized ceramic-specific adhesive for your decking;
- priming. Choose between a powder solution to mix with water or pre-mixed and ready to use.
Beautiful interior with notes of sophistication and comfort
Using a pre-mixed solution skips the hassle of doing the prep yourself, but a powdered solution can be useful if you want to avoid waste.
Because you have to mix a certain exact amount of the substance needed for very small or very large rooms.
Use solutions with anti-mold properties to ensure your floor always looks amazing.
Look for solutions with anti-mold properties for bathrooms and kitchens - this will help keep your floors in good condition longer.
Styling tools:
- silicone sealant and cartridge;
- tools;
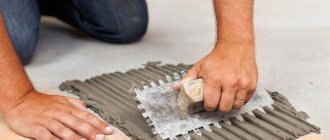
- notched spatula;
- tile spacers;
- tiled file to remove unnecessary elements;
- electric cutter;
- molding machine;
- level;
- rubber mallet for careful leveling;
- sponge;
- soft fabric;
- respirator and safety glasses.
Installing ceramic and granite tiles is usually presented as a fairly simple procedure and is accompanied by advice to “just cut” with a wet saw.
In practice, it’s not so easy to install everything efficiently
Then “grease the underside” and “set it in place” and finally “press it into the solution” and then: voila, the magic happens. Perhaps this is really some kind of magic and there is no need to complicate anything? Not certainly in that way.
Marking
Having decided on the materials and adhesive mixtures, you can begin marking the room. But first you need to determine how to lay floor tiles in order to accurately calculate the required quantity.
The easiest option is to first draw everything on a piece of paper. It is best to use a computer layout program. Now there are many of them.
After purchase, it is recommended to lay at least part of the tiles “dry” on the floor and visually look at the result. You may need to adjust (move in one direction or another) the location.
Important! The tile is highly durable, but at the same time fragile. Therefore, it is recommended to buy it with a margin of 10-15%.
Easy job
Projects and topics that tend to be easier to complete are as follows:
Dry places
Areas where leakage may occur are more complex, requiring special work with the backing material and sealing.
We update the interior beautifully and quickly
Rainfall can be especially problematic for the amateur tiler to make the problem area completely waterproof.
Floors near walls
Slippage is something you will constantly struggle with when dealing with walls.
The small one is also easy to install
Tiles ranging from 10 to 30 cm
The small size, especially if it is a mosaic, is especially easy to install. Use self-adhesive (although it has very limited uses).
Attention It is better to start your amateur career with tiles that will maximize your skills.
Tile composition
If you plan to decorate a large room, you can create geometric shapes using different shades of tiles. Existing “borders” for tiles will help add contrast to monochromatic coverings or create zoning of an area.
There are even entire floor panels consisting of 4, 8, 9, 16 or more tiles with printed images.
In general, there are many decor options. It all depends on the availability of a good hardware store nearby, your own imagination and financial capabilities.
Turn disadvantages into advantages
The coldness of the tiles can be overcome by a heated floor system, and then the kitchen will definitely become the most beloved and cozy place for all relatives.
The sound of the tiles will be slightly eliminated by a soundproofing substrate, which will muffle the sounds coming from the neighbors.
Note!
Laminate for the kitchen: TOP-130 photos of coating ideas, pros and cons of laminate. Choosing kitchen floor colorsKitchen floor: TOP-140 photos of flooring ideas, pros and cons of varieties. Choosing flooring materials in the kitchen
Linoleum for the kitchen - master classes on installing linoleum in the kitchen interior. The best design ideas and color schemes (120 photos)
It is more difficult to prevent the fall of breakable objects, but it will give you a reason to change the annoying service. And again - the dishes beat for good luck.
Due to its durability, a rather expensive coating will become less expensive, but it will help you not to think about repairs for a very long time. A good solution to this problem would be a combined floor in the kitchen.
The tiles will look great with laminate, linoleum, and wood. In this case, the tiles are laid in the work area, and all other materials will become the covering for the remaining area.
Options for laying tiles in the kitchen
You should also decide on the flooring technique. Today there are two rules for laying tiles. Namely:
- Seamless;
- With seam.
Seamless technology has appeared relatively recently. But despite this it has already gained popularity. The surface obtained in this way creates the effect of a certain solidity of the entire floor. But this option is not very easy for beginners.
- Firstly, in order for the floor to look impeccable, you need extremely smooth tiles with the correct geometry. Most of its cheap types, and sometimes some of the expensive ones, are guilty of this. Therefore, before laying, you should go through all the material and sort it by size. Otherwise, it will be impossible to hide flaws.
- Secondly, in the event of any even minor peeling, the resulting surface will begin to deteriorate very quickly. This method of flooring is best left to an experienced craftsman.
The suture technique has been used for quite a long time and is well known to everyone. In this case, there is a distance between the two mating tiles. As a rule, this is 1-3 millimeters.
To ensure that the seams are the same size, special crosses are used when laying. After the adhesive has dried, they are removed and the gaps are filled with a special tile grout.
Porcelain tiles
Porcelain tile is a relatively new material that is a more durable, advanced ceramic. Porcelain tiles are so durable and stable that they can be easily laid even outdoors, which means they will no doubt last a long time in the kitchen without any flaws! Porcelain tiles are not afraid of moisture, cleaning agents and fire. Thanks to improved production technology, slabs made from it can be simply huge in format: up to three meters in height. This will appeal to those who do not like tile seams that interrupt the pattern. The natural surface of this material is non-slip and matte. However, there are polished, glossy and structured options. With all these advantages, porcelain tiles have excellent aesthetic characteristics. In particular, it easily imitates more expensive and capricious materials such as natural marble or wood.
Laying tiles diagonally
Options for laying floor tiles with a seam are divided according to the installation method.
There are three main ones:
- Seam to seam;
- In the dressing;
- Diagonally.
- The first one can be called classic. The tiles form rows in horizontal and vertical directions.
- The second involves pairing the tiles like a “brickwork” bond.
- And with the third, seams are formed in diagonal directions at an angle of 45 degrees relative to the walls.
Tools
To lay tiles, regardless of the base, mixtures used to level the floor, methods, adhesive tile compositions and other components, you will need a certain set of tools. Here he is:
- Flute brushes and paint brushes - for cleaning the surface for laying. You can also use a construction vacuum cleaner;
- Paint roller – for priming the floor;
- Tape measure, square, ruler - measuring tools. Will be needed all the time until the end of the flooring;
- Hydraulic level, tapping cord - will serve at the stage of marking the surface for laying;
- Rule-trapezoid, level, nylon thread - necessary to create precise horizontal lines and prevent differences in floor level;
- A drill with a mixing attachment and a deep container - you cannot do without their help when preparing the adhesive mixture;
- Spatula, notched trowel, trowel - tools for applying diluted mortar to the surface of tiles and floors;
- A rubber hammer is a tool for shrinking the laid tiles;
- Tile cutter, tile cutter, grinder with a disk for dry cutting - specific tile tools for cutting tiles in straight lines;
- Tile nippers - will be needed in case of removing small pieces of tiles (in particular corners) of irregular geometric shape;
- Ballerina is a tool for drilling even round holes of various diameters.
- Grouting compounds
Grouting tile joints
With the help of grouting compounds, the laid tiles acquire a finished look. With their help you can create an excellent contrast to the tiled surface.
It should be noted that in addition to the decorative function, the grout also has a very practical purpose - it protects concrete screeds or wooden floors under the tiles from moisture from the environment.
Today, the two most common types of such fillers are:
- Cement based;
- Based on resins (mainly epoxy).
- The first, in addition to cement, contain additives that increase ductility and water resistance. May contain coloring pigments. Designed for filling joints indoors. They are relatively inexpensive.
- The latter are usually two-component. They consist of resin and hardener itself, which, when hardened, form a very durable moisture-proof surface. They are used for grouting joints in all types of premises and even swimming pools.
It is also important that they resist temperature changes very well. Do not react to chemically active substances.
The only downside is the difficulty of working with them due to their viscosity and the difficulty of cleaning the tiles if they are applied incorrectly.
Laying floor tiles is a long and labor-intensive process. It has its own laws, specifics and rules. But if they are followed correctly and completely, the expected end result will certainly be achieved.
Do it yourself
If you're trying to save money, one way to approach this is to hire a professional for the most visible areas and centerpieces, leaving yourself the legal right to do it yourself in the corners that will be cluttered with furniture.
The material is easy to cut using a special tool
If you are not sure that you can lay everything straight, then it makes sense to hire a professional layer to avoid irreparable mistakes.
A flat floor will ensure the durability of your surface in your kitchen.
And for all the desperate home reformers like me, I suggest continuing with this instruction.
One of the problems that will come your way is that it will be difficult to unstick if you make a mistake.
Beautiful combination of flooring with a kitchen apron
The tile grout allows some movement, but unfortunately it will also move the rest of the work, although this mostly applies to vertical masonry.
For these purposes, there are tiles that will be easier to remove and move if necessary.
Kitchen floor design options
The following tutorial aims to show you the difficult parts of the job and how to do them in a way that is easier to remove.