Those who are new to tiling work, especially when it comes to ceramic materials, often have questions about which trowel to use for laying tiles. After all, in reality there are quite a lot of them. And let some people think that laying tiles on a continuous layer of adhesive is of better quality, but in the meantime we will consider the choice of tool, and we will do everything correctly, observing reasonable savings on tile adhesive.
Tile comb: subtleties of choice
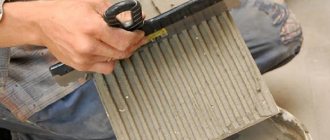
- What is a notched trowel used for?
- Varieties
- Teeth shape
- Advice from professionals
High-quality tiles can delight owners with their beautiful appearance for many years.
Therefore, it is important to lay the material according to all the rules so that the finish does not become deformed in the future. Finishing work, as a rule, does not take too much time and physical effort, especially if done with the right tools. In addition to a regular spatula, you will need a tile comb, the subtleties of choosing which you need to know before purchasing it.
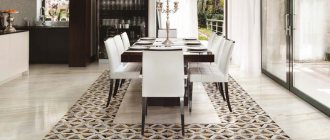
Color solutions
As a rule, light colors are chosen for the kitchen. There are 10x10 tiles, from which a whole panel is laid out, representing an image of an appetizing dish, fruit, or an intricate drawing of abstract content.
Multi-color ceramic tiles imitating smalt are very beautiful and effective. However, the embossed surface with protruding false cubes will become very dirty, and cleaning it will be very difficult.
If you find it difficult to choose tiles that have a pattern or ornament, feel free to take a 10x10 square tile in two colors and lay it out in a checkerboard pattern.
Tooth shape
- To apply ridges from 6 to 10-12 mm, standard square teeth are used.
- For ridges over 12 mm when working with cement mounting mixtures, semicircular teeth are used. At this thickness, the track combs more evenly and does not fall off if it has a semicircle in cross-section rather than a square. They are also used for applying synthetic adhesives with strong spreadability, regardless of the layer thickness.
- There are also sometimes combs with triangular teeth. They are not suitable for laying tiles; they are used for applying elastic adhesive in a thin layer (up to 4 mm) for PVC tiles.
Depending on the shape of the teeth, the spatula may be marked with letters and numbers. The number indicates a group of size parameters, and the letter indicates the shape:
- A – triangular teeth, without large spaces between them;
- B – triangular with large intervals;
- S – triangular without gaps;
- C – square;
- R – rectangular (including irregular shape);
- M – semicircular.
Tooth sizes
The thickness of the applied glue can be adjusted by changing the angle of inclination. Also keep in mind that after pressing the tiles, the glue will distribute into the voids and settle.
The adhesive layer flattens out after pressing.
Approximate sizes of teeth depending on the area of the tile:
| Tile area, cm2 | Teeth size, mm | Adhesive layer after pressing when applied at an angle of 45°, mm | Adhesive layer after pressing when applied at an angle of 60°, mm |
| 2500 | 12 | 4,2 | 5,2 |
For a floor or uneven base, the size of the teeth is selected larger.
Sliding comb for tiles
The desire to do work faster and get less tired forced us to come up with a device that could reduce the time of applying glue by 70% .
Comb - transformer when folded does not take up much space. When unfolded, that is, in working condition, it is capable of applying glue to a horizontal surface very quickly and efficiently. In this case, the master finisher is standing on his feet, not on his knees. This is very important, because for each tiler, knees are a completely separate matter.
The width of the adhesive layer can be adjusted from 5 to 60 cm or from 6 to 90 cm , depending on the model. The height of the layer and the shape of the teeth can be selected depending on the configuration of the nozzles.
Advantages of a sliding comb for applying tiles:
- don't have to kneel while applying the mixture.
- You can strictly set the width of the adhesive layer depending on the width of the tile.
- The speed of applying glue to the surface increases significantly , which is especially noticeable when working with a whole team.
- Particularly effective on large areas
disadvantages :
- If you come across a poorly mixed lump of glue, you will have to remove it manually .
- Washing and dismantling the device will take much more time .
- It is not very effective when working in the sun and when working with 1 - 2 tilers , since the applied adhesive may weather due to prolonged inactivity.
Despite the apparent simplicity of a tile comb, choosing it is a responsible matter. After all, a properly selected notched trowel is the key to a quality job.
What to look for when choosing?
There are different types of combs for laying tiles. So what should you pay attention to when purchasing so that the tool does not fail during operation?
In order to be able to lay tiles efficiently, you must take into account the size of the tool and the shape of its teeth:
- A product with square teeth is typically used to apply 5 to 10mm thick mixture.
- Semicircular teeth are perfect for working with mixtures that have a synthetic composition. In addition, they can be used for better glue distribution. It is best to apply a compound with a thickness of more than 12 mm using a tool with semicircular teeth.
- In stores there are also specimens with triangular teeth. This type of comb is perfect for working with very liquid mixtures. It can also be used if it is necessary to apply a layer of no more than 5 mm. Thanks to its triangular shape, this type of tool ideally distributes the liquid mixture over the surface.
- There are also universal spatulas on sale that are suitable for laying standard tiles and mosaics, so before you pay attention to the shape of the teeth and choose the right tool, you must know exactly the size and thickness of the tiles that you are going to use for finishing work.
- Consider another important fact: the width of the tool itself must correspond to the width of the tile or be slightly larger, otherwise installation difficulties will arise.
- It is important to pay attention to the size of the teeth. If this parameter is less than a millimeter (0.6-1.2 mm), then this option is perfect for applying a very thin layer of the mixture.
- The 0.3mm size is ideal for working with mosaics.
- For installation of various types of ceramics, a size of 0.4 mm is needed.
- Teeth measuring 6 mm are excellent for installing larger tiles and wall laying.
- To install large floor tiles (thickness more than 12 mm), you need a comb with teeth of at least 10 mm.
Often, several different tools are required for repairs, since the owners plan to install tiles on both the wall and the floor. Moreover, the material comes in different formats and thicknesses.
If you choose a tool solely for applying glue, be sure to read the instructions on the package. As a rule, manufacturers give clear recommendations on the selection of construction equipment. The size of the comb and its features will be indicated on the packaging, which will facilitate the selection process.
Before you decide on a particular tool, be sure to hold it in your hands to make sure that it is comfortable and that the handle is comfortable and holds securely. Professionals prefer varnished holders - they are practical, do not slip, and do not leave splinters.
Another important point to consider is the price. In fact, high cost is not a guarantee of high quality, so pay attention not to the cost, but to the quality of the product.
Why do you need a special spatula?
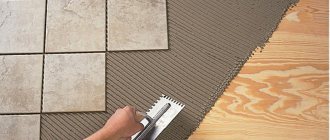
First, let's figure out why you need a comb for laying tiles. Everything is quite simple here. When applying the adhesive mixture, it is leveled with a notched trowel, resulting in grooves being formed. They also determine the uniform distribution of the adhesive mixture over the surface of the tile.
Due to this we get the following advantages:
- High quality styling. This is due to the distribution of the adhesive mixture in an even layer over the entire area of the tile. Accordingly, the material itself will lie as smoothly as possible, of course, if the base is previously prepared and leveled.
- This approach also increases the speed of work, since in this case you do not have to press the tiles in and remove excess glue every time.
- The strength of the connection is ensured. In the case of a lack or excess of glue, on the contrary, it decreases, and using a tile spatula helps to apply exactly the required amount of the mixture.
- And the last thing is cost-effectiveness, since the spatula will help eliminate waste of material by applying exactly the required amount.
A little advice on which tile trowel to choose. It is most convenient to work with a tool that has two serrated sides, while the other two are smooth, which allows you to do all the work with one tool, without constantly changing one to the other.
Using a comb
The notched trowel is selected:
- Environment of use of tiles (interior or facade)
- Vertical or horizontal surface (floors or walls)
- Type of facing material (ceramics, porcelain stoneware)
Notched trowel for façade (interior)
The comb for the facade and interior does not have any fundamental differences. The difference between them is the thickness and area of the working blade . On a façade trowel the area slightly larger ; the metal of the sheet is usually thicker and stiffer . Often they make a rubberized handle on the tool. Although the definition of “facade notched trowel” does not prohibit its use indoors, on the contrary, it is often more convenient to work with a facade trowel than an interior one.
Comb for laying tiles on the floor (walls)
The notched trowel for floors and walls has a difference in the size of the teeth . As a rule, tiles that are larger and thicker than wall tiles are used for the floor, based on this we select the adhesive mixture and, accordingly, the comb; for floor tiles the layer of the adhesive mixture is often more than 12 mm , which means the teeth should be larger (see Shape of the comb teeth above) .
Comb for ceramics (porcelain tiles)
The peculiarities of installing porcelain tiles force you to approach the work with great responsibility. Porcelain tiles practically do not absorb moisture, so only glue marked “for porcelain tiles” on the packaging is used. For porcelain stoneware slabs, the following rule applies: the adhesive layer must be no less than the thickness of the tile . So, for example, if the porcelain stoneware slab is 10 mm thick , then the tooth on the comb should be at least 10 mm.
A notched trowel for ordinary ceramic and tiles is selected based on the size of the tile, the base, and the operating environment.
Mosaic comb
For mosaic , use a comb with minimal teeth . The height of the teeth is usually less than the thickness tile itself . This is due to the fact that with a large layer of adhesive mixture, the glue fills the space between the tiles, and as a result, it will take more than one day to clean the seams. So, for example, for a 3-4 mm mosaic a 2-3 mm comb is used , sometimes the height of the comb teeth is even cut down to 1 mm.
Tile comb dimensions
Comb sizes from 10 to 45 cm . When choosing a trowel, you need to take into account the size of the tile; the trowel should be the same size or slightly larger. Therefore, if you have tiles of different sizes in your project, you need to acquire spatulas of the appropriate sizes.
A notched trowel must be selected depending on the tile format and the composition of the adhesive mixture . The tool is selected according to a simple principle - the larger the tile, the larger the teeth . You can choose the right notched trowel by experiment.
Apply the adhesive mixture to the back side of the tile , remove excess glue with the comb of your choice, then lay it on the prepared base, tap lightly with a rubber mallet. With the correct selection of the comb, the glue should not go over the edges; it should evenly cover only the area of the tile .
- On the packaging with the adhesive mixture , the manufacturer usually indicates the composition of the adhesive and recommendations for a notched trowel .
- The notched trowel should not be too hard ; when pressed, the metal should bend slightly.
- that is too soft quickly fail , and a soft tool will not be able to remove the required amount of adhesive mixture at one time.
Recommendations from tile adhesive manufacturers
One of the important characteristics of masonry mortar is adhesion to the base. It shows how tightly the glue holds. The adhesion strength depends on parameters such as:
- mixture composition;
- layer thickness.
And the last indicator depends precisely on the size and shape of the teeth. Therefore, manufacturers indicate on glue packages not only the dimensions of the tiles, but also which spatula is best to use, for example:
- for tiles with a side up to 7 cm - you need a comb with 3 mm teeth;
- up to 10 cm - 4 mm;
- 10-20 cm - 6 mm;
- 20-30 cm - 8 mm;
- 30-50 cm - 10 mm;
- more than 50 cm - 12 mm.
Attention! If the cloves are too small, the solution will be less than necessary. The tile will stick worse and will come off over time. And if they are too large, more mixture will be needed, in other words, repair costs will increase.
Different types of glue differ in composition, setting time and shrinkage coefficient. The manufacturer's recommendations regarding one of them may differ from the average. Tips for choosing combs for the most common brands of tile adhesive are given in the table.
| Name | Tile size (cm) | Teeth height (mm) |
| Ceresit CM11 Plus | up to 5 /10 /15 /25 /30 | 3 /4/ 6 / 8 /10 |
| Ceresit CM12 | up to 30/60 | 10 /12 /18 |
| Ceresit CM 14 Extra | up to 15 /25 /30 /45 | 6 /8 /10 /12 |
| Ceresit CM17 | up to 10 /15 /25 /30 /45 | 4 /6 /8 /10 /12 |
| Plitonite A | up to 10 / 20 /25 /30 | 4 /6 /8 /10 |
| Plitonit B | up to 10 /20 / 25 / 30 / more than 30 | 4 /6 /8 /10 /12 |
| Plitonit Superpol | 10-20 / 20-25 /25-30 /from 30 / from 40 | 6 /8 /10 /12 /15 |
| Lithoacryl Plus | 5 /15 / 25 / 33 /45 | 4 /6 / 6-8 / 8 /10 |
| LitoGres K44 ECO | 10 /20-25 30 | 6 /8 /10 |
| Litoelastic | 5 /10 /15 /25 | 4 /6 /6 /6-8 |
Grouting joints
- Before grouting, remove the bottom guide.
- Grouting of joints between tiles is carried out the next day. This is done 12 hours after laying the tiles, because when the tile adhesive hardens, the tiles may shrink slightly, and if the seams are rubbed immediately after laying, the seams may crack.
- Grouting is done with a rubber spatula, pressing the grout into the seam.
- After 20-30 minutes, the seams should be wiped with a damp sponge, removing excess grout.
- The seams should be moistened with water for the next 3–4 hours. Each hour. This will increase their strength.
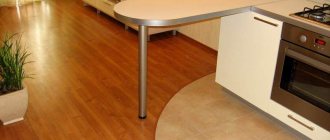
That's all! 10 x 10 tiles installed in the kitchen. You can start assembling the furniture.
©Remont-kuxni.ru
Other articles in the “Kitchen doors” section
- No entries found
Categories
- Apartment design
- All about repairs
- Doors
- Window
- Ceiling
- Walls
- Plaster and putty
- Drywall
- Furniture
- Other about repairs
- Floor
- Leveling the floor
- Cement strainer
- Dry floor screed
- Semi-dry screed
- Self-leveling floor
- Flooring
- Warm floor
- Electric floor
- Water heated floor
- Floor coverings
- Tile
- Laminate
- Everything about plumbing
- Water pipes
- Bath, shower
- Faucets
- Toilet
- Heating
- Everything is electrical
- Wiring
- LED in everyday life
- Ventilation
- Construction materials
- Tools
- Materials
- Construction calculators
- Repair of a country house
- Miscellaneous articles
- Top review
- Question answer
- News
- Repair video
How to apply glue correctly
The main thing in this work is not to leave a void between the cladding and the base. The grooves that the comb forms help squeeze air out of the adhesive composition. However, novice tilers may make mistakes when finishing, which can lead to the material peeling off from the base.
So, the sequence of work:
- We take a spatula for laying tiles with smooth edges and apply a lump of glue to the product.
- Using a toothed comb, level the mixture over the entire width and 2/3 of the length.
- We tilt the tile towards the container with glue and distribute the mixture along the entire length, discarding the excess.
- If the working solution is not enough, add another lump of glue.
- Next, apply the working solution to the wall/floor and press the cladding.
Base requirements
If you want to get a result that complies with current standards (and this is worth striving for), then you need to have an appropriate basis. So, let's consider what maximum deviations in laying tiles indoors are allowed by SP 71.13330.2017 (Updated edition of SNiP 3.04.01-87):
Walls: • Deviation from the vertical is no more than 1.5 mm. by 1 m, but not more than 4 mm. to the floor. •Deviation of seams horizontally and vertically is no more than 1.5 mm. per 1 meter of seam. •Plane irregularities when checking with the two-meter rule (clearance) are no more than 2 mm. •Seam width deviation ±0.5mm
Floor: •Plane deviations no more than 1 mm. on the two-meter rule. • Deviation from a given slope (slope from the horizon, by default) is no more than 0.2% (2 mm/1 m), but not more than 10 mm.
Therefore, the base must be no worse than the requirement for the lined surface. It’s even more like this: the base should be as perfect as the tiler can level it. A beginner should not hope to correct some errors with the help of cladding - most likely, irregularities will only increase.
Yes, the base must be perfect, so the tiler must be able to plaster. There is an unspoken rule that the master prepares the base for laying the tiles himself - then you certainly won’t be able to blame someone else for poor quality work.
↑ List of required materials and tools
These materials, equipment and tools will be needed to cut, lay and sand floor tiles:
- building levels 1 and 2 meters long;
- tape measure, marker;
- regular trowel, trowel and trowel with teeth (7 mm);
- pliers;
- for mixing mixtures, a construction mixer with an attachment;
- brush, pieces of cloth for cleaning tiles;
- Bulgarian;
- electric tile cutter or tile cutter;
- core;
- mallet;
- crosses of the required size;
- glue that matches the material of the floor surface;
- grout of the desired color or white with the color of the required shade;
- primer;
- floor tiles.
It is advisable that before starting work you have all the material on the list, and do not have to interrupt work and run to the hardware store.
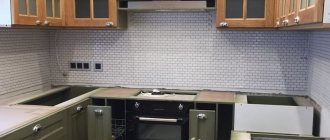
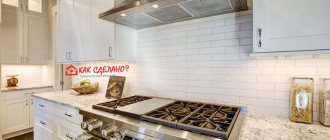
The role and functions of a kitchen apron
As a rule, the size of the kitchen is not always large, so it is impossible to protect yourself from contamination and splashes of water and food juices. The kitchen sink is designed in such a way that a strong stream of water sprays in all directions. In addition, the thermal processing of food is inevitably accompanied by smoke and the formation of a special kitchen fume, which, mixed with the unclean odors of the human body and the water closet, creates an unpleasant spirit of the apartment, so familiar to visitors who can distinguish one home from another by smell.
When choosing tiles for the kitchen, it is important to take into account the features of the future interior
Wallpaper is very rarely installed in kitchens, since the kitchen interior is not designed to solve aesthetic problems or create a certain mood. Frequent cleaning of walls, and, if possible, ceilings, requires a practical and durable coating that does not absorb odors, does not retain drops of grease, blood, etc. and does not deteriorate from frequent wet cleaning and wiping.
This coating is usually carried out in two versions:
- Kitchen apron made of tiles;
- Wall panels made of gypsum fiber sheets.
Experience says that aprons made of glazed and unglazed ceramic tiles are more practical. This coating is practically eternal and unchanged from the very minute it was laid on the walls.
It is better to avoid using unglazed tiles for kitchen renovations, as this coating greatly complicates cleaning
As a rule, the kitchen is equipped with a cutting table, and wall cabinets are located at the level of the human head. Therefore, the wall space between the tabletop and the bottom of the wall furniture must be covered with a special apron.
The size of the apron is such that it extends 5-10 centimeters beyond the boundaries of the hanging furniture and tabletop.
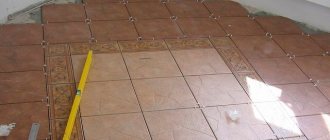
Marking before laying tiles on the floor
Before laying tiles on the floor, mark the surface. To do this, use a laser axle builder. But only professional builders have such a tool. A budget option is to use a tape measure, cord, nylon thread and pencil.
It is recommended to start marking depending on the design idea. The optimal solution is to take the center as the starting point. Initially, the starting point of the tile (border) is marked, then this area is divided into 2 parts and a line is drawn. The first slabs are laid on both sides of this mark (direction to the left of the center) - then the parts of the tile will be identical in size. The first row is placed along the line, after which they move to the second.
The tiles are cut using an electric tile cutting machine (it guarantees a high level of cutting accuracy) or a manual tile cutter. In the absence of such tools, use a regular grinder. But when working with it, keep in mind that there will be a lot of noise and dust.
If it is necessary to cut round, square or other tile configurations, first draw a layout (use cardboard or a sheet of paper) then cut out the tiles according to the drawing. For this manipulation, use a grinder, and use pliers to bring the hole to the desired shape. When performing such work, be sure to wear special safety glasses.
Joining
The final stage in cladding, anyone can handle it. The seams must be cleaned of glue residues and moistened for better adhesion to the jointing. The jointing is applied with a rubber spatula, after 10-15 minutes the excess is removed with a slightly damp cloth. It happens that problems arise with porcelain tiles that are too porous; the remains of the jointing do not want to be washed out of the pores on the tile. In such cases, you should grout in small sections in order to be able to remove excess grout from the surface of the tile as quickly as possible; if there are stains left, you will have to rub the stains with detergent for a long time. There are known cases when it was necessary to change white tiles because the black jointing was eaten away, but this is no longer a question of high-quality porcelain tiles sold for pennies in a well-known store.
List of required tools
Tile laying tools
High-quality cladding depends on the chosen tool for laying tiles. Porcelain stoneware, glue and a hammer are not enough for the work. Professional tilers use special equipment. If you are planning one-time work and need to reduce the burden on your budget, rent a tool.
To cover an uneven floor, you will need basic equipment: a hammer drill with a whisk attachment or a mixer, a tile cutter, a grinder and wire cutters.
- rubber hammer for tapping;
- trowel and notched trowel;
- ladle for adding glue;
- scraper, construction knife;
- a set of plastic crosses or SVP;
- extension cord and pencils;
- roller for applying primer.
Auxiliary tools: tape measure, squares, water or laser level (spirit level), aluminum rules 2.5 and 1.5 m.
Grouting kit:
- bucket 2 l.;
- grout spatula;
- rubber and felt gloves;
- hard washcloth;
- foam rubber and 10 liter capacity.
When performing construction work, follow safety precautions. When using an angle grinder, wear glasses. A respirator will prevent dust from entering your respiratory tract. Use gloves to protect your hands from minor injuries.
SVP is an innovative scheme that allows you to level the tiles on the floor when laying. The system is suitable for ceramics and porcelain tiles with a thickness of 3-20 mm.
Observations from practice and our experience
We admit that the technology for laying tiles given below will raise doubts among some readers, but nevertheless, the trial, rather risky experience withstood all sorts of tests, including a 4-year period after the completion of the renovation and finishing of the bathroom. We will talk about laying tiles made of natural marble, dimensions 305x305x10 mm, laid using the “comb” method on pre-plastered walls with Teplon gypsum plaster.
Once, during the work, we encountered the peculiarities of marble tiles, which were difficult to install even with special Knauf-MARBLE adhesive, since the back side of the marble was not treated with special water-repellent chemicals. During the drying period, the subsequent, almost perfectly leveled tiles “sank” in the plane in relation to the previously laid and dried row.
As it later became clear, the reverse side of the marble tile, like a sponge, actively absorbed moisture from the slowly setting solution, due to which unplanned “shrinkage” occurred.
There have been attempts to treat the working side of marble tiles with primers in order to prevent increased moisture consumption. However, the result was still unsatisfactory, and chemical spraying in that case was not possible.
Unusual experience of laying marble tiles
Everything worked out using Flizekleber
solution from gypsum putty
“Pufas”
, used exclusively for preparing plastered walls for wallpaper, leveling plasterboard surfaces, sealing joints, etc., that is, for painting work. But it was the putty’s ability to quickly harden that helped solve the problem with laying marble tiles - moisture was also absorbed, but the putty set faster, preventing the marble tiles from “sagging.”
Results of the experiment
However, there remained one more controversial issue that could nullify all efforts - the natural humidity of the bathroom, under which conditions the use of gypsum solutions is not recommended. The solution was found to be very simple - a banal tile grout for joints, blocking the access of air and moisture to the back side of the marble tiles.