Despite the huge selection of modern finishing materials, facing brick is still unrivaled. It is used both for finishing the facade and the interior, for example, made in the “Loft” style. Developers are particularly attracted to masonry that is at least 100 years old. Such brick has an attractive “torn” texture and creates a special atmosphere in the room. Many would like to repeat this type of masonry at home, but the price of hand-molded bricks, and even more so of bricks obtained from dismantling old houses, is steep. That is why many portal users are looking for ways to reduce the cost of decorating the walls of a room with antique brickwork, which we will discuss in this article.
- How to cut brick into tiles.
- How to glue brick tiles to walls.
Is it possible to lay tiles on an unprepared surface?
Almost all experts say that laying tiles on a brick wall without plaster is possible. But it has a number of nuances, because of which experts do not recommend doing it yourself.
It can be glued to the following coatings:
- Laying tiles on a brick wall without plaster. Ideally, the fence (wall) should be level. But unevenness is corrected with glue. In such a situation, glue consumption increases and repairs become expensive. It is worth considering that some products shrink. In this case, over time the ceramic coating will become uneven, and the repair will have to be redone. The alignment process with glue takes a very long time.
- Glue onto a previously prepared coating. In this situation, the walls are leveled using plaster and primer. The master can only lay the ceramic material on a small amount of glue. This option is much cheaper and the process of completing the task takes less time.
Installation methods and process
There are three ways to lay tiles:
- seam to seam when they match;
- in the dressing - with a half displacement;
- diagonally - the ribs are joined along a diagonal line.
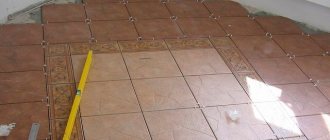
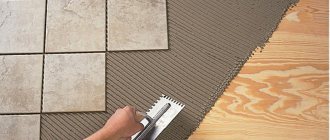
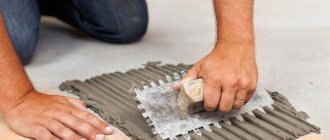
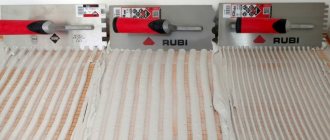
If the masonry surface of the tile is embossed, a smooth trowel is used, otherwise a serrated trowel is used. Laying is carried out as follows:
- Attach the substrate for laying the first row from bottom to top.
- The excess is sawed off with a metal file. The trimming is left for the final stage.
- The glue is applied to the tile, which is tightly fixed to the wall at the level of the substrate.
- Excess solution is removed, and the residue is washed off with a wet brush.
- The width of the seams is determined independently.
- Each row is shifted by half of the previous one, simulating ligation of seams.
- The remaining spaces are being worked on.
- The work surface is left to dry for a day or more.
- The seams are decorated with grout.
Technology of laying tiles on a prepared surface
This process is extremely simple. It can be performed by a master with any experience. For repairs, you need to prepare a primer and a brush for application, plaster and a spatula, glue and tiles.
Stages of work:
- The wall or partition is cleaned of dirt and dust. If there are oil stains, they are cleaned and treated well with special products.
- Apply primer. Deep penetration is desirable. It will provide the best adhesion between the plaster and the seams. Leave until completely dry.
- Apply a thin layer of plaster to the dried partition, level it and leave until completely dry.
- A small amount of glue is applied to the plastered wall and the tiles are laid.
Preparing the wall
Before any wall finishing, it is necessary to prepare the surface for finishing. The training requirements are standard. The surface must be cleaned of old coating, if any. The presence of old mortar or plaster will reduce service life and complicate tile laying. It is important to prime with a deep penetration mixture and plaster the wall, leveling and smoothing out all defects. Significant differences are best hidden with drywall, since the consumption of plaster for leveling will be too large.
What is better glue or liquid nails?
You can lay tiles using two means - glue or liquid nails. Many people will have doubts: is it possible to lay tiles on brick using liquid nails?
The answer is yes, but they are used for installation on drywall or a flat treated surface. In this case, the second option is used only if the brick partition is smooth.
But it is worth considering that the nails dry quickly and after 15 minutes they can begin to perform other work. In most cases, tiles are laid on brickwork using glue. If the surface is smooth, then a notched trowel is used for this.
It applies the adhesive evenly to the surface of the ceramic piece. But if the wall is not level, then use a smooth spatula.
When choosing a building material for the exterior cladding of a house or other structure, you should pay attention to hand-molded bricks.
Expensive? Yes, but there is an option that is half the price and without loss in appearance!
Facade brick: advantages, types, formats
The main advantage of facade bricks over other facing materials is strength. By covering the walls of a building with bricks, builders protect it like armor from low temperatures, natural phenomena, and mechanical damage. Indeed, in addition to strength, building materials are characterized by two most valuable properties:
- Low moisture absorption, which guarantees frost resistance, prevents the formation of fungus. An exception is “antique handbrake” brick, which has higher moisture absorption compared to other types of brick cladding, due to wide internal pores. Absolutely not critical for this type of brick.
- Thermal stability is the ability to withstand any changes in air temperature, from the famous Russian frosts to the summer heat.
Interesting fact: the world record for the largest temperature difference during the year on the planet belongs to the Russian Verkhoyansk - 104.3° Celsius from winter -67.6° to summer +36.7°.
The main types of facing bricks - “let’s announce the whole list”:
- Ceramic - made from clay with special additives by pressing. Most affordable.
- Clinker - made from a special type of clay, fired at a higher temperature. It is much more durable, moisture- and frost-resistant than ceramic, and accordingly costs more.
- Hyper-pressed - made from a cement base with natural stone chips, crushed stone rejection, etc., pressed under extreme pressure. It is practically not used anymore.
- Transom - a modification of ceramic or clinker brick, characterized by an elongated shape.
- Hand-molded brick is a type of ceramic, the peculiarity of which is its “antique” appearance, giving a truly magnificent look to houses and other buildings
The list of facade bricks often includes sand-lime brick, but we do not recommend using it for cladding, since it is inferior to ceramic brick in almost all characteristics.
Each type of brick is available in different colors and sizes, which have their own advantages, thereby providing the buyer with a wealth of choice.
The delights of hand-molding using the example of Don Zori bricks
The manufacturer and sellers of wonderful products note that this hand-molded brick retains the warmth of the palms of Russian craftsmen, and that it is made according to carefully preserved ancient traditions.
The secret is that the traditions of antiquity are harmoniously combined with unsurpassed technological solutions. The effect of antiquity is achieved through:
- unique firing method;
- adding specific impurities to the composition;
- spinning the formed bars in special drums, during which the bricks become covered with “aging” cracks.
Important: unlike works of art and antiques, in construction a modern “remake” is even better than the ancient originals.
The above-mentioned brand is remembered because it occupies a leading position in the Russian market. At the same time, Russians are offered hand-molded material from other domestic companies, as well as manufacturers from several European countries:
- Belgium;
- Germany;
- Denmark;
- Netherlands.
But domestic products are superior to imports in terms of price, as well as appearance - more exclusive and/or more similar to the material from which ancient Russian estates were built.
Antique material is used for both external and internal cladding. But not only - it is also in demand among restorers, fence designers, designers involved in the interiors of luxury restaurants, hotels and similar establishments. Ideal for constructing fireplaces in mansions.
What is attractive about Donskie Zori products:
- “Russian size”, which can be selected for any styling;
- over 100 different collections of flowers;
- additionally “any whim for your money” - production of bricks with a logo or other graphic image of the client’s choice;
- We repeat, because it’s worth it - a lower price compared to products from foreign companies, up to half as much.
But we promised something even cheaper than this brick!
So…
Are halves better than wholes?
An ingenious architectural solution for homeowners who want to get the magnificent exterior of a Russian merchant or landowner’s estate at a reduced price - half-size brick.
It differs from the standard one in half the thickness, but after finishing the facing work using building materials of this format, the building looks absolutely no different from brick lined with the classic format!
In other words, the buyer pays the same money as for the most affordable “conveyor” type ceramic material, but gets a house that looks incomparably more beautiful, richer, and nobler. Moreover, a full-bodied “half” is no more expensive than hollow ceramics, but it is more reliable.
All the advantages of the “half”:
- saving up to 35% of the finances of the owner of a house under construction;
- you can get by with a less strong foundation than when using any other façade brick;
- easier execution of facing work due to the lighter weight of the building material;
- less cost of money and effort for transportation and unloading.
- Saving masonry mortar
Minor minus: the “half” stone is slightly less heat-resistant than a full-weight stone. But for areas with a temperate climate it will serve as sufficient insulation. And in areas where it is colder, you need to additionally insulate the walls in a different way, and the problem will go away. And nowadays, cladding is no longer used to “insulate” a house; it is needed rather only as a protective material and a material for the aesthetic appearance of the facade.
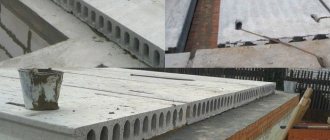
Tip: Use a good backing material, such as ceramic block, to retain heat, rather than relying on facing bricks, especially half bricks.
Tips for laying antique bricks
- Wet each brick before laying.
- Buy a special solution - saving on the “full weight” of the material, spare no expense in laying it securely, creating a truly strong facing “armor” for your home.
- Form a seam higher than the usual 10 millimeters (up to 15), compensate for minor unevenness of the stone with mortar consumption.
- Make the solution strictly according to the instructions included with the material.
- Pre-lay a row of bricks without mortar and calculate everything, only after that start working with mortar.
- Adjust the horizontal position using a level.
- Lay the brick with the notch facing up.
- Mix variegated series of bricks from several packs so that the variegation becomes uniform; there is no need to specially “create” the pattern.
- Do not forget about reinforcing the first and last seams.
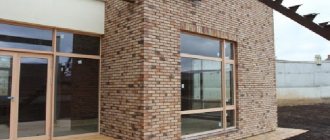
In this example, the customer played it safe by insulating the ceramic block, but in general the photo shows well how the halves should be used.
Important: to form the corners of the building, as well as laying it in openings, you need a full-size brick in an amount that is easy to calculate. Nevertheless, the savings from cladding with “halves” are more than significant without compromising the result. On average, using halves costs the client 2 times less than a normal brick format. The cost of cladding from hand-molded brick halves ultimately turns out to be cheaper than cladding from ordinary ceramic bricks.
Summary
Halves, or facing bricks 0.5NF or 0.5WDF - this is full quality and a rich appearance of the facade at the price of conveyor ceramics. Now you know about a modern solution that allows you to get excellent cladding on an average budget.
Types of tiles
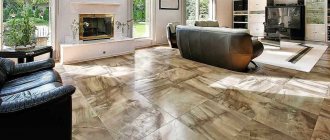
There is a very wide selection of this material available on the market. And any type of ceramic product is used for repairs. The choice depends on the purpose of the room where the work will be carried out. For example, in a bathroom it is better to use porcelain stoneware on a brick partition.
Let's look at the types of ceramic tiles:
- Porcelain tiles have minimal water absorption and are frost-resistant. If the material is not glazed, it is very similar to natural stone, but the physical and strength characteristics are better.
- Clinker is a product with good physical characteristics. It is often used in swimming pools because it does not absorb water and can resist chemicals.
- Cotto - this product is made from red clay, which is why there is not a large selection on the market. Most often it is used for flooring. After the firing process, a special agent is applied that prevents moisture from penetrating into the product.
Advantages
In addition, brick tiles have a number of other advantages:
- a wide selection of colors and shades (if necessary, it will not be difficult to choose cladding to match other coatings or furniture);
- a variety of textures (aged, burnt, with chips and special reliefs, patterns and ornaments);
- practicality and wear resistance;
- high environmental friendliness and safety;
- ease of installation and maintenance;
- original appearance and style versatility;
- visually combines with almost any materials (wallpaper, wood, stone, metal, glass);
- retains heat well in the room (no need to use additional materials for wall insulation).
Laying technology on an unprepared surface
This type of work is more difficult to cope with. To carry out repairs, you need to prepare a primer and brush, tiles and glue, and a building level.
The procedure for laying tiles on bricks is carried out in several stages:
- The wall is thoroughly cleaned of dirt and dust. Before starting the first stage, there should be no foreign particles or greasy stains left on it.
- Apply a primer to the surface and wait a couple of hours until it dries.
- Using a building level, determine how uneven the wall is.
- Glue is applied to the tile; the thickness of the layer depends on step 3.
- The ceramic product is pressed well to the surface and checked using a building level. It must be laid in such a way that it levels the surface.
How to correctly calculate the number of tiles?
- Measure the length and width of the surface to be finished.
- Decide on the size of the facing tiles. More often it is 20×30, 25×33 cm.
- Divide the height and width of the wall by the same parameters of the tile material. Having received 2 numbers, multiply them. This will give you the total quantity (per piece) of the required cladding product. At all stages of calculations, rounding is done up.
- If necessary, calculate the tiles for windows and doors individually, and then subtract them from the total quantity.
- Increase the final figure by 10%. This margin is necessary to align the edges or in case of damage.
Decorative inserts
Brick-like tiles are great for dividing the kitchen into separate functional areas. With its help, it is easy to visually separate the dining area from the kitchen. Individual decorative inserts made from such tiles look more advantageous than walls completely lined with brick.
Such decor allows you to emphasize the advantages of the room and hide its shortcomings, avoiding the impression of gloom and sloppiness.
Brick tiles are often used to decorate window and door openings, frescoes and mosaics. With its help, you can lay out a false window, filling it with suitable photo wallpaper.
No less common are “brick” inserts in the form of neat panels above the baseboard, under the windows, on mezzanines and kitchen aprons. Sometimes only the corners of the kitchen are decorated with tiles, and the areas around the sink and stove are also especially highlighted.
When laying, it is recommended to leave a slightly larger distance between the individual “bricks” than when installing regular tiles. This way the decorative coating will look more natural.
Types of tiles with bricks
There are several types of decorative brick tiles: ceramic, gypsum and clinker. All of them are made in different ways and have their own characteristics and recommendations for use.
Ceramic tile
The most practical and versatile material for cladding kitchen walls. Ceramics tolerate temperature changes, high humidity, sunlight and treatment with household chemicals well. But it does not imitate natural brick very realistically, differing from it in a more smoothed texture.
However, a wide selection of brick tile collections still allows you to choose acceptable options.
You can handle laying such tiles yourself, and caring for them will not be difficult. Traditionally, it is successfully used in covering kitchen aprons, sinks and other kitchen work surfaces.
Gypsum decorative tiles
This is the most budget-friendly cladding option, which is available in a variety of colors and types. Gypsum tiles are lightweight and can be installed without problems, but they do not have the best wear resistance and do not tolerate moisture well.
This environmentally friendly and fireproof material provides good thermal insulation. But keeping it in order is quite difficult. However, this problem can be solved if the gypsum bricks are varnished.
An important advantage of such tiles is their natural appearance and the cozy atmosphere that they create in the room. However, placing it on work surfaces is not recommended.
Clinker tiles
Clinker is a more durable material that is produced to withstand high humidity and temperature changes. It is ideal for decorating stoves, fireplaces and kitchen splashbacks.
This porous material is very reminiscent of brick, making the cladding as natural as possible. At the same time, clinker tiles are more complex to install and maintain, and take up more space due to their thickness. It is impossible to trim it.
You can simplify the care of clinker by purchasing varieties coated with a special glaze.
Classic
The classic style is universal and can harmoniously fit into kitchens of any size and features. Here you should adhere to the following requirements:
- a restrained palette of materials (tiles of light shades and calm texture are preferred);
- the tile is chosen strictly to match the rest of the cladding;
- ideally alternating narrow “brick” stripes (every 1.5-2 meters) with plain wallpaper between them;
- The most common solution is to lay out only the kitchen apron with bricks, matching the rest of the space, covered with matching wallpaper.
Loft
This style is relevant for spacious kitchens with high ceilings and the absence of any partitions. Otherwise, the kitchen will look gloomy and unkempt, and the stylish effect will be lost. Brick tiles here can be organically used to decorate an entire room or a separate wall, allowing you to visually divide the free space into functional zones. It is often used to highlight individual points in a room (window openings, niches, doors).
In this case, the best choice is a tile that is as similar as possible to natural brick in texture and color.
Many manufacturers produce specialized tile collections that include several shades at once. This allows you to make the cladding as realistic as possible due to inclusions of bricks of different tones.
These tiles go well with untreated wood furniture, a variety of industrial-style decor, structures made of pipes and concrete, and modern household appliances.
Scandinavian
Restrained colors, laconic decor and practicality of furnishings are the main features of the Scandinavian style. “Brick” tiles with a pronounced texture are used here with great success. The most typical combination is white and black colors with rare contrasting inclusions (here “brickwork” can act as both an achromatic wall background and as a bright accent).
The most popular option for implementing this style is to cover the entire surface of the walls with bricks painted in light colors (white, beige, light gray, blue). It is important that they look as simple as possible. This design will be wonderfully complemented by contrasting accessories, decor and furniture made from natural materials.
Provence or country
Relief brick tiles, designed in warm colors, will perfectly emphasize the slight carelessness and homeliness characteristic of “rustic” styles. In such a kitchen, ceramics in natural shades that imitate the texture of old stone will look good.
Narrow tiles of small size and rectangular shape are preferred. Bright details (embroidery, small bouquets, wicker accessories), as well as wooden furniture, will successfully complement the atmosphere. Laminate or linoleum with a wood texture is suitable for finishing the floor.
Often in such cases, “brick” cladding is combined with glossy ceramic tiles in contrasting or simply light colors.
Pop Art
This quirky and artsy style calls for bright, explosive colors and unusual textures. “Brick tiles” may be relevant here too. Now many manufacturers provide a wide selection of pop art style tiles. Typically, such collections include many contrasting tones (ruby, orange, indigo, bright green) and eclectic textures. By combining such bricks on the wall, you can achieve spectacular results.
This allows you to safely experiment with cladding, focusing on certain details of the room and layout features. Collections with unusual prints in the spirit of the 60s or with references to popular comics and films are interesting.
No less common is the option of decorating a kitchen with slightly whitewashed “brickwork”, against which dark furniture and colorful accessories look especially good. This style welcomes the most daring experiments, giving preference to colorful and varied materials.
Chalet
“Brick” tiles in natural colors (red-brown, gray, red, yellow) will help create the atmosphere of an alpine rural house in the kitchen, implied by this style. In this case, it is very important to adhere to simplicity and naturalness. Therefore, the “bricks” should have a rough texture, giving the impression of real stone or old brick.
At the same time, the most simple and practical furnishings with many wooden accessories and decorative elements are preferred. One of the features of the chalet is the exposed wooden beams.
The chalet style is suitable for spacious kitchens with high ceilings. In a small room, such decor will look sloppy and visually reduce the space.
Mediterranean
Light and fresh Mediterranean style also includes rough brick tiles and an emphasis on natural materials. However, the choice of shades and textures here is much wider:
- The most commonly used tiles are terracotta and marine shades. This type of cladding serves as an excellent backdrop for bright ethnic accessories and furniture.
- Laying tiles that imitate patchwork will help make the interior special. In this case, different tiles are used (plain and printed), creating a kind of patchwork quilt on the wall.
- Particular attention should be paid to brick tiles with stylized patterns. Ethnic motifs and natural colors are welcome.
This type of cladding can be complemented by wooden furniture and various decorative inserts (frescoes, mosaics). The main thing here is to adhere to rich colors and variety of textures.
Kitchen apron
The design of a kitchen apron requires a special approach, since its lining must not only be aesthetically pleasing, but also withstand serious loads (temperature changes, household chemicals). Brick tiles are perfect in this case too. Experts recommend using clinker here - this is the most practical material for decorating the workspace between cabinets.
Most often in such cases, a simple monochromatic laying is used over the entire surface of the apron or only in its lower part. You can diversify your interior by alternating tiles of different shades or combining them with other materials (mosaics, films).
The decor looks no less interesting, in which the tiling continues on the mezzanines and cabinets. In this case, a particularly luxurious monolithic effect is created. At the same time, it is quite acceptable to experiment with laying methods, using not only the brickwork format, but also diagonal or herringbone.
Gothic
A very ambitious stylistic direction that can turn an ordinary kitchen into the premises of an ancient castle or cathedral. Recommended for owners of spacious kitchens that are not limited by low ceilings.
Here again the combination of natural stone and wood is at the forefront. Therefore, it is worth taking a closer look at tiles that realistically imitate natural materials.
The color palette can be quite wide (from light brown to dark gray), but you will have to give preference to natural shades.
Such cladding can make the room gloomy. To avoid this, it is recommended to cover part of the walls with glossy tiles.
You can complement the gothic atmosphere of the kitchen with antique wooden furniture, forged and glass accessories. But it is better to avoid decorative inserts in wall decoration.
Fireplaces and stoves
Decorating fireplaces and stoves is the most common and harmonious way to use brick-like tiles. It is successfully used to decorate fireplace niches and to create false fireplaces and stoves, adding real comfort and a pleasant touch of antiquity to the kitchen atmosphere.
The choice of suitable tiles largely depends on the desired style:
- to decorate a stove in the Russian style, you will need white tiles with a restrained texture;
- a European fireplace involves the use of slightly aged “brickwork” in natural warm shades. The texture is desirable to be rough and pronounced.
If the fireplace or stove is working, you should definitely take care of choosing a heat-resistant cladding. It is recommended to glue such tiles using a sand-cement mortar, since the special glue may not withstand high temperatures.
Flaws
However, such tiles also have their disadvantages, which also need to be taken into account:
- fragility;
- the relative high cost of the tiles themselves and consumables;
- not suitable for repeated use.
IMPORTANT! Clinker and gypsum tiles, which have a rough texture, are quite difficult to maintain. They need to be used thoughtfully in kitchen design.