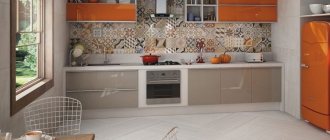
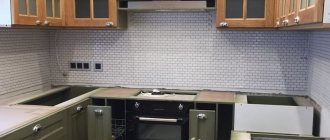
A kitchen apron made of tiles is the most popular way to decorate a work area. It helps protect the wall from exposure to steam, greasy splashes, and drops of dirty water in the sink. This design can be made with your own hands.
In this article we will look at how to correctly install a tile backsplash in the kitchen in corners and on a flat surface, the materials and tools needed for this, common mistakes and much more.
DIY ceramic tile kitchen apron
Tile selection
The future interior of the kitchen largely depends on the color of the tiles. It should be combined with the surrounding environment, not draw attention to itself, but at the same time be catchy and memorable. The variability of shades depends on the chosen material.
| Material | Advantages | Flaws |
| Ceramic | Environmental friendliness, low price, variety of shapes and sizes, patterns. Ease of treating walls with ceramics. | The weak point is the seams; you will have to tinker with the grout, especially if you do not have the proper experience in the work. A messy installation process that requires a level base. |
| Mosaic | Durability, suitable for the design of non-standard shaped surfaces, the ability to create complex compositions. | A large number of seams, complex and expensive installation, |
| A natural stone | Strength, density of the material, expensive and attractive appearance, variety of shades, high degree of resistance to external factors. | Opportunity to buy from an unscrupulous manufacturer, high price, possibility of radioactive exposure. |
| Marble | Low price, beautiful appearance. | High level of moisture absorption. |
| Fake diamond | Does not require special care, durable, seamless apron, a variety of shades. | High price, rough appearance. |
| MDF and chipboard | Low price, variety of colors and shades, ease of installation | Strength is lower than other materials |
Wallpapering kitchen walls
If for you wallpaper is not a very modern and even banal option. Try to consider a non-standard approach - glass wallpaper . A very popular type of finish and the main quality of this coating is its very high strength. The material consists of fiberglass and looks very similar to fabric. Fiberglass has a special dust-repellent composition, does not attract static electricity, can improve the microclimate of the kitchen space, and professionals consider glass wallpaper one of the most environmentally friendly materials.
Listen to the advice of experts and try not to save money when choosing glass wallpaper. In order to get all the above qualities, pay attention to the country of manufacture, choose the highest quality wallpaper from a European manufacturer.
There is also a wide range of wallpaper compositions to choose from, vinyl or non-woven. Vinyl wallpaper has a polyvinyl chloride coating that protects the surface from dirt and extends its service life. Dense and textured, they easily mask unevenness and roughness on the walls.
You can also consider such an interesting material at the moment as liquid wallpaper .
We determine the dimensions of the apron and calculate the material
We determine the dimensions of the apron and calculate the material
Before you begin laying the apron, you need to calculate the amount of materials and determine the size of the occupied area. Standard parameters of a kitchen apron:
- 55-75 cm vertically. You can navigate from the level of the countertop or furniture.
- It is recommended that the tile border be at least 20mm below the level of the worktop to prevent dirt and moisture from accumulating in the joints.
- The upper border of the apron is the hood.
- Horizontally, the kitchen apron occupies the entire wall, from one corner to the other.
Depending on the interior, the kitchen apron can reach the very floor. Horizontally, it can be limited to one work area, where the stove, sink and kitchen table are concentrated.
What comes first, a kitchen set or an apron?
“Which comes first, the chicken or the egg?” - a burning question, but even this is not associated with as much controversy and discussion as with what to do first - laying the backsplash or installing the kitchen?
p, blockquote 1,0,0,0,0 —>
Expert opinion
Mikhailova Maria Vasilievna
Furniture store manager. Knows everything about comfort and interior design
Most likely, the designer will advise you to install the kitchen first, and the tiler to lay the apron, and then hang the set. Who is right? Let's figure it out.
p, blockquote 2,0,0,0,0 —>
In fact, both options have a place to be. An acceptable option is selected by the customer based on several factors. Let's analyze both cases, their features, pros and cons.
p, blockquote 3,0,0,0,0 —>
Preparing for work
Preparation before laying the kitchen apron
This stage includes preparatory work for laying the kitchen apron. The walls must be treated with plasterboard or plaster in advance to make them smooth and hide small cracks. The glue is applied less easily to curved walls; in some areas it may not adhere well.
You need to remove whitewash or old plaster from the wall. You will have to make notches on the oil paint using a grinder.
It is important to mark the bottom level of the tiles so that the rows are even. It is better to install a profile at the bottom to prevent the tiles from slipping in case the glue does not dry completely. A laser hydraulic level is best suited for this purpose.
Necessary materials for work
For construction work of this type, the following materials will be required:
- A tile of a suitable material with a selected pattern. The recommended resistance level is at least AA; such tiles are resistant to external influences and can withstand any household chemicals.
- Putty and primer to get rid of cracks and uneven walls.
- Glue.
List of tools for work
Tools for laying a kitchen apron
Tools required for construction work:
- Hammer (the main task is to help remove the old coating to apply a new one).
- A screwdriver will be required if you intend to install the socket and run the wires.
- The adhesive solution is mixed with a special mixer.
- Buckets for diluting glue and water.
- Three types of spatula: narrow, serrated and rubber.
- Level for determining the angle of inclination and even placement of the tiles.
- Laser hydraulic level for adjusting the lower level of the tile and protecting it from falling in case the glue does not dry completely and it starts to fall.
- Crosses and also pegs.
- Pencil for marks.
Stage No. 2 - preparing tools
The tile is already waiting in the wings, the calculations have been made, now you need to prepare the tools. We will stock up on the tools that we will need to clean the walls of old kitchen coverings and for subsequent installation of tiles with our own hands.
In the photo - a master tiler's kit
So, you need to get:
- perforator. It will be used to remove old coating;
- screwdriver with mixer. We will use it to make an adhesive composition;
- bucket. It is better to prepare two buckets with a capacity of 10 liters;
- several spatulas - narrow, with teeth and rubber;
- two building levels - short and long. They will help you take measurements of each tile and the entire wall plane;
- tile cutter; nippers and abrasive bars - these tools will help correct broken areas; with a rubber hammer - we will use it to check the tightness of the apron; crosses to set the thickness of the seam; ruler and pencil; cord.
We will glue the tiles with a special compound. We purchase it along with the material. There is no need to prepare the adhesive composition in advance. Our next step is to dismantle the old coating.
Installation instructions
- The first stage is to make markings using a hard pencil, a cord with a weight for a perfectly straight vertical line, and a plasterboard sheet for the bottom border.
- Dilution of the adhesive solution. It is important to maintain all proportions so that the glue holds the tile firmly and prevents it from falling to the floor. After two hours, the glue will begin to dry and lose its important properties, so you need to use it up as quickly as possible. The thickness of the adhesive layer should not exceed 10 mm.
- Laying the apron. An adhesive solution is applied to the wall, the lower border is marked with a profile. It is important to press the tile firmly against the wall so that the adhesive adheres firmly.
- You can start laying from the edge, then you will have to install a special corner in the corner. If any part lies unevenly, it can be disconnected and reinstalled.
- The first row is the most critical; you can proceed to laying the next one when it is completely dry. You need to install crosses between them so that the seam spacing is uniform.
- The final stage is cutting the tiles and grouting them to give the backsplash its original appearance.
Preparing the wall surface
Preparing the wall surface before laying the kitchen apron
Before you move on to laying a tile backsplash in your kitchen, it is important to properly prepare the wall. First you need to remove the previous coating - paint, wallpaper, decorative material. To clear the wall of old tiles, you will have to use a hammer drill. Fill all irregularities with primer and putty so that the surface becomes smooth and the tile lays on it without problems.
The angle when moving from one wall to another should be perfectly even. Professionals advise making small notches so that the adhesive solution adheres better. To remove fungus, mold and salts from the surface, it is better to use a high-quality fungicide so that the dirt does not spread further and spoil the materials.
Marking
Particular attention should be paid to the markings so that the pattern is not disturbed and the tiles lie flat. The standard distance from the tile to the floor is 70-85 cm, the recommended height is 55-65 cm. The upper edge of the tile is marked with a hard pencil, the lower edge is limited by an even wooden beam, which will support the tile if the glue does not have time to dry.
The wooden beam can be replaced with a metal profile or sheets of plasterboard. A vertical mark can be made with a special cord with a weight. It is mounted under the ceiling and goes down in a straight line, marking the border. Under the force of gravity, the cord will create a perfectly straight line. You can start laying from the edge or from the center.
Preparing the adhesive solution
Preparing the adhesive solution before laying the kitchen apron
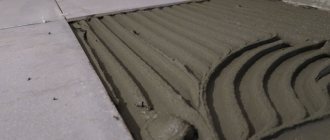
Before laying kitchen backsplash tiles, the wall should be treated with a primer so that the adhesive adheres better and adhesion increases. The adhesive solution must be diluted according to the instructions, observing the proportions and dosage.
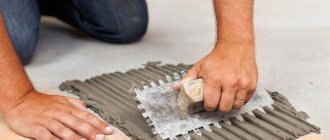
First, a small amount of glue is applied to the wall itself. The surface should be covered with a shiny film. The remainder is applied directly to the tiles. For better adhesion, the adhesive is removed from the tiles with a knife or scalpel; the residue should be left in the recesses and cracks to ensure better adhesion.
Using a notched trowel, spread the adhesive evenly over the wall. The composition will begin to harden in 15-20 minutes, during which time you need to start laying the tiles. The adhesive solution can remain in the bucket for no more than two hours.
Trimming and styling
Anyone who has tried to lay a tile backsplash in a kitchen with their own hands knows that in most cases it has to be cut to fit the dimensions of the room and the features of the walls. For convenience, it is recommended to use a special tile cutter, however, there is no point in buying one specifically for laying a kitchen apron.
How to cut tiles for a backsplash:
- This can be done with a regular glass cutter. Use a marker to make the necessary marks and draw the tool along the line, pressing firmly on your hand. Separate the unnecessary part with your hands, placing it on the corner of the table.
- To make it break better, it is recommended to place it in water at room temperature for 10-15 minutes before starting.
- If you have a grinder, you can cut it with it. However, in this case, you will have to get a tight respirator to protect your respiratory system from fragments.
Laying tiles for a kitchen splashback
The next stage is laying the tiles. You should start with whole pieces; it is better to place them in the center so as not to spoil the integrity of the design and the appearance as a whole. Leave the trimmings at the very end, for example, along the edges, under the tabletop, where they are not so visible.
It is extremely important to lay it in even rows. Vertical and horizontal marks are made differently. The first tile will act as a kind of beacon, relative to which the remaining elements will be aligned.
The tile must be pressed tightly against the wall so that all the air escapes and the glue sets well. Then the material will not peel off and will last for many years.
How to lay a backsplash tile in the kitchen:
- The pattern should be uniform; its integrity should not be violated, otherwise the apron will look untidy. To make the installation process as simple as possible, on the back of each tile, manufacturers mark with arrows which direction the pattern is located.
- The profile is screwed to the edge of the picture. It is on this that the horizontal mark of the tile is placed. It is better to place plastic wedges under the first element so that you can adjust its position until the glue dries.
- After the first row is completed, plastic crosses should be placed in place of future seams. The thickness of the seams depends on the depth of their immersion.
- The undercuts are attached at the very end in the free areas.
Grout
Grouting the kitchen apron
The kitchen apron will take on its final appearance at the very end. Grouting is carried out upon completion of all work. It is important that the composition does not contrast with the color of the tile, so that the design does not turn out faded. The grout is applied with a rubber spatula; excess can be removed with a sponge.
To protect the seams from fraying, they can be additionally treated with a water repellent.
Output of wires and sockets
The outlet for the wires is installed at the very end, after grouting. The hardest part is making the holes for the socket. The lining of the future location for wiring should be done carefully. If the wires have already been laid, while laying the tiles they should be protected from glue and other liquids using film or a plastic bag.
Once it is installed, you can proceed to marking the location for the future outlet. Mark the boundaries directly along it with a marker or paint and drill holes with a tile drill. Remove dust. It is important that during the process the tiles do not crack or begin to crumble.
If glue gets on the wires, it should be quickly removed with a dry sponge.
Photo wallpaper on the kitchen wall
Photo wallpaper, bright and stylish, with high performance. A variety of color options, patterns, and pastoral landscapes will help combine style and decorate the interior.
Photo wallpaper is a budget-friendly and great design idea for the kitchen space.
Recommendations from experts
Some expert advice on how to lay a tile backsplash in the kitchen:
- The grout will have to be updated regularly so that the apron does not lose its attractiveness and does not fade.
- After calculating the amount of materials needed, it is worth adding another 10-15% to this figure in case during the repair process some of the tiles deteriorate and become unusable.
- Installation should start from the center if the tiles for the apron are the same size on the left and right.
- Laying from the edge is suitable for corner kitchens and the edge of the apron in a visible place.
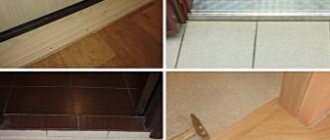
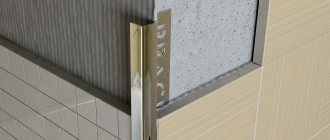
Hemming the edges
To obtain an even seam, a bevel is made at the junction of the fragments - cutting the ends at 45°. This can be done with an angle grinder, a roller tile cutter or fine-grained sandpaper. The trimmed pieces are placed in the corner end to end so that they coincide and form a solid transition. To do this, the wall at the corner must be perfectly evenly processed.
Overview of methods
Painting the walls in the kitchen
Painting walls is considered a fashionable European trend today. There is no bright, deliberate decor; the walls are leveled and painted in pastel neutral colors. The main advantage is that it is a very budget option if you have to save money, but really want to refresh and renovate your kitchen.
It is possible to do everything on your own without involving specialists. There is an opportunity to be creative and create your own style. The owner of a small kitchen space can experiment and paint the walls in different colors, demarcate the space in this way and give the kitchen a more voluminous look. The only advice I would like to give in choosing moisture-resistant paint is to choose a washable option.
A small but important nuance. Before painting, the wall must be perfectly prepared, that is, have a smooth, primed surface. Otherwise, the painting result will be disastrous. The paint is especially glossy, which should be ideal for covering kitchen walls; in this case, it will only emphasize and highlight even more defective unevenness of the walls.
If there is no desire or opportunity to level the walls, it is better to use matte paint. Matte paint leaves roughness on the surface and you will have to spend more time and more time cleaning and cleaning.
Video review
The video below shows how to lay tiles on a backsplash. Detailed instructions allow you to do this yourself, without having much experience in repairs.
A high-quality kitchen apron allows you to create a truly stylish and beautiful dream kitchen. In addition, it reliably protects the kitchen from various types of mold and mildew, high humidity, and dirt. To assemble a kitchen apron, you don’t need much experience, just follow the instructions and carry out each step with care.
Option 1. Apron first
There are two options for the development of events:
p, blockquote 4,0,0,0,0 —>
- the apron is placed with a reserve - i.e. “goes” behind the upper and lower cabinets;
- The tiles are laid clearly between the upper cabinet and the countertop. In this case, the wall cabinet is adjacent to the top line of the apron, and the cabinets are adjusted to the bottom line using adjustable legs. But keep in mind: it’s quite difficult to hang a kitchen millimeter by millimeter.
pros
p, blockquote 5,0,0,0,0 —>
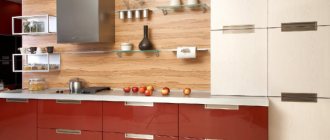
MDF kitchen wall decoration
Quite a decent, widespread and durable material. MDF is moisture-resistant, dense, resistant to temperature changes, and immune to bacteria, fungi and microorganisms. A quick and easy way to mount panels on the sheathing, but they are much more expensive than plastic ones.
The color range is varied, but wood imitation is the most popular. The material consists of waste wood crushed into flour and pressed under high pressure. The resulting slabs are then laminated with film.
The only drawback of this method of finishing kitchen walls is that MDF reacts to high humidity and begins to expand. To avoid this process, it is recommended to treat open sections with sealant during installation.
Surface treatment technology divides MDF into three types:
- veneered,
- painted
- laminated panel.
The veneer panel perfectly imitates the texture of natural wood, presentable and noble. The panels are finished with veneer made from natural and noble wood (beech, oak, American walnut, sometimes mahogany). Laminated MDF is subjected to additional processing with polyvinyl chloride film, which is glued to the surface of the panel. A wide range of shades and colors, textures, patterns, strikingly distinguishes this type of panels.
Laminate is used not only for surface finishing; a wide variety of furniture and interior items are made from it. Lamination gives the panels not only a respectable appearance, but also increases sound insulation properties, greatly improves wear characteristics, and has increased resistance to moisture. Painted panels come in all sorts of colors; there are even silver and pearl-colored models that perfectly harmonize with the high-tech style.
Cladding the walls in the kitchen with clapboard
Ecological and aesthetic material made of wood or plastic will create a wonderful and cozy microclimate in the kitchen. Lining is a long strip or board made of wood. Wooden lining is good not only for cladding walls; it is used in finishing ceilings and floors. It retains its excellent appearance for a long time, has excellent sound insulation and has the property of leveling walls.
To make lining, wood species such as spruce and pine are used, which adds a certain smell and feeling of freshness to the room. It is not recommended to decorate the kitchen work area with clapboard; after all, this is varnished wood, so the fire hazard is quite high. But decorating the dining area in the kitchen with clapboard is quite a wonderful option; clapboard will create an additional atmosphere of comfort and warmth, and add some charm and mystery.
How to place the lining on the wall - vertically or horizontally depends on your taste. The more common option is vertical. Horizontal finishing is used only if there is a need to visually make the kitchen room wider. You can and should protect the lining in the kitchen from moisture and the penetration of various microorganisms by using an antiseptic or covering it with moisture-repellent paint.
Wall decor in the kitchen
Decorative plaster is an expensive pleasure, a luxurious and spectacular look for the kitchen. Firstly, the material itself is expensive, and secondly, you will have to invite specialists if you want to get real quality and unique style.
Decorative picturesque plaster is also called liquid wallpaper. It has excellent sound insulation, has increased wear resistance to mechanical stress, and it is almost impossible to damage walls coated with decorative plaster. Retains excellent characteristics under the influence of temperature changes. The only disadvantage of this coating is the lack of moisture resistance, but professionals have found one excellent option to protect the surface; for this they use varnish. Plaster has two different types of base: mineral base and synthetic base.
Classified by type of filler:
- acrylic,
- textured,
- structural,
- Venetian,
- and other types.
Acrylic plaster is made on the basis of acrylic resins. Thanks to this, it not only has good strength, but is also plastic and has good water-repellent properties. The only negative is the low fire resistance, it gets dirty easily and requires cleaning with a damp sponge.
Silicone is the most expensive type of plaster coating and deserves the highest rating. Retains strength and reliability over a long period. Mainly used only with special primer formulations. The silicone composition of the plaster has high characteristics: sound insulation, excellent breathability, plasticity and versatility of the material, which of course affects the high price of the product. The silicone coating fits perfectly on any prepared surface. The composition is sold ready-made, so this is a big plus for those who decide to do the repairs on their own.
Mineral plaster, used together with quartz primer on surfaces with a mineral coating. This type of plaster has moisture-resistant characteristics and is distinguished by a variety of colors. The only drawback is that the material is not very elastic.
Silicate plaster, this type is used mainly for external work. The material contains silicate glass and is characterized by rapid hardening; without experience and skills, applying this coating on your own will be impossible. Since silicate plaster is much more expensive than those already mentioned, it is better to invite professionals to work with it. The characteristics are durable and plastic, easy to care for.
Type of filler: structural, textured and Venetian
The textured mixture of plaster is mainly filled with various natural wood fibers, mica and stone chips. Textured finishing gives a pronounced appearance and volumetric relief to the surface of the coating. Completely repeat the structure of hewn stone, wood or corrugated paper. The material is wear-resistant and does not tend to crack over time.
Structural, can be filled with all kinds of small pebbles and wood fibers, granules and grains of minerals of various origins. The mass is water-based and has good plasticity, and can be easily processed with any tool. The surface covered with structural plaster is more uniform than textured one.
Venetian, has the appearance of a marble coating and creates the impression of a very expensive and luxurious coating. The smooth and shiny surface of Venetian plaster acquires a mother-of-pearl effect due to the filling of marble chips. A beautiful effect for such a surface is achieved by combining two shades. The main advantage is fire safety, water resistance, and practicality.
Flock, a more complex and expensive technology, involves step-by-step surface coating. First, a cool base is applied, then flocks, and the final stage is varnishing. Completely imitates a woven covering due to filling with silk fibers. Quite soft to the touch.
They use a variety of methods and devices to apply patterns to plaster. Designs can be applied using a roller, either with a factory attachment or made with your own hands from available materials (foam rubber, film, rope, coarse fabric, etc.). The design is applied using a stencil and a comb. They use different technologies to apply patterns.