Application options
The main ways to use wall panels in interior decoration:
Wall covering. It is rare that MDF sheets are used as a material for an entire room; more often they are used to create accents: for example, to highlight a media area in the living room or a dining area in the kitchen, to decorate the surface behind the bed in the bedroom, or to adjust the geometry of the room.
Advice! Plates can be used to decorate not only the vertical, but also the horizontal part of the wall - for example, to make the outline of a room at a level of 80-100 cm from the floor.
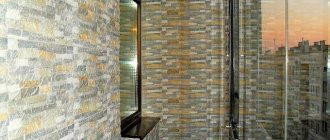
Niche processing. MDF panels are suitable for emphasizing the architectural features of an apartment or house, for example, recesses. They can also be used to improve bay windows.
Improvement of slopes. Protrusions, slopes and even doorways look more expensive if decorated with wood fiber material.
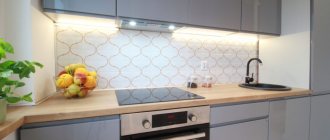
Work surface protection. One of the frequently used options in the kitchen is MDF aprons. The finished products are 60 cm high - the ideal size for installation between the top and bottom tier.
Protection is also used in hallways - by attaching MDF panels to the wall in the entrance area, you will simplify your cleaning task. After all, laminated coatings do not absorb dirt; they can simply be wiped with a damp cloth.
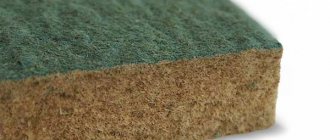
The photo shows the finishing of the opening with MDF panels
TOP 8 types of MDF wall panels
According to their shape, the panels are:
1 In the form of slats (narrow panels) having a groove connection: groove - ridge. They are easy to install independently and are widely used for cladding.
Narrow panels with a groove connection
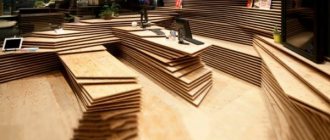
2 In the form of sheets of various sizes. The sufficient area of the sheet allows you to use different techniques for its design: photo printing. 3D images, panels and graphics.
Sheets of panels of various sizes
3 In the form of slabs, similar to large tiles. To fasten the design of these products, just like slatted panels, a “groove-tongue” locking connection is provided.
Slabs similar to ceramic tiles
Based on their appearance they are produced:
4 With a veneered surface , when the top layer consists of a thin coating of natural wood, which is called veneer. The product looks completely identical to a natural wooden board and is significantly less expensive.
Panels with veneer surface
5 With a laminated surface , which is a thin coating of a special film, imitating various natural materials, colored or plain patterns. The wide variety of designs makes laminated products the most popular MDF products for wall cladding.
The most popular laminated panels
6 With a painted surface , when the lamella is painted on top in a variety of color shades. Paint performs a protective and decorative function.
Painted wall panels
7 Panels with photo printing. The image is applied to the front side of the panel. The top is coated with acrylic colorless varnish, which protects it from external damage.
Panels with photo printing
8 Panels with a pattern or design that has a 3D effect. These products have been recently developed and are a new design. The surface of the products, which depicts abstract three-dimensional drawings, geometric figures imitating various types of relief, looks unusual and very impressive.
3D effect on panels with a pattern
Design examples
MDF panels in the interior will not look boring if you use your imagination or resort to ready-made solutions - for example, order individual production.
Interesting options:
- The design of MDF panels imitating wood is a classic. But besides wood, they can have other textures: stone, brick, concrete, even leather or matting.
- Using wall panels without a lamination layer allows you to paint them yourself in any suitable color (or order them already painted in production). The choice is made according to the RAL palette.
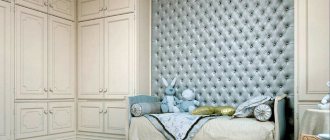
The photo shows a room completely finished with MDF panels
- Thanks to the possibility of photo printing, they replace works of art: you can print any plot, inscription, picture and simply assemble it like a mosaic.
- Cutting out individual parts of fancy shapes from sheet material and assembling them into a decorative panel is another option for “decor without decor.”
- Textured walls with lighting look impressive - LED strips emphasize the volume of the surface, while simultaneously acting as decorative lighting for the room.
The photo shows decorative wall lighting
Advantages and disadvantages
Before choosing any building material, you need to familiarize yourself with its advantages and disadvantages.
Advantages of MDF panels
- Availability. Easily found at most hardware stores or specialty markets.
- Low cost. The total cost of the purchased material will be less than most analogues.
- Ease of installation. The simplicity of the design allows you to install MDF panels quickly and without problems. Even a person with no experience can do this job if they have the necessary tools.
- Presentable appearance. The appearance of MDF panels looks extremely solid, especially the colors that match expensive wood species.
- Additional thermal insulation and sound insulation.
- Safe composition. Do not contain substances harmful to human health.
Flaws
- Fire hazardous. Made from wood components, the panels can catch fire when exposed to flame.
- Poor moisture resistance. A damp indoor environment is not the best option for placing MDF panels. Long-term exposure to a humid environment negatively affects the structure of the material, it swells and bends.
How do they look in the interior?
The panels can be mounted in all rooms of the house - including on loggias and in bathrooms. Let's consider application options depending on the functionality of the room.
Bedroom
A wall open to creativity is located behind the bed. MDF performs both a decorative and protective function - for example, by placing a bed without a headboard, you don’t have to worry about damage to the wall from constant touching.
Place it vertically, horizontally, diagonally, or create an abstract composition.
Advice! Placing it vertically will allow you to achieve the visual effect of a high ceiling, horizontally - to expand the room.
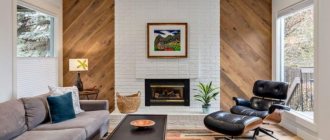
Living room
There are already two options for use here, but most often the walls behind the sofa (all or part) are highlighted with panels. Just like behind the bed, the panels protect the wall from mechanical damage and have a decorative function.
The second option, favored by designers, is to allocate an area with a TV. The wires are perfectly hidden in the box used when installing MDF sheets. The result is a stylish media zone.
Kitchen
A functional use case is an apron, which we have already discussed in previous sections. An MDF apron can be attached not only between tiers, but also in a kitchen without upper cabinets - for this, the upper edge is closed with special decorative U-shaped plugs (they also protect the stove from moisture).
Decorative option - accenting the dining area. The wall in the dining room can be left as is, supplemented with lighting or decor (paintings, clocks, posters).
In the photo there is an apron to match the tabletop
Hallway
As in the kitchen, the panels in the hallway serve both a decorative and functional purpose. In the context of the first, they are used to adjust geometric parameters: you can visually move the walls apart and make the room more square using panels of a darker or lighter shade.
As for functionality, wall slats are indispensable near the front door. They can withstand dirt from boots, shuffling from jackets and umbrellas, and impacts from a bag or stroller.
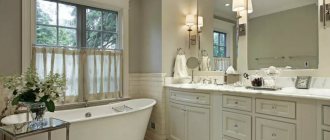
Bathroom and toilet
Although MDF can be moisture resistant, it does not tolerate changes in temperature and humidity worse than plastic or ceramics. Therefore, it should not be used in finishing the walls above the bathtub or in the shower panel. But in the drier part - near the toilet, washing machine, they are irreplaceable.
MDF is a beautiful, practical, but underrated material. If you are looking for a wall decoration option that is both stylish and easy to maintain, take a closer look at this option.
New for 2021
Breeze panels with 3D effect. Allows you to use panels as a decorative accent in the interior. Combines with regular panels.
It can be laid horizontally or vertically, thereby simplifying zoning options.
Ceiling installation
The technology for finishing the ceiling with PVC panels includes several stages:
Step one. Using a level, we mark the places for attaching rigid profiles, which should go along the perimeter. They must be installed exactly horizontally. We fasten the profile tightly to the wall so as not to leave any gaps or cracks.
Step two. Using self-tapping screws, we install transverse profiles - the same ones that will hold the ceiling panels.
Step three. We mount a profile similar to the English “L” on the profiles around the perimeter.
Ceiling sheathing for PVC panels can be made from either metal profiles or wood. But this option may not be suitable for the bathroom or other wet areas.
If your ceiling repair option involves installing special lighting or masking communications, it’s time to do this before you start directly installing PVC panels.
Step four. Using a hacksaw or metal scissors, carefully cut the panels along the length of the ceiling. Laying the first panel should not become a pancake clump. We fasten it as close as possible to the corner to the transverse profiles with self-tapping screws. The following are mounted in the grooves that are located on the previous panel; We attach it to the frame.
Step five , the most difficult and requiring special care, is the installation of the last panel. It usually needs to be cut to width, and then carefully inserted into the plank on the opposite wall.
Step six . We apply liquid nails to the ceiling plinth. Press tightly to the ceiling for a few seconds. Use a rag to remove excess glue.
How much to take in meters and pieces: calculation of the required amount of materials
The thickness of plastic panels is usually 5–10 millimeters, width – from 25 cm (standard) to 50 cm.
Length – from 2.7 meters (standard) to 3 meters. The components are three meters long.
To calculate the required number of panels, you need to divide the ceiling area (the sides are measured and multiplied by each other) by the area of one panel indicated on the package. We will add 15 percent for the cuts with which we will deliver the missing amount; round up to the nearest whole number.
- We calculate the number of metal profiles for installation. This is more complicated. We draw on paper a proportionally reduced diagram of the ceiling. We draw parallel ones along one wall. We take into account that the profiles should be 60 centimeters apart from each other. We estimate how much is needed for the whole room.
- You will need even more rigid profiles that will go around the perimeter.
- The number of screws that will fasten the panels and dowels that will secure the profiles is calculated taking into account the number of both plus the reserve.
If desired, you can replace the profiles with wooden beams, and the screws with staples. This will reduce the cost of the process and simplify the process of assembling plastic panels. But in this case they will not stand like new for decades.
- And finally, the ceiling plinth. We divide the perimeter of the ceiling into three (the length of the segment is three meters) - this is the required amount of plinth.
As for tools and other materials, you need a hammer drill or drill, a screwdriver, a hacksaw, a knife, metal scissors, a miter box, liquid nails, and a rag.