[DIY metal door]
Even a novice master can do this if he knows how to handle a welding machine.
Of course, you won’t be able to create a complex model right away, but making and installing a basic model of an entrance door is quite affordable.
The importance of the front door cannot be underestimated.
This is not only the first and main line that prevents dishonest citizens from entering your home, but also one of the key details of the interior of a residential building.
Sound insulation and regulation of air temperature in the room are two more functions of a metal entrance door.
And if you begin a major renovation of your apartment, then the issue of installing a new metal entrance door is one of the first to be decided.
A ready-made door purchased in a store does not at all guarantee that it has no hidden defects, and the prices there are not always affordable, adjusting it will be difficult, and the sound insulation will probably not suit you.
Well, self-made shaped doors are still ahead of you, but we’ll start with the simplest.
Advantages of a homemade door
Making a metal structure with your own hands has a number of advantages over purchasing finished products. At a minimum cost, you can get an entrance door to your apartment without altering the doorways. When making metal doors yourself, you must follow safe work rules and perform all operations carefully and accurately at every stage. Advantages:
- by choosing the material for production yourself, you can be confident in its quality;
- can be made with an individual finishing option;
- You can make an iron door on a budget.
Doing it yourself can save a lot of time.
Preparatory work
As in other cases, the manufacture of a metal door begins with paper work, in other words, we have to create a drawing.
In order for the drawing to be accurate and true to reality, you have to decide on the dimensions.
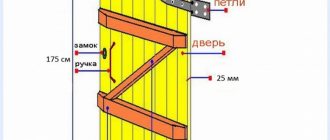
The design diagram of the front door offered for review will introduce you to the names and locations of the main components and elements.
Preparing the diagram
A drawing of a metal entrance door is a large-scale diagram of the door leaf, according to which the assembly and installation of the product will be carried out, with the dimensions of the door frame, the location of the stiffeners and hinges marked on it.
We arm ourselves with a tape measure and take measurements from the doorway.
The standard door size is 90 x 200 cm; if the actual dimensions of the opening are significantly larger than the data, it makes sense to install a separate block on top or on the side of the door leaf.
The side block can be made solid or hinged, and the top block can be covered with sheet metal, glazed or lattice.
We also apply all this to our drawing.
The dimensions of the door frame should be 2 cm smaller than the doorway - this will be the installation gap in which the installation of the block is adjusted to avoid distortions. Below is a sectional diagram of a metal door.
Most often, the door is attached to 2-4 hinges, their number depends on the weight of your structure.
Hinges can be external or hidden; the second option is more difficult to manufacture and requires certain skills.
Since we are trying to make a “door for beginners,” we will focus on the first option.
To distribute the load evenly, the hinges should be made at an equal distance from each other, and the top and bottom hinges should be located at a distance of 15 cm from the edge of the door.
IMPORTANT TO KNOW: Air ducts made of galvanized steel
You can make stiffening ribs in any direction - horizontally, vertically or in a mesh, as well as diagonally - everything is at your discretion.
The ribs must be made so that they do not pass through the places where the lock, peephole, or door handle will be installed.
You determine the number of ribs yourself; it must ensure that the door does not bend under its own weight, otherwise the door will require repairs after some time.
So, the drawing is ready.
Preparing materials and tools
Having decided on the dimensions, we prepare a set of tools that we will need during the work, calculate the amount of materials needed and go to the store.
We offer you a sample list of tools:
- welding machine;
- drill;
- a set of screwdrivers or a screwdriver;
- Bulgarian;
- clamps;
- files or grinder;
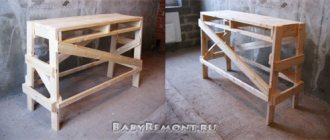
- trestles or door table for assembly;
- measuring instruments (corner; tape measure, etc.);
- building level.
Video:
For a standard size metal door you will need:
- steel sheet 2-3 mm thick - 100 x 200 cm;
- metal corner 3;2 x 3;2 cm – 6 running meters. (for door frame);
- profile pipe 5 x 2;5 cm - about 9 l.m. (for the door frame and stiffeners);
- metal plates 40 x 4 cm, 2-3 mm thick - at least 4 pieces (for attaching the door frame to the walls);
- door hinges;
- lock;
- accessories;
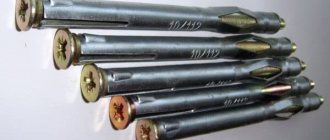
- anchor bolts;
- anti-corrosion coating;
- metal paint;
- polyurethane foam.
Choose fittings and locks to suit your taste. Manufacturers offer a large selection of locks, the most reliable of which are considered three-sided.
A lock with bolts on three sides is, of course, more difficult to install, but it is also not easy to break into.
If you are making a metal door for a utility room (shed), then you can make a lightweight, economical option - in this case, instead of a profile pipe, a thick reinforcing rod is used for the stiffeners.
Lock installation
To install the lock in the flange of the corner of the door frame, make a cutout of such a size that the lock fits into it without a gap. Having installed the lock, you need to mark all the holes: mounting, key, handle, etc. Based on the markings, you need to drill holes of the required diameter.
In addition, you need to make holes around the entire perimeter of the door for screws with a diameter of 4 mm, with which boards will be screwed to the door from the inside (one of them should have a cutout for a lock). For fastening, you can use screws 35-40 mm long.
All cutouts for the latch and various latches in the box are made only when the box is installed and the door is hung. At the stage of installing the lock, a door peephole is also made.
Do-it-yourself cold forging of metal is a real art that takes a long time to learn. When welding titanium, certain difficulties can arise, especially if the welder is inexperienced. Read more in this article.
Do you need to cut metal quickly and efficiently? Useful tips and recommendations at https://elsvarkin.ru/texnologiya/plazmennaya-rezka-metalla-svoimi-rukami/ link.
Final stage
The locking mechanism cuts into the vertical part of the frame, which frames the door leaf. As a rule, the lock is placed at a height above 1 m from the floor. Then the key panel is applied to the corner, after which a hole is cut along the contour. Reinforcing plates are welded at the screwing points.
Holes for fastening the lock are marked on the plates with a core, drilled and threaded with a tap. The final installation of the lock is carried out after painting the door. If necessary, a hole is drilled in the canvas for the door peephole.
Plates are welded onto the outer frame to secure the structure to the slopes using anchors. After finishing with paint or upholstery, the locking mechanism and peephole are installed.
Finishing
Making a metal door with your own hands is not all. It must be formatted accordingly. With blocks installed in outbuildings it is quite simple; as a rule, they are painted. But if we are talking about a door at the entrance to a residential building (apartment), then it is advisable to decorate it. The choice of option is at the discretion of the owner, and some recommendations will help with this.
How you can finish the canvas:
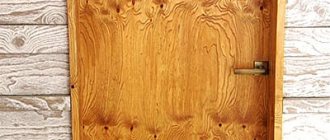
- Solid materials - multi-layer plywood, fiberboard, vinyl plastic, wooden lining, laminate, MDF followed by varnish coating (colorless or with tinting components).
- Leatherette and leatherette are used to cover the sash.
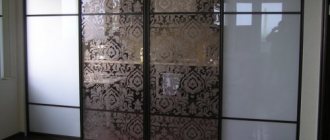
- The water door to the apartment can be covered with decorative film. Since the impact of atmospheric factors is minimal, this finish will last a long time. And taking into account the low cost and simplicity of design, it is one of the best solutions.
How to avoid mistakes?
To prevent unforeseen situations from taking you by surprise, you must:
- take correct measurements;
- create a drawing of an object;
- carefully measure angles and parallels;
- adjust the frame and canvas;
- treat materials with protective compounds.
Making a front door takes time and patience. Only by carefully following all the recommendations can you achieve a good result. Accuracy is important in the work, so you need to measure the doorway in several places. If it is uneven, it should be strengthened with cement mortar.
Sources
- https://ODveryah.ru/montazh/izgotovlenie-metallicheskih-dverej
- https://filippovdoor.ru/dveri/dver-iz-profilnoj-truby-svoimi-rukami.html
- https://dekoriko.ru/dveri/vhodnye/svoimi-rukami-kak-sdelat/
- https://o-dveryah.ru/metallicheskie/zheleznaya-svoimi-rukami/
- https://aystroika.ru/remont/metallicheskie-dveri-kak-sdelat.html
- https://rezhemmetall.ru/metallicheskaya-dver-svoimi-rukami.html
- https://melt-spb.ru/oborudovanie/dveri-iz-profilnoj-truby.html
- https://gorodverey.ru/izgotovlenie-zheleznoj-dveri-svoimi-rukami.html
- https://vitdoors.ru/dveri/izgotovlenie-metallicheskoy-dveri-svoimi-rukami.html
- https://stroy-podskazka.ru/dveri/vhodnye/metallicheskie/svoimi-rukami/
- https://novamett.ru/dver/vhodnaya
- https://krrot.net/zheleznaya-dver-svoimi-rukami/
- https://VseoDveri.ru/vhodnye-dveri/vhodnaya-dver-svoimi-rukami/
[collapse]
Post Views: 1,904
Basic rules for welding canopies:
- Traditionally, the distance from the edge of the leaf to the edge of the canopy is taken to be 20-25 cm. If the door is heavy, 3 canopies are installed.
- The lower parts of the canopies are attached to the outer frame, each at one point. After tacking, check the location of the canopies using a level. Small defects can be easily corrected.
- If a sheet thinner than 2.5 mm is used to make the sheet, then control plates 3-5 mm thick are welded onto the sheet to strengthen the area under the canopy. These areas are tacked and then, after checking, the upper parts of the canopies are welded.
How to make a metal door from a corner with your own hands
A factory-made metal door is a fairly expensive product, so many people try to make their own structure from a steel sheet and an angle or profile pipe. It is easier to weld a frame from a corner, due to the thickness of its shelf being 3-5 mm. The wall thickness of the profile pipe is approximately 1.5 mm, which can cause certain difficulties for craftsmen who do not have much experience in welding.
Increasing product rigidity
Now the loot needs to be given additional rigidity with reinforcing plates.
Photo 4. Reinforcing plates to increase the rigidity of the loot.
If the workpieces were bent correctly, then these plates should fit between the casing and the rib of the mounting dimension. In this case, it is advisable to maintain a right angle so as not to reduce the gap between the hole and the wall. The presence of a stiffener to which the plates will be welded allows you to slightly guess the size of the height of the plate, but the plate should fit snugly to the casing, without gaps. This will reduce deformation during welding.
It is important to consider two points here:
- It is necessary to have a reinforcing plate in the place where the canopies are welded (an error is visible in photo 2, since the upper canopy is welded between the reinforcing plates), and it is desirable that at the corners the reinforcing plates come together and are welded, which will give additional bending rigidity. To do this, you may have to slightly sharpen the stiffening ribs on the risers so that they will accept the corner plates.
- It is also advisable to weld several reinforcing plates into the threshold.
It would not be amiss to remind you that at first all the reinforcing plates are only tacked (two points at the top and bottom), and then scalded gradually to avoid excessive temperature deformation. It is especially important to observe this condition when scalding on the casing, since it can lead inside.
After the plates are welded, the loaf can be straightened again with a rubber hammer. It is also worth marking the location of the lock in advance and do not cook the plate in this place yet. This can be done later, when the lock is cut into the door and a groove is cut in the door or holes are drilled for the bolt and latch tongue. You may have to make a cutout in this reinforcing plate and sew it up with a box (if the crossbars extend further than the plate) so that the mounting foam does not get into the holes.
All that remains is to check whether the screw has moved. To do this, you need to put it in a vertical position and check the parallelism of the risers. If in this unloaded state they are parallel, then the loot is ready. If not, you need to reverse bend the loot back to its correct shape. To do this, the “sinking” corner is fixed, wooden blocks are placed under two adjacent ones, and the opposite corner is pressed in. The operation will have to be repeated with increasing effort if the loot does not return to the required state. Now you can start making the door.
Making a door frame
Work must begin with accurate measurements of the opening. Most often, a standard opening has a width of 800-900 mm and a height of 2000 mm. In order to avoid errors in measurements, it is necessary to “get” to the end of the wall (concrete or brick) by knocking down a layer of paint and plaster in a short area and making a cutout using a hammer and chisel in the vertical platband, if any.
This operation should be performed on all four sides from the outside and inside of the opening. When you have decided on the true outlines of the opening, you can take measurements. After the dimensions of the opening are precisely determined, we begin making metal doors with our own hands.
The dimensions of the metal door frame must be such that there is a gap of 20 mm wide between the ends of the walls delimiting the opening and the frame. It will allow you to adjust the position of the door during installation if the opening is skewed. Upon completion of installation work, this gap is sealed with construction foam.
First of all, you need to cut a corner to the size of the box (with a shelf length, for example, 50x25 mm) of the required length and lay it out on some plane (preferably on a welding table) in the shape of a rectangle. Instead of a welding table, you can use sawhorses calibrated for flatness. To make sure that all corners of the box are equal to 90 degrees, you need to measure the lengths of the diagonals. They must be equal. Then the corners are welded.
Prefabrication and installation stage
It is strictly not recommended to assemble on the floor. The assembly stage is performed exclusively on a workbench with a flat surface.
The assembly of a metal door on a frame made of angle bars is carried out in several stages:
- cutting sheets and corners (it is important to immediately calculate the method of welding corners - with cutting the shelves at 45 degrees or directly);
- measuring and comparing the diagonals of the outer frame;
- welding the corners (it is not recommended to weld the entire seam at once to avoid deformation of the metal workpieces, the joints are tacked in 2-3 places, checking the diagonals and final welding of the seams);
- processing of seams with a grinder (carried out after the parts have cooled);
- assembly of the internal frame (it is recommended to place the workpiece inside the outer frame; to maintain gaps, it is necessary to insert templates - most often metal plates);
- fixing the structure with clamps;
- tacking and welding of the internal frame;
- welding stiffeners to the corners of the structure;
- Welding the sheet at points in 10 cm increments.
Assembly of the structure
Essentially, it all comes down to hanging the sash, checking its position, the operation of the locks and adjustments (if necessary). All that remains is to install the handle, lock and peephole. If the door design includes crossbars and lower (upper) stops, then you need to make markings.
The sash is covered, and the places for drilling holes are marked on the jamb. After readiness, their coincidence with the fixing elements is checked. This applies to both the main canvas and the additional, small one.
The final “touch” is installing the manufactured door into the opening and lubricating all rubbing parts (which many people forget about). After this, we can state that everything is complete, the work has been completed.
For those who have skills in working with metals and want to get a high-quality iron door at low cost, making it yourself is the best option. Moreover, the drawing, diagram, and external finishing are chosen not by the manufacturer, but by the craftsman. This means that the entrance to the house will not only be reliably protected, but also designed in an original way, and the block structure will fit perfectly into the interior of a particular building.
In most cases, for this purpose they use:
- corner 50x50 mm - for making an outer frame;
- corner 40x40 mm - for the internal frame of a door with insulation, 25x25 mm - for a non-insulated structure and installation of stiffeners;
- steel strip - mm wide, 2-4 mm thick - for fixing the structure to the doorway;
- sheet 1-3 mm thick - for canvas;
- metal canopies;
- pen;
- lock;
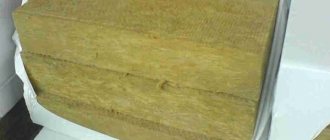
- for an insulated door - plywood for internal lining, polystyrene foam, polystyrene foam, foam chips for installing an insulating layer.
Advice! If you purchase rolled steel from a metal depot, it is advisable to immediately order metal processing. The sheet and corner will be cut to size using specialized equipment, which will greatly facilitate assembly and installation work in the future.