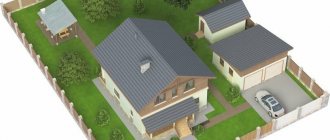
On a plot of 10 acres, a frame bathhouse has already been built, then it’s up to the house, we decided to build a frame structure on two full floors, measuring 7 by 10 meters, plus an adjacent garage to the left wall, 10 by 5 meters. The whole thing will stand on a strip foundation. We carried out the work together, we were building for ourselves and for the first time. I’ve read and watched a lot about frame houses on the Internet, so I have an idea of how to assemble a frame house with my own hands. Don’t judge strictly, we are not experienced builders, so there are a lot of mistakes, we know it ourselves)))
Pouring the foundation
We start with the foundation, make formwork from boards from pallets, in the distance we can see a bathhouse built last year.
We begin reinforcing the foundation with fiberglass reinforcement, prudently leaving out one side of the formwork so that there would be access. The crushed stone that lies at the bottom of the hole for the foundation compensates for the depth of the hole; we dug it manually, of course, since a frame house requires a minimal foundation, 20-30 cm wide, with a depth of about 30 cm.
This angle (2) turned out to be high, because the difference in height of the area along the diagonal of the foundation was about 40 cm; the photo below shows the lowest angle, so the depth of the hole was slightly reduced. What am I leading to all this, before making a foundation for the frame, check the height differences using an optical or hydraulic level
We tied the reinforcement with ties, it didn’t turn out very smooth, but it’s been standing for three years now, no problems. The width of the foundation was 35-40 cm.
We begin to mix the concrete using a concrete mixer.
The proportions were as follows: 1:4:6 (cement: screenings: crushed stone). Everything was filled in for about a week. Size 7*10 meters plus a garage 5*10 meters, one partition for the house and garage is common.
We waited a little (a week), removed the formwork, and this is what happened. They laid sewer pipes and brought them under the foundation, to the future septic tank.
They brought timber, 10 cubic meters. Board 50 by 150, regular, not dry.
Installation of a frame made of boards
We begin to put the frame on the foundation, after reading on the Internet, we make waterproofing from roofing felt
We are assembling the lower framing of the frame, we are not building the garage yet, first the house.
We put logs where there will be a wooden floor, in a place where crushed stone is poured, there will be a bathroom, we will fill the floor.
The first wall was leveled. Corner boards sewn together with the letter “G”
We install the racks with a pitch of 59 cm (THIS IS VERY IMPORTANT!), so that we can then put the insulation into the spacer; the width of the slab is 60 cm. The same with the logs.
More photos
Added more racks
We placed all the racks around the perimeter of the first floor, added jibs, window openings were also outlined, there is an undoubted advantage in frame house construction, you can always make a window or doorway anywhere, even when the house has already been completed.
I sunk the jibs into the racks using a circular saw and an axe, then fastened everything onto screw and rough nails, which were available; rough nails hold much better. I took the length to 90 mm, so that I could sew two 50 mm boards without the nail sticking out of them.
We imperceptibly moved on to building the second floor of the frame house, first of all we laid the logs, with a distance of 59 cm between them so that the insulation would fit into the expansion. Looking ahead, we will insulate the frame with mineral wool.
Installation of the second floor frame
We are putting up the racks of the second floor; it will be full-sized, 2.5 meters high, just like the first floor. This is due to the fact that OSB for finishing a frame house from the inside has a height of 2.5 meters, plus the attic roof is much more difficult to properly insulate, so there will be a cold attic.
We continue to install the second floor racks
Another photo of a frame two-story house in the process of being built with your own hands.
We installed the racks of the second floor, laid the attic joists, after 99 cm, there is no load on them, we are not going to walk through the attic, their role is only to carry insulation and OSB.
Average prices
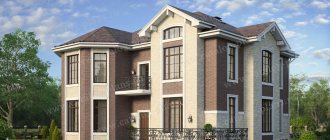
The average cost of construction depends on the region of Russia, the number of rooms, the size of the structure, and the need to further strengthen the frame. For example, for a house measuring 6x6 meters with a balcony and terrace you will have to pay 2,000,000 rubles, subject to finishing. If you build such a house without finishing, just with a frame under the roof, then the price will be lower - 1,213,000 rubles.
For larger buildings prices are higher. So, for a house measuring 12x11 squares with finishing you need to pay about 4,545,000 rubles, without finishing only the frame - 2,231,000 rubles.
Installation of rafters and roofing material
We installed the rafters, having previously installed the ridge beam, we will make the roof from Ondulin, so after calculating the minimum roof slope angle for Ondulin, the ridge turned out to be about 1.5 meters high.
Then the rains began, so it was necessary to urgently make a roof; I took few photographs, mostly taking photographs while waiting out the rain under the already nailed ondulin. I did the roof alone, I had never done this before, I just watched videos on how to lay ondulin correctly, and everything worked out, nothing complicated.
It became more fun with the roof, the rain no longer interferes with the work, they poured a slab under the bathroom, adjusted the height by eye, so that later they could put 50 mm extruded polystyrene foam and make a reinforced screed on top with pipes for a warm floor.
Since we already have jibs and frame posts on two floors, we can cover the walls with a windproof membrane, we will insulate the walls from the inside, and we will make sheathing for the siding on the outside.
Making the floor in the house
We make a subfloor from pallet boards, mineral wool will lie on these boards, no loads are expected on them, we attach them to the floor joists from below, with self-tapping screws, with gaps so that the insulation in the floor can breathe through ventilation holes in the foundation
During the construction of the frame house, do not forget about the cellar under the floor, it was also slightly trimmed with pallets, pouring crushed stone to the bottom, groundwater is far away from us, so everything is dry.
Connecting the bathroom floor to the wooden floor of the house.
Of course, all subfloor boards and joists must be treated at least against fungus and mold. I did this using a regular sprayer.
Engineering and technical examination of the condition of the building
It is allowed to begin the construction of an additional floor after a detailed study of the technical characteristics of the structure. Engineering and technical expertise makes it possible to calculate changes in the load on the load-bearing structures of the structure and determine the location of partitions. The implementation of the engineering and technical inspection procedure is within the competence of public and private organizations that have the appropriate documents permitting the provision of such services.
During the research process, the following object parameters are determined:
- technical condition of the building's components;
- safety margin of load-bearing structures;
- features of strengthening structural elements.
To identify even hidden flaws, a comprehensive inspection of the object is carried out. Eliminating existing shortcomings will help prevent additional material costs in the future. A comprehensive study includes several stages:
- collection of information about the technical characteristics of the house, the building materials used, duration and operating conditions;
- drawing up a plan for research activities;
- inspection of the structure using special equipment;
- laboratory testing of samples;
- preparation of a technical report.
After a visual inspection and a detailed examination of the organization’s experts, inspection reports and a technical report are issued containing a research action plan, the results obtained, their assessment, conclusion and advice on strengthening the structure.
Insulation of a frame house with mineral wool
Next, we need to insulate the frame house from the inside; for this we will use basalt insulation, the density should be from 30 to 50 kg/m3. The manufacturer Ecover makes a good Ecover Light Universal slab, it is rigid enough that it can be installed in the walls of a frame house. They brought in some insulation.
We begin to place the slabs in the spacer between the racks. It is necessary to do it in several layers, and at intervals to cover the joints of the slabs with the next layer. We have three layers of 50 mm each, so the total thickness of the wall insulation is 150 mm, which is quite normal for the Urals. The windows, by the way, are simply installed on mounting foam, as in any other house.
They installed a metal door, after which there will be a waiting room. If the dressing room is not made, then an ordinary iron door, without “thermal breaks”, will “cry” very much.
Work on insulating a frame house continues in any weather and at any time of the day, as long as there is time, strength and desire.
We decided to hem the ceiling with OSB; to do this, we must first make a vapor barrier; we attach it with a construction stapler to the joists of the second floor. The vapor barrier was used with Stroizol B or Izospan B, I don’t remember.
This is how insulation occurs around the frame jibs, the slab is cut at an angle, and then placed on different sides of the jibs. Gaps should not be allowed between the mineral wool and the frame; they must be filled with pieces of the same mineral wool obtained from scraps.
The procedure for carrying out construction work
First of all, you need to prepare the necessary materials and tools:
Scheme of strengthening brick walls.
Before building the second floor, it is necessary to dismantle the roof and prepare the house for the construction of the superstructure. First, they get rid of the tiles, then dismantle the rafter structure. Before further work, it is necessary to remove construction debris. The wall panel is lifted upward using a winch or construction crane. After installation, the end walls are connected using longitudinal beams and reinforced with vertical elements. After this, rafters are attached to the horizontal beams.
Now you can move on to insulating the walls of the second floor on both sides. For this purpose, sandwich panels made of plasterboard with insulation are used. After covering the walls are plastered. The sheathing is installed on the roof frame, and the roof is covered with the selected material. After installing the double-glazed windows, you can start decorating the interior of the room, connecting communications and installing sockets and lamps.
If desired, the constructed room can be divided using plasterboard partitions or Penoplex. Do not forget to provide an opening in the ceiling for installing a ladder. If you are building a full second floor, it should be located in the living room or hallway.
The entrance to the attic can be left outside. Having learned how to add a second floor to a brick house, you will be able to complete all construction work without any problems. How to build an attic?
OSB interior wall cladding
We have hemmed the ceiling and are starting to sheathe the already insulated walls. This is done with OSB sheets, the height of the sheet is 2.5 meters, the height of the wall is 2.53 meters. Coincidence? Don't think)). OSB on the walls is attached to the vertical posts of the frame, using self-tapping screws,
When sheathing OSB, there is a little trick, you need to get into the rack with a self-tapping screw, through a sheet of OSB, it is not so simple, you either need to draw lines on the sheet, or use a plumb line, both of these methods are time-consuming, the best option is an inexpensive optical level, which can draw lines on the wall and ceiling, I bought it on Aliexpress for 1200 rubles, you can see what they have now (link)
I have this one, we put it higher, it is self-leveling.
Then we point at the mark of the rack on the ceiling (we mark all the racks with chalk in advance), and the vertical line of the level shows us where to turn the screws, everything is simple and fast. Same thing with the ceiling.
It is also necessary to do foam insulation on the walls of a frame house from the inside of the room; it should not let moist air into the insulation, because it will condense there and turn into water.
More photos of the vapor barrier of frame walls
Insulation of ceiling and floor
Next, we insulate the ceiling (aka the floor of the second floor), photo from the second floor. All the insulation was done by hand, there is nothing complicated about it. The fish is already drying here)). In the photo below, you can see the vapor barrier of the ceiling, made before the OSB3 filing
The floor of the second floor of a frame house was insulated very tightly.
Since we do not plan to leave the completion of the second floor until next year, we protect the floor insulation with a membrane so that the cotton wool fibers do not blow out and do not get wet from snow and rain, which can blow into the gables and roof overhangs.
Plywood flooring is an inexpensive option
The time has come to make the floor on the first floor, after estimating the cost of tongue and groove boards and other materials for the floor, it was decided to reduce the cost of the structure using free material, namely boards from pallets, among which there are boards with a thickness of 22-25 mm. (see article on how to disassemble pallets). We decided to make a sheathing out of them along the floor joists, then screw 12 mm plywood on top.
We place the sheathing of boards so that the edge of the plywood sheet lies in the middle of the board, the next sheet will lie on it in the same way.
We are making a partition at the same time, since it is starting to get colder outside, and we are simply closing the extra rooms so as not to heat them.
Recommendations for strengthening load-bearing elements of a structure
Based on the results of the engineering survey, as well as the degree of deterioration of the load-bearing elements of the structure, additional reinforcement of the base and walls may be required to add an additional floor. This will ensure the safety of the future structure and extend its service life.
When constructing an additional floor, the following measures are carried out aimed at reconstruction and increasing strength:
- strengthening the base;
- increasing the width and depth of the foundation base;
- replacement of base elements.
The necessary work to strengthen the foundation of the house is determined based on the characteristics of the reconstruction project. To strengthen the base of a wooden structure or replace supports, objects and things are taken out of the room. Entrance and interior doors are removed and floors are dismantled. Next, the structure is raised using special jacks and a new foundation is laid.
The building can be reliably strengthened by installing a monolithic belt with reinforcement. This structure is a protective layer of reinforced concrete located on the outside of the building, following the contours of its walls.
Important!
Strengthening the walls of a building after installing a reinforced belt is not recommended until after a year. This is due to the possibility of shrinkage of the new foundation.
To install a reinforced belt around the perimeter of the structure, a trench is dug at a depth exceeding the level of the old foundation by at least 80 cm. The width of the trench is on average 50 cm. Sheathing is made from boards or plywood. A layer of crushed stone and gravel is poured into the trench. Thoroughly clean the surface of the old foundation and apply a primer with a high degree of penetration. Then horizontal pins are driven into the base to be strengthened at a distance of 25 cm from each other. The pins located in several rows are welded to metal reinforcement, a mesh is laid on it and filled with concrete solution.
If you plan to add an attic or full floor from light building materials, only the corners of the building can be strengthened. The diameter of the trench around the corners should be approximately 1 m, its depth should exceed the depth of the previous foundation by 50 cm or more. The metal lattice is welded to the reinforcement bars of the house’s foundation, and the space is filled with concrete.
Foundation repair
Making partitions in the house
We also put a vapor barrier in the partitions so as not to breathe in cotton wool, besides, in winter, we don’t heat non-living rooms, we just close the door, the temperature there remains +1+3, while the temperature in living rooms is +25+27
The floor is made of plywood, suitable for the cellar (here I am making a lid for the cellar). It's already frosty outside.
We are installing a dressing room partition; there will be two doors leading into the house. Entrance through the dressing room.
We put a door in the dressing room. with your own hands, using polyurethane foam.
In the meantime, the facade of our frame house will look like this. The top is covered with a windproof membrane, and the siding is partially installed. This way the house will be used for the winter, but the premises are already suitable for living on weekends.
Partition in the bathroom
We continue to do the interior work, it's a matter of partitions, in the photo below there is a bathroom partition.
In frame housing construction, walls are erected very quickly, and partitions even faster. On the left are the doors - a toilet and a bathroom, on the right is the kitchen. Straight ahead - exit to the dressing room.
Construction Features
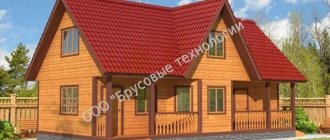
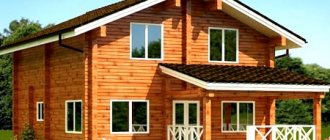
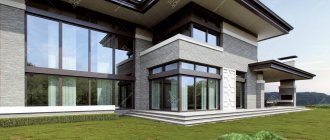
One of the main features of the construction of frame houses is that they can be erected without problems in a fairly short period of time. In just a month, a new building can be completely ready for a family to move into. In addition, it is currently possible to order a two-story frame house 7 by 7 or 8 by 8 meters on a turnkey basis.
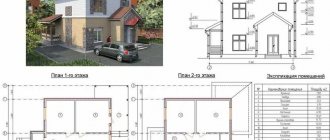
Sectional view of the building showing its main elements.
Video of the construction of frame houses on our website. Thanks to this, the process of building construction can be constantly monitored, based on the experience of other people.
Wintering a “frame” without a façade
The frame house spent the winter in this form. Inside, everything has already been done for a comfortable weekend, except for the bathroom and water, since the septic tank did not have time to finish. The windows on the second floor were simply covered with a membrane, then we’ll just cut them out.
Winter has passed, the snow has melted, we purchased siding, it’s time to cover the façade of our frame house with siding. We are finishing the sheathing for the siding. The preparatory stage is the longest. The windows were framed with lathing. There is a mistake here, we did not install flashings on the foundation before covering it with siding.
Briefly about the main thing
To know how to make a second floor in a private house under a roof, you need to familiarize yourself with all the rules and installation technologies. It is worth calculating the materials in advance and assessing the risks with the help of specialists. If the building is not able to withstand heavy loads, then its frame and foundation should be well strengthened before carrying out major work.
The process itself is not difficult to carry out independently without the help of a team; it is enough to follow the plan and step-by-step instructions. The last stage is the arrangement of the room depending on its purpose. By following the rules, you can build a durable and beautiful second floor, which will become not only additional living space, but also a decoration of the house.
Ratings 0
Finishing the facade with siding
First of all, when installing siding, window trims, starting profiles, corners and other additions are installed; siding panels are installed last. The window is ready.
We waited until evening and screwed on the starting profile using an optical level, the length is 10 meters, so the optical level is just right.
The starting profile is ready, let's make the corners.
The first floor of a frame house is sheathed on one side. Siding from Deke, block house, Banana color. It looks very good, imitation of profiled timber.
They installed scaffolding, since the height of the frame walls, about six meters, would not be enough for ordinary scaffolding.
I trimmed the second floor windows with platbands. They put molding on top, there will be soffits.
We cover it with siding further, on the right in the photo is the bathhouse, which was built a year earlier. The siding on it is the same.
With the pediment, everything is more complicated, the scaffolding does not reach, so in order to cover the pediment of a frame house, we put ladders on the second floor of the scaffolding. The missing leaf of Ondulin is a hole from the roof, then I will install it. There is already an antenna on the pediment to enhance mobile Internet
We completed all three sides of the frame house, then began building the garage, which is adjacent to the house.
Risk assessment
Before building an attic on an old house or on the second floor, it is necessary to conduct a thorough preliminary examination of the structure, which is carried out by specialists from our company.
A home inspection allows you to determine:
The condition of the object’s base, walls, ceilings.
Availability of safety margin and reliability.
Possible options for strengthening the building structure.
During the inspection process, the specialist calculates the efficiency and rationality of the superstructure to the house and gives practical recommendations on how to build the second floor efficiently, safely and reliably.
Attaching a garage to the house
The frame garage has one common wall with a two-story frame, so it was not covered with siding; the garage will be described in another article.
As a result, the construction of a two-story frame house took two years; they did it together, slowly, as building materials were purchased. The second floor has not yet been insulated, there needs to be a floor, partitions and other interior work, I will also make a staircase to the second floor with my own hands, there is work in this direction, I will make it from boards. There is already water in the house, a hydraulic accumulator distributes water to the bathhouse and to the house, so that the water supply does not freeze, a heating cable has been made.