The joy of buying an apartment passes quite quickly and is replaced by more pressing questions: where to get furniture if there is no money? In particular, this issue is especially acute for the kitchen: the amount of all kinds of utensils simply needs to be stored somewhere, not to mention the fact that all of this needs to be used. Today we’ll look at the process of creating a kitchen from plywood with your own hands - on a budget, not too difficult and quite practical. Go!
1. Real case from practice
2. Drawing and calculations
3. Prices
4. Photos of homemade kitchens
5. Video
Real kitchen
The kitchen was in approximately this state:
Since I wanted to move into my own apartment quickly, the decision was made to make a kitchen with my own hands on a minimal budget.
Necessary materials:
- Plywood 10 mm
- Bruschi
- Fasteners
- Furniture hinges
- Wood varnish
- Self-adhesive film
This minimal set will allow you to build a simple kitchen that can be used comfortably.
So, 10 sheets of plywood were purchased, the bars were found in the village bins, in addition to them, polycarbonate was found - this is already an option.
An old sink was also found, for the installation of which the bottom was glued with rubber - only there the sink was securely fixed and did not rattle.
Commercially available plywood is divided into 5 grades, but in the simplest case it can be divided by type/purpose as follows:
- The best is for facades.
- Medium – for the countertop.
- The rest is shelves and back walls.
After this, we move on to decisive action :
- We carefully measure all kitchen dimensions
- Thinking through the headset plan
- We cut plywood and timber
- We purchase fasteners (screws, metal corners, nails, furniture hinges)
- We install the kitchen
In fact, you can use a homemade kitchen made of plywood already at this stage, but let’s not overdo it by decorating it and making a safety margin. Let's move on to the tabletop - it will bear the main "impact":
- Skinning
- Apply several layers of varnish
- We glue the film
With this sequence of work, the tabletop will withstand all tests for 2-3 years, the main thing is to cut nothing on it.
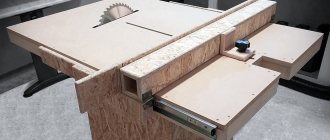
DIY plywood set
This is what a plywood kitchen looks like halfway to its completion.
At the same time, the installation of filters and the dishwasher is carried out.
After everything is assembled and installed, you can begin decorating our budget plywood set. We will need:
- Pens
- Paint/self-adhesive
- Rails and LED strip optional
In our case, the plywood kitchen was painted in the same way with our own hands in several layers. It is advisable to pre-treat the surface and edges with sandpaper.
Kitchen made of plywood painted blue
The final touch is to install a decorative panel around the dishwasher. This is also painted plywood.
Features of polyvinyl chloride lining
Covering the ceiling with PVC lining is an excellent option, since the material is very easy to handle and easy to install. However, it is worth remembering that PVC planks are fragile and very easy to damage.
There are two types of PVC lining:
- with seams;
- seamless.
Seamless lining allows you to create an almost seamless, smooth surface on which the seams between the individual planks will be almost invisible. If you want to create a surface reminiscent of eurolining, you should use panels with seams.
One of the main advantages of polyvinyl chloride panels is that they are resistant to wet environments. However, you should avoid exposing such a ceiling to direct sunlight, since under ultraviolet radiation the lining will begin to lose its original color.
Thus, the best options for finishing the ceiling with clapboard would be plastic (PVC) panels, as well as wooden planks.
Drawing and material calculation
Let's try to calculate the cost of a homemade kitchen set using the example of one standard cabinet, as is usually the case when ordering modular kitchens.
| What | How many | Size/Qty | Size |
| Side walls | 2 pcs | 82x52 cm. | 0.8528 m2 |
| Shelves | 3 pcs. | 60x52 cm. | 0.624 m2 |
| Tabletop* | 1 PC. | 60x60 cm. | 0.36 m2 |
| Rear wall + facade | 1 PC. + 1 pc. | 60x82 cm + 60x78 cm. | 0.96 m2 |
| Basement facade | 1 PC. | 60x4 cm. | 0.024 m2 |
| Total plywood: | 2.8208 m2 | ||
| Bars for shelves | 4 things. | 52 cm. | 2.04 m |
| Bars for countertops | 2 pcs | 60 cm. | 1.2 m. |
| Total timber: | 3.24 m. | ||
| Self-tapping screws | 30 pcs. | ||
| Furniture handles | 2 pcs. | ||
| Furniture hinges | 4 things. | ||
*the tabletop is designed with an overlap behind the cabinet itself for the easiest insertion of pipes, etc. The gas hose, wires, etc. will also be hidden there.
Care Tips
Despite the practicality and relative durability of the material, the lining needs special care.
- Despite special impregnations, wooden lining cannot be moistened with water to avoid deformation and swelling of the board.
- Do not use aggressive cleaning agents or detergents. If a serious stain appears, you can gently go over it with a soft cloth and a weak solvent. For varnished surfaces, you should use a cotton swab or cotton swab; you need to treat the stain very carefully so that the solvent does not remove the varnish along with the dirt.
- Any lining is lightly wiped with a soft damp cloth.
- Once a year it is recommended to treat the surface with protective agents (waxes, varnishes). Before doing this, the boards must be cleaned and dried thoroughly, sweeping away the dust with a soft cloth or brush.
- The clapboard trim should be positioned so that fresh air flows to them - if possible.
- In the apron area, it is better to place the boards vertically to prevent moisture from accumulating.
Prices
| What | How many | Price |
| Plywood, 10 mm. | 2 sheets (2.326 m2 each) | ~7 USD |
| Beam, 50x50 mm. | 3.24 m. | ~2 USD |
| Self-tapping screws | 30 pcs. | ~1 USD |
| Pens | 2 pcs. | ~1 USD |
| Furniture hinges | 4 things. | ~2 USD |
| Varnish + paint* | 5 USD and less | |
| Self-adhesive* | 5 USD and less | |
| Total: | 18 USD | |
*or
Calculating the cost is, of course, not final: a do-it-yourself plywood set can always be reduced in price in a dozen different ways.
The calculations do not include the cost of tools and deliberately do not indicate the necessary list; prices are indicated with a reserve. Thus, the lower tier of the direct kitchen is 3 sq.m. will cost about $40 because:
- The sink cabinet does not require a back wall and a countertop (for a sink cover)
- It is possible to combine several cabinets into one - less plywood will be required
- You can refuse to buy timber in favor of furniture corners
- It is not necessary to close the base
- Prices for accessories vary greatly
- You can easily find much of this list in your garage/dacha/at your neighbor’s house.
If desired, ready-made doors for facades can be purchased at large chains like Leroy Merlin or Ikea
Types of plywood
The choice of plywood intended for the manufacture of kitchen furniture should be approached responsibly. When purchasing a material, it is necessary to take into account its brand, type of processing, grade, purpose and type of wood used in its manufacture.
Based on the raw materials from which it is made, plywood is divided into:
- hardwood material: birch, beech, mahogany;
- material from coniferous species (pine).
Plywood made from softwood is less durable, but cheaper.
There is a moisture-resistant brand of plywood - FC, intended for interior finishing work. It is this plywood that is recommended to be used for assembling the headset.
Advice! You can purchase plywood from both Russian and foreign manufacturers, for example, Finland. You should refrain from buying Chinese material due to its low quality.
Before purchasing, each plywood sheet should be carefully inspected for the presence or absence of defects or defects: paint runs, swelling, cracks, scratches, chips.
Photo
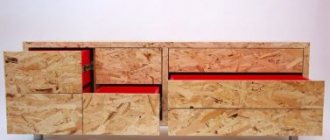
Even if you decide to make your own kitchen, you don’t have to use plywood for this. We show several examples of photos where headsets were made independently.
DIY plywood kitchen
Corner kitchen made of plywood and glass
Another version of the drawing that can be used in practice.
Ceiling Design Ideas
The most interesting ceiling design ideas.
Two-level
Different levels of differences on the ceiling look interesting and unusual. With the help of such double structures, you can zone the space and give it visual complexity.
With beams and false beams
An aesthetically attractive and very original version of the ceiling design, which allows you to visually enlarge the room and favorably emphasize its style direction.
The photo shows a living room and a white clapboard ceiling decorated with beams.
Combined
The lining combines very harmoniously and stylishly with other materials. Contrasting ceiling combinations look especially successful and beautiful.
Sloped ceilings with gable roof
Wooden products are quite popular and almost irreplaceable option for covering a gable ceiling.
Turning into a wall
The ceiling structure that smoothly flows onto the wall looks very original and gives the room a more stylish and modern look.
Brushed
Such models have a pronounced woody texture and an unusual aged texture, which is obtained as a result of special treatment with metal brushes.
With an unusual middle
Such an extraordinary design will undoubtedly add brightness and originality to the interior.
Antique
To achieve this aged effect, treatments with various varnishes or stains are used.
Bathroom
A toilet or bathroom can also be finished with clapboard, but only on the condition that it is impregnated with a water-repellent composition. Otherwise, such an interior will very quickly lose its original appearance. The use of lining in toilet rooms is also encouraged only if the area is large enough. Do not forget that installing boards greatly reduces the area of the room. Ideal if the bathroom is combined. In other cases, it is better to limit yourself to plastic panels that imitate natural clapboard boards.
Application options
You can cover almost the entire room with battens.
Walls
The most obvious option is full coverage, without highlighting zones, even work zones. If you do not want to spend effort and money on other materials, we recommend that you take a closer look at a board painted white. This option is more relevant than a solid wood covering.
- A half-decorated wall looks interesting. This technique is often used by American designers when decorating the kitchen-living room with clapboards. They combine it with wallpaper or paint, and carefully decorate the joints with molding.
- You can use a board to make an accent. Usually this is the wall near the dining group. If the room is large, then you do not need to worry about choosing moisture-resistant paint.
- Another option is an apron. Here, on the contrary, it is important to choose a coating that would protect wood or MDF from moisture and dirt.
Ceiling
A thin board can be a good alternative to decorative beams or simple plaster. It is only important to choose the size of the slats.
- If the kitchen is small, it is better to avoid covering the ceiling with wood.
- In spacious rooms, options in natural colors can also look interesting.
- The width of the slats is subject to general rules, but there are no strict canons. Wide ones will visually increase the area, narrow ones will reduce or emphasize it.
- Try not to get carried away with one type of slats (and their installation) for covering walls and ceilings. It's better to try a combination of materials. Otherwise, the space will turn out to be cramped and limited.
- Material prepared by: Anastasia Khripunkova