how to make a table for a schoolchild
Being a schoolchild is not easy, although it is fun. The task of parents is to provide maximum comfort to the child so that he can fully study at home, doing homework, that is, he needs suitable furniture. If possible, it is better to make a table for a schoolchild with your own hands . This solution has many advantages and this applies not only to finances. Although the choice of children's tables for schoolchildren is huge, a homemade design makes it possible to take into account all factors - both the individual characteristics of your child and the space available in the house. Here are some examples of how to make a desk for a schoolchild with your own hands . Before you get down to work, it is important to think everything through. There are mostly step-by-step photos and instructions, but on the Internet there are many useful tips and recommendations on how to make a children's desk for a schoolchild, taking into account height, weight, age and other factors. Based on this, you can make a children's desk with your own hands or a full- fledged desk for a schoolchild . And what’s also important is that if you did it yourself, you can fix it yourself, but children’s furniture often breaks. Children, what can you do?
Final finishing and decor
After the wooden table is assembled, we begin to process its surfaces. Natural wood requires special antifungal and moisture-repellent impregnations. The product is applied in two or three layers. Each time, the surface is completely dried and only then proceed to the next application of the product.
Creating original round tables with your own hands, tips for craftsmen
If the item is made of MDF or laminated chipboard, then treatment with an antiseptic liquid is skipped, since the laminated film on the surface is a kind of protective coating. But these slabs require processing of the edges of the tabletop. Veneer is glued to the end parts to close the cut.
To make a folding table made of wood or metal look aesthetically pleasing, it is coated with varnish or paint. The product is processed completely, including the legs. If the surface has a beautiful wood pattern, then you can use transparent or tinted varnish. The product is applied twice. Tables painted in pastel or rich colors look no less aesthetically pleasing. Bright colors can maintain a cheerful mood, which is especially important during picnics and holidays.
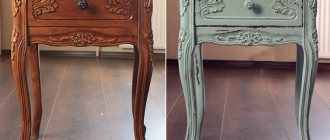
Step-by-step restoration of an old table, ideas for original decoration
Techniques such as painting, appliqué, decoupage, craquelure, and burning will help transform furniture. If the product is not intended for interior purposes, but serves purely practical purposes, then it is best to cover the tabletop with self-adhesive film. It will protect the surface from moisture, dirt and make it easier to care for the item.
Making a folding table with your own hands is a creative activity. Having constructed the desired model and drawn all the details on the diagram, it is not difficult to turn your plans into reality. With high-quality assembly and proper processing of the material, homemade furniture will last for many years. A beautifully decorated item acquires a unique look and therefore can become an original decoration for a room.
Views and drawings
Depending on the design, all welding tables intended for private workshops are divided into two types: simple and semi-professional. For temporary or simple work, the first option is suitable. For the manufacture of complex products, a semi-professional (rotary or assembly-mounting) design is required.
The easiest way is to make the first type of welding table with your own hands. A simple model consists of a rigid rectangular frame to which four supports are welded. As the latter, use a corner or a steel pipe. For greater stability, the legs are fastened around the perimeter with metal crossbars. The tabletop of a simple table is equipped with perforation grooves for securing the parts to be welded.
The design of the semi-professional workbench is equipped with a round platform that can rotate smoothly. Movement is possible thanks to the installed electric motor. This model allows the welder to create complex products without moving around the furniture. The assembly and assembly table provides additional built-in elements: head devices for drilling, grinding, milling, as well as a built-in fan.
For self-installation, you must prepare drawings of the device. All details must be drawn on them with exact dimensions. If there is no ready-made option, drawing up a drawing of the welding table is done manually. To do this, create a bill of materials. A summary table with table dimensions and names of materials is reflected on one sheet with the sketch itself. When making calculations, it is taken into account that the height of the workbench should be within the range of 700 to 850 mm, and its area should be at least 800 × 1000 mm.
Simple
Semi-professional
Assembly and installation
Drawing
Design Features
The welding table is the main workplace of the welder. On a flat metal tabletop it is convenient to perform manual welding, cutting metal, cleaning parts, and final grinding of products. A classic DIY welding table suitable for installation in a garage or workshop. In such conditions, the overall structure serves as a grounding element, since it is entirely made of metal.
Another difference between a workbench and a regular table is its structure. It meets the criteria of practicality and safety requirements. Mandatory elements are a fireproof tabletop, tray and legs. The design can also be equipped with a lower shelf, on which it is convenient to store tools and equipment - a welding machine, a shield, an ammeter, a voltmeter, a pencil case with electrodes. Any welding equipment is manufactured and installed according to safety rules:
- above the table there is a working hood for removing gaseous substances;
- the ventilation device is mounted at a height of 1.3–1.5 m above the welding workbench;
- a copper edging is welded along the edge of the tabletop to keep the grease off the electrodes;
- The workplace is equipped with lamps operating under a voltage of 36 V.
No flammable substances or materials should be stored on or near the table.
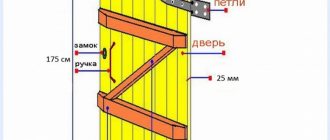
How to make a growing (height-adjustable) chair for a child
The structure of the growing chair includes special fastenings. The set of these parts is designed to change the configuration of the chair - adjusting the back, seat height, position of the bar under the legs in accordance with changes in the baby's growth.
What are the pros and cons of making children's growing furniture yourself?
The disadvantages of creating a growing baby chair yourself include:
- complexity of manufacturing. You will need carpenter skills and the ability to use construction tools;
- you will have to devote a lot of time to ensure that the design meets all the requirements of growing children's furniture;
- There is a possibility of error when designing a product yourself, which will negatively affect the child’s posture.
Positive sides:
- independent selection of quality material. There is confidence that the wood does not contain toxic impurities that are harmful to the child’s body;
- positive emotions from the creative process;
- creation of an exclusive version of furniture;
- unlimited number of design options;
- the opportunity to involve the child in creating a growing chair, to instill in children new, useful skills;
- improving your own skills in carpentry;
- cost savings;
- a common cause unites the family.
The picture below shows the key points to keep in mind when making a growing chair and shows the incorrect postures for a child when using growing furniture.
Step-by-step instructions (with drawings, dimensions, diagrams) for making growing chairs yourself
If making a growing chair for a child with your own hands is your first creative work on creating furniture, carefully study the instructions provided. Make an objective assessment of your capabilities and be patient. Be prepared to see results only in a few days. In addition, check whether you have all the necessary tools.
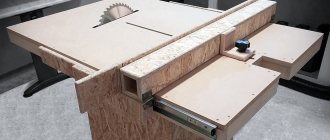
Carpenter's router table from a manual router
In search of a worthy answer to the discomfort that arises when working with hand-held milling tools, owners of home carpentry eventually come to the need to purchase a convenient milling table.
VovroKsyuUser FORUMHOUSE
I've been thinking about the table for a long time. Especially after I manually milled 22 m of fence.
The purchase option can be expensive; the dimensions of a machine assembled in a production environment do not correspond to the size of a small home workshop. The optimal solution in this case would be to assemble the milling table yourself.
Those who want to make a homemade milling machine will find drawings and step-by-step instructions in the corresponding FORUMHOUSE section.
How to make a milling table
A homemade milling table is a simple machine for processing wood. The main working unit in it is a manual milling machine. Working with hand-held power tools involves moving the working cutter along the surface of a stationary workpiece (which is not always convenient). A milling table for hand tools allows you to change the processing method and mill in a lightweight way: the hand tool is fixed on the work table, and the workpiece is easily fed to the cutter by hand.
A milling table for a manual router consists of basic and additional elements. Additional elements are not required, but their use makes it possible to make the technician’s heavy work as easy as possible, make the design of the device safer, and make the functionality closer to the capabilities of serial installations.
Universal milling table: basic design elements
The main elements of the milling table are indicated in the figure.
Aib User FORUMHOUSE, Moscow.
I really needed a mobile milling table. I welded the frame, painted and assembled the structure.
The dimensions of the milling table depend on the dimensions of the parts being processed, as well as on the height of the craftsman himself. The length and width should be slightly smaller than the tabletop, and the height of the bed is 850...900 mm, which corresponds to the most comfortable conditions for standing work. The homemade legs can be made adjustable, which will allow you to compensate for uneven floors or change the height of the bed.
Tabletop for router
The dimensions of the tabletop depend on the size of the parts being processed.
dautovFORUMHOUSE user
In a home workshop, a small table of 500x500 mm is sufficient.
To process relatively long parts (for profiling edges on door frames), you will need a tabletop of the appropriate size. Let's look at the drawing:
For the manufacture of the frame, wood-based materials are most often used, which can effectively dampen vibrations. This could be a countertop made of chipboard, which is used in the manufacture of kitchen furniture, or a sheet of thick plywood. Here, for example, is a countertop made from chipboard scraps formed after installing a kitchen sink.
Krott64FORUMHOUSE user
With this tabletop scrap, after some simple modifications, you can do some pretty decent things.
Some people make countertops from metal, others from edged boards, but, as practice shows, chipboard and plywood are always a priority.
Orfo74FORUMHOUSE user
If I make it, it will be from laminated plywood (I have one like this on my trailer). I have already traveled hundreds of thousands of kilometers under the heat and below zero. Neither salt nor rain spoiled it. And it can still be used, but you need to assemble it either in 2 layers, or make the bottom out of simple plywood.
To make a countertop, you cannot use material that has defects on its surface (knotty boards, etc.).
Mounting plate for hand router
A hand router is attached to the mounting plate using threaded connections. Therefore, its production must be taken with full responsibility. The material from which the plate will be made must be strong enough so that the router does not tear out during operation (the consequences can be imagined). This can be a rectangle made of metal or plywood sheet (but metal is more reliable).
AlekXFORUMHOUSE user
A powerful car has a lot of dope. And if she turns out of the table while working, it won’t seem too bad.
– not recommended, because the thicker the plate, the smaller the vertical overhang of the cutter.D
DgusepeFORUMHOUSE user
The legs can be made of wood, but it is advisable to make the tabletop from 3 mm metal. For maximum cutter lift.
The length and width of the mounting plate must correspond to the dimensions of the base of the hand router, with which the power tool will be attached to the table.
Longitudinal workpiece stop
The longitudinal stop can be made from a regular sheet of chipboard or from an edged board. The stop must be made movable to ensure the possibility of adjusting the horizontal reach of the cutter. For more precise adjustment, you can attach measuring rulers to the sides of the tabletop.
The design of the locking mechanism, which allows you to secure the longitudinal stop in the required position, is extremely simple. It can consist of two slats with through longitudinal grooves and two threaded fasteners with wings.
Instead of slats, you can use two metal corners, which will last longer and will not deform under the action of clamps.
To prevent dust and chips from interfering with work, it is advisable to equip the longitudinal stop with a dust collector, to which a chip extractor or a small carpenter's vacuum cleaner is connected.
The longitudinal stop can be made double, which significantly expands the functionality of the milling table.
SuperkuzenFORUMHOUSE user
The monolithic stop makes it impossible to carry out a lot of operations performed on the milling table, that is, it makes the table of little functionality.
A milling table can perform the functions of a small jointing machine if an adjustable difference between the working planes is arranged between the two halves of the longitudinal stop. This design allows you to move one half of the stop relative to the other, setting one stop flush with the cutter using thin wooden plates. Adjustment plates are placed under the non-working surface of the stop.
Manual milling machine
The performance of the milling table will directly depend on the technical characteristics of the hand tool (power, number of revolutions per minute, etc.). You should choose a router for a milling table based on the expected load. The additional functionality of the machine will be an additional advantage for the master. If you don’t yet have a manual milling cutter, then choose a tool with an adjustable cutter rotation speed and the ability to set the processing depth (plunge-beam milling machines). Very easy to use machines with a spindle lock (for easy replacement of cutting tools), as well as devices with soft start and quick stop of the spindle.
We looked at the main elements of a milling table, which will allow the owner to perform the simplest milling operations. In order to expand the functionality of the device, make it universal and increase operational safety, it is necessary to ensure the availability of additional devices. Let's look at the most common of them.
Longitudinal guide for movable milling carriage
Using a longitudinal guide built into the surface of the table top, you can attach a variety of devices to the milling table: an angular stop with a protractor, a perpendicular stop, etc.
The longitudinal guide can have a different design, but most often it is an aluminum C-shaped profile into which bolts and wing nuts are inserted. This design allows you to quickly install the device you need at the moment on the milling table.
By the way, using the C-shaped profile, you can also attach a longitudinal adjustable stop to the tabletop.
Vertical clamp
The upper clamp increases safety when working with a homemade router and increases processing accuracy. Its fastening can be implemented using the type of clamps for a movable carriage.
If you are planning to make a router table with your own hands, a video about setting up a universal carpentry workshop for personal use will help you with this.
Lift for router
The vertical reach of the cutter very often has to be adjusted. To perform this adjustment, a milling lift is provided - an adjustable stop that allows you to maintain the milling machine at a given height and, if necessary, quickly change this height.
It is advisable to use a milling elevator in conjunction with submersible milling machines. Their design initially has guides for adjusting the reach of the cutter (unlike machines with a fixed motor).
A lift for a homemade router can have different designs.
Car jack lift
You can use an old car jack to create a lifting mechanism.
leon42FORUMHOUSE user
The elevator can be made from a car jack: there is a shelf under the router, and we attach the jack to the shelf. We turn the jack - the router rises or lowers.
For convenience, the jack handle can be moved out of the side wall of the bed. This will make adjustments much easier.
Threaded rod lift
Blackk FORUMHOUSE user
The angle with the threaded rod is screwed to the protrusion on the router, to which the measuring pin is normally attached. The corner for the threaded rod is threaded. By rotating the pin, we seem to screw into the corner and pull the entire router up along the guides. Accordingly, when rotating backwards, we lower the router.
In this case, the threaded rod has a recess for a hex key.
Elevator based on threaded wedge
Another effective and easy to implement elevator design.
The mechanism consists of a wooden wedge (item 1), in which a through hole is drilled for a screw (item 2). Thanks to metal plates (item 3), attached to the sides of the wedge and having threaded holes, the wedge moves in a horizontal plane, raising or lowering the milling machine. The handle of the lifting mechanism is located on the side surface of the bed. To reduce the load during lifting, the router is equipped with a homemade roller (item 4).
Turning the router table on and off
All necessary equipment for the electrical part of the milling table is already provided in the design of the milling machine. The only thing that can be added to an existing electrical circuit is a remote switch and an emergency shutdown button (after all, no one has yet canceled the safety rules during operation).
You can use a very ordinary switch for the router. As for the possibility of quick shutdown: it can be realized by installing an emergency button with a locking mechanism on the table (in which the unlocking is carried out by turning).
Table assembly
We have listed the main and auxiliary elements of the milling table. Each master can determine the order of assembling the device for himself. The only point to pay attention to is the manufacture and installation of the mounting plate.
After a plate of a suitable size is cut from a steel (or plywood) sheet, it is necessary to drill holes in it for attaching the milling machine, a hole for the cutter (its diameter must correspond to the diameter of the hole in the base of the router) and mounting holes (for attaching the plate to the tabletop) .
The base of the router has threaded holes for fixing the plastic cover. These holes can be used to attach the router to the mounting plate using countersunk screws (the stock plastic trim is removed).
If there are no mounting holes in the base of the router, then metal clamps or standard fixtures provided for by the design of the router can be used as fasteners.
The mounting plate must be flush with the tabletop. Therefore, a recess of appropriate dimensions should be made in the tabletop.
If you have already assembled a milling table with your own hands, we invite you to share your personal manufacturing experience in the appropriate FORUMHOUSE section (there you will find instructions and drawings). People who have seriously decided to master carpentry will be interested in an article about what tools they need to have in their carpentry or furniture workshop. And a video about the design of a homemade milling table and the features of power carpentry tools will help you find answers to questions regarding equipment that is extremely rarely used in a small home workshop.
Labor and cost
Cutting out the parts will take an hour. Subsequent assembly and fastening is another half hour.
Painting, together with drying of each layer, takes about four days.
- Adhesive primer 4 kg. - 300 rubles
- Paint with magnetic properties 0.5 l. — 1500 rubles
- Blackboard paint 1 l. — 1000 rubles
- Three sheets of plywood 1700 x 900 mm - 5800 rubles
The total cost of the table is 8,600 rubles.
With such a table, a child will pass through more than one class. The height of the chair and the lid can be adjusted, so this furniture will serve the owner for several years.
Varieties
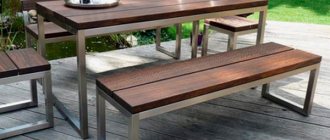
Depending on the scope of application, metal tables can be divided into several separate groups:
- Garden tables. Used for outdoor placement.
- Loft base with surrounding metal structure and rough wood tabletop.
- Workbenches for the workshop.
- Coffee tables made of glass and metal.
- Computer tables.
Designer tables are often made with glass tops. Under them there can be various pebbles, books, and accessories. Depending on the material of the countertop, the following types of structures are distinguished:
- glass;
- metal;
- wooden.
Coffee table made of metal and glass (Photo: Instagram / artlandstudio)
Necessary materials
To make a transformable children's desk we will need three-layer wooden panels. The main parts of the structure will be cut out of them. The thickness of the panels is 30 millimeters and dimensions are 1700 x 900 millimeters.
- Adhesive primer. This material improves the adhesion of paint to the surface.
Adhesive primer Tikkurila - Paint with magnetic properties. Before use, the paint is diluted with water.
Magnetic paint Tikkurila - Paint for school boards. Used for decorative design of surfaces.
Blackboard paint