Gas boilers are simple and easy to use, do not cause problems during maintenance, and effectively cope with their functional task. They are bought much more often than their electric and solid fuel counterparts, but not everyone knows that before turning on a gas boiler in an apartment or private house, preparatory measures need to be carried out.
In the article we present you will find useful information about starting a gas unit and the rules for preparing it for the upcoming work. We will talk about the features of filling the heating circuit with water. We'll show you how to enable and select the settings you need.
Generation of new heating systems
Modern models of gas boilers are more advanced in comparison with traditional analogues.
Both single-circuit and double-circuit devices are available on sale. The first ones are intended only for heating. The latter are capable of simultaneously performing two functions: heating the premises of the house and providing its owners with hot water supply.
Scheme: arrangement of single-circuit and double-circuit boilers
Innovations concern not only the design of the device itself, but the use of higher quality devices:
- The design now includes control and regulating devices that allow you to set different modes.
- In the ignition system, traditional handles have been replaced by piezoelectric elements.
- The casing coating is characterized by increased resistance to damage and durability.
They are convenient because they are able to operate smoothly and efficiently, without requiring constant human supervision. Sensors located on the body will indicate malfunctions, while at the same time identifying the system that has failed.
Thanks to the automatic AGV, in the event of a drop in gas pressure, unexpected extinguishing of the pilot flame or a decrease in draft, the system is instantly switched off, which is important for the safety of residents
- The main elements of the automation unit are:
- Electromagnet – controls the gas supply valve;
- Thermal sensor – controls water heating;
- Draft sensor – monitors the draft level in the pipe;
- Thermocouple – creates an electric current in a circuit.
Modern boilers are as compact and automated as possible
The gas supply to the burner is controlled by a thermal sensor. To ensure uninterrupted operation of the unit, you just need to set the desired parameters. When the shutter is automatically activated, the gas supply to the burner is reduced to a minimum, and the operation of the system is maintained only by a weakly burning wick.
As soon as the temperature sensor triggers to lower the temperature of the coolant, the automation starts and the wick ignites.
Description of some models
The Conrod range of gas boilers is represented by several main models:
- KSts-G-S is a single-circuit type boiler equipped with SIT automation. The power of the unit varies from 8 to 30 kW. Water can heat up to 60-90 degrees, operating pressure can range from 0.2 to 1.9 bar.
- KSts-G-N is also a single-circuit type model, but with thermo-hydraulic automation. The boilers are produced with a power from 10 to 30 kW; cold rolled steel was used to manufacture the cylindrical heat exchanger.
- KSts-GV-S is a two-circuit type unit with SIT automation and a power of at least 12 kW. The boiler fully functions when connected to a system with natural and forced circulation.
- KSts-GV-N is a double-circuit model of gas boilers, equipped with thermo-hydraulic automatics. The boiler power ranges from 12 to 30 kW. There is a function to turn off the gas in the absence of traction. With a short-term reverse thrust, the device normalizes operation.
Autonomous heating systems are becoming increasingly popular.
The development of private housing construction, the emergence of remote residential areas in which there is no possibility of connecting to centralized heat supply lines, contribute to an increase in the number of users of independent home heating systems.
High demand has provoked an increase in supply - there is a huge selection of heating equipment on the market, manufactured in different countries and with different prices.
At the same time, the prices practically do not correlate with the performance qualities of the equipment, which complicates the choice and requires some knowledge regarding the qualities of gas boilers.
Installation of a wall-mounted gas boiler
Diagram of a gas floor boiler.
Tools and materials:
- welding equipment;
- level;
- pencil;
- container for mixing the mixture for concrete screed;
- drill with a set of drills;
- metal scissors;
- screwdrivers;
- a set of keys.
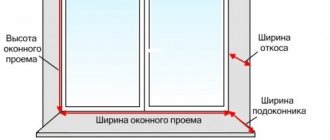
- The height of the suspension of gas equipment along the edge of the lowest pipe must be no lower than the top of the sink spout and no less than 80 cm from the floor.
- The space under the boiler must remain free.
- There should be no cavities in the installation room that could become a place for the accumulation of combustion products or an explosive gas mixture.
- A strong fireproof metal sheet measuring 1x1 m should be laid on the floor.
- An expansion tank and an air valve are installed at the highest point of the system.
Installation diagram of a wall-mounted gas boiler.
When purchasing a boiler yourself, check the contents and availability of fasteners; if not, they should be purchased separately
Pay special attention to the availability of equipment certification, otherwise, after installing it yourself, you will not be able to register it; also check that the serial number in the accompanying documents of the boiler matches the number printed on the inner surface of the boiler
If the wall that will become the basis of a wall-mounted boiler is made or finished with highly flammable material (paper wallpaper, wood), a heat-resistant coating with a layer of at least 2 mm is laid on the surface. The boiler is installed at a distance of 4-5 cm from the wall level. Before installation, rinse the internal tubes by running water under low pressure. Thanks to this washing, it is possible to remove from the tubes all kinds of debris and dust that could have entered during assembly.
When starting installation yourself, attach the mounting strips at a height of 1-1.6 m from the floor. Check the position of the slats with a level and only then hang the boiler itself. Install a hard filter on the water supply pipe to prevent possible clogging of the heat exchanger. Thanks to the installation of shut-off elements on both sides, the filter can be periodically replaced without draining water from the system or cleaned.
Install the chimney and check the draft. Despite the fact that most modern wall-mounted boilers do not require strong draft, since combustion products are removed using a special fan, it is necessary to make sure that the draft is not reverse.
Connect the boiler to the pipeline using a threaded coupling from the side end. The water supply pipeline is connected from above, the water return - from below. The most convenient connection method is gas welding. Do-it-yourself installation rules allow for a slope of heating pipes within 5 mm per 100 cm of pipe.
To connect to the gas pipeline, the participation of a gas specialist will be required. A gas supply valve must be installed on the gas supply pipelines; to connect the boiler to the pipeline, the gas supply through the air line must be shut off. The gas supply is carried out using a metal pipe through an element such as an American pipe or a special squeegee, so this work can only be carried out by specialists.
If the boiler is volatile, it is equipped with automatic equipment that protects against short circuits and overheating, and requires connection to the electrical network.
At the final stage of connection, the boiler is put into operation with your own hands, which can only be carried out by a gas industry worker after checking compliance with the rules and safety requirements.
Raised floor covering
The floor is insulated, the balcony is glazed, this radically changes the microclimate of a small room. This means you can use materials that are not usually used in open space.
Stelem linoleum
Linoleum on the balcony
First of all, you should choose a material at least 3 mm thick with a special pile. Thanks to the hairs on the rough side, the floor will be softer and warmer. Also, the size of the piece should allow it to completely cover the entire area of the balcony floor.
Before laying, the roll should be unrolled and allowed to lie on the balcony. This will allow the material to level out and “get used” to operating conditions. In a couple of days you can start working.
How to lay linoleum on the balcony
The plywood base is already there. It is necessary to check the screw caps; they must be well recessed. The next step is trimming the excess. Using a metal ruler, the linoleum is pressed against the joints of the wall. The excess is cut off with a construction knife
It is important to leave a margin of approximately 10 mm.
Linoleum laid out on the floor is bent in half. Apply glue to the freed part of the floor using a wide brush.
You need to wait 10 minutes and turn the bend back
Starting from the center, rolling towards the edges occurs with a roller. This will allow you to level the linoleum and squeeze out excess glue, which should be immediately removed with a rag. The same is done with the remaining half. A day later, after the glue has completely dried, you can attach the baseboard.
Laying laminate or parquet
Laminate flooring for balcony
As for the support of the material, the laminate should be moisture-resistant, and any parquet board should be used. The installation process for both floors is almost identical, and on a plywood base it is carried out according to the following instructions.
It all starts with vacuuming
It is important to eliminate any small particles that may get into the connecting grooves. This will cause the seams to squeak or bulge. One of the substrates is laid on the prepared surface: cork or polyethylene
Its parts are fastened together with tape. Starting from the corner farthest from the door, lay the first board so that the tenon rests against the wall. Next, the entire row adjacent to the parapet is assembled. The floor parts are attached to each other with a special lock and do not require the use of nails, glue or other connecting elements. The lock should be latched with light blows of a hammer on a wooden block adjacent to the edge of the board. Small wedges made from scraps of material should be inserted into the gap between the wall and the edge of the laminate floor. This is done to create an expansion gap.
All rows after the first are mounted so that each subsequent board is shifted by half the length of the previous one. The material must be cut with a jigsaw with a special file. It does not have inclined teeth and will not leave chips on the front surface of the laminate. A staple or nail puller is used to install the last row. It is inserted into the slot and secures the board in the groove. A plinth is installed around the perimeter of the floor, which should only be attached to the wall. After completing this operation, the coating is ready for use.
How it all began
At one time, gas boilers of the AGV-80 or AGV-120 brand were used to heat a private house. This equipment had low productivity, but given the low cost of gas, this fact did not bother anyone.
AGV gas boilers for private homes were equipped with primitive automation, which failed in the first year of operation. However, the equipment functioned normally without it.
Installation of pipes for distribution is carried out outside around the perimeter of the house. However, this issue was not relevant at that time, and heat was supplied to the house in full. Pipes were used with a diameter of 2 inches, since a smaller diameter could cause the formation of air pockets that impede the natural circulation of the coolant.
After a slight modernization, gas boilers for heating AOGV and AOKGV appeared on the market, but this equipment was characterized by the same shortcomings (low performance and unreliable automation).
Despite this, boilers of this type have held up quite confidently on the market due to a serious advantage: the AGV heating stove operates without being connected to a power supply.
Other advantages of a heating system using AGV include the following:
- If we compare imported equipment and AGV, we note the affordable cost of the latter option.
- In contrast to the AOGV and the gas boiler produced by domestic manufacturers, the efficiency of the AGV can be noted.
The listed characteristics help in deciding what is better: an AOGV or a boiler.
This is interesting: A stove with a fireplace designed for long-term heating - how to choose for a summer house. Types, models, burning duration and other characteristics
Varieties of classic style
The concept of classical style unites a number of trends that have a common basis, but different means of expression. Let us next consider the two most popular trends in interior design.
IMPORTANT: do not skimp on purchasing high-quality materials and interior items - it depends on how the room will look - cheap and pretentious or dignified and elegant.
American classic style in the interior
This style came to us from across the sea from colonial settlers. In pursuit of a better life in the New World, they furnished their homes as best they could - so by the end of the 20th century, by intertwining European and local country styles with a touch of Art Deco, an elegant American classic style was formed, which has several characteristic features:
- The center of the house is the living room, usually with a fireplace and combined with the dining room. Upholstered furniture is concentrated in the center, wood predominates in materials;
- The rooms flow into one another - the doors close only to private rooms;
- Photos of kitchen interiors in a classic American style usually have one common and integral detail - a bar or kitchen island, which is also sometimes a dining table;
- Lighting is another characteristic feature. It divides the room into zones: a large chandelier and additional floor lamps and sconces - everything is like in ordinary classicism. However, additional light sources are turned on only when necessary - a tribute to the economy and thrift of the inhabitants of the New World.
Interior style: modern classic
If in the photo the classic style in the interiors of apartments or houses seems to you too oppressive, “smells of mothballs” and deliberately pretentious, but you still want something timeless and sophisticated, a more modern neoclassical style in the interior (or modern classics, as it is sometimes called) just for you. Here, too, typically classical decorative techniques are used - stucco molding and gypsum rosettes, patina and pilasters, Greek columns and complex relief patterns. However, the overall impression of the interior is lighter and unobtrusive - this effect is achieved by intertwining classic features with modern laconicism.
The neoclassical style in the interior also supports the principle of symmetry - there are no random or disordered things here. The color scheme is predominantly light, pastel tones. The main colors are still white, beige and gray, but unlike the classic interior, color accents are increasingly found here, albeit muted, in textiles and furniture upholstery - azure, green, red, pink, blue, etc.
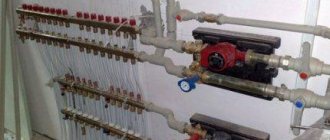
Composition of the AGV system
The AGV system for heating devices consists of the following main elements:
- AGV boiler;
- pipelines;
- heating elements (radiators, registers);
- expansion tank, which is mounted above all other elements (necessary when starting the AGV heating system).
The basis of the AGV is the AGV boiler. It is a tank mounted in an iron casing, inside of which a pipe for burning gas is mounted. It looks like a samovar. The combusted gas heats the water flowing inside the tank. Gas combustion products are released into the atmosphere through the chimney.
The heated water enters the heating system, where, in accordance with the known laws of physics—hot water is lighter than cold—it flows through pipelines into heating radiators. There, having given up thermal energy, it cools and again enters the AGV for heating. This creates a closed circuit through which the coolant flows by gravity. Its driving force is the difference in height between the heating (AGV) and cooling devices (radiators). The greater this difference, the more intense the water circulation. Such a heating system is called a thermosiphon or a system with natural circulation of coolant. However, recently heating systems with forced water circulation have become increasingly used. In this case, a circulation pump is installed at the outlet of the AGW into the pipeline, which significantly increases the rate of water circulation and, as a result, reduces the time for heating the premises at a given temperature and the consumption of gas consumed. In this case, automation is used that maintains the specified parameters and monitors the fulfillment of basic safety requirements (switching off the gas supply when the water pressure in the line decreases or the burners go out).
Price range
Conord boilers belong to the group of inexpensive equipment. Prices for units fall within the range of 11-47 thousand rubles, which is significantly cheaper than imported units.
A big bonus is the energy independence of the boilers, which frees the user from the need to purchase a voltage stabilizer as unnecessary.
IMPORTANT!
Purchasing water filters is necessary, especially for residents of regions with hard water. You also need to enter into a guarantee agreement, which you will also have to pay.
Operating principle of AGV
The main structural element of the AGV is the container in which the coolant is heated. When gas burns, a heat exchanger, made in the form of a pipe and installed inside the AGV housing, heats up. The heat from the heated pipe is transferred to the coolant, which is subsequently sent to the heating circuit.
Gas combustion products are discharged through a chimney built into the boiler design. All automation is a valve that opens the gas burner. Thanks to the operation of the valve, the required temperature is constantly maintained in the tank.
AOGV boilers also have an automation unit that turns off the device in case of a number of problems:
- Traction disorder;
- Significant reduction in gas supply pressure;
- The igniter stops burning.
- Expansion tank;
- Heating devices located in each room requiring heating;
- Main pipeline providing distribution of heated coolant;
- Upper pipe distribution;
- Return pipe.
To know how an AOGV gas boiler works, you need to imagine the physical laws that arise in the heating system during its operation. The heated coolant has a lower density, which allows it to independently rise above the cold liquid. The coolant enters the main pipeline, is carried through the heating devices, gives off heat to them, and returns to repeat the heating cycle.
In AOGV boilers, the liquid moves by gravity, without any additional effort. If during the heating process the coolant expands too much, then its excess is drained into the expansion tank. This element is installed on the uppermost section of the heating circuit. When the temperature in the circuit decreases, the coolant returns to the OGV gas boiler.
To increase the efficiency of the system and make it more stable, you can supplement the AGV with a circulation pump, which forces the coolant to move forcibly and ensures more uniform heating of all sections of the circuit. It must be remembered that the pump requires electricity to operate - and the main advantage of the AGV is its independence from electricity.
Advantages and disadvantages
The advantages of floor-standing gas boilers Conord are considered to be:
- Reliability, simplicity of design, absence of unnecessary parts and components.
- Initially designed for operation in Russian conditions.
- Easy to control, stable operation.
- Attractive appearance, compact size.
- The non-volatile design eliminates the risk of system shutdown in the event of a sudden power failure.
- Low price.
The disadvantages of boilers should be considered:
- The need to ensure a technological slope of the heating system, allowing the liquid to circulate naturally.
- Difficulty in ignition, which is done manually.
- The need for periodic maintenance.
Turning on the gas boiler
A prerequisite for warranty service of a gas boiler is that the first switch-on must be carried out exclusively by a specialist from the gas service. If the user follows all instructions and safety precautions when starting up independently, then you can also count on the reliability and durability of the heating system.
The initial start-up of a wall-mounted boiler is carried out strictly after checking the following points.
The first thing you need to do is make sure that the gas pipes are tight when the gas valve is closed and open. If gas flow is not recorded within 10 minutes after connecting all pipes, then it can be stated that the system is sealed.
The gas supplied from the main pipeline must meet the requirements specified in the instructions for the boiler. When transferring the unit to process a liquefied mixture, you need to change the nozzles in advance.
You also need to check the pressure level in the system. It should be as recommended. The air intake and carbon dioxide exhaust pipes should be checked for blockages.
Sometimes users encounter the problem of poor circulation of the pump. Often the cause is low mains voltage. This problem is solved by installing a stabilizer
It is necessary to make sure that the room with the boiler has a working ventilation system. Additionally, the smoke pressure safety switch is checked.
After carrying out the preliminary work, the procedure for starting the boiler follows:
- The gas boiler is connected to the network, the gas supply to the device is opened;
- Check that all valves at the inlet and outlet of the coolant into the unit are open;
- Press the button or turn the switch on the boiler dashboard depending on the switching method specified in the instructions.
You can adjust the temperature using the corresponding buttons. Working in automatic mode, the boiler independently turns on the burner if it is necessary to heat the water in the system. If the boiler is double-circuit, then when hot water is turned on, the burner automatically turns on for heating.
On the boiler display, after the initial start-up, it is recommended to configure all boiler parameters. The instructions usually indicate the sequence of necessary actions.
The interlock system cuts off the gas supply if the burner does not ignite within approximately ten seconds. When starting for the first time, it may be necessary to remove the ignition lock due to the presence of air in the gas line. You need to wait until the air is replaced by gas. The lock is removed when the device is restarted.
To start a floor-standing gas boiler, you need to carry out the same preparatory procedures as for a wall-mounted one. Before starting up, you need to ventilate the boiler room, make sure that all heating pipe taps are open and that there is draft in the chimney. You can check the traction using a piece of paper.
There are two options for turning off a floor-standing gas boiler. You can turn off only the main burner or the main burner together with the pilot
Switching on the floor-standing boiler:
- The door of the device is opened, the position of the boiler control knob is checked in the off position.
- The gas supply valve opens.
- The control knob is set to the piezo ignition position.
- Next, press the handle for 5 - 10 seconds so that the gas passes through the pipes and displaces the air. The piezo ignition button is pressed.
- Then the presence of a flame in the burner is checked. If the burner does not light, the procedure is repeated.
After igniting the main burner, you can use the control knob to adjust the heating temperature.
Pre-launch process
The sequence of actions to prepare for startup depends on the type of gas boiler being installed. It can be single-circuit or double-circuit, with a closed or open combustion chamber, floor-mounted or wall-mounted. The first launch is always associated with an increased level of responsibility and risk, so it must be carried out in compliance with all the nuances and subtleties.
The instructions for the gas boiler contain simple explanations according to which you need to start a specific model. The gas boiler must by this time be connected to communications in accordance with the agreed project. The first start-up is carried out after connecting the heating system into a single whole and installing equipment, radiators, and pipes.
Gas boilers with a closed combustion chamber do not require a large chimney. Also, their positive characteristic is the ability to be located close to the wall with a gap of 2 cm, which allows you to save space in the apartment
According to fire safety rules, the gas boiler should be located in places protected from the possibility of ignition, away from flammable objects and materials. In this case, the heating unit should be located at a certain distance from the wall and floor. The exact distance value is individual for each boiler and is indicated in the instructions.
Wall-mounted models are hung on anchors so that there is a small gap between them and the plane of the wall. The boiler must be installed strictly exactly at the water level. Distortions and tilts of the equipment are unacceptable.
After installing the gas boiler to the wall, it is necessary to connect the device to the pipe supplying cold water. To do this, you need to remove the plugs from the receiving pipes.
In addition, a coarse water filter and a mud filter are installed at the inlet of communications to the boiler, which will protect the internal pipeline of the unit from clogging and sedimentation. Ball valves are installed on all pipes when piping.
Installing and running pipes to the boiler is an important task. The end result should not only be beautiful and aesthetically pleasing, but also provide easy access to key parts of the system
Before starting the boiler, an important step is to install a gas pipe to it. This work cannot be carried out independently. You will have to invite craftsmen from the GorGaz branch with which you have a service agreement.
Gas workers will calculate the required length of the pipe, lay it, install a gas meter and seal it. In order for the device to work for a long time and not smoke, you need to take care of the supply of good gas.
Also, for a gas boiler, for safety reasons, it is advisable to install a separate power line with its own automatic circuit breaker installed at the entrance. A socket should be placed close to the device, at a distance of 30-50 cm from the body. Grounding must be done; it will protect users from receiving electric shocks in the event of a breakdown on the housing.
Reliable and high-quality pipes are the key to the longevity of the heating system. You should buy pipes and radiators only from trusted manufacturers. A cheap product in this case will only bring problems
A boiler installed in a private house is equipped with its own chimney. It should go outside through the wall or through the attic space to the street. The chimneys of boilers in city houses up to five floors are connected to a public smoke shaft.
Depending on the specific device, the amount of work required to install the chimney varies. Some devices with a closed chamber are also equipped with a pipe to supply air to the combustion zone.
Upon completion of all preparatory work, you need to fill the heating system and the boiler itself with cold tap water. After filling, the system is checked for leaks. Then a remote control panel and a thermostat are mounted on the wall, to which temperature sensors are connected.
Features of filling the system with water
Before you ignite the gas boiler and activate the system, you need to properly fill the heating system and all its elements with water. To begin filling the heating equipment and the circuit connected to it with water, first disconnect the boiler from the power supply. We still need to turn off the gas supply.
Next, you need to turn on the water by opening the valve or tap that supplies cold water, as well as the make-up tap located at the bottom of the boiler. The exact location of the make-up tap is indicated in the instructions for the device.
The technician checking the system must definitely go around all the rooms along the pipes and radiators and check them for the presence of water leaks. If a leak is detected, you need to shut off the water supply and begin to fix the problem.
Before filling the system with water, you need to make an additional bypass of all heating devices and make sure that all connections are tight and tight.
You can drain the water from the system completely or shut off the corresponding link. Then you need to unscrew the leaking pipe connection, drain the water or screw in the plug. Afterwards, the necessary material and tools are prepared, the plugs are unscrewed, and the pipe is tightly reconnected to the radiator using sealant. Next, you need to check the tightness of the system again.
The intake of water is accompanied by a characteristic sound. It is important to unscrew the valve slowly and gradually, avoiding sudden movements. If you open the tap suddenly, there is a high probability of air pockets occurring. Simultaneously with the system being filled with water, the gas boiler pressure gauge shows the current pressure in the system.
The operating pressure must be found in the instructions for using the boiler. When the pressure reaches the operating range, you need to stop the water supply by closing the valve. Typically, the operating range of the boiler is a pressure value of 1.5 - 2 atmospheres.
It is recommended to fill the system with water in the warm season. If the temperature outside is sub-zero, you should preheat the room using a portable radiator to about 20 degrees Celsius.
Removing air pockets
Upon completion of the filling stage, the system must be checked for air pockets, excess air must be bled off and, if necessary, cold water must be added. If you do not bleed off excess air, the radiators will not heat up enough, since there will be a space in them that is not filled with heated coolant.
The Mayevsky tap is a simple device that is a needle valve. It is used to bleed air from the batteries.
To make the first start successful, you should go around each radiator with a screwdriver or other tool and bleed the air from the heating devices. Some batteries are equipped for this procedure with an air vent, a Mayevsky valve, which can be controlled by hand.
The air from the pipe system and the heating devices connected to it is drained until water flows. While the air flows, a characteristic hissing sound is made.
For convenience, it is worth preparing in advance a basin or ladle into which the water will be drained, as well as a rag, which is then carefully used to cover the stream of water so as not to stain the wall or nearby appliances. After the air has been released, you need to tighten the radiators tightly so that water does not leak from them.
Modern boilers are equipped with devices that allow you to automatically remove air pockets from the heating system. However, such devices do not always effectively cope with the task assigned to them. Therefore, you often have to bleed the air manually.
Having completed bleeding the air from the closed heating circuit, they begin to fill the space freed from air pockets with water. Without this operation there will be no working pressure in the system, because it is not filled enough.
To replenish the circuit with water, connect the unit to the power supply, open the feed tap and press the “Power” button. In this case, the pump should start and the boiler burner will try to ignite. However, after a couple of seconds, the electronics will block all attempts, and the display will display an error code, because gas does not flow to the injectors.
This procedure will need to be repeated several times. It will be necessary to recharge until all the air comes out of the pipes and devices of the boiler, as well as the circuit connected to it. When the stage of filling the system and freeing it from air pockets is completed, you need to check the pressure and open the gas supply.
The circulation pump ensures the movement of the coolant. The manufacturer is prohibited from performing any manipulations with it independently, otherwise the warranty obligations automatically become void. If the pump breaks down, simply replace it
Before igniting the boiler, the gas engineer carefully checks that the connection diagram corresponds to the design solution on the basis of which it was assembled. The technician once again makes sure that the pressure in the system corresponds to the parameters recommended by the manufacturer. Tests the tightness of all communication lines and their connection points.
Checking and flushing the system
In order to ensure the high quality of the work performed and prevent possible water leaks, plumbers recommend performing a pressure test of the system before starting the boiler. This procedure will require expensive equipment - a pressure pump. However, there is no need to buy it, as it will only be needed for half an hour to check the system.
You can borrow such a device from friends or rent it. You can also use the service of an on-call technician who will independently check the system and correct any problems that have arisen if necessary.
The purpose of pressure testing is to identify leaky areas of the system and eliminate them. A system that has gone through this process is guaranteed to serve for a long time and will not fail at the most inopportune moment.
There are two methods of crimping: with a water column or with compressed air. The essence of the procedure is pumping air or water into the system to establish a pressure level in it approximately one and a half times higher than the working one. After pumping, it is necessary to record the pressure value on the pressure gauge and wait 10 - 15 minutes.
Before performing pressure testing, it is important to take into account the characteristics of all elements that make up the heating system. In addition to checking the functionality of the system, it is also important not to damage its structural elements with excessively high pressure.
If at the end of this period of time the pressure remains at the same level, then the system is considered pressurized and has no leaks. If the pressure has dropped, then you need to identify the place where water is leaking and eliminate this problem. Then carry out the procedure again.
Please note that before installing a new unit, flushing a circuit that has been in operation for several years must be done. All ]gas equipment[/anchor] warn that installing a gas boiler in an old circuit that has not been cleared of mineral deposits is prohibited. Failure to comply with the rule will result in the boiler owner losing his warranty.
This process is carried out in two stages. Initially, rough washing is carried out. In this way, the largest contaminants are removed. The pressure in the system when flushing should be about 3.5 atmospheres. After the water is agitated under pressure, it is released from the system through a drain valve.
In this case, the coarse filter often becomes clogged. It may need to be washed once or twice. Finish washing is carried out using pressure pumps.
After finishing washing, you need to check the coarse filter. It must be uncontaminated. Supplying contaminated water to the boiler is highly undesirable
After completing the preparatory work, you can start launching the device.
User manual
Activating the system is a rather complex procedure, so we will provide step-by-step instructions for using it.
- First you need to pour water into the device and check whether there is traction in it. You should also make sure that the temperature control lever is closed.
- Next, open the tap to supply gas to the boiler.
- We open the viewing window - to do this you need to move a special flap.
- We tighten the air regulators.
- We light the piece of paper, press the activation button and, holding it in this way, bring the burning piece of paper to the igniter through the window.
- After thirty to sixty seconds, the button should be released, and the fire on the igniter should remain. If this does not happen, the operation is repeated.
But the main burner is ignited as follows:
- Turn the temperature dial until the main burner lights up.
- Adjust the air supply until the fire turns bluish.
- We set the temperature mode we need.
Important! To avoid “popping” noises when a fire occurs, make sure each time that the temperature and air regulators are in the full position
Removing paint from a car's surface
Vehicles are coated with enamel that is resistant to high temperatures and solvents. You need to clean the body with a grinding machine, gradually reducing the grain size of the nozzles. After complete removal of the paintwork, the metal surface is polished with a soft nozzle with the addition of abrasive paste.
New generation of AGV devices
The main model produced at Russian factories is AOGV-23.2-1 (domestic gas heating apparatus). It is designed to heat houses with an area of 140-200 square meters. There is a device with less power, designed to heat areas of 100-140 m2. In appearance, these two brands are practically no different from each other.
Not so long ago, manufacturers began to offer a new combined model AKGV-23.2-1 with a water circuit. This unit can be used both for heating the house and for organizing the supply of hot water. Its filling has also changed. Instead of a pipe running inside the boiler, manufacturers began to install three steel sections. They are made by stamping and are hollow inside. The sections are mounted vertically, connecting into one chimney, through which gas combustion products enter a separate chimney pipe.
The most amazing thing is that water for domestic needs is heated using a coil that encircles the entire circuit inside the boiler. Water flows through it, which is used for everyday life. And in the boiler itself the water for heating is heated. An excellent device, so to speak, two in one. By the way, the coil is made of copper pipe.
An injection burner has been added to the kit of the new model, ensuring efficient combustion of gas without residue. This type of burner works great even if the gas pressure in the pipeline drops.
AKGV-23.2-1 with water circuit
Special conversation about the automation of the new AGV. This is a unique system that completely controls the entire water heating process. The automation unit consists of:
- Thermal sensor that controls the water temperature;
- An electromagnet responsible for controlling the main gas supply valve;
- Thermocouple, which is installed near the igniter. It is heated by a constantly burning torch, thereby creating an electric current in the circuit. And the current guarantees that the gas supply valve will always be open;
- A draft sensor, which is mounted in the chimney and monitors the effective draft of the pipe.
In general, the automation unit will never give you the opportunity to play a cruel joke on you if one of the indicators of the boiler’s efficient operation suddenly goes wrong. There will be no fire or gas leak. The most important thing is that the automation is correctly adjusted.
Safety regulations
Remember, gas is a common cause of explosions and fires. Therefore, treat fire safety techniques with respect, follow the requirements and instructions.
Frequently encountered dangerous malfunctions and methods of elimination according to safety rules:
- flame failure is a moment during which the flame extinguished, but the gas supply did not stop. The solution is to turn off the gas supply and open the room in which the boiler is located for ventilation. During ventilation, it is strictly forbidden to use open fire, turn on and off electrical appliances, lighters, etc.;
- decrease in the filling of the circulation circuit with water - occurs when there is a water leak. If a leak is detected, turn off the boiler, but under no circumstances start filling the circulation circuit. Wait until it cools down completely, find the leak, and fix it. After which you will have to fill the circulation circuit again;
- the draft in the chimney has disappeared - stop the boiler and clean the chimney. Ventilate the room. When the draft resumes, return the boiler to operation;
- The pilot light goes out - turn off the boiler, carry out the switching procedure according to the passport and the attached instructions.
Do not forget that a gas boiler is a high-risk device; such equipment must be operated strictly according to the instructions, in compliance with full fire safety measures.
Speaker repair
AGV – 80 gas heating boiler. Technical characteristics of agv-80:
- Heat load 6000kcal/h
- Water temperature setting 40 - 90gr/C
- Heated room area up to 60m2
Main components of the AGV-80 heating boiler.
- Galvanized tank (80 liters), thermal insulation, min. cotton wool. In the center of the tank is a flame tube with a heat flow extender.
- The main burner, in front of it, the tap regulates the gas supply.
- Automatic security.
- For flame, solenoid valve, thermocouple, igniter.
- For draft, tee, connected pipe, draft sensor.
- Temperature-thermostat.
Boiler solenoid valve. The boiler solenoid valve consists of two parts: gas and electromagnetic. There is a membrane between them. The thermocouple consists of two metals, chromel and copel, welded together. The flame heats the boiler thermostat, generating an electric current that magnetizes the core. By pressing the start button, the armature is pressed against the core by a pusher, while the paired valves move inside the gas part, opening the gas to the boiler igniter and compressing the return spring. At the end of the thermocouple warming up for 60 seconds, you must smoothly release the boiler button; under the action of the return spring, the paired valves are shifted back - 2.3 mm. Gas opens to both the igniter and the main burner of the boiler. The valve cannot return completely to its original position. They are held by an anchor magnetized to the core. If the igniter goes out, then the thermocouple of the heating boiler cools down and the magnet releases the armature; the return spring pushes the valve to its original position, no gas flows to the burner.
Malfunctions of the gas heating boiler AGV-80
- Contamination of the surface of the core and armature (clean, degrease)
- Thermocouple burnt out (Replace)
- No electrical contact.
Automatic traction (with gas removal from the igniter)
Gas from the electromagnetic valve of the heating boiler flows through the tee to the igniter, as well as through the connecting tube to the draft sensor installed under the hood of the device. The draft sensor is a bimetallic plate with a plug, which, during normal draft, closes the gas from the connecting tube. When the draft is covered, combustion products come out from under the hood and heat the bimetallic plate. It unbends, the plug opens the gas from the connecting tube, and gas is supplied to the igniter. Response time from 10 to 60 seconds.
Gas boiler thermostat. Operation accuracy 5gC, thermostat parts.
- Frame.
- Toggle lever system.
- Valve with spring.
- A brass tube with an invectar rod is screwed into it.
- Lever for thermostat.
When the water in the tank is heated, the brass tube lengthens, but the intar rod does not. The rod moves behind the tube and stops pressing on the system of closed levers, which, under the action of a spring, closes the valve with a click, blocks the passage of gas to the burner; when the water cools, the brass tube shortens; the rod presses on the levers, they close and turn off the valve. When the setting lever is rotated counterclockwise, the response temperature increases.
Malfunction of the boiler thermostat.
- The thermostat does not work and cannot be adjusted: The lever system has stretched or burst.
- The large or small levers are deformed.
- The supporting edges of the levers are worn
The thermostat operates but does not stop the gas supply: The valve stem sets the guide bushing.
AGV, or automatic gas water heater, is an element of the heating system, thanks to which it becomes easy to operate along with a fairly long service life. However, the presence of these characteristics is possible only if the gas boiler is properly installed and properly maintained.
Epilogue
In conclusion, it is worth recalling that the repair of AGV, along with the maintenance of gas boilers, are quite difficult operations that must be carried out by specialists. Only by observing this condition can the risk of damage to housing and injury to its inhabitants be eliminated.
Repair of AGV, OAGV, gas heating boilers 8-903605-49-99
Specifications
Let's look at the parameters of Conord boilers:
| Parameter | Meaning |
| Boiler type | Gas heating |
| Installation method | Floor |
| Feature Set | Heating and hot water supply |
| Efficiency | 90 % |
| Unit power range | 8-50 kW |
| Combustion chamber design | Open (atmospheric type) |
| Fuel type | Natural or liquefied gas |
| Heat exchanger material | Stainless steel 3 mm, cast iron |
| Energy consumption | Absent |
| Service life declared by the manufacturer | At least 15 years |
| Guarantee period | 3 years |
Generation of new AGV systems
Some units are produced at Russian factories. One of them is AOGV-23.2-1, which structurally looks like a household heating cylinder. It is used in houses with an area of 140-200 square meters. There is a unit with a lower heating power - approximately 100-140 square meters. Apart from power, these two devices are no different from each other.
Recently, a new system was released called AKGV (Combined Gas Water Heating Apparatus). According to the method of use, it is no different from AGV; it is used both for heating the house and for supplying hot water. But the design of the AKGV unit is different - instead of a pipe that goes inside the boiler, three steel sections are installed, which are stamped in a special way, they are mounted in a vertical position and connected into one chimney.
This device is rightly called “two in one”, because it initially heats the water using a coil, which is encircled along the entire contour of the boiler. The water flowing through the coil is used for domestic purposes, and in the boiler the water is heated for heating.
The newest models have an injection burner. It ensures gas combustion without residue and works even when the gas pressure drops.
Automation of the new AGV
This irreplaceable item fully controls water heating and consists of:
- Thermal sensor, which gives the system an idea of the current temperature;
- Electromagnet - valve control device;
- Thermocouples, which are installed next to the igniter and are responsible for generating electric current when heated from the torch;
- Traction sensor. It is installed in the chimney to control draft.
With proper adjustment, the automation unit will prevent sudden shutdown of the AOGV in the event of a breakdown or failure in the boiler settings, and most importantly, will extend its service life.
If we talk about the origins, this type of heating equipment was developed back in the 50s, due to the lack of central heating in villages, villages and small towns. Since then, AGVs began to systematically gain popularity, and soon most houses in the USSR began to be heated with them. Thus, this system, of course, after modernization and modifications, fits well into modern realities
It is only important to know how to choose AGV heating, remember the rules for handling this system and follow them, then the boiler will serve you much longer than its declared service life. After all, the system in which hot water circulates does not tolerate jokes and amateur activities. In general, this system is quite economical both in terms of funds and in terms of space occupied
And with the introduction of ACS (Automated Control Systems), its operation and maintenance does not cause any trouble at all. After proper setup, according to instructions or with the help of a specialist, the coefficient of intervention on your part becomes minimal, and guarantees warmth to your home
In general, this system is quite economical both in terms of funds and in terms of space occupied. And with the introduction of ACS (Automated Control Systems), its operation and maintenance does not cause any trouble at all. After proper setup, according to the instructions or with the help of a specialist, the coefficient of intervention on your part becomes minimal and guarantees warmth to your home.
What should the floor be like in a small bedroom?
One of the most important roles in a small room is always played by the finishing materials chosen for the floor. If you choose the wrong shape and, accordingly, color, it can cause great harm.
It is best if modern technologies are used for design, but various classical methods are not inferior in quality.
Colors for the ceiling such as beige or white will make it visually higher. If you want to increase the space, then the layout of the bedroom should be carefully thought out and it is better to choose a glossy stretch ceiling that will reflect light. Many today have already forgotten about the use of the once popular drywall, but in vain. It looks very advantageous in modern interiors.
When choosing a floor covering, first of all you need to pay attention to what style is chosen for the room and what it will be intended for: only for sleeping, or will it be a study or a children's room as well.
It is advisable that the color scheme be the absolute opposite of that chosen for the furniture. Using this technique, it will also be possible to increase the area.
If you plan to design a small bedroom in a Khrushchev apartment, then you need to take into account a number of nuances.
Firstly, the main piece of furniture in the room is the bed. Try to choose an option that is not too bulky, the width of which will not be more than 2 m.
Secondly, in a bedroom with such an area it is best to abandon chests of drawers. An excellent replacement can be a long drawer, harmoniously placed, for example, directly under the bed or against a free wall.
Thirdly, in order for the sizes to be chosen perfectly and all pieces of furniture to become part of a single interior, it is better to discuss their choice with the designer and, in those cases where it is possible, to make them to order.
In conclusion, it is worth noting that you can add an interesting twist to the interior by placing beautiful decorative flowers in vases in the room or installing interesting lamps.
Modernization of AGV boilers by the manufacturer
The boiler manufacturer AGV was in no hurry to discontinue them due to obvious advantages.
However, taking into account that this equipment needed a thorough modernization, the following design changes were made:
- Fragile glass thermometers have been replaced with more reliable instruments made in Italy;
- The new systems were equipped with automation from the American company Honeywell;
- To turn on the device with a handle, a piezo ignition system was used;
- New coating technology has made the appearance of the unit more aesthetically pleasing.
Boiler diagram AOGV - 23
Rules for handling the heating system
The unit is installed in a separate room. It is advisable that this room be soundproofed, since when the boiler burner is turned on, a rather loud bang occurs.
In some new modifications (AOGV-23.2-1-U), this drawback has been largely eliminated, since when the water overheats, the automation does not turn off the burner completely, but switches it to a mode in which the flame is minimal.
A chimney (with a diameter of 140 mm) for combustion products is installed outside residential premises. Below the junction of the pipe from the heating tank with the chimney, there is a garbage container - a “pocket” for foreign objects and waste that accidentally fell into the channel.
Option for a chimney for AGV in a private house
For the unit, a room should be allocated in the lower part of the building. The ascending pipeline needs insulation. The return line should not be insulated.
The installation instructions for heat transfer devices (radiators, convectors and heating panels) provide for their installation at the highest possible height from the unit itself. To circulate layers of air, such devices should be installed under windows. The return pipeline is laid under the floor of the room.
If the return line is laid above the door jambs, airing of the system may occur.
General view of a fragment of the pipe layout of a heating system with AGV
Two-inch network pipes do not look very aesthetically pleasing, however, when replacing them with pipes of smaller diameter, it is necessary to take into account that as the diameter of the pipe decreases, hydrodynamic resistance increases, which weakens the water pressure in the system. This, of course, can seriously impair the performance of such a unit.
AOGV connection: rear view
During installation, pipelines are installed with a slope of 1 cm for each meter of pipe length. This avoids the appearance of air locks in the system, facilitates water circulation and allows water to be drained from the system.
This video examines some practical issues of installing AGV in a private home:
Some Caveats
- When the water temperature in the system drops below 55-50°C, condensate begins to release abundantly. If it accumulates, it can extinguish burners;
- Combustion products, when mixed with condensate, form nitric and sulfuric acids, which cause corrosion of equipment;
- If the water temperature in the system drops below 50°, then its circulation in the system almost completely stops;
- If the room is not heated in winter, the water from the system must be drained, but in this case corrosion increases significantly;
- To get hot water without heating the entire system, you can use a tap that shuts off the circulation in the heating system. And if you connect the forward and return lines, you can maintain turnover.
Have a warm winter!
Basic faults
The design of Conord boilers is very simple and does not have many details. This can significantly reduce the number of weak points in the design and reduce the number of malfunctions .
The heat exchanger and ignition equipment are usually considered to be the most loaded and most likely to fail. The heat exchanger is susceptible to lime deposits. The additional layer isolates the coolant from the walls, reducing heating efficiency.
It is necessary to increase the combustion mode, which increases the load on the external part of the heat exchanger, which fails faster . The ignition equipment fails due to thermocouple failure or other reasons.
There is also a constant danger of burner nozzles becoming clogged with soot, which can be eliminated by periodically cleaning the boiler.
The best condensing gas boilers
These boilers are considered the most economical because they can use the energy of not only gas combustion, but also condensing steam. As a result, their efficiency is almost close to the coveted 100%.
Vaillant ecoTEC plus VUW
89%
buyers recommend this product
Stuffed with intelligent electronics and eBus switching, the unit works not only for efficient heating, but also for preparing hot water, that is, it also belongs to double-circuit units. The capacitor system is more environmentally friendly compared to the traditional one, and also provides a very high efficiency of 98%.
The combustion chamber is equipped with a modulating burner with wide power adjustment capabilities (from 28 to 100 percent). With such efficiency and equipment, the dimensions of the boiler are quite acceptable: 720x440x372 mm. The ecoTEC line itself consists of three models with a maximum power of 24, 30 and 34 kW.
Advantages:
- Digital control and diagnostic system;
- The most informative panel;
- Possibility of control from a mobile phone and connection to a “smart home”;
- The burner can receive air both from the room and from the street;
- Short-term increase in power for quick water heating;
- Removal of condensate outside.
Flaws:
- Difficult to repair;
- High price.
ecoTEC Plus boilers still scare off many due to their high cost. But there is minimal hassle with them, and the fuel savings will pay off the investment over time.
Viessmann Vitodens 100-W
88%
buyers recommend this product
An expensive boiler, capable of operating at a power of 4.7-35 kW, saves not only blue fuel, but also electricity - due to the adjustable operation of the fan. This model also has other highlights. We are talking about a cylindrical MatriX burner, consisting of many micro-nozzles, which practically does not allow heat loss. A ring heat exchanger made of stainless steel works no less efficiently.
Advantages:
- Compact housing 400x400x350 mm;
- Two ways to prepare hot water;
- Maximum efficiency and energy efficiency;
- High efficiency (98%);
- Intelligent automation;
- Remote control – from a touch panel or smartphone;
- Possibility of working on LNG and biogas;
- Easy access for repairs and maintenance.
Flaws:
Price.
If your home is equipped with a smart home system, the equally smart Viessmann Vitodens will be the best solution for creating a heating and hot water system.
Viessmann Vitopend 100-W A1HB003
Baxi Eco Four 1.24 F
Vaillant AtmoTEC Plus VU 240/5-5
Heating power 34 kW 24 kW 24 kW Type single-circuit single-circuit single-circuit Efficiency 90% 92.9% 91% Combustion chamber closed closed open
Specifications
All models have the following technical characteristics of the Conord gas boiler:
- Guaranteed flawless operation for 3 years.
- Possibility of operation for 15 years.
- Boilers with cast iron heat exchangers can operate for a quarter of a century.
- Heat exchangers made of cold rolled steel allow them to withstand thermal deformations.
- Using tap water as a coolant.
- Ban on the use of antifreeze.
- Connection to a system with natural or forced circulation of the working environment.