PROS AND CONS RELEVANCE OF THE METHOD ORDER OF WORK MAIN STEPS OF INSTALLATION Until recently, installation of electrical wiring in a house or apartment was carried out almost exclusively along the walls. This method is extremely expensive and labor-intensive, as it requires a groove or a thick layer of plaster to hide the cables.
After the widespread use of suspended and suspended ceilings, the wiring was almost immediately transferred to the technical space between the ceiling and the ceiling.
However, this option also requires significant amounts of wall gating, especially if sockets and switches are located below.
The third method is to locate the wiring under the floor. In this article we will talk about the features of laying electrical wiring under a wooden floor and in a concrete screed.
Let's consider the advantages and technical limitations of each method, as well as the basic rules for performing the work.
Advantages and disadvantages
The main advantages of this method of laying electrical cables include:
- Increased level of safety compared to installing wiring in the wall. Any accidental damage to the line associated with driving in nails, dowels and other fasteners, which is accompanied by the use of a drill, jackhammer or grinder, is excluded.
- The total amount of cable required to organize the network is reduced. A lot more wires are required to run in the wall.
- You don't have to be a qualified specialist to handle the task yourself. Difficulties can arise only when placing the cable inside a corrugated or metal pipe.
- The junction boxes are located near the wall or at the bottom, which eliminates the possibility of cable breakage.
- There is no need to chisel the walls, apply a thick layer of plaster or perform other finishing work.
Installing wires on the floor allows you to get rid of wall slitting.
Floor wiring scares people for the following reasons:
- Serious difficulties when performing repair work or when it is necessary to replace the electrical cable. Sooner or later the chain may break. It is almost impossible to find the emergency area on your own, so you will have to dismantle the system and lay a new wire. However, the problem can be avoided if you follow the rules and recommendations for installing floor wiring. For example, you should make sure that the cable placed in the pipe moves freely through it. Before pulling out the cable, tie a strong rope or wire to the far end so that you can then easily pull the new wire into the pipe.
- The cost of the work increases due to the need to purchase corrugation, which is not needed when installing in walls, when the cable is hidden inside the groove or under a thick layer of plaster.
With floor installation, replacement becomes more complicated and the cost of work increases
. There are only two disadvantages, but the first is easily eliminated if you follow the installation technology flawlessly.
Requirements and standards of the PUE
Laying cables in the floor is officially permitted by the 7th edition of the PUE and refers to hidden wiring. In Chapter 2.1 of these rules it is noted that when forming cable routes, they can be used
- round pipes, boxes of various types with a rectangular cross-section, as well as flexible metal or other fireproof hoses;
- it is possible to lay it directly in the structure of the building structure in a groove formed for this purpose, followed by coating with putty or plaster;
- It is permissible to lay wires into the structure of the structure under a layer of concrete directly at the factory during its manufacture.
To connect wires, you can use crimping, screw clamps of various types, and soldering. In places where the splice is formed, an installation supply of cable should be provided, sufficient to make at least one additional connection. According to the requirements of paragraph 2.1.23, the connection points must be accessible, allowing repair or maintenance to be carried out. Further, paragraph 2.1.24 puts forward the requirement that there are no mechanical impacts on the connection areas.
Installation can be carried out using either a flexible multi-wire cable or a rigid single-wire cable. The conductors themselves can be either copper or aluminum. The minimum cross-section depends on the material, connection method and design. When connecting with screw terminals, the minimum cross-section of copper wire is 1 mm², increasing to 2 mm² when switching to aluminum. Copper conductors can also be connected by soldering with a minimum cross-section of 0.5 mm² for a single-wire conductor and 0.35 mm² for a multi-wire conductor. The exact cross-sectional value is determined by calculating the consumer’s power at the project execution stage.
It is separately indicated that when installed in a channel, regardless of its design, it must be possible to replace the electrical wiring if such a need arises.
Inputting electricity into the house
It makes sense to deal with this issue even before the start of building a house: obtaining specifications for connecting to electrical networks is not a quick matter, no one will return the time spent going through the authorities, sometimes it is even better to hire a specially trained person for this.
For a house up to 150 sq.m. A single-phase connection up to 15 kW is sufficient.
Smak13FORUMHOUSE Member
Many people ask what is better to take, three phases or one? But this depends on the operating organization. The Allocation Act describes the type of input and the one-time allocated power. It can be 10 kW/220V (1ph) or 10 kW/380V (3ph). Common practice: if 10 kW and above - then 3 f., if 5 kW - 1 f.
Power engineers are engaged in conducting electricity to the ShchUP (electricity metering panel). The control panel is installed either directly on the facade of the house, then it’s up to the homeowner to take care of it. You can, having made a grounding loop, run a cable into the house in a grounded metal pipe, or, if the distance from the house to the nearest power line support is more than 25 meters, install an intermediate support and mount the control panel on it. Then the cable is led into the house through the air, or laid in the ground. To do this, use a special cable VBBShVng, or VVGng in double corrugation.
Do not run the cable below the foundation.
Some features
Returning to the first disadvantage of floor wiring, we emphasize that the specifics of installing electrical wiring of any type are clearly stated in the document PUE (“Electrical Installation Rules”). The main point is the availability of the entire system for inspection and repair work.
The points where wires connect/split must be free from mechanical tension from the material covering the floor. For this reason, various pipes made of corrugated, metal or polyethylene are used. The surface of this product takes the load of the coating. Remember that there must be enough free space inside for the wire to move.
One of the main elements of the electrical network in the house are distribution boxes. But placing them under the flooring is unrealistic, so the products are mounted in the wall. It is important to choose the correct height above the floor to avoid short circuits when the apartment is partially flooded and to prevent free access for children.
Since the corrugated pipe used for wiring must be smooth, in most cases it can be replaced with a regular polyethylene pipe with the appropriate diameter. However, the final decision is entirely up to you. Metal, corrugated and plastic products differ in technical characteristics and cost per linear meter.
Is it possible to do the work yourself?
The option of arranging electrical wiring on the floor is not the simplest, but it is the most convenient for self-installation. You can do this kind of work with your own hands, but you don’t always use the method of laying it on the floor, since the wires are often pulled far from the panel.
In order to decide whether to use this method and how to implement it, it is necessary to consider each stage of the work in more detail.
Having determined the advantages for yourself, it is easy to make a choice in favor of the method.
conclusions
As you can see, the installation of cable heated floors can be very diverse. What I would like to draw your attention to in conclusion:
- Be sure to use insulation under the heating cable, preferably foil.
- Cover the heating cable with a cement screed of at least 5 cm.
- When installing cement screeds less than 5 cm, do not forget to add fiber.
- The best option would be to attach the cable to the reinforcing mesh and then install a tie.
©Opolax.ru
Articles on the topic
- Instructions for installing semi-dry floor screed with fiberglass (fiber)
- Instructions for applying polymer self-leveling floor
- Instructions for laying laminate flooring
- How to prepare the base for a screed
- How to make a cement-sand screed correctly
- How to make a screed
- How to install cement-polymer floors
- Installation of electric heating on a wooden floor
- DIY bath floors
In what cases should you resort to installing electrical wiring in the floor?
Laying cables in the floor is not always the right solution. Sometimes it is worth resorting to the usual chiselling of walls, laying wiring and subsequent putty. But there are several options in which you should lean toward installing wires in the floor.
- When installing completely new wiring in a room without repair. This situation awaits the owner who recently purchased a home. And most often, a complete lack of repair can only be observed in new buildings. And then laying the cable in the floor will be the ideal solution. There is no need to violate the integrity of the walls, and the work will take much less time than when installing hidden wiring.
- When laying cables and wires in wooden houses, where the use of plastic cable ducts is not relevant. Then it is necessary to lay the cables in the floor, discreetly leading branches to sockets and switches. Distribution boxes are also installed in the floor.
How to properly lay cables in the floor
You should remember the basic rule: when installing a cable in a concrete floor, ordinary corrugation is used, and when installing in a wooden floor, metal is used. Laying wiring without any protection is prohibited by all regulatory documents.
What you should know when starting to install electrical wiring on the floor:
- All connections must be made only in junction boxes. The presence of twists in the floor, without additional protection, is unacceptable. Also, other types of connections cannot be left open: using sleeves or terminal blocks, bolted connections, etc.
- It is very convenient to place the junction box on the floor surface. This allows you to quickly identify and eliminate the problem without compromising the integrity of the floor covering.
- The corrugation should not be filled more than half with cable. This should be taken into account and a corrugation of the appropriate diameter should be selected. Only then, to replace the wire, can it be completely removed from the floor.
- You should not install too long lines - 20 m is enough. If the use of longer conductors is required, then special transit boxes must be used.
- There should not be more than two bends on one cable, the angles of which are 90 degrees or higher. This will have a detrimental effect on the further operation of the electrical network and, if necessary, the conductor will be impossible to get.
- When laying a cable in a wooden floor, you should not attach it to the joists; in this case, special holes are made in them, through which the corrugation is then passed. The presence of such holes will not affect the stability of the floor covering in any way. For additional safety, all wooden floor elements must be treated with a special composition that prevents combustion.
- When starting to pour a concrete floor, you must remember that the thickness of the cement screed above the wiring should be approximately 30 cm. For better stability (but not for electrical safety purposes), reinforced mesh is also placed in the screed.
- The corrugation with conductors should not intersect; all cables should run parallel to each other. When crossing them, it will be necessary to raise the floor level, which implies additional consumption of building material.
Most importantly, consider this level 0
Whatever you do, always ask the performers for a diagram! And talk about this not after the work is done, when no one remembers anything (they will draw at random in order to at least give something away), and those who remember have already been replaced, but before the start of work. Payment only after transfer of the scheme. Print out a dozen floor plans for an electrician so that he can mark on it with a pen what goes where, and then redraw it completely, at least let it be that way. It should be completely drawn; there is no need to accept scribbled, dusty, crumpled pieces of paper for another electrician to understand later. It is important to identify all cables, both electrical and low current, with cable markings and the location of all elements.
Example. You don’t want to implement any automation now, but install twisted pair cables along all power cables to make it happen. Five years later, you decide to install something like a Smart Home and call different integrators. What's the first thing they ask? Cable diagram, of course. But there is no diagram. Someone at this stage will immediately refuse, since he will already begin to understand how the end will end, but someone needs money more, he will offer to check all the cables and draw this very diagram, only for quite a significant amount of money.
A Smart House is a Smart House, and the electrical work must be done correctly. With all the necessary elements, a normal panel and installation diagram.
242, total, today
Related posts:
- Selection of Wirenboard equipment and system design I’ll tell you a little about how to design a Smart Home system on…
- Comparison of Smart Home systems: Larnitech, Wirenboard, Beckhoff, Z-Wave, EasyHomePLC By popular demand, I will write a short comparison of Smart Home systems, with…
- Payback of the electrical and Smart Home project For me, all the advantages of preliminary implementation of the electrical, low-voltage and...
- What can be installed from a Smart Home Since not everyone understands what a modern…
- Video surveillance in an apartment in 2021 What capabilities of a home video surveillance system can we get today? Options...
- Smart Home and clouds Actually, it has long gone into the clouds. One can only state that…
- Video surveillance systems: analogue, digital, AHD and others I have been involved in video surveillance since 2008. I was selecting systems then...
Places where it is beneficial to use the method
Electrical wiring on the floor is convenient in houses that have not yet undergone any renovation. Such buildings include newly erected new buildings, where, as a rule, only pre-finishing has been done. You will not have to violate the integrity of the walls; the cable can be laid in a place convenient for you in the floor, and the necessary wiring can be made from it to switches and sockets.
Installation under the floor will also be a profitable solution for a wooden house. In this case, wiring disadvantages associated with difficult access will disappear. For a wooden house, this solution is quite relevant, since running cable ducts along the walls will significantly affect the interior of the rooms, and retro-style wiring will cost much more than modern wiring.
By placing the cable under the floor, you will not only hide all the wires and make the wiring convenient, but if necessary, you can easily pull it out from under the boards and make repairs.
Difficulty level 2 - For advanced
- Remember about non-switchable devices. If there is an accident somewhere that triggers an RCD or an automatic circuit breaker, then what should remain working? The most obvious answer is a refrigerator. It is also possible, if there is one, an alarm system and video surveillance. Wi-Fi router, since remote access to video surveillance and some devices depends on it. We install separate protection on them with an automatic or automatic + RCD powered from the input (after the voltage relay). If there is a good short circuit, it is possible that the input circuit breaker will also go out, but there is no way to insure against this. The likelihood that such a short circuit will occur when you are not at home is not so great; you just need to plug something seriously faulty into the outlet.
- Make more power supply groups. Sockets in each room have a separate cable. Kitchen - usually at least 5 cables: countertop sockets, hob, dishwasher + chopper (filter) + microwave, oven. Sometimes countertop outlets are split into two or even three separate groups. The more groups, the fewer cable connections, fewer devices are turned off in the event of an accident, less cable heating, and it is easier to localize the problem. But there are also more costs for cables and installation.
- We add voltage and power indication to the panel. VAR-M02 or a similar device shows the voltage of each phase and current consumption, as well as the number of power outages. Helps control consumption and phase balance.
Advantages of corrugation
The corrugation, which is used when installing in a screed, must be rigid or heavy, as it is also called.
It has almost the same appearance as a light PVC corrugated tube. However, the price for these products differs several times! As an alternative, many use orange or black HDPE corrugation. Three types of corrugated tubes and their characteristics PVC, HDPE, PP:
PVCHPNDPP
PP
However, do not forget that corrugated HDPE is flammable! Although the majority here are reassured by the moment of its installation on a concrete slab, and even a screed poured on top.
When using cheap PVC, during work, you will step on it more than once and push it with your own weight. At the same time, do not forget about careless handling of the stepladder and falling of heavy objects. All this can easily damage the cable insulation.
Anyone who dares to lay a cable in a screed without protection, that is, without corrugation, may face serious problems in the future. Unfortunately, the screed sometimes cracks, and along with them the wire will break.
By the way, regarding the myths about the replacement of wiring laid in corrugation, you can read in detail in the article “Installing cables in corrugation - errors and misconceptions.”
The only full-fledged replacement option can only be when laying a wide plastic cable channel or pipes into the wall.
This is often done on the wall where the TV will be hung. And then, in this case, completely different cables are used.
When installing on the floor, it is advisable to place the entire cable at a distance from the edge of the wall (approximately 30cm). There is no need to make connections close to it.
When installing baseboards, bar counters or other furniture, the cable can easily be pierced and damaged.
As for junction boxes, the best option would be to install all connections in the socket boxes. That is, where switches and sockets are installed, recessed socket boxes are used and all switching is performed inside them. If you need to audit contacts or reconnect something, there will be no problems with this.
The mechanism of the switch or socket itself is removed, the wires are pulled out from there and all the work is carried out. Then everything is put together in reverse order.
In this case, you do not need to dismantle and then re-stretch the suspended ceiling, as is the case with wiring along the top.
Difficulty 3 - Adding simple automation
But here there is already room for imagination in the realization of various wishes. What can be done, in order of difficulty:
- Function to turn off lights and/or sockets with one button. To leave the house and immediately turn off all the lights and sockets. We have separate batteries for the refrigerator and low current, so they will not turn off. How to turn it off is up to you. You can have a card switch, like in hotels, you can make a hidden button, you can have a code keyboard or a contactless key reader. You can use a fingerprint. Or you could put a big red button on the shield. Read Turning off the lights with one button, Turning off the sockets with one button.
- Walk-through lighting groups through simple automation. For example, impulse relays or programmable relays. An excellent option is OWEN PR programmable relays, they cost very little and are easy to program. You can connect motion sensors to the relays, light sensors in the corridor or on the stairs (in a private house) and configure the cunning switching on of the light at different brightnesses at different times of the day according to the motion sensor. Or just convenient control of light from different places, without bothering with pass-through and cross switches. And most of all, I recommend using Wirenboard relay modules and dimmers; they can be used to implement light control of any complexity, very flexible and convenient. It is not even necessary to understand module programming; it may not be needed.
- Programmable relay for controlling bathroom hoods and ventilation. By turning on the lights, by timers. Read Control of hoods via a programmable relay. Or also via Wirenboard relay modules.
Similarly, through programmable relays, you can control street lighting, create a presence simulation mode and other things. It is enough to try to program the Aries PR relay according to the instructions once to understand how easy it is to create different scenarios on it. There are many analogues, for example, Siemens Logo or X-Logic, EKF.
Safe installation
Before installing the cable, make sure it is intact. Special distribution boxes are used for each individual section. Avoid any twists that reduce the reliability of the system as a whole. The boxes described above are placed on the walls at a safe height to prevent moisture from entering during flooding or interference from children. In some cases, the selected height may be minimal.
The installation box can be installed directly in the floor. In this case, it should be protected by a durable removable lid that can be easily removed so that, if necessary, the master can access the contents. Don’t forget about the possibility of creating a floor wiring diagram, which will make it easier to find the right node or wire in the future.
Junction box in the floor
Another important condition for increasing the safety level of electrical wiring is the correct filling of the corrugation. Do not try to cram a lot of wires inside such a tube. It is advisable to leave about 60% of the total tube space empty. The maximum length of one line (from the distribution panel to the socket or switch) should not exceed 20 m. When placing at right angles, make sure that there are no more than two cables. However, the recommendation is similar for situations with sharper angles. Try to avoid any sharp bends.
In wooden houses, placing wires along joists is unacceptable. Installation is carried out using pre-drilled technical holes. When using wooden parts, they must be treated with a high-quality composition that prevents combustion. Avoid branching the route directly from the panel, this will significantly complicate repair work if the electrical wiring is damaged.
Laying wires in the technological holes of the log.
Installation of wire in a screed
Well, at the last stage, let's look at the installation itself. It is not so complicated and can be done with your own hands, but we should pay attention to some nuances.
We make walls for embedded boxes
- First of all, we are building walls to install embedded parts for sockets, switches and wiring to them. After all, these devices cannot be placed close to the floor. In this case, the groove should be of such a depth that the wire fits in the corrugation, and then the putty layer should be at least 1 cm.
Pulling wires in a corrugated
- The next step is to lay the corrugation. It is better to lay the corrugation with the wires already stretched, although this can be done later. When laying corrugations, we try to eliminate their intersection and get rid of sharp corners. This will make it easier for you to change the wire if necessary.
We try to avoid intersection of corrugated hoses
- After this, we connect all electrical points. It is mandatory to check their functionality with voltage applied. Ideally, even turn on all electrical points for a day, and then see if we have heating anywhere.
We fix the corrugation to the floor
- If we used plastic corrugation, then we fix it to the floor. This is necessary in case it starts to float while pouring the screed. This practically does not happen with metal corrugation, but it is better to secure it in the same way as in the video.
- Well, at the very last stage we directly fill the floor. In this case, it is better to remove the voltage from all wires in this room. The screed must provide at least a 3 cm layer above the corrugation. The functionality of the network should be checked only after the concrete has completely dried, which is 15–30 days.
Checking the thermostat before installation
In order to be sure that the thermostat is working properly, before installing and connecting a heated floor to it, you need to check the thermostat. A separate article on the website “How to repair a thermostat for heated floors” is devoted to the repair of thermostats for heated floors.
The photo shows the simplest thermostat with a temperature sensor, which only allows you to set the heating temperature without the ability to change it during the day.
On the back of any thermostat there is a screw terminal block for connecting wires and markings for their connection. A temperature sensor is connected to contacts 1 and 2.
Contacts 3 and 8 are supplied with the supply voltage of household electrical wiring. Wires coming from the heated floor are connected to 4 and 5. Pins 6 and 7 of the terminal are grounding. yellow-green PE grounding wire is connected to one of them.
the color of the electrical wiring, and to the second the wire coming from the heat-reflecting aluminum substrate, which spreads under the heated floor film. When checking the thermostat, contacts 6 and 7 are left free.
To check, instead of heating elements of a heated floor, you need to connect an incandescent lamp of any power with a voltage of 220 V to contacts 4 and 5. Place the temperature sensor on top of the light bulb. Use the thermostat knob to set the temperature a little higher than the air temperature, connect the thermostat to the power supply and turn it on.
On the thermostat panel, the voltage supply indicator to the heating element should immediately light up and the connected light bulb should light up.
After a few minutes, when the light bulb heats the temperature sensor to the set temperature, the thermostat will stop supplying the supply voltage and the light bulb should go out. After cooling, turn on again and this should be repeated if the thermostat is working properly ad infinitum.
Combined electrical option
However, there is no need to take all of the above as an axiom and install electrics in your apartment only on the ceiling, or only on the floor.
A very common option is a combined solution to this issue. Some of the wires run on top, and some on the bottom.
Sometimes equally, sometimes not. The reason for this may be the very large volume and ramification of the entire wiring architecture.
If you have at least two or three dozen modular protection devices in your electrical panel, and at the same time you also have a low-current panel, then when installing all this equipment on the floor, you would get a huge trail of wires.
The wider it is, the higher the likelihood of overlaps and intersections of corrugations with each other. Such intersections are not good. And in some cases they can even lead to an increase in the thickness of the screed.
Therefore, the ideal solution here would be a combined option. A small amount of corrugations (primarily low-current) can be run along the ceiling.
And lay the power wires in a screed.
Also, in the future, it will be possible to run additional lines along the ceiling that you did not initially plan, for example, for the air conditioning system.
You can't do without grounding
When assembling an apartment switchboard, a TN-CS grounding circuit is used instead of the outdated two-wire one. In the new system, an additional PE conductor appears - grounding; now three conductors should come to the consumer: L phase, N zero, PE grounding. Each electrical appliance that has a special PE contact must be grounded. If your house or apartment does not have grounding, then this circuit is not difficult to make with your own hands. In a series of articles on the site, the design of a ground loop for self-installation was discussed in detail. All you need to do is study the section: .
What else is important to know is that it is prohibited to carry out zeroing in apartments of old housing stock. Those. use additionally zero N (without upgrading all common house wiring) as a PE grounding wire. The reason for this is that in the event of an accident (break of the neutral wire on the floor below), the wire acquires a dangerous potential and objects connected to such a conductor may receive an electric shock. In such cases, it is better not to connect the PE conductor anywhere until better times, until the home network is modernized.
Laying cables in a concrete floor: installation rules and features
Laying wiring on a concrete floor has its pros and cons, but today it is the most relevant.
The advantages of such installation include a high level of electrical safety - even in the event of a breakdown, the dangerous potential will not reach the resident, even those located near the breakdown site. A layer of concrete will hide the entire electrical network, and a reinforced belt will give the structure additional strength. With proper installation and subsequent operation, wires in concrete will function properly for several decades.
Now we should move on to the disadvantages. The main disadvantage of installing cables in the floor is the impossibility of creating connection points. After all, if a twist or terminal block burns out in concrete, then it is almost impossible to find the location of the damage. Therefore, it is necessary to lay solid lines directly from the panel or connection points located above the floor level.
According to technical standards, the concrete layer above the electrical wiring must be at least 30 cm. If the room is large, creating such a screed will require a large amount of building material, which leads to additional costs.
To replace the electrical wiring located in the floor screed, as well as when troubleshooting or laying a new line, it is necessary to dismantle the concrete surface. And after all the work, re-fill the floor. In order for concrete to gain the required hardness, a certain time must pass, so eliminating errors in cable laying in a concrete floor may take more than one day.
To cut concrete pavement, diamond blades are used, the cost of which is now quite high. You may also need a hammer drill, the use of which will lead to a large amount of construction waste.
Pros and cons of this installation
You should not lay a cable in the floor without knowing all the intricacies of this process. And you should start with the advantages of hidden electrical wiring:
- High degree of electrical safety. The floor covering (floorboard, laminate, linoleum) will become the dielectric that will prevent the spread of potential in the event of a cable breakdown. This means that a person will not be shocked by electric current even if he stands in the place under which the cable passes.
- Less spending. High-quality wiring will require less cable, which will provide significant savings.
- Ease of operation. The most difficult stage will be pouring the concrete floor. When installing electrical wiring, you need to insert the cable into the corrugation and simply lay it on the floor. Many electricians do not even attach the corrugation to the concrete base.
But in addition to its advantages, any work also has its disadvantages. The disadvantages of installing cable wiring under the floor include:
- The complexity of identifying and eliminating the malfunction. If the cable breaks down, you will have to lay a new line or dismantle the floor surface.
- Additional expenses for pouring a new floor if dismantling is required. Also included in the category of additional investments is the consumption of corrugation, without which the cable cannot be laid in the floor.
On a wooden floor
Laying in the structure of wooden floors is complicated by the fact that it is carried out in a fire hazardous environment. Taking into account this feature, cable products whose shells do not propagate fire should be used for installation. The best according to this criterion are cables whose letter part of the brand is supplemented with the symbols “ng” - non-flammable.
The best results are obtained by using metal pipes, which also protect against mechanical damage. A blind metal tray is also acceptable.
The formation of a cable channel system is performed in the following sequence:
- First, pipe laying routes are formed. To pass through the logs, technological holes are made in them, which can be replaced with cuts
- Metal pipes of individual channels are installed according to the design, followed by fastening to the transverse beams. The main means of fastening pipes is perforated tape; self-tapping screws are used for fixation.
- If there is a large gap in the places where the beams pass through, it is sealed with polyurethane foam.
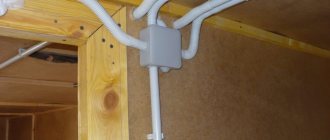
- Individual sections of pipes are connected to each other through junction boxes. An example of such a connection is shown in Figure 8.
- Regardless of the type of metal pipe, they must be grounded to form channels.
- Power cables are pulled into the formed tubular channels.
When cable ducts pass through wooden structures, the use of protective sleeves and short sections of pipes is not mandatory.
When using a system for underground laying of electrical cables, taking into account the high fire hazard of wooden structures, it is necessary to additionally treat them with fire retardant compounds.
An example of installing a junction box with grounding of pipes and foaming of mounting cuts in joists.
Laying cables in the floor has a number of advantages, but due to certain technological difficulties in implementation, it is advisable to use it in the process of new construction of city apartments. For wooden houses, this limitation shifts to the level of major repairs.
In the process of forming the wiring, it is advisable to provide a system of mounting boxes, and the pipes between the individual boxes should have a minimum number of turns. The process of forming electrical wiring using a gasket in the floor is not highly technologically complex; with the use of modern building materials, it can be performed without outside help with initial qualifications and without the use of special tools.
Subtleties of laying cables in a floor screed
Let's consider certain nuances associated with laying an electrical cable under a concrete screed.
Marking and diagram
Before starting work, you should make a marking to indicate where under the floor the corrugation with the electrical cable will be located. Consider those elements that will be placed on the wall or floor; they also need to be noted.
For convenience, create a diagram on paper where the location of the wires will be marked. This will come in handy if you need to drill into the floor: you can avoid getting caught in a wire.
The diagram should show the dimensions of the wires, as well as the distance at which they are removed from the walls. If possible, mark the depth of the wiring under the floor.
It is much more convenient to groove walls or install socket boxes using markings. You will be able to carry out the work more accurately, check how evenly all the structural elements will be located without starting work, and evaluate whether their location is convenient.
Laying electrical wiring in the floor
When installing the electrical cable, you should pay attention to its fixation. Fastening is carried out using plastic clamps, which avoids any shifts during installation of the screed. If you ignore this point, it is more likely that the wiring will simply move out of place, making the previously created diagram irrelevant. You may not even know about it, and in the worst case, you will realize it when you accidentally drill into the cable. To increase the strength of the screed and protect the corrugated pipe, experts recommend using reinforcement or mesh made of polymers.
You should not save money and purchase low-quality cable channels. Make sure to choose durable products that will improve the reliability of your home's electrical wiring. Electrical installation components must be routed from the distribution panel. Ideally, each wire should have a separate channel, since a large number of branches will complicate the potential replacement of the damaged section. This may lead to the need to open up the floor.
When you pass the cable through the channels, the created passages should be covered with plaster. It can be replaced with cement mixture or plaster. Next, a floor screed with a thickness of at least 30 mm is performed. The load on the box should be minimal to avoid deformation and destruction of the surface with subsequent damage to the wiring.
In addition to saving on materials, electrical wiring in the floor provides freedom when arranging furniture in the room. Think in advance about the location of sockets depending on where the household appliances will be located. Try to create the required number of plugs to eliminate the need for tees and extensions. It is always better to connect each device to a separate point.
Floor socket device
As you can see, installing electrical wiring in the floor is much simpler than installing wires in the walls. However, there are some nuances and the need for impeccable implementation of the rules and recommendations prescribed in the PUE. If you doubt the quality of the work performed, contact professional specialists. A qualified electrician will install reliable wiring, drawing up its diagram in advance and calculating the amount of materials and equipment (making an estimate).
Electrical circuit and principle of operation of a heated floor
All electric floors, regardless of the type of heating elements, are connected according to the same electrical circuit. Let's consider the diagram and principle of operation of a heated floor using the example of a film floor, made on the basis of carbon heating elements placed between two layers of Mylar film.
The heating film consists of two layers, between which copper bars are laid along the edges of its entire length. Separate carbon heating elements are connected to them. To heat the film, it is enough to apply supply voltage from household electrical wiring to copper busbars.
To avoid unnecessary energy consumption, overheating of the flooring (it is not recommended to heat the laminate above 27C°) and increased room temperature, the film is connected to the network via a thermostat
.
In order for the thermostat to receive data on the heating temperature of the heated floor, a temperature sensor is installed under the covering, which is a thermal resistance, usually with a nominal value of 10 kOhm or 15 kOhm.
Although the diagram indicates the phasing of connecting the heating film F (phase) and N (zero), this is conditional; the polarity of its connection does not matter. If several strips of heating film are laid in parallel, then all copper bars are connected in the same way. For example, all left strip buses are connected to phase, and right ones to zero.
What to do if it floods
The most common question that arises for any apartment owner who has agreed to install wires on the floor: “What will happen to the electrics if you are flooded for some reason?”
Nothing catastrophic. All wiring is carried out not only in a corrugated cable, but also with a cable having several layers of insulation.
The most important thing is to check during the pouring of the screed that there are no joints or insulation burrs underneath it. The cable must only be solid. Then you won’t have any problems with the wiring, even if it’s ankle-deep in flooding.