The most important thing in installing fence posts is to ensure that they do not rise due to heaving forces or fall from other influences. These natural forces can not only mow the fence or ruin all its beauty and harmony, but also prevent the owner of the fence from leaving his own yard. This happens when, due to the movement of the pillars, the wicket and gate jams. Of course, this is an extreme case. It can occur in regions where the depth of soil freezing breaks records and saddens many owners of private houses.
How to avoid problems with the fence due to improper concreting of the posts? If you don't want to get depressed over wasted money and wasted time, do it right the first time. You won’t have to suffer or spend money redoing the fence again. It will stand without any changes, causing the envy of neighbors and the admiration of passers-by. But that's not the main thing. It is important that it is beneficial, convenient and pleasant for you personally.
Installation of wooden poles
Made from solid logs, such poles will be quite expensive, especially if they are high-quality samples from hardwood. Pine, mulberry, oak and larch have the best properties in terms of resistance to natural factors and the effects of mold and fungi.
Pine and fir are also used in the production of poles. But birch, aspen, beech or alder are not used. In addition, before installation, wooden poles must be treated with an antiseptic and burned to the charring stage. It is advisable to use such supports for wooden fences.
If you decide to use wooden supports, then you need to choose them with a diameter of at least 150 mm; for intermediate installation you can take 100 mm.
They are treated with a solution of copper sulfate or other antiseptic, and the lower edge is treated with resin, followed by coating with roofing felt material. Painting with oil paint will also be useful. And it must be installed with the top down.
The holes are drilled with a diameter twice the size of the support. With a ground height of 1.5 m, the depth must be at least 0.5 m. Remember, for strength, at least a third of the length of the entire support must be buried.
Before installing the pillar, you should arrange a drainage cushion from a layer of crushed stone or expanded clay. After strictly vertical installation, the pit is filled with crushed stone and fragments of bricks. During the work process, compulsory compaction is carried out.
The strength of the fastening can be ensured by using metal sleeves with a diameter smaller than the size of the post. A wooden log is inserted into a metal tube.
Hammering with a sledgehammer
The ideal way to quickly install fence supports without spending additional budget funds is to hammer in fence posts with a sledgehammer. This method is appropriate when constructing a fence up to 1.5 meters high; it is very difficult to hammer in higher fences with a sledgehammer.
Hammering poles with a sledgehammer Source www.masterovit.ru
At least two people must perform the driving. One must hold the support in a vertical position, the other must hit it with a sledgehammer. The impact point on the support is softened by a special wooden spacer. Cramped conditions are excluded here. The goal-scorer needs to have a full swing.
The process of hammering supports with a sledgehammer is quite labor-intensive. When performing work with different intensity (human factor), the rack may become skewed relative to the vertical axis. Therefore, the vertical support is checked with a level at certain intervals.
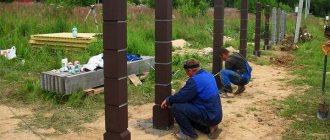
Metal constructions
Such supports are not only distinguished by their versatility and applicability for various types of fences, but also by their high strength. This is a durable material, but the pipes must be treated with anti-corrosion agents. Regular coloring is also required.
There are two types of supports:
- hollow welded round shape;
- made of metal profiles with a square cross-section.
The optimal diameter of the pillars will be 60 mm with a wall thickness of at least 2 mm. The strength of the material ensures that the fence is resistant to various types of loads, including wind. For installation, concreting methods are used, or supports are driven into the ground.
It is advisable to install fence posts by concreting in areas with sandy soil, as well as if the soil is susceptible to heaving. Two technologies are used:
- a hole is drilled with a size slightly larger than the diameter of the support, then a pole is placed, and the gap between it and the walls of the hole is filled with concrete;
- After drilling the hole, concrete is placed in it, and only then the support is placed vertically, providing a more durable fixation.
If the site has heavy, dense soil or you plan to use a fairly lightweight fencing structure, then you can use the technology of driving in supports.
First you need to drill holes. But their diameter should be less than the size of the pillars. Then the supports are driven into the holes with a sledgehammer.
The distortion can be eliminated with blows of a sledgehammer. To simplify the installation procedure, you can use poles with a helical spiral for screwing into the ground.
Screw piles
As a rule, they are used for the construction of fences made of heavy materials. The advantage of screw piles is that there is no need to prepare holes in the ground. Screw piles have a special design that allows them to be simply screwed into the ground.
But such supports cannot be used in rocky soil. The consistency of such soil is not suitable for reliable fixation of piles.
Asbestos-cement and concrete fastenings
Asbestos-cement supports are a durable, but expensive option for arranging fencing. Moreover, if water gets into the empty space of the pipes, there is a risk of rupture. Also, this material is not used with all types of fencing.
The concrete structure will be very heavy, but these supports are strong, reliable and durable, since they are not affected by most environmental factors. Due to their weight and high price, they are rarely used - mainly for very massive structures.
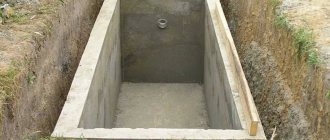
Asbestos-cement pipes are usually taken with a diameter of 120 mm. A two-meter pole requires a depth of at least 800 mm. The lower part of the pit must be made with an extension, which must first be filled with concrete. Roofing felt is used to insulate walls. Moreover, the insulating material should protrude outward by 150-200 mm.
A wooden formwork is installed around the ground part of the roofing felt, and then the pit begins to be filled with concrete. A bracket in the form of a metal rod is inserted into the solution until it hardens completely.
The length of the pin should be less than the length of the support. An asbestos-cement pipe is strung vertically onto it, and the cavity inside is filled with concrete solution. A rounded cap is made at the top to allow water to drain.
Video description
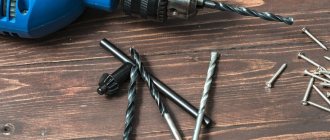
An example of driving a pipe with a hammer drill is shown in the video:
The hammer drill is not intended for driving posts, but when using the tool in impact drill mode, it can also be used for driving. To do this, you will need a special nozzle, which you can easily make yourself. For large volumes of driving, the nozzle manufacturing process will be completely justified.
The nozzle is a metal cup with a diameter slightly larger than the transverse size of the pipe (profile) itself. Having placed the glass on the support to be hammered, you need to ensure that it is evenly centered towards the end of the pipe and the hammer drill is positioned strictly parallel to the support.
Installation of brick pillars
This is a visually attractive design, but installation requires strict adherence to technology. A foundation for the load is required.
To install fence posts with your own hands, you need to lay a strip foundation. To do this, a trench is dug and brick fragments are placed in it. Concrete solution is poured on top.
For the post at the place of its subsequent installation, a frame is equipped in the form of reinforcement made of metal rods or pipes. Roofing felt is laid on top of the foundation. Brickwork is done around the frame. The internal cavity must be filled with concrete.
Why are the pillars squeezed out or warped? Heaving and soil movement forces
There is such a natural phenomenon as the force of soil heaving .
For any type of soil, heaving is a normal phenomenon. This is a seasonal increase in soil caused by icing of the waters with which it is saturated.
Most often, the fence post that is hammered or backfilled is hollow, which eliminates the possibility of squeezing it out of the ground (there is simply nothing to press on).
However, when a pillar is concreted or some kind of structure (anchor) is attached to its base, then a platform appears, on the area of which heaving forces act and squeeze the pillar out of the ground.
In order to avoid extrusion of the pillars due to heaving forces, they must be concreted below the freezing depth of the soil.
Read more about the depth at which fence posts are installed here.
In addition to heaving, fence posts can be affected by soil movement and incorrect selection of building materials.
Imported soil is mobile and is used to create landscapes and level areas. Such imported soil, unlike the mother soil, slowly and gradually moves towards the slope of the site. When installing a fence, you need to keep this in mind and make reinforcements - retaining walls so that the fence posts do not move along with the soil.
Columns can also become skewed due to improper selection of building materials, without taking into account wind load. Thus, before choosing a method for installing fence posts, it is worth taking into account the nature of the soil, deciding on the material and the height of the fence.
Tips for arranging supports
Along the perimeter of the future fence, you need to install stakes in place of the supports and pull the rope. The placement of pegs must be strictly aligned. The distance between the pillars is up to 3 m, and for heavy structures no more than 2.5 m. For extreme, corner supports, pipes of larger diameter are selected. This will ensure the stability of the structure before loading.
First you need to sequentially install the corner posts and check their height matching using a level. Twine is pulled from below and above between the pillars. It will help you position the intermediate supports evenly.
Installation will be more difficult if the height difference in the area is more than 250 mm. In this case, you need to install additional supports and arrange a stepped structure. In areas of the fence where it is planned to install a wicket or gate, it is necessary to install additional posts for greater reliability.
It is mandatory to check the structure vertically with a level. This way you will get the correct fence, as shown in the photo of the fence posts. Fastening the fence itself should begin no earlier than 3-5 days from the moment of concreting.
Particularly dangerous are areas with heaving soil or high water levels. In this case, it is possible for the supports to be pushed out of the soil over time or to undergo putrefactive and corrosive destruction.
If you are faced with a groundwater problem, then you need to dig a trench or drill a hole deeper, i.e. lower relative to the water level. In this case, you will need to prepare a significantly larger volume of solution.
Experts also recommend constructing a high-quality drainage pad. Crushed stone with expanded clay is placed in the pits in a layer of at least 200 mm. Then a pillar is placed, and the gap between the pit is filled with crushed stone. But not completely, but with a shortfall of 150 mm. Concrete is poured from above the pillow to ground level.
You can install fencing on the territory of a country house yourself. To do this, you need to select supports that match the fence material, and then install them, following our simple instructions.
Site preparation
First, the place where the fence will be installed must be cleared of foreign objects, including the remains of the old fence. In the process of preparing the site, you will need the following tools and materials:
- wooden stakes;
- twine;
- roulette;
- shovel;
- sand;
- crushed stone
If the soil difference is small, you can level it. The previously prepared stakes should be driven into the corners of the future fence. After this, a string is pulled over them. After this, using a tape measure, you need to mark the places where the support tables will be located. In the marked places, holes are made with a drill or a shovel, the depth of which depends on the level of soil freezing and the degree of soil heaving. At the bottom you need to fill up to 5 cm of sand and a 10 cm layer of crushed stone. After this, you can begin installing the supports.
Photo of fence posts
Driving metal posts and wooden supports - the pros and cons of the method
Financial capabilities and time reserves do not always allow you to build a concrete foundation for a fence. In this case, wanting to speed up the process of constructing a fence and reduce costs, site owners often use the method of plunging supports into the soil using a regular sledgehammer or using a special device.
Driving metal posts
When deciding to use the driving method, evaluate all the features of the technology. Main advantages:
- the ability to immerse supports into the ground without performing excavation work. When using the impact method, the installation process is simplified and installation time is reduced;
- a significant reduction in the cost of installing posts for the future fence. A sharp reduction in the estimated cost is influenced by the lack of need to use Portland cement, gravel and sand;
- no need to involve assistants or use special equipment. It’s easy to drive the posts into the ground yourself, using a massive sledgehammer or a hand-held device;
- stability of columnar supports driven into the soil. With a low moisture content in the soil and the location of aquifers at an increased depth, the supports will retain their original position.
The main disadvantages of the impact method:
- a sharp decrease in the stability of the fence with supports driven into peat, sandy and swampy soils. With an increased area of the fence, the supports may become skewed and the fence may fall due to the increased windage;
- significant deformation of the upper part of the column, subject to mechanical stress. Impacts applied at different angles deform the end of the fence post;
Evaluate all the features of the technology when deciding to use the driving method
- breaking of the soil around the pillar as a result of impact immersion of the support. Due to the different directions of the strikes, the soil is deformed, causing the support to become loose;
- increased likelihood of supports shrinking under the weight of a massive fence. With an increased concentration of moisture in the soil, subsidence of the pillars is possible, causing deformation of the fence;
- the difficulty of driving posts into soil with large inclusions of the rocky fraction. The end of a fence post in contact with a large stone will not be able to penetrate the soil to the required depth.
Having decided to use the impact method, remember that not all types of soil allow the use of this technology. Driving is possible on soft and medium soils and soil in which the concentration of the rocky fraction is minimal.
Installation of fence posts using the hammering method during the construction of fences
According to the requirements of the technology, to drive the supports into the soil, it is necessary to perform the following work:
- Carry out protective and antiseptic treatment of racks.
- Mark the coordinates for installing fence posts.
- Drill holes of reduced diameter for subsequent driving of supports.
- Check the verticality of the holes and compact their base.
- Place a layer of sand and gravel backfill at the bottom of the well.
- Hammer the posts into the prepared cavities.
Installation of fence posts using the driving method
. Experts focus on important points:
- mandatory control of the vertical position of supports;
- placing the ends of the pillars in the same plane;
- making pits of the required depth for driving posts;
- maintaining a constant pitch between columnar supports.
To perform the work, you need to prepare a tool.
What tool is used
The list of tools for impact diving is small:
- a massive sledgehammer or mechanized driving device;
- level and tape measure;
- nylon fishing line and stakes for marking.
When the height of the supports is no more than 2 m, the manual immersion method is used. Three-meter posts are driven in using a special device.
The manual immersion method is used when the height of the supports is no more than 2 m
We are going to install a fence with hammered supports - the preparation stage
Before starting driving, do the following:
- Apply an antiseptic solution to the surface of the wood posts.
- Tar or coat the submerged part of the wooden post with bitumen.
- Clean the surface of the steel pipe and cover the support with soil.
- Mark the places where the posts will be driven.
To make it easier to drive supports of a larger cross-section into the soil, you should first drill holes of a reduced diameter. When installing posts on soft soils, the technology allows driving without making a guide hole.
How to construct a fence support structure - technology for driving posts
After completing the preparatory activities, begin the process of installing the pillars.
The work is easy to do on your own using the following algorithm:
- Drive the first support at the corner of the site.
- Check the driving depth and check the position of the post with a level.
- Place the remaining posts along the contour of the fence being constructed.
- Stretch the twine between the corner posts.
- Check that the height of the pillars corresponds to the marked level.
When striking, try to strike parallel to the vertical axis of the post to prevent deformation of the support. Constantly monitor the height of the posts, since removing a clogged support from the ground is more difficult than making a few additional blows.