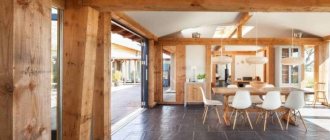
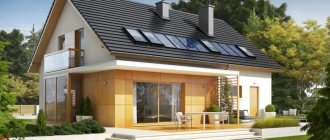
Have you long dreamed of creating a cozy place in your own garden, but are not yet ready to build a full-fledged gazebo? This means that one of the modern types of canopies will be ideal for you: wooden or plastic, with a reliable roof or one through which all the night stars are visible. Add a little textiles and imagination, and such a budget building will look no worse than a real summer cafe!
Moreover, building a canopy with your own hands today, with all the abundance of construction and finishing materials, is not at all difficult. The main thing is to decide for what specific task it is needed - for a car or summer get-togethers with friends, a swimming pool or just a bench, and choose the appropriate material. And our photo instructions will help you consider the whole process in detail and become well versed in this matter.
Kinds
Let's look at the types of wooden canopies by design:
- attached (on the side closest to the building it rests on the wall of the building, on the opposite side there are supports);
- free-standing (“roof on supports”);
- cantilever (canopy over the porch).
The shape of the canopy can be: flat, single-pitched (consists only of rafters and sheathing), gable, arched (it is difficult to make it from wooden elements), hipped, multi-gable and domed.
Depending on the purpose, there are different types of canopies:
Materials
What to make a canopy from? Priority is given to inexpensive but durable types. The most commonly used materials are:
Corrugated sheets and metal tiles. They are quite durable and resistant to damage. Has a long service life. Coating with a special paint allows the color not to fade for a long time under the influence of sunlight.
Polycarbonate. Very durable and easy to install and maintain material. It is better to use the cast version.
Asbestos cement slate. It is made from a mixture of cement and asbestos. It can be smooth or wavy.
Fiber cement slate. For its manufacture, mineral fillers reinforced with fiber and cement are used. The material is very durable, but it is rarely used for independent construction.
Lumber. This can be moisture-resistant plywood, boards, beams or OSB.
Metallic profile. It can have different cross-sectional shapes: square, circle, rectangle.
Fasteners Self-tapping screws, bolts, nuts, washers and steel angles are used.
Canopy over the door
This type is the most common. Its design should be combined with the overall appearance of the building.
A wooden canopy is suitable, for example, for a structure made of logs. It protects the entrance from external factors. It must be durable to withstand the snow mass in winter and have a water drainage system.
It is more convenient to make a single-pitched canopy on supports over the porch.
Design
The shelter must fit into the overall composition of the yard in size and design. The canopy should not stand out too much from the surrounding buildings with its dimensions, but also not get lost among them. The materials and decorative elements of the main structures and small buildings must match each other.
To add airiness, lighting is used in different combinations - around the perimeter and center of the building
Forged parts go well with brick or stone masonry walls of the house
Wooden gratings will look impressive when designing a canopy in an “eco” style.
Flowers in pots and climbing plants will decorate and add elegance to even the simplest, inexpressive structure
Designer-made barbecues and barbecues can decorate a gazebo and terrace and give a cozy look
Carport
This kind of parking is more economical than a garage; it’s not difficult to do it yourself. You need to choose a site closer to the entrance.
Drops of water should not fall on the machine; for this, the slopes of the canopy must be made wide enough (at least 15 cm from the supports). When choosing the height of the structure, you need to take into account the passage of the machine with the load.
Calculation
The canopy is subject to loads from wind and snow, so strength calculations are required. Let us briefly describe its main provisions.
Carport-garage
Snow load
Specific snow load per 1 sq. m of coverage, calculated by the formula:
S = k * Sg,
Where
- K - the coefficient of transition from the snow load on the ground to the load on the coating, varies for different conditions ranging from 3% to 20%;
- Sg is the standard specific snow load in a given region, varying from 0.8 to 5.6 kg/sq.m. m (information for all regions of the Russian Federation is given in SNiP “Building Climatology”).
BBQ gazebo
Wind loads
The specific wind load is calculated using the formula:
W = W0 * k * C,
Where
- W0 is the standard specific wind pressure, for different regions it ranges from 17 to 85 kg/sq.m. m;
- k is a coefficient taking into account the distribution of wind force over height;
- C is the aerodynamic coefficient, which takes into account the dependence of the nature of the wind influence on the structure of the object.
The value of the coefficient k depends on the terrain and for different conditions is 0.4 – 2.75.
Finished design
The coefficient C for the canopy is assumed to be -2.
Parameters of the proposed design
Based on the calculation results, the parameters of the proposed typical canopy, subject to construction in the middle zone of the country, will be as follows:
- number of racks with section dimensions 9x9 cm: 8 pcs.;
- distance between posts: 2.5 m.
The distance between the rafters with a section size of 15x5 cm is 60 cm.
"Summer cuisine"
In the summer you want to cook outdoors: it’s more pleasant and economical. For the kitchen you will need: barbecue, oven, table, benches, washbasin.
A summer kitchen will allow you to host family dinners or friendly gatherings outside. You can have a barbecue here.
Stage IV. Frame assembly
Now we are installing the pillars of the future canopy. To do this, use the same 50x150 boards. It is better to make jibs at the top and bottom so that they do not interfere with the operation of the building:
Here's how to properly build a shed from a profile pipe: here the ready-made element of the shed roof will be a truss. You will need to cook it from metal on the ground. As a result, you will have an equilateral triangle with a central element that will go from the top of the triangle to the middle of its crossbar. If you remember your school geometry course, this is the altitude of a triangle.
To make the rafters themselves, you will need a profile pipe with a cross-section of 20x20 millimeters, or an iron rod with a diameter of 10 millimeters. For light weights, the second option is more suitable, since it is easier to work with: you will not need to cut at an angle. But for a good canopy it is better to use, of course, a profile pipe.
So, we build a metal shed with a pitched roof step by step, with our own hands:
- Step 1. Making the foundation. For this purpose, we dig holes in the ground a little more than a meter deep, and narrower ones up to one and a half meters. We fill these holes with gravel to a depth of 20 centimeters.
- Step 2. Insert pipes with a cross section of 25x25 millimeters into these holes.
- Step 3. Install supports in the pits, fill them with medium gravel and concrete them.
- Step 4. Next, check the height of the racks - it should correspond to the angle of inclination of the future roof.
- Step 5: Now weld the pipes to the tops and post. Now check and clean all seams. Prime the surface and paint. It is better to use modern anti-corrosion paint for this purpose.
- Step 6. Lift and install the finished firms, and make movable jumpers between the trusses at a distance of 50 centimeters.
In addition, you can visually close such a canopy from the entire other area, but without blank walls, using a pergola:
Tree selection
In order to build a canopy, they take wood from moisture-resistant species: beech, pine, oak, larch.
For expensive canopies, radial cutting (the central part of the trunk) and chamber drying are used (heated in a chamber so that the material does not shrink or crack).
For this you can use various lumber:
- beam;
- log (for supports);
- bars (for visors);
- slats;
- lining, board, panels.
Canopy in the courtyard of a private house made of metal profiles: advantages and disadvantages
The second most popular material for making awnings in the yard is metal profiles or corrugated sheets, if that name is more familiar to you.
According to its purpose, corrugated sheeting is produced as wall, roofing, load-bearing and universal.
For our case, that is, for making a canopy in the yard, the optimal brands will be C20, C20K, C21, NS35 and MP. Corrugated sheeting of other brands, such as NS44, H57, H60 and H75, has a higher wavelength and is intended mainly for apartment buildings and industrial construction.
Galvanized corrugated sheets are produced in standard sheets 6 and 12 meters long.
Many manufacturers cut corrugated sheets with decorative coatings from 1.0 m in order to expand the range.
The width of metal profiles of different brands may vary. For painted ones it is 1100 mm.
Let's take a closer look at the performance characteristics of this material. As with polycarbonate, let's start with the positive qualities of the material.
An important advantage of corrugated sheeting is its higher durability. Its average service life is about 30 years, which is quite acceptable in most cases.
In addition, corrugated sheeting can withstand significantly greater loads compared to polycarbonate. If you live in a region where there is significant snow cover in winter, then this quality is essential.
The higher rigidity and strength of corrugated sheeting makes it possible to produce a canopy frame with a much smaller number of sheathing ribs compared to polycarbonate. This saves both money and time.
Laying corrugated sheets is very simple and does not require special skills.
The light weight of the sheets allows even one person to do the job.
Corrugated sheeting with decorative coating has a fairly large selection of colors, so you can easily choose what best suits the color of your house roof or fence.
A canopy made of corrugated sheets heats up significantly in the sun, but since it is not translucent, it creates a shadow. Therefore, under such a canopy it is not as hot as under a polycarbonate canopy.
The price per square meter of corrugated sheeting is slightly lower than that of polycarbonate.
The coating on corrugated sheets practically does not fade. In any case, it is not noticeable.
In what way does corrugated sheeting lose to polycarbonate?
Firstly, the corrugated sheeting makes noise in the rain.
But the main thing is that it does not allow you to build canopies of complex shapes. To lay corrugated sheeting, only a flat surface is required. For this reason, it is difficult to build something original.
Of course, you can lay corrugated sheeting in a wave along the decking, and not across it, as it should be. Then it can be bent in the same way as polycarbonate. Although this is not entirely correct from the point of view of organizing drains, if the shed is adjacent to the house. Yes, and you can use corrugated sheeting in this way only with a small comb.
Still, let's look at a few examples of canopies using corrugated sheets.
DIY canopy
You can make a wooden canopy yourself, having all the necessary materials and tools at hand. But in order not to make mistakes when building this structure, it is recommended to create a project that includes a sketch and a drawing with dimensions. After this, preparatory work is carried out (leveling the area).
At the next stage, recesses are made, the racks are lowered, concrete is poured, and supports are placed. After two weeks, the entire structure is assembled: brackets and cross beams are mounted, sheathing is created and the roof is mounted (preferably with a drain). Construction is completed by installing the platform with paving stones, tiles or gravel.
If you have no experience in such work, then it is better to use the services of a professional company, because if it is later distorted, then everything will have to be redone, which is unpleasant due to the extra costs and wasted time.
If you approach this responsibly, you will acquire reliable shelter from rain and sun in an open space.
Market news and unusual technologies
There are more interesting and unusual ways to construct a canopy. For example, German students managed to create shadows using drones! Their system is autonomous and is called Cyber Physical Macro Materials.
The essence of the idea is that drones independently select places that need to be protected from the scorching sun (for example, with people on vacation), and rally for this purpose. It looks simply amazing, and savvy summer residents are trying to repeat something similar using cheaper and more readily available materials.
For example, by installing umbrellas or large plastic crafts on a long cane that is easily stuck into the ground, and creating rest areas in the country simply by a cluster of such umbrellas, easily regrouped in the right place. Or they hang such elements in the air on thin ropes attached to the frame of the canopy.
What kind of canopy do you have at your dacha? Share your ideas!
Preparation for use
To ensure that a wooden carport for your suburban home lasts a long time, it is necessary to prepare the surface. To do this, we carry out: cleaning, grinding and impregnation with antiseptics.
Products for finishing wooden surfaces can be divided into two types: tinting and protective.
Stage I. Design
A shed with a pitched roof is the simplest design that even a beginner can handle. Most often, sheds are installed on the north side of the house, which is usually not suitable for anything larger: it is useless to grow anything near it, and because of the falling shadow it will always be cool there.
So, place the corner points of the future canopy directly on the ground. For convenience, use two stakes that are connected to each other by a rail. In total you will need about 10 of these, and they will help you lay out the correct markings for the future canopy.
Now let's move on to choosing the roof slope. Let's clarify that any roof suffers most from these two factors: wind and load from precipitation, and the smaller the angle of inclination of a pitched roof, the less wind affects it, but the steeper the roof, the worse snow and water are retained on it.
In order for water to completely drain from the shed roof, the angle of inclination should be at least 15 degrees. And to do this, cut both edges of the boards at this angle. In general, select the angle of inclination of the shed roof in accordance with the conditions of your region. For such a building, a slope of 15-20 degrees is usually recommended.
Here, for example, is how to build the simplest shed with a pitched roof:
And the same standard roof with a standard slope for such a building.
Protective
They are applied over tinting to obtain a smooth, clean surface that preserves the natural beauty of the wood for a long time.
The most popular surfaces lately are those on which the natural texture of wood is visible. Sometimes, for the sake of sophistication, artificial creation of cracks with spraying is added to obtain the appearance of aged timber.
To maintain a natural look, finishing begins with tinting the surface with light shades, moving on to darker ones.
Area
Construction begins with site preparation, at this stage the following actions are performed:
- clear the area, removing vegetation and debris. If the canopy is intended to protect a resting place or barbecue, fine grass is left;
- particularly prominent mounds and depressions are cut off or filled in, respectively;
- if the area under the canopy is supposed to be concreted, covered with crushed stone or covered with paving slabs, cut off the top layer of soil to a depth of 10 - 15 cm. It contains plant seeds, they would break through the covering;
- carry out markings, noting the location of the supports. The number of supports and the pitch between them are determined by calculation at the design stage. As a result of marking, the outline of a rectangle should appear on the ground. To make sure that the figure is drawn without distortions (due to its large dimensions this is quite likely), measure the lengths of the diagonals: for a rectangle they are equal;
- in the places where the supports are installed, excavations are made with a depth exceeding the soil freezing mark by 10 - 15 cm. If the depth is less, the frozen soil will squeeze out the posts in winter (the force of frost heaving).
Excavations of shallower depth are allowed only in rocky and sandy soils that have draining properties.
Exterior
Wooden canopies are well combined with stone, polycarbonate, concrete, metal, which emphasize the beauty of wood, merging with the natural landscape.
They can serve as a support for ornamental hanging plants, flowering perennials such as clematis, wisteria, climbing roses or for climbers such as maiden grapes or ivy.
Landscaping will hide us from prying eyes, protect us from drafts and heat, and add romance to the area.
For comfort, you can install light and install lighting fixtures.
Features of polycarbonate
Polycarbonate is a synthetic material, transparent like glass, but more durable and durable, despite its light weight. This polymer can be monolithic or cellular. The second type is characterized by a cellular structure.
Among the advantages, the following can be noted:
- High strength characteristics.
- Resistance to various natural phenomena and chemicals.
- The material is flexible and elastic, which allows it to be used at low temperatures.
- Transparency of about 90% ensures normal natural light.
- The low weight makes it possible to create structures that do not place a large load on the walls and foundation of the house.
- Low thermal conductivity coefficient.
- Good soundproofing characteristics.
- Compliance with environmental regulations.
- Long-term operation without loss of quality.
- Fire resistance.
- Convenient and simple installation.
- Ability to protect against ultraviolet rays.
Polycarbonate has few disadvantages, but you also need to know them:
- The material expands greatly when heated.
- Mechanical stress and alkalis can destroy polycarbonate.
- The surface of the material reflects the sun's rays.
Conclusion
After looking at numerous photos, we can conclude that a wooden canopy outside the city is simply necessary. It is convenient, beautiful, easy to build and operate.
And most importantly, it helps create a comfortable environment conducive to relaxation and admiring the beauty of the surrounding nature.
Stage III. Construction of the foundation
So, we’ve decided on the material – it’s time to start construction:
- Step 1. So, we dig cylindrical holes. Make the depth from 60 centimeters to 90. In total, for this option we will need 6 holes.
- Step 2. We prepare the concrete separately, for example, in an old bathtub, where it is easy to mix cement and sand with gravel. Take the proportions 1:3:5. Add water.
- Step 3. Mix well and pour a layer of concrete into the holes so that the thickness is 5 centimeters, and lower the pipes there. They will serve as formwork for the foundation.
- Step 4. Now we fix the pipes from the outside. Fill with concrete.
- Step 5. Level the pipes and make shelves for them from boards.
- Step 6. Now we wait three days for the mixture to harden. The easiest way to install wooden posts on such a foundation is with an anchor, which is installed on completely hardened concrete.
- Step 7. Now we connect the support beams to this pillar. We screw the boards with self-tapping screws so that they protrude about 3 centimeters beyond the edges of each post. And on the side these protrusions will be needed to fasten the crossbar of the sheathing.
- Step 8. To give the entire structure greater rigidity, especially if the anchors have come loose, use spacers. The spacers are cut at an angle of 45 degrees and screwed with self-tapping screws.
That's all! The hardest part is behind us.
Stage V. Lathing
You cannot assemble wooden roof trusses using nails, modern metal fastening plates, or angles. We advise you to use plates, which perfectly hold the fastened elements and the gable roof turns out to be very durable. Moreover, they are easy to use.
You just need a good press machine or a regular hammer, depending on which fastener you choose. In the ridge, all these construction firms will be connected by one beam, along which you will align the distance between the trusses so that it is the same.
Now we move on to installing the crossbars. The first way is to attach the support beam with self-tapping screws using fastening metal corners. It is important that there is a distance of 50 to 55 cm between the crossbars.
As for the sheathing and its density, this issue should be based on what roofing material you will use. For example, for something as heavy as shingles, you will need to make an almost continuous sheathing so that it can support the weight of the covering. Moreover, sometimes you have to use OSB boards. But for corrugated sheeting or seam roofing, lathing with a pitch of 60 cm is quite suitable. Continuous lathing should also be for a soft roof, like roofing felt or flexible tiles.
More details in the video:
Stage VI. Roofing pie device
What is insulation? First of all, it is a waterproofing film, which is located directly under the roofing. The main task is to prevent moisture from getting in after rain or from melted snow through problem areas in the roofing.
If this is planned, you will do everything in the following sequence:
- Step 1. Place a vapor barrier film on the finished canopy joists and nail it in place using nails or a construction stapler.
- Step 2. Place thermal insulation on the film.
- Step 3. Cover it all with another film - waterproofing. Also nail it to the joists.
- Step 4. Nail the batten and roofing on top.
Ventilation of such a roof is mandatory. Forced, if you install a special fan, or natural, if you position the dormer window correctly or leave a mandatory gap between the waterproofing film and the insulation so that the air takes moisture droplets from it.