About fence posts. Types of posts, recommended distance between fence posts
The spacing of fence posts and the depth to which they are driven are important factors to consider when designing and constructing a fence. The fact is that if the distance between the supports is too large, the structure will not have sufficient rigidity. If the pillars are installed too close to each other, there will be an overconsumption of material and the labor intensity of construction and installation work will increase.
Advantages of a chain-link fence
- saving financial resources. The price of a chain-link fence is almost the lowest of all possible fence options. Only a fence made of branches can compete in price, but otherwise it will lose;
- light weight. A massive frame or pouring a foundation is not needed;
- strength and resistance to environmental factors: moisture, temperature changes, ultraviolet radiation, fire, mechanical damage;
- light transmittance. A chain-link fence does not create an obstacle to the penetration of sunlight, which means that there will be no shaded areas on the site and the plants will feel comfortable in any part of it;
- low maintenance and constant repairs;
- ability to withstand significant load. For example, it is easier to break a wooden fence than to break a metal network;
- availability. You can buy chain-link at any hardware store or market;
- a large assortment allows you to choose the one that is best suited for your specific needs;
- high installation speed. Two people can install a chain-link fence in one day.
Of course, a mesh fence is not without its drawbacks, including: unattractive appearance, “transparency” of the fence and the need for painting. Some of the shortcomings can be easily eliminated if you know how to choose a chain-link mesh correctly.
What determines the distance between supports?
The distance of one support from another is not a randomly selected average parameter and not a general value dictated by building codes, but the result of a professional calculation, on which in many cases stability and maximum service life depend.
The choice of distance between supports depends on many factors
In the calculations carried out, the following components are certainly taken into account:
- the type of material chosen and methods of attaching it to the supporting pillars (strength and character, number of structural elements, section width, if it is homogeneous);
- the type and design, width and strength, as well as size are very important in purchased or manufactured supports;
- depth into the soil and the method used to introduce and secure it to the intended locations;
- soil condition, presence of waste or groundwater, type of soil, presence of erosion, subsidence or swelling (each type has its own difficulties and features of working with fence supports);
- the weight of the structure, which should not exceed permissible limits, otherwise installing the fence makes no sense (it will collapse at the slightest load);
- availability of a site plan and cadastral markings, especially if a permanent fence is being built (this is extremely necessary if the site is of irregular shape);
- the accuracy of the measurements taken and the verification of the calculations made when marking for digging holes (otherwise the standard sections may not fit);
- a distance dictated by strength indicators and carefully verified using proportions (you can calculate the depth for the underground part as follows: – 1/3 of the entire height of the fence);
- Will the fence rise to a standard height or is it planned to build a more grandiose one.
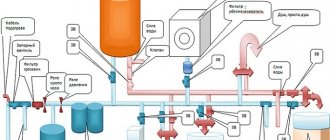
Approximate diagram of the formation of a fence span
Materials
To create a fence you need:
- Rabitz. Basically, rolls of 1.5-meter width with a mesh of 40 or 50 mm are used;
- pipe for making posts. It’s better to take a profiled one - it’s easier to weld to it. Acceptable size is 60x60x2 mm or 80x80x2 mm. Especially for the installation of mesh fencing, racks with hooks welded to them are produced. An alternative option is pillars made of wood or concrete. But these options are not suitable as a good replacement. The first - due to their short service life, the second - due to bulkiness;
- cement, sand, crushed stone. If the soil is dense, the posts do not need to be concreted: due to complete ventilation, the mesh fencing is impervious to wind force. In soft soil, it is better to fill the supports with concrete;
- Depending on the design features of the fence, a corner, wire or rod may be required.
The mesh is available in three versions:
- Without anti-corrosion coating. The cheapest modification, but it will have to be painted every two years. It is advisable to purchase this material only for temporary structures;
- Galvanized. It costs more, but you don’t have to take care of it;
- With polymer coating. This option is not only corrosion-resistant, but also attractive: the plastic protective film can be any color.
If you plan to build a permanent fence, then you should give preference to the option with a polymer coating.
Calculation of the amount of mesh for a fence
Before building a fence, you need to determine in advance how many posts and linear meters of material you will need. To do this, it is worth considering the following points:
- The length of the chain-link should be calculated based on the total length of the fence. Most often, the mesh is usually supplied in rolls of 10 m.
- The number of supports is determined according to the same principle, but it is important to take into account the distance between them. It should not exceed 2–2.5 m. Moreover, this rule applies regardless of the method of attaching the mesh.
- In the tension version of the design, the length of the wire is equal to two lengths of the future fence.
- When assembling sectionally, in order to calculate the length of the profile corner, it is necessary to multiply the perimeter of the frame by the number of sections.
Scheme of installation of poles and fastening of the mesh.
The average price for non-galvanized chain-link with dimensions 50*50*2 mm starts from 45 rubles. for 1 sq. m, galvanized - from 56 rub. for 1 sq. m, with polymer coating - 220 rub. for 1 sq. m.
Support structures
To install a chain-link fence, you need to select reliable supports. The main criteria are durability, ease of fastening the mesh fabric, and accessibility. The supports can be made of various materials:
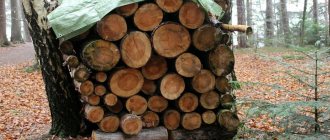
- Tree. Wood is not durable, so to extend its service life it is necessary to treat the pole with an anti-rotting compound, waterproof the underground part of the support, and paint the above-ground part every two to three years. The advantages of wooden poles include low cost and simple installation of chain-link using nails, staples or wire. To make wooden supports, use timber with a cross-section of at least 100x100 mm or round timber of similar sizes
- Metal. Pipes with a diameter of at least 60 mm or a square profile with a cross-section of 25x40 mm are used. Metal thickness – from 2 mm. This is the optimal type of support for a chain-link fence due to its high strength and durability, and the ease of fastening elements by welding. This type of fencing looks aesthetically pleasing. Poles made of metal profiles are treated with an anti-corrosion compound, primed, and painted. A plug is attached to the top end to prevent moisture from entering inside, causing corrosion. Manufacturers offer special poles equipped with hooks for attaching chain-link, but this option is more expensive
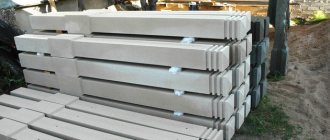
- Concrete. Reinforced concrete pillars are rarely used in combination with chain-link. Monolithic supports are labor-intensive to manufacture; delivery and installation of finished products requires special equipment due to their heavy weight - this increases the cost of construction. In addition, it is difficult to attach the mesh fabric to a concrete pillar.
- Asbestos cement pipes. This is a relatively inexpensive material and easy to install. But to fasten the chain-link you will need to use clamps or twisted wires, which is not very convenient. It is necessary to install a plug on the upper end, otherwise moisture that gets inside may freeze and the pole will burst.
- Brick or stone. The construction of supports made of brick or stone requires the construction of a foundation, and the construction material itself is not cheap. But the combination of such pillars with frames covered with chain-link looks aesthetically pleasing. To fasten sections by welding, it is necessary to provide embedded parts.
What else to consider
When building a permanent fence, everything needs to be taken into account, and this can be verified by carefully reviewing the requirements for installation and fastening means.
Correct calculation of all necessary parameters and drawing up a plan ensure the durability of the structure
The desire to save on building materials or labor time does not lead to anything good. That’s why there are unspoken standards that experienced builders use.
Preparatory actions for construction work: calculating the area of the future fence
Before you begin calculating the area of the future fence, you need to establish what type of foundation will be used. Since the mesh has a relatively light weight, the load on the supports will be insignificant. Therefore, heavy concrete bases are usually not used for chain-link fences, but this also depends on the preferences of the owner.
An important point will be to study the soil in which the pillars are dug or the foundation is laid:
- If it is rocky soil, then there is no point in spending money on a concrete base, since the installed pillar will not deform over time.
- If clay soils predominate at the building site, then the gap between the pillar and the hole must be reinforced with gravel or filled with concrete.
- If the fence will be installed in an area whose soil contains a large amount of sand, then it is necessary to use a strip base.
When studying the soil, it is necessary to determine the freezing point, since installing a post above it will lead to deformation of the fence at low temperatures.
Calculating the area for the fence will not be difficult. For a simpler calculation, just multiply the length by the width of the foundation.
The width of the strip-column base should be at least 25 - 30 cm, and the length, for example, 30 m. We make the calculation: 0.4·30 = 12 m2 - this is the total area of the strip base of the chain-link fence.
When pouring a strip base, for the purpose of strengthening, the size of the foundation for each support is made wider than the gap between them. For more accurate measurements, it is necessary to add up the areas of the base of all the pillars and the areas of the spaces between them. For example, the size of the base of the pillar is 40x40 cm, and the gap is 30x215 cm.
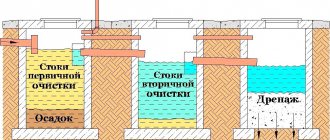
Tape-column base: calculation diagram
To calculate the total area of this foundation, you need to find out the values first for the bases of each support, and then for all the intervals. There are 12 supports (pillars) for this fence. Therefore, the length of the base for the pillar must be multiplied by the width, and the resulting result multiplied by the number of supports: 0.4·0.4·12=1.92 m2 - this is the total area of the base for the pillars (supports). The area for the gaps is also calculated, only you need to multiply by one less: 0.3·2.15·11=7.09 m2. Now we need to add up the results obtained, and we will get the total area for the entire tape: 1.92 + 7.09 = 9.01 m2.
What material is suitable, the dimensions of the fence mesh. Tips for choosing
Chain-link mesh is manufactured in different sizes, which are standard. Chain-link with mesh sizes: 0.4x0.4 cm, 0.5x0.5 cm, 0.6x0.6 cm, as well as options with intermediate sizes: 0.45x0.45 cm, 0.55x0.55 cm have found wide application. In terms of roll height (mesh width), this material has dimensions: 120 cm, 150 cm, 180 cm and 200 cm. The length of the mesh web also has established standards. A mesh of 10 or 15 meters in length is rolled up in a roll.
Some manufacturers produce chain-link mesh in non-standard sizes. In this case, the material can be up to 4 m high, with cell sizes from 30 mm to 150 mm.
When purchasing a chain link, you need to pay attention to the thickness of the wire and the quality of the metal. It shouldn't bend easily. The mesh cells must be identical, since any deformation is a sign of low quality metal. Spirals should not be twisted. If you do not take this defect into account, then after a few months the wire in this place may burst.
When purchasing this material, you need to look at both edges of the roll. Each end of the wire must be connected to the adjacent element and bent. The length of the bent “tail” of the wire should be more than half the cell. Otherwise, the edges of the stretched mesh may unravel after some time, which will lead to its deformation.
If the choice is made on a plastic-coated mesh, then in the cheap version it will bend easily. Inexpensive mesh options are coated with low-quality polymer, which can crumble after a few seasons. In this regard, it is necessary to clarify the warranty periods established by the manufacturer.
An inexpensive option is non-galvanized mesh. The main enemy of this type of mesh is moisture. In this regard, after installing the fence, you need to take care of painting it.
All this suggests that when buying this material you should not choose cheap options.
Carrying out calculations of the required material. Calculation examples
To build a fence using chain-link, it is necessary to determine:
- type of material used;
- the width and length of its canvas;
- number of supports;
- type of foundation and required volume of concrete mixture, if a permanent foundation is selected;
To construct a fence from this mesh, you need the following materials:
- The slave herself.
- Metal channel.
- Concrete mixture marked M200.
- Wide wooden boards or sheets of plywood for making formwork.
- Bolts, nuts.
- Wire, metal fasteners and clamps.
- Reinforcing bars.
- Sand.
- Crushed stone.
- Anti-corrosion primer.
- Dye.
To build the fence, a chain-link with a polymer coating will be used, with a cell width of 40x40 mm and a wire thickness of 3 mm. The width of the fabric in a roll is 150 cm, length is 15 m. Channels with parameters 50x50x2400 mm are used for the pillars. To install this type of fence, a strip foundation will be poured. The length of the fencing section is 30 m.
Having established what materials will be needed when building a fence with chain-link, you should proceed to calculations. First you need to calculate the total amount of concrete for the permanent foundation. To do this, you need precise parameters for the length, height and width of the base. Since the foundation under the pillars is wider than under the fence span, each of them will be calculated separately.
Concrete piles will further strengthen the base of the pillars
The calculation of the concrete base for a chain-link fence will look like this:
- To determine the volume of concrete for the base of one pillar, you need to multiply its length, width and height: 0.4·0.4·0.4=0.064 m3.
- To calculate the volume of concrete for one pile, you need: 0.15·0.15·0.5=0.011 m3.
- Now you need to add these values: 0.064·0.011=0.075 m3 - this is the volume of concrete required for the foundation of one pillar.
- In 30 meters of the future fence there will be 12 bases for pillars and 11 for spans. Therefore: 0.075·12=0.9 m3 is the total volume of the foundation for all pillars.
In the same way, it is necessary to make a calculation for 11 spans between the pillars. According to the diagram, the distance between the bases of the pillars is 2.15 m, therefore: 0.3 2.15 0.4 = 0.258 m3 is the volume of concrete for one span. For all spans: 0.258·11=2.838 m3.
Next, you need to find the total value for the concrete required to lay the entire foundation. To do this, you need to add up the total values for the pillars and spans: 0.9 + 2.838 = 3.738 m3.
To calculate the total length of the chain-link, you need to multiply the distance between the metal channels by the number of spans: 2.5 11 = 27.5 m.
Required Tools
When building a fence using chain-link, you will need the following materials:
- Hand drill or screw shovel.
- Shovel and bayonet shovel.
- Cord and stakes.
- Concrete mixer.
- Pliers.
- Metal scissors.
- Welding machine.
- Building level.
- Plumb.
- Yardstick.
- Metal brush.
- Paint brushes and roller.
- Hammer.
- Nails.
- Buckets and tanks for water and concrete mixture.
An easy way to build a fence is to stretch the mesh along the posts, with direct fastening. This method is not particularly reliable.
More suitable for cases where the fence is planned to be temporary. Sagging occurs very often; pulling the wire through the mesh around the entire perimeter will help correct the situation.
Selecting a suitable mesh
Chain-link is made from different raw materials, has differences in the diameter of the cells, type of coating, which is why it has a wide range of applications. Let's look at the main types that are most suitable for fencing.
Photo: mesh fencing on a metal frame
Metal type
Happens:
- stainless steel;
- made of low carbon steel.
In the first case, the material has increased rigidity, so it is more often used for fences.
Cell size
Available in diameters from 25 to 100 mm. Moreover, the larger the dimensions of the cells, the lower the price, but the load-bearing capacity of the mesh is also low. A product with a small cell will be heavier in weight, because more metal is spent on it, and therefore cost more.
Photo: cell shape - a method of weaving a chain-link. On the left is rhombic, on the right is square.
On the border with the neighboring plot, it is recommended to install a chain-link fence with a diameter of 40 mm to 60 mm. If this is a fence for poultry (chickens, ducklings), then the mesh should be taken with a fine mesh of 25, 30 mm.
Coating
There are three types:
- Non-galvanized. The cheapest due to its fragility. Has a tendency to corrosion. To avoid this, the mesh must be painted immediately after fastening. The layer will have to be updated once every 2-3 years. Cell size from 50 to 100 mm. The thickness of the wire used is 1.2 – 5 mm.
- Galvanized. The steel mesh is coated with zinc, which makes it durable and resistant to environmental influences. Does not require maintenance. The cell diameter ranges from 50 to 100 mm. Wire thickness - 1.6 - 5 mm.
- Plasticized or with polymer protection. Covered with a layer of PVC. It has a neat appearance and a large selection of colors. The service life is much longer than the first two types, but the price is higher. Wire thickness is from 2.5 to 2.8 mm. Cell diameter is from 25 to 50 mm.
Photo: woven mesh with polymer coating
Advice from builders: when buying a polymer-coated chain link, ask the seller for a quality certificate and a warranty card. A product with a regular PVC layer, without protective additives, will be inexpensive, but after 2 years it will become unusable, causing cracks on the surface.
Installation of chain link
Installing a chain-link fence using the sectional method looks quite attractive. Support pillars are installed at equal intervals and at the desired height.
A stack is attached between them. This method is expensive, but more reliable. Suitable for installation on uneven terrain.
You can reduce the cost of installing a chain-link fence if you use reinforcement as a frame. There is no need to make separate elements. You can stretch it into the mesh cells at the top and bottom, and weld it to the posts.
Fence posts made of metal chain-link have the best performance characteristics. To install them, you just need to treat the metal with a primer and paint the part that will be sunk into the ground.
Any fastener can be welded to metal poles. You can buy such poles at any collection point for metal products, saving a lot of money.
Also, on the metal industry market there are support posts that are already painted with special hooks for constructing a sectional type fence. Their price is higher, but there is less hassle with them. It is recommended to use a rectangular profile, which is particularly durable due to the stiffening ribs.
Wooden supports are also popular due to their availability and low cost. But very often, the saying “the miser pays twice” comes into play. Wood tends to be subject to the negative influence of precipitation; various insects love it.
Soft woods are cheaper but short-lived, while hard woods are too expensive. Using products to treat wood against parasites and rot, you can extend its service life by a couple of decades.
Asbestos cement pipes are also used as fence posts. They are strong and not very expensive. The cost ranges from 400 rubles per 1 m.
Brick chain-link fence posts are used extremely rarely as supports. These two materials look very awkward together. The monumentality of brick and the lightness of mesh is not a very attractive combination.
In order to install brick supports, you need to pour a solid foundation. But, as you know, chain-link mesh is used primarily because of its cheapness, and brick pillars only contribute to an increase in the cost of the project.
The same applies to concrete pillars. Yes, they are strong and durable and can last for many decades. But they are also inconvenient to install; they require pouring a foundation under the supports.
Do-it-yourself work on installing a chain-link fence begins with clearing the area.
How to mark the territory
Marking. Place pegs at the corners and pull a string between them. Then, mark the locations of the columns, at a distance of 2 - 2.5 m. This prevents the mesh from sagging.
You can calculate the number of posts by dividing the length of the fence section by 2 - 2.5. The total length will be divided by the average value. Example: side 35:2= 17.5 pillars, 35:2.5=14. We choose the round number 14. 37 m: 14 racks = 2.5 m.
Marks are placed along the line of the stretched cord and depressions are dug, the level of which should be 15–20 cm lower than the freezing point of the ground. These are approximate indicators that differ in each individual area.
However, the recess must be at least a meter. The mass of a chain-link fence is large, and if the holes are not made deep enough, the structure may tilt.
Metal supports are driven in with a sledgehammer, after laying down a board or plywood. This is done to avoid metal deformation. The installation of supports must be carried out in a uniform manner, in order to build one line.
After the concrete base of the pillars has hardened, you can begin stretching the chain-link mesh. A cord is pulled over the posts to determine the top level of the fence. The mesh is installed in such a way that there is no contact with the ground, which will cause the material to quickly become covered with rust.
The chain-link is attached to metal poles by welding, to wooden ones using nails every 15–20 cm. A mesh is attached to asbestos-cement and concrete poles using wire or plastic clamps.
They start fixing the mesh from the corner post, since going around it in the future is not very convenient. The mesh roll is placed in a vertical position and secured using any convenient method.
For ease of work, you can stretch the rod and fasten it by welding with hooks. This will allow the mesh to be stretched evenly. It is more convenient to work with several hands: one person holds, the second unwinds, the third secures.
In order to connect the edges of the chain-link to each other, you need to pull the wire from one edge to avoid sagging of the chain-link fence; reinforcement or wire is passed through the cells and secured to the posts. Straight antennae on the chain-link are bent to avoid injury.
What should be the distance between fence posts
Modern technologies make it possible to build a fencing structure for a dacha or suburban area with your own hands and in a fairly short time. But in the process of performing work, it is necessary to take into account many important characteristics. Therefore, let's talk in this article about what should be the distance between fence posts of various types. After all, the strength and durability of the entire structure depends on this parameter.
Distance between corrugated fence posts
Installation in the right way
The distance between two adjacent support columns of a fencing structure on a dacha or suburban area is the step with which these supports should be installed in the ground. However, it is important to clarify the following point: this is not a universal parameter. That is, for each individual type of fencing, experts recommend adhering to a certain value, measured in meters. Then the fence at your summer cottage, built by you yourself, will certainly please you with its durability and strength.
Let's talk in more detail about the different values of this parameter in certain specific cases.
Rabitz
Chain-link fences have become very common lately. This can be explained by the ease of installation of such a fence and its cost-effectiveness. To make the site more attractive, many summer residents plant vines next to it, which curl very beautifully over a metal mesh:
- Experts say that the most suitable width of metal mesh for a garden fence is 1.5 m. But if you want to make the structure taller, you can raise the top edge of the mesh to the height of your choice. And the lower part of the structure can be laid with any material at hand. For example, bricks or wooden boards are used for these purposes,
- If we talk about the required number of support posts for installing a product made from chain-link mesh, then this indicator is calculated based on the measured length of the fence and the selected distance between its supports. That is why it is important to clearly determine the optimal distance between the posts of a chain-link fence. Practice shows that to ensure the strength and reliability of the entire structure, this figure should be equal to 2.5 m.
Made of brick
People have been using brick for many years in the process of building fences for country and suburban areas. Examples of such buildings are shown in the following photos. This trend is due to the high performance qualities of this material. Brick is valued for the following characteristics:
- high strength,
- durability,
- reliability,
- attractive appearance.
Brick columns are laid in the usual way using cement-sand mortar and mandatory bandaging of the seams. If you undertake to do the masonry with your own hands, make sure that the support is horizontal and vertical. To make the product more attractive, add decorative stitching to the seams.
In the process of building a brick fence post, you need to install two embedded parts on all sides of the support into the masonry. This is done in order to subsequently be able to secure the spans, wickets and gates of the structure.
To determine the required height of brick fence posts, you need to know the height of the structure. Typically it varies from 2 to 3 m. The distance between the support columns will depend on the width of the spans. However, experts do not recommend installing brick supports more often than every 2.5 - 3 m.
From corrugated sheets
The optimal material for creating structural pillars from corrugated sheets is a profiled metal pipe:
- If we talk about the distance between the support posts in this case, qualified experts advise sticking to 2 - 2.5 m. Such span sizes will give your fence the required level of rigidity and flexibility, but will not allow it to break under the influence of strong gusts of wind,
- The length of the pillars will be determined by the size of the profiled sheet used, as well as the characteristics of the soil in your suburban or summer cottage.
Knowing the step with which you will install supports for a structure made of corrugated sheets, you can easily calculate the required number of supports.
Wood is the most common material in country and country construction. This is a highly environmentally friendly and affordable material, which determines its popularity.
When constructing a wooden fence, the distance between its supports is often chosen, which is 2 - 3 meters. Be sure to take into account the following fact: the higher your wooden structure is, and the wider its spans, the more securely you will need to fix its supports.
Logs or metal pipes of various shapes can be used as posts for such a fence.
From a picket fence
Let's talk separately about wooden picket fences. They are one of the most frequently erected types of similar structures in private construction. They outline the boundaries of the summer cottage, but, at the same time, do not at all shade the plants that grow next to them. This design of fencing looks very attractive.
You can give fences for a summer cottage, built from picket fences, any height, shape, or color. The installation distances of the support pillars can be any. For these reasons, such designs have a very original and attractive appearance. Look at the following photo to see this.
Let's sum it up
The spacing with which support pillars of fencing structures are installed is a very important parameter on which their strength, resistance to gusts of wind and other loads, durability and reliability will depend. This fact should not be neglected, otherwise your fence will not please you with a long service life.
Technology for assembling a sectional fence from a chain-link mesh
Preliminary work is the same as described above. The first step is to install supports from the selected material. To install the mesh, you need to unwind the roll and select the desired piece by pulling out the wire.
To tension the mesh between the supports:
- twigs 4–5 mm thick are inserted into the outermost holes of the mesh;
- welded on one side inside the corner;
- reinforcement is placed below and above;
- using welding, they connect the reinforcement on the side where the mesh is fixed;
- the mesh is stretched and secured inside the frame of the pillars.
After the sections are secured, it is necessary to attach metal strips 4–5 mm thick to the supports, which should protrude along the sides of the pillars in such a way that it is possible to secure the frame. A sectional chain-link fence is labor-intensive, but its appearance is much better than usual.
The cost of constructing a chain-link fence depends on its design and the materials used. You can use the services of companies that install turnkey chain-link fences, or you can build it yourself, spending much less money.
The nuances of installing tension fencing
When installing a tension fence, the first mesh is secured with clamps near the corner post, with the bent edges of the chain-link facing upward.
Advice! When installing a non-galvanized product, the element is raised to a distance of 10-15 centimeters from the ground level, which will prevent corrosive destruction of the material. After this, a metal frame is installed at the bottom of the fence and the gap is filled with bricks or pieces of slate.
The rolls are carefully unwound by hand and oriented along the bottom jumper. During the work, you need to untangle all the pieces. It is recommended to connect the elements into a single structure on supports. Pay special attention to the position of the mesh at the corners of the fence. The chain-link must be laid in such a way that distortions do not occur.
How to stretch a chain-link mesh onto a fence alone
When the concrete solution has hardened, hooks are welded onto the fence posts. The mesh is then stretched on them. What are rods, wires, nails used for, that is, any material that bends into a hook?
Next you need to stretch the fabric. First we straighten the mesh. After this, we place it near the first corner post of the fence. You need to pull the chain-link onto the posts using hooks.
To prevent the fence from sagging in the future, wire or reinforcement with a diameter of 2–3 mm can be threaded into the top row of cells, then it is welded to the corrugated pipe.
This increases the tension of the mesh significantly.
We unwind the chain-link one span to the next fence post. A little further than the area where the mesh is tensioned with the stand, the reinforcement is threaded. By holding it, you can stretch the fabric.
If you just pull with your hands, the tension will be uneven. The procedure is repeated for other pillars using the same technology.
Options for attaching to fence posts
It is not advisable to go around the corner posts with chain link. It is necessary to attach it to the post, cut it, fix the cells of the second part of the canvas and continue to stretch. This will reduce the load on the racks.
One roll is often not enough to stretch all the spans of the fence. There are times when half a meter of mesh remains, and there is still 2 m to the post.
So, we take out the wire from the last row, apply the ending mesh to the new fabric, and insert a rod between them. When the entire area is blocked by a fence, check the tensioned material and bend the hooks on the supports.
The video shows how to stretch the mesh.
Selecting materials: what to pay attention to
Whichever option you prefer, consider several important points on which the result of all the work will depend:
Mesh quality.
Non-galvanized mesh is only suitable for temporary fences, as it rusts instantly. For a fence that will stand for a long time, purchase galvanized or plasticized mesh. Be sure to check that there are no defects on its coating.
Pay attention to the geometry of the mesh: it must be perfect, otherwise it will be impossible to tighten it accurately. Inspect the edges especially: the ends of the wires that form the diamonds must be firmly fastened together, otherwise they will open up during work, significantly complicating your task and giving the entire structure an extremely sloppy appearance.
Do not buy a mesh made of soft wire that can be easily bent with your fingers - it will certainly deform during operation, which will negatively affect the quality of the fence.
Select the correct mesh size. The smaller it is, the stronger the mesh, but at the same time, it will be more difficult to stretch, it will cost more and its ability to transmit sun and air will decrease (relevant for garden fences). The optimal size is 40-50 mm.
Pillars.
You will need hollow metal pipes of round or square (better) cross-section 60x60 mm (for a tension fence) or 80x80 mm (for a sectional fence), absolutely smooth, without signs of corrosion.
When choosing their length, keep in mind that:
- standard mesh width varies from 1.5 m to 2 m;
- a gap of 5-10 cm is required between the mesh and the ground;
- the top of the mesh is strengthened flush with the pillars;
- pillars are dug to a depth of 75 cm for tension fences, or 1 m for sectional fences (for Moscow and the Moscow region).
Remember that corner pillars and entrance group supports experience the greatest load, so they are buried 20 cm deeper than ordinary pillars.
The number of posts depends on the length of the fence. The optimal distance between them is 2.5 meters. With a smaller distance, the fence will look unattractive, and your costs will increase unjustifiably. If the distance is too large, the wind will cause the mesh to sag quickly.
In addition to the posts and mesh, it is advisable to purchase thick steel rods (the same number as the posts) with a length equal to the width of the mesh - this will be used to tension and fix the mesh, and a coil of thick steel wire. Remove several twisted segments from the edge of the mesh in advance - they will be needed to connect the canvases to each other.
Now let's get started!
Fence decoration options
A mesh fence can serve not only as a fence for a site, but also as its decoration. For this, various methods and materials are used. One simple option is to plant climbing plants along the entire fence line. As the bindweed grows, it will fill the entire area, creating a beautiful hedge.
As special materials for decoration, you can use colored twine or polymer ribbons, using them to create a variety of colored patterns. A simple, although not very fashionable, option is to use a camouflage net. But here it should be taken into account that its elements fade over time in the sun and become covered with a persistent coating of dust.
Among the more modern methods, we can recommend a special photo grid made of polymer materials. It is secured to the surface with eyelets or polymer clamps.
Manufacturing of sectional fencing
Sectional fences have an attractive appearance, which invariably affects the popularity of this type of fence. It will not be difficult to carry them out using quality materials. The differences in operation are that the supporting posts are not made with fixing hooks, but have additional welded metal plates. Subsequently, the completed section filled with mesh will be attached to such plates.
To assemble the fence you will need:
- Fittings.
- Welding inverter.
- Grinder with a metal circle.
- Steel corners 40 by 40 millimeters.
- Fence mesh.
The site is marked and the supporting pillars are concreted. Having measured the distance between the supports, we begin to assemble the fence frame. The width of the section will be 15-20 centimeters less than the existing distance between the supporting pipes. The height of the section is the total height of the column minus twenty centimeters.
Steel corners are cut to the size of the frame, welded into a rectangle, scale is removed from them, and the internal and external surfaces of the completed frame are ground.
The resulting section blank is inserted into the frame and the reinforcement is welded to the inside of the corner. The mesh is carefully pulled down and the reinforcement is welded to the underside of the corner. The sides are secured in the same way. The finished sections are lifted vertically and then welded to the plates on the support posts.
When making a sectional fence, you need to ensure that the height of the frame attached to the support is the same. Even a difference of a few centimeters will be noticeable, and the fence will have a sloppy appearance. After installing all sections, all that remains is to prime the metal elements and paint them with special protective paint.
A mesh fence is a universal fence that is equally suitable for a summer house or a private home. Chain-link is a reliable, durable material that, if chosen correctly, will last for many years. It’s not difficult to make sectional or tension fences from mesh yourself, so every homeowner can handle this kind of work.
It is only necessary to pay due attention to the quality of fastening of the support pillars, which are buried to one third of their height and carefully concreted
This is interesting: fences made of welded gitter mesh.