Collection, purification and disposal of wastewater from the site is one of the most important tasks for ensuring comfortable living in a private country house. This article will describe the step-by-step process of constructing a sewer system from concrete rings with your own hands.
One of the most popular materials for solving this issue is concrete rings.
Devices made from such elements for a private home are the most durable, require virtually no repairs during operation, are financially affordable for any budget and are easy to install.
Waterproofing outside
To prevent precipitation from penetrating into the well water and spoiling it, it is necessary to make external insulation of the well. We will use dense clay as a sealant.
Around the last (upper) concrete ring of the well, we dig a trench 50-70 m wide and about 1-2 m deep. We fill this space with clay so that it forms a slope from the walls of the ring (at the top point) down and to the sides. We compact the clay well and form a kind of house.
The finished well should be completely pumped out several times. After this, the liquid can be taken to the laboratory for analysis. You can drink it only after an expert opinion. At this point, the installation of the well can be considered complete.
Overflow
If you are in the middle zone, lay pipes no deeper than 1.1-1.2 meters. The slope of the pipes through which the drains will flow should be 2 cm per linear meter. The inlet pipes must be located above the outlet pipes; water is directed down through special sewer tees, which are installed vertically (see photo).
Their lower ends collect water at depth, and their upper ends clear suspended matter.
In the pipes themselves, solids can be retained using special vertical pipes.
Do not forget to prepare holes for pipes in concrete rings in advance. Take care of openings for overflow pipes, as well as openings for the septic tank ventilation system.
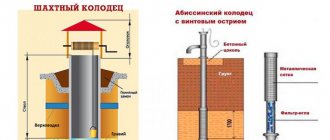
Well installation
Plastic tray well
One of the simplest processes is the technology of installing sewer wells. But this work must be done carefully and following all the necessary rules.
So:
- At the point where the pipes exit and enter, guided by the design, a corrugated pipe equipped with a bottom is installed.
- A cutter is used to make a hole corresponding to the diameter of the coupling for mounting the inlet pipe. The hole must be located at least half a meter from the bottom of the well for normal observation and control of the water level.
- If necessary, a check valve is mounted on the well inlet pipe.
- A trench is filled in above the lid at a level 25 cm above it, then leveled and thoroughly compacted.
The question often arises, what should be the distance between sewer wells?
This depends on the length of the highway itself, as well as on the presence of interchanges and turns in it. It is advisable to install inspection wells at key points. This will greatly simplify cleaning and repair of the pipeline if it becomes clogged.
As for the drainage well, as noted above, its depth must be at least two meters. The construction of a sewer well of this type is necessary for the discharge of water if there are no sewers, lakes or rivers nearby.
If you have a septic tank on your property, inspection wells are necessary. Their size can be small, and choose the distance between sewer wells based on the distance from the house to the septic tank.
If there are no turns along the drainage system, it is enough to install one or two small wells. They are installed simultaneously with the installation of an autonomous cleaning system.
In the case of a properly laid sewer pipe with the required slope for unimpeded flow of water, the well will be used extremely rarely, and only to control the drainage and clean the pipes.
If necessary, the drainage well can be used as a filter for the final purification of water that has passed through the septic tank. The water drained into the well will be filtered, passing through a layer of sand and gravel at the bottom, thus purifying itself. The finally purified water will be absorbed into the soil without polluting the environment or causing inconvenience to anyone.
Distance from septic tank
The distance from the house to the septic tank according to the standards and unambiguous requirements of sanitation is a necessary parameter developed in the era of state standardization and ongoing scientific research on sanitation and hygiene. Sanitary standards and regulations do not allow making a septic tank closer than the prescribed minimum distance.
At the summer cottage
Violation of them is fraught not only with a fine from the sanitary inspection that monitors compliance with SanPiN, but also with liability under a special article of the Code of Administrative Offences.
However, in this case, the desire to remove it at a considerable distance from the residential building brings inconvenience to the residents. The erroneous principle “the further the better” in this case makes a person feel uncomfortable in case of an emergency or bad weather outside
The rules for installing a septic tank are not among the easily resolved problems, since this issue is given priority attention
In the countryside
SanPiN considers the norm for removing a structure as a variable figure; in some sources it ranges from 5 to 10 m. The upper permissible distance is provided for simple devices without a bottom or homemade ones, which may have flaws in design and construction.
It is possible to install a septic tank at a minimum distance, provided that the system operates using modern technologies and complies with the standards for a specific type of building - SNT or individual housing construction.
The difference in requirements, according to the new law of 2021, for a garden plot is its almost always minimum dimensions, while on residential plots there may be ranges that allow you to safely choose a location even according to the stated standards. From the moment the law comes into force, treatment facilities and their location on the site will depend not only on the status of the building, country house (and now garden) or residential.
In stock
It is necessary to take into account
The fundamental difference lies in the requirements for the capacity of the septic tank and its arrangement system. Because according to the requirements of SanPiN 2.2.1/2.1.1.1200-03, permanent or seasonal residence, the number of people living in the house and the approximate amount of waste produced per day should be taken into account. It is known to depend on the number of residents and their temporary or permanent residence.
Standard distances from the septic tank according to SNiP and SanPiN
Failure to observe even the minimum distance from the septic tank is fraught with various consequences:
- According to existing rules, an outdated or incorrectly located structure should be located no closer than 5 meters from the house, because leakage can lead to destruction of the foundation.
- The distance from the external sewer depends on the type and diameter of the pipes used - otherwise they may be gradually destroyed by caustic excrement and rotting sewage.
- The optimal distance of 4 meters from the trees to the septic tank is associated with possible risks due to the growth of a powerful root system, which large trees are prone to. For the same reasons, a similar distance from them to the house and well is maintained.
- The distance standards from a residential building can be significantly reduced if the developer has the opportunity to install a safe Topas septic tank. You can also purchase another version of the system that does not require cleaning with a sewer machine, otherwise the odors and insects attracted by them will be in close proximity to the house.
Minimum distance from the septic tank on a summer cottage according to SNiP and SanPiN standards
The installation of a septic tank at the proper distance is regulated not only by sanitary standards. In 1999, Law of the Russian Federation No. 52-FZ “On the sanitary and epidemiological welfare of the population” was adopted.
The Code of Administrative Offenses has a special article providing for administrative and financial liability for creating an epidemiological threat and violating environmental safety standards.
But the decision on the illegality of installing a septic tank is made based on a set of requirements - the type of soil, the type of device, its manufacturability and the cleaning method used. Each option is considered separately.
Layout of buildings on individual housing construction and SNT sites in accordance with SNiP standards
How to calculate the size of a septic tank from rings
For the calculation you will need the following information:
- the number of people living, taking into account the household appliances used that consume water and plumbing fixtures;
- the design of the structure as a whole - single or multi-chamber;
- type of waste disposal - discharge of waste water into the ground after clarification, connection to centralized communications, pumping using special equipment;
- soil features on the site. The latter is necessary in order to correctly determine the type of foundation required for installing a septic tank and the nature of the pit preparation.
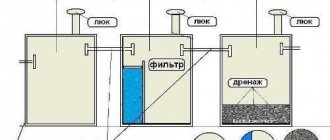
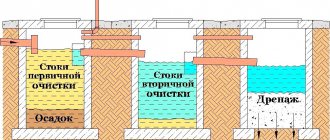
For ease of calculation, we will accept the most popular design option - a two-chamber septic tank with the discharge of settled and treated waste into the ground through a crushed stone-sand cushion.
The illustration shows a well with a diameter of 1,000 mm. Since the internal diameter is indicated, models KS 10-3 and KS 10-6 with a height of 290 and 590 mm, respectively, from Table 1.2, are suitable for this standard size. The capacity of KS 10-3 is 0.1 cubic meters, for KS10-6 the volume is 0.16 cubic meters.
Next, you need to calculate water consumption and, accordingly, the amount of waste per day.
On average, SNiP 2.04.09-85 gives the following recommendations: 200...250 liters per day per person. Accordingly, a family of four consumes about 1000 liters per day, which corresponds to one cubic meter. If this standard seems too “costly”, you can recalculate the approximate consumption taking into account the water consumption for each hygienic procedure.
Table 1.3. Water consumption for hygiene and household procedures.
| Type of procedure, type of plumbing fixture | Amount of water, l |
| Taking a bath | 150…180 |
| Using a shower (in a shower cabin or hydrobox, bathtub, except for “tropical shower” type devices) | 30…50 |
| Hand washing, washing over the sink | 1…5 |
| Flushing the toilet (depending on the model and the possibility of incomplete flushing) | 9…15 |
| Using a bidet (depending on the model, the presence of manual control of water flow) | 5…17 |
| Water consumption by washing machine, per cycle | 40…80 |
| Dishwasher water consumption per cycle | 10…20 |
| Washing dishes for the family: of two people of three people of four people | 12…15 17…20 21…35 |
| Water consumption when preparing food, including during preservation | 10…50 l/hour |
Important: this does not include water costs for irrigation, since the liquid goes directly into the soil and not into the septic tank.
Interestingly, both hand washing and manual dishwashing use two to three times more water than using automatic devices. Therefore, before installing a septic tank, it is a good idea to install an economical washing machine and dishwasher - the volume of drain water will be less.
According to statistical studies, the average resident of Russia uses plumbing fixtures in accordance with this infographic.
Also, for a family of four, at least 5...8 times a month they use the washing machine for a full cycle, and if they have a dishwasher, they turn on the dishwasher once or twice every day.
Of course, for a private home the indicators may differ slightly, but it is better to focus on large numbers.
Thus, taking into account the information from tables 1.3. and infographics, we get approximately the same figure as given by the standards, that is, one thousand liters (one cubic meter) for a family of four people per day.
Since they usually try to ensure that the level of wastewater in the septic tank does not rise above the middle of its height, or better even a third (taking into account unforeseen circumstances, difficult treatment of some wastewater, exceeding the average daily discharge), then accordingly we take the volume of the septic tank equal to the average daily water discharge multiplied by on three:
V = Q x 3 = 1 x 3 = 3 cubic meters.
Thus, for a well with a volume of 3 cubic meters, 30 KS 10-3 or 19 KS 10-6 rings will be required. Of course, this quantity is divided into two wells according to the scheme - about 18 and 12 when using KS 10-3 and 11 and 8 for KS 10-6. The first number refers to the primary filtration well, the second to the septic tank for the final purification of water discharged into the ground.
Taking into account the sizes of the rings, the height of the wells will be 5.5 (7) and 3.5 (4.8) meters. The dimensions are indicated taking into account the installation of the bottoms and ends of the wells. For rings of other diameters, the height of the wells will be very different, so it is necessary to take into account the groundwater level and correctly calculate the ratio of the diameter and height of the reinforced concrete products.
The depth of the pit is calculated taking into account the arrangement of the sand and gravel cushion under the well (with or without a bottom), as well as taking into account the fact that the head is usually located 0.2...0.5 m below ground level.
Ventilation system
This system must be provided so that explosive and toxic gas is removed from the sewerage structure in a timely manner. Each chamber must have a ventilation pipe with a diameter of 10 cm and a height of 70 cm above the ground. If the pipe will be installed on the roof of your house, do not raise it too high (higher than 30 cm), otherwise it will freeze in the cold season. If the pipe freezes and becomes clogged, gas from the septic tank can disrupt the siphons of all the plumbing in the house and lead to the formation of an unpleasant odor.
The soil drainage ventilation system should not be connected to chimneys and ventilation of the house.
When preparing holes in concrete rings, place them at least 20 cm above the wastewater level. Their area should be twice the cross-section of the exhaust pipe.
You can also improve ventilation if you prepare non-sealed hatches for the inspection ports of your septic tank. Cast iron hatches are excellent for this purpose.
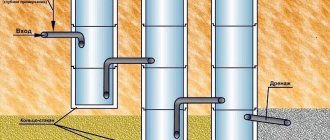
Installation of reinforced concrete rings for a storage well
To build a sewer well with your own hands, first of all, you need to “plant” the first ring of the shaft on an M100 grade solution. This is followed by:
- Make holes for sewer pipes. They must fit into the shaft ring at least 100-150 mm;
- The gaps between the pipes and the wall of the reinforced concrete ring should be sealed with cement mortar;
- Now at the bottom of the well you need to make a concrete trench, the diameter of which would correspond to the internal diameter of the sewer pipe;
- Then a second one is installed on the first casing ring so that their locking connections are located at the same level;
- The subsequent casing rings are installed in a similar manner;
- At the final stage, a lid with a hatch is installed to protect the tank from the accumulation of precipitation.
Installation
Installation of a manhole requires compliance with the requirements of SNiP. They say that the tray must be placed on a dense sand bed. Depending on the level of soil freezing, wall insulation may be needed. For these purposes, the pit is equipped with a clay or textile casing.
General requirements for the design and installation of wells:
They must be located at a distance of at least 30 meters from each other. This indicator depends on the diameter of the main pipeline. For example, a scheme with a pipe from 600 mm requires a minimum distance between branches of 100 meters
In addition, inspection structures should be located at each “important” section of the sewer system; If a plastic outlet is selected, it is recommended to use a cable type of pipeline. It differs from the classic one in having a corrugated surface equipped with numerous stiffening ribs; It is also important for the drainage system that the inspection structure is not washed away by groundwater.
Step-by-step installation instructions:
- The foundation pit is being prepared. A hole is dug, which is 50 centimeters larger than the size of the well. After this, its walls are compacted, and if necessary, formwork is built. You can later fill the protective casing over it;
- A cushion of sand and crushed stone in equal proportions is poured onto the bottom. It is better to take river sand for the inspection well - it is denser;
- Afterwards, the tray (a piece of pipe with a diameter of at least 600 mm) is immersed and the bottom is sealed. If you choose a plastic outlet, you can do this yourself. To install models made of cast iron and concrete, you will need to use the services of lifting equipment;
- The outlet of the pipe (sewer, drainage, drainage) is connected to the well pipes. The joints are sealed, thermally insulated and sealed. To ensure that pressure drops do not occur in the network during operation, it is necessary to separately consider the ventilation of the inspection compartment;
- The free space on the sides of the container is filled with sand and crushed stone. Compacts. After a few days, the procedure must be repeated;
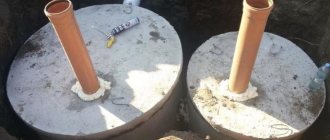
- The last thing to install is the cover. Hatches for inspection wells are selected according to the diameter of the outlet and the necessary features. It will be possible to operate the sewerage system within 3 days after the installation of the inspection structure.
You can buy ready-made inspection wells at any plumbing supply store; their price depends on the brand and design features. For example, a model from Uponor (300 mm) in St. Petersburg will cost 60 euros, and in Krasnodar - 58.
Types of inspection wells and the permissible distance between them
Observation
Installed for free access and maintenance of the system. The distance between wells is indicated in the table.
| Pipe section (mm) | Distance between wells (m) |
| 150 | 35 |
| 200-450 | 50 |
| 500-600 | 75 |
| 700-900 | 100 |
| 1000-1400 | 150 |
| 1500-2000 | 200 |
| >2000 | 250-300 |
Rotary
Mounted in places where pipes form a turning angle
- The distance between wells is calculated along a straight section of the pipeline.
- The length of the segment is indicated in SNiP. If you do not meet the requirement, you will have to install an additional well.
Variable
Structures are necessary in areas with changes in the height of pipe laying
- SNiP has not established standards for the distance between these structures, but the following requirements are imposed:
- One difference cannot be more than 3 meters. If the slope is greater than this footage, then a stepped overflow system with wells is created.
- If the difference is 50 cm, the well can be replaced with an overflow
Nodal
Used at the junction of pipes. The distance depends on the diameter of the pipe.
| Diameter (mm) | · Distance (m) |
| · 600 | · 1 |
| · 700 | · 1,25 |
| · 800-1000 | · 1,5 |
| · 1200 | · 2 |
When arranging an external sewer line, it should be taken into account that the distance from the sewer to a source of drinking water must be at least 30 meters.
Which rings to choose - with or without a lock?
Concrete rings with a lock (tongue-and-ridge connection) and without it are available on the market. There is an opinion that the former provide higher water resistance and better protect the septic tank structure from lateral movement.
However, according to experts, this is not true. In practice, there is no big difference between both types of rings in terms of water permeability. If there are such significant shifts in the soil during frost heaving that, in principle, they can displace one ring relative to another (the weight of one ring with a diameter of 1 m is 600 kg), then the lock will not save. As for the convenience of centering rings with a lock during installation, this is only true for a structure of two rings. In the case of a septic tank with three or more rings, the difference is unlikely to be noticeable.
Construction of different types of sewer wells
The sewerage system has a very ancient history, so its design and technology have been brought to a very high quality state. This article will discuss the main issues related to the use of sewer wells in the sewerage system.
The regulatory act regulating the requirements for sewer wells and the procedure for their installation is SNiP 2.04.03-85 “Sewerage. External networks and structures." The document displays all the factors relating to sewer wells, including their location, classification, dimensions and operational characteristics.
To install a sewer system on a private property, it is necessary to use inspection wells, placing them on the section of the pipeline between the building and the wastewater receiver. In addition, one of the possible options for disposing of wastewater after it has passed through a septic tank is a filter sewer well. Inspection wells must be installed not only in private households, but also on local sewer systems. The installation site must be located behind the so-called red building line, which is a conditional boundary dividing the target area into certain segments. SNiP states that sewer wells must be installed every 35 meters if the pipeline diameter is up to 150 mm, or every 50 meters for a pipeline with a cross-section of 200 mm.
In addition, inspection wells are installed if the system contains:
- turns and bends;
- changes in pipe diameter or slope;
- branches of the structure.
Requirements for the operational characteristics of reinforced concrete wells are reflected in GOST 2080-90, and for polymer wells - in GOST-R No. 0260760. Most plastic structures are also supplied with manufacturer’s instructions, which outline the conditions for using the well.
Brick, concrete or reinforced concrete are used to make stone sewer wells, and rubble stone is used to create filter wells. Polymer wells can be made of polyvinyl chloride, polypropylene or polyethylene. In addition to structures made from a single material, there are structures on the market made from compounds of various resources.
According to SNiP, the dimensions of sewer wells vary as follows:
- when using pipelines with a diameter of up to 150 mm - at least 700 mm;
- up to 600 mm – 1000 mm;
- up to 700 mm – 1250 mm;
- from 800 to 1000 mm – 1500 mm;
- from 1200 – 2000 mm;
- from 1500 mm with a system laying depth of 3 m.
The volume of the structure is not indicated anywhere, but knowing the initial depth and diameter, you can calculate this indicator yourself.
The order of actions will look like this:
first, the exact location on the site where the well will be located is determined; then the selected area is cleared of any plants (bushes, trees, etc.); if necessary, buildings located on the construction site are demolished or moved; It is very important to ensure unobstructed access to the site.
Next, the preparation of the pit for the sewer well begins.
As a rule, a pit is created according to the following principle:
- first of all, a hole of the required dimensions is dug;
- then the bottom is cleaned;
- a check must be made to ensure compliance with the laying depth of the structure and the slope angles of the pit walls;
- in the case of stone structures, a 20-cm waterproofing layer must be laid at the bottom of the pit, compacting it as tightly as possible.
Ventilation for sewerage
When processing wastewater, especially with a significant admixture of fecal waste, methane is released. In the absence of ventilation, its concentration can reach an explosive consistency.
In this case, ignition occurs when using electrical equipment from the slightest spark. The consequences can be fatal.
To avoid such consequences, you need to install ventilation in the well chamber.
Solving installation issues
Assembling a structure from concrete rings
Components of the assembly of structures made of concrete rings.
Start by preparing the installation site:
- mark out the area for the pit;
- debris, trees, and shrubs are removed from the territory;
- provide access for equipment.
A hole is dug to the depth of the structure, adding 20 cm for a crushed stone cushion. The walls are formed and the bottom of the pit is leveled. Cover with crushed stone and, if necessary, seal with bitumen.
Next, work on installing the well is carried out sequentially:
- A reinforced concrete slab is laid on the crushed stone bed or a screed is made. Trays are formed, reinforced with reinforcing mesh.
- Lower the working chamber rings. After settling, after 2-3 days, the seams are sealed with cement, the inside is covered with bitumen, and the pipes are sealed.
- Install the floor slab and neck. The joints are carefully sealed. Waterproofing is done from groundwater 0.5 m above its level.
- Conduct a leak test. Close the pipes, fill the chamber with water and leave for 24 hours.
- They are backfilled with earth using a tamper. Set up a clay castle: 0.3 m wide, 0.6 m above the pipes. A concrete blind area 1.5 m wide is made around the neck.
The hatch is closed with a lid.
We are building a foundation pit
The permissible depth of groundwater from the earth's surface when installing filtration wells should not be less than 3 meters, and when making filtration fields or on loamy soils - 1.5 meters.
When digging a pit, when using a shovel you begin to notice intense moisture in the soil at a sufficient depth, you should stop, since the goal has been achieved. But, if you went no more than a meter deep and came across water, then you should forget about the filtration well and bury the hole.
When building a system of several containers, they are installed on a concrete base, with the exception of the last one, in order to prevent drainage from leaking into the soil and to increase stability.
The diameter of the pit is dug 30 cm wider than the diameter of the container being installed. Slag, crushed stone or gravel with a fraction of 1.5-3 cm is poured into the resulting voids between the walls of the tank and the soil. When installing a multi-section system, such filling is carried out only with the outermost container, the rest are filled with ordinary soil.
The specified backfill is the “working part” of the filtration well.