Water supply in the country from a well
One of the popular options for autonomous water supply is to use your own well as a water source. In the “stationary” version, of course, that is, when a full-fledged water supply system is created at the dacha from a well, with the installation of pumping equipment and a water treatment system. At any time, owners receive fresh water at the desired point of consumption, which has undergone the entire complex of filtration and purification, with the required pressure. But for this to really be the case, you will have to work hard.
Preparing for work
Before you take on such important work, you need to think carefully about a few things:
- in what mode do you want to supply water - winter or summer, only for irrigation or also for drinking;
- what are the possible volumes of water consumption - how large is the area, how much water is needed daily for irrigation, are there any greenhouses and how much moisture will they require for irrigation;
- what source of water supply can you choose - your own well, a centralized one or a well that is on your site or not far from it. To do this, it’s a good idea to take a map of the area or ask your neighbors where they get water for irrigation and other purposes;
- what are the characteristics of your climate - is there a risk that the water in the well will dry up in especially hot months, is a backup source needed in these cases;
- what are the features of the internal structure of the site, where it is necessary to stretch the pipes, and where you can use a regular hose;
- is it planned to supply clean drinking water to the house and utility rooms;
- finally, the budget for all work - how much do you have.
IMPORTANT. The price factor, of course, is important, but not decisive. The fact is that such an important job as making your own water supply system at your dacha from a well is not done for 1 year. You are making an investment for a very long time, and if you skimp on the quality of materials and mechanisms, you can later overpay on their repair and replacement with others.
Equipment selection
The most crucial moment is the choice of a pump and accumulator for the water supply from the well to the house. The following parameters must be taken into account:
- well depth;
- static water level (height from the mirror to the surface of the earth);
- dynamic water level (shows the flow rate of the well when the equipment is running);
- degree of water contamination with suspended matter and solid fractions;
- water consumption with simultaneously switched on consumption points;
- distance from the well to the pumping station (for suction pumps);
- distance from the well to the hydraulic accumulator (for submersible pumps).
If we talk about the degree of adaptation, then submersible well pumps best meet the conditions of a stable water supply at home. They are reliably protected from “dry running” in the event of water consumption exceeding the flow rate of the well. They have models for lower and upper water intake, so you can choose the best option even for a “shallow” well. And most importantly, well pumps are able to work with “dirtier” water than well equipment, and their filters are easier to clean.
If the flow rate of the well is low, and it will not provide long-term water flow with several consumption points turned on simultaneously (bath or shower mixer, washbasin, kitchen sink faucet, washing machine), then a large-capacity storage tank can correct the situation. Based on the daily norm for one person of 200 liters, a hydraulic accumulator with a capacity of 1 m3 can satisfy the needs of a family of 4 people.
What does an autonomous water supply consist of?
When you were able to clearly answer all the questions above and have drawn up a rough plan of action, you need to figure out what the constituent engineering elements of a water supply system are. Essentially, these are the pipes themselves, as well as the mechanisms for injecting them onto the surface:
Pipes of different diameters
Taps and fittings (connecting parts) for installing pipes into a single unit
Mechanisms for pumping water various types of pumps (their choice mainly depends on the required volumes of water supply
Electric motors for pumps
If it is necessary to heat water (for use at home) - water heaters
Filters for mechanical (coarse) and deep water purification (you can’t do without them if the water is used for drinking purposes)
You will also need working tools and materials for attaching pipes to surfaces, additional protection (insulation) of pipes for use in winter.
In general, a do-it-yourself country water supply system from a well should look like this as a single system.
And the schematic diagram of the system looks something like this
TAKE NOTE. If you are making water supply not only for plants, but also for supplying water to the house, then it would be better to allocate a special room for the water metering unit. A small closet with an area of 4-5 square meters will be enough. It is optimal to do it in the house itself so that the temperature inside is acceptable all year round. This way you can constantly monitor the pressure level, water supply volumes, and also quickly troubleshoot possible problems.
An innovative way to install water supply
More recently, a new method of creating a winter water supply system has been developed, based on the use of flexible polymer pipes insulated industrially.
There is a layer of waterproofing on top of the thermal insulation shell of such pipes, and a special channel is made along the surface of the pipe for laying a heating cable, which greatly simplifies installation and reduces the time required to lay the water supply system.
The pipes are flexible and supplied in coils, which allows the number of joints to be minimized, which means reducing the risk of leaks and the need for repairs to zero.
The cost of such pipes is quite high, but by using them you save on insulation and simplify the installation of the plumbing system. Legend: d – pipe diameter; e – pipe thickness; e1 – thickness of the protective shell; D – outer diameter of the pipe with insulation
What types of water pipes are there?
Water pipelines in a dacha most often do not function all year round, but only in the summer. They can be used not only for irrigation, but also for drinking, if the water in the source and the condition of the pipes are satisfactory.
Summer
This is the simplest option, familiar to every summer resident. You can assemble it alone, it won’t take much time. Typically, a rubber hose is connected to a special branch pipe coming from a central source. The pressure is regulated by a tap and in the old fashioned way by narrowing/expanding the hose itself.
Often, summer residents connect to the main pipe not with rubber hoses, but with their own plastic pipes, which are stretched along the entire site in pre-dug recesses. Special racks are also created from vertically located pipes near those parts of the site that need additional watering (for example, near greenhouses).
Special nozzles are used for pipe branches. which allow you to cover almost the entire area of the garden, if the pressure at the source allows.
NOTE. For summer water supply systems, it is best to purchase pipes made of lightweight materials (polypropylene), since most often summer residents bring them only for the season, and then disassemble them and take them back, because in winter, abandoned property can be stolen by summer house thieves. If you still decide to leave them assembled, be sure to thoroughly drain all the water, because otherwise, when it freezes in winter, it may damage the integrity of the pipes.
Winter water pipes
Winter water supply options are more complex than summer ones, since they provide the site and house with water all year round. They have the following differences:
- the water source must contain sufficient volumes, and the water itself must not freeze in winter;
- pipes must be additionally protected from low winter temperatures, for example, using polystyrene foam
- the house must have a water heating installation;
- The source of water supply must also be protected from frost.
Do-it-yourself measures for insulating a country water supply system for the winter
Conclusions and useful video on the topic
The following video provides detailed tips on how to independently assemble and install a pumping station:
For comfortable and stable autonomous water supply, pumping stations are most often used. They are reliable and easy to maintain .
A storage tank system is a low-cost water supply option and is more suitable for temporary rather than permanent use.
Would you like to share your personal experience in installing water supply in a suburban area? Do you have any questions while reading the information we provide? Please leave comments.
Where to get water from, or how to choose a source of water supply
After you have studied all the elements of the future water supply system, and also drawn a diagram specifically for your site, you need to decide on the source of the water supply. In a country house, unlike a city apartment, there are several options:
Centralized water supply
The most convenient and obvious option is centralized water supply. This option is the cheapest because you do not need to install a pump or purchase additional tools to pump water and control its pressure level.
Essentially, you need to dig holes, lay pipes, strengthen them in the ground, connect them to each other, and the system is ready for watering. Of course, the central water supply system also has its weaknesses:
- This is usually a summer option - it does not function in winter;
- ordinary water is poorer in the content of nutrients than artesian water (if you have a well on the site);
- finally, the central source may be too far away, and it will be more expensive to run pipes across neighboring fields than to make a water supply system in the country with your own hands from a well.
Often there is no centralized water supply nearby at all - and then there is no need to consider this possibility.
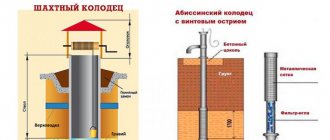
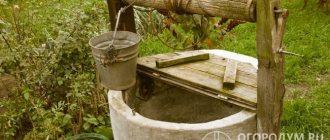
Mine well
If you have a well on your property or a neighbor with a source of good, clean water, you can consider yourself very lucky. Such plots are not found very often, and they usually cost more.
The well, in addition to the outer part with a gander and a stone support, has an internal base. This is a trunk that allows water to reach the surface and the aquifer itself, where natural water is contained.
The well itself can be located at different depths, and depending on this parameter there are:
- A well “on limestone” - it lies deeper and is reliably separated from groundwater. In this case, it is necessary to filter the water much less, and in terms of the content of microelements it is much richer than a well “for sand” and even more so than chlorinated city water.
- A “sand” well is located higher and most often contains a lot of mechanical impurities (sand, small stones, soil). However, this does not prevent it from being used for watering. But for drinking, a filtering process is required.
NOTE. If you live in regions with poor quality water (too hard, with excess iron, magnesium salts, etc.), then before designing a water supply system for your dacha with your own hands from a well or other local source, be sure to conduct preliminary research. To do this, you need to send water samples to the nearest laboratory and ask for a comprehensive analysis of the content of inorganic and organic substances. If heavy metals are detected, then such water will be unsuitable not only for drinking, but also for irrigation. In this case, the only option is centralized water supply.
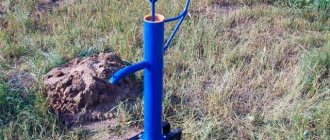
Well
The well ensures the rise of water that lies shallow (usually up to 12 meters). In all other cases, a well must be drilled on the site. This option is much more expensive in terms of effort, money, and, of course, time. However, the result is worth it - thanks to the well, it will be possible to ensure a year-round supply of water to both the site and the country house.
You can compare a well and a well and feel the difference in this diagram.
Indeed, usually the depth of the well is several times greater than the well. But there is a lot of water there, and it is much cleaner and healthier.
Well waterproofing
Why do you need to waterproof a well?
Judging by books and films, wells used to always have crystal clear water. And the wells themselves were built from the simplest materials. We don’t undertake to judge how true this is, but in any case, there is no arguing with the deterioration of the environment in recent decades. And this cannot but affect the quality of water. Therefore, high-quality waterproofing of a well is more important today than ever. Without this, it will be of little use as a source of drinking water.
Properly carried out waterproofing is the key to obtaining high-quality well water.
Waterproofing a well is necessary for several reasons:
- In order for the water in the well to be clean and suitable for drinking, it is necessary to completely prevent the ingress of surface groundwater into it. That is, located above the water surface in the well. This refers to soil (ground) moisture that is absorbed when precipitation falls or snow melts. And also the so-called “overwater” - unstable aquifers located close to the surface.
Water from the surface layers could not undergo high-quality ground filtration, and it should be prevented from entering the well through its walls.
Both can be saturated with decaying organic matter, contain microorganisms dangerous to the human body, petroleum products, compounds released into the atmosphere with industrial and automobile exhausts, chemicals used on agricultural land, and many other substances that make water unsuitable and even extremely dangerous for drinking.
- Any material from which the walls of a well are built requires protection from the chemical aggressiveness of soil moisture. By the way, concrete is no exception in this regard. Over time, under such influence, it becomes porous; cracks, chips, and areas of looseness may appear in it. Such shallow groundwater can seep into the well.
Waterproofing of joints between reinforced concrete rings of a well.
- In addition, if the well is built from concrete rings, which is practiced everywhere, gaps will inevitably form at the joints. If waterproofing measures are not taken, these seams become an entry point for contaminated ground moisture. The same applies to technological holes made in the walls and intended for connecting the pipeline.
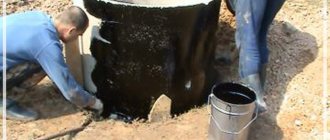
Applying an external waterproofing layer
Prices for bitumen mastic
Bitumen mastic
The best option would be to carry out all waterproofing work at the well construction stage. This approach provides more opportunities to achieve high quality results.
External waterproofing can be applied to concrete rings both before they are installed in the pit and after installation.
Waterproofing bentonite rubber cord.
Well, as a waterproofing material for the gaps at the joints of the rings, you can use the sealing bentonite-rubber cord “Barrier” or “Gidroizol”. This elastic material tends to expand when exposed to moisture, reliably sealing the junction line of the structural parts.
When choosing waterproofing for a well, it is necessary to comply with special requirements, which somewhat limit the possible range of materials. It is clear that the materials should not pose a danger to both human health and the environment.
External waterproofing
Materials for external waterproofing work differ significantly from those that can be used for application inside a mine.
- For the external protection of a well built from concrete rings, in most cases, roll waterproofing made on the basis of bitumen is used - this can be the familiar roofing material or more modern materials. In addition, to secure the canvases, you will need special mastics, also made on a bitumen basis.
- Instead of bituminous materials, a special deep penetration waterproofing solution can be used - this is the second option for external protection of the well tank.
- Another method is shotcrete using non-shrinking or expanding waterproof cement mortar. However, for such processing one cannot do without special equipment and without the skills to work with it. In any case, you will have to invite a team of specialists. It cannot be said that this method is popular in the construction of wells.
You can resort to shotcrete concreting of the outer surfaces of the well walls. But this technology is not cheap, it requires special materials and equipment, and the involvement of specialists.
- To prevent atmospheric precipitation from entering the well, a reliable clay castle is created around it, which diverts rainwater away from the walls of the well. A good owner, in addition, high-quality blind areas will be concreted around the well.
To carry out external waterproofing of the walls of a well using any of the above methods, it is necessary to carry out preparatory work consisting of the following steps:
— If the well has been in operation for more than a year, then its outer walls will have to be cleared of soil to the maximum possible depth, which should be at least 3000÷4000 mm.
— After the walls are freed from soil, it is necessary to inspect the entire surface. If damaged, loose areas of concrete are found, they must be removed using a hammer drill or jackhammer.
Cleaned outer wall of the well.
— Then the surface must be cleaned and washed from dirt, fragments of destroyed concrete, accumulations of mold and salt deposits. For this purpose, metal brushes (for example, attachments for an electric drill or grinder), chisels, spatulas and other hand tools are used. Then, all the dirt is washed off with water under high pressure - mini-washes are well suited for this. After the walls have dried, they must be carefully inspected again and dust removed from the surface as much as possible.
— If, after removing weakened loose concrete, part of the reinforcing belt of reinforced concrete rings is exposed, then traces of corrosion should be removed from the metal parts and then coated with an anti-corrosion compound.
As a rule, simultaneously with digging up the walls of the well, a trench is also dug for laying a pipeline from the well to the house. If installation conditions allow, the pipe should be placed at a depth of approximately 300÷500 mm below the soil freezing level. This way there will be less hassle with its insulation or heating.
Having completed the preparation, you can proceed directly to waterproofing the walls of the tank from the outside.
Waterproofing using roll material
Waterproofing using roofing material or its analogues is carried out as follows:
- A primer is applied to the concrete, which will ensure high adhesion for the materials. It is especially necessary to treat areas where loose areas of concrete were removed. The best option for primers are compositions like “Betokontakt”.
- After the soil has dried, it is necessary to repair the damaged sections of the walls, making them as smooth as possible. Potholes, cracks, and large cavities are sealed with concrete mortar having a thick consistency. To quickly set and dry the concrete, PVA glue is added to it. After carrying out the repair work and waiting for the solution to dry, the surface must be primed again.
At the same stage, a hole is usually punched for laying a pipeline into the well shaft.
Waterproofing a well using roofing felt.
- The next step is to apply a coating of bitumen mastic to the walls, onto which the first layer of roofing material is glued. It is recommended to make two or three such layers. Roofing felt sheets are fixed with an overlap of 150÷200 mm. The seams of the last outer layer of material are additionally coated with mastic.
Some owners refuse roofing felt, using only mastic for waterproofing. But this is not recommended, since such bitumen-based coating may crack over time from contact with the ground, and all the work will be done in vain.
Prices for roofing material
Ruberoid
Waterproofing external walls with deep penetration impregnation
When choosing a special deep-penetrating hardening impregnation for waterproofing, no other primer composition is required. This solution performs two functions at once: it strengthens the concrete walls and makes them waterproof.
- The first step is to prime only those areas that require repair with cement mortar.
- After the soil dries, the damaged sections of the well wall are repaired. For this, a cement-sand composition with the addition of PVA or, better, a special repair composition is also used. An example of such a special repair composition is CERESIT CN-83.
For repairing damaged or worn concrete surfaces, a special composition is well suited - dry construction mixture “CERESIT CN-83”
- When the repair patches have hardened, the walls must be moistened.
- Now you can apply a deep penetration waterproofing compound to the surface. One-component impregnations such as, say, Penetron, Elakor-PU Ground, Neogard and others are suitable for work. The characteristics of these compositions must directly indicate that they serve to strengthen the waterproofing (waterproofing) of concrete surfaces. The applied composition is absorbed into the structure of the material, and upon drying it crystallizes, completely clogging its pores, thus making the wall waterproof.
Some deep penetration impregnations by themselves make concrete completely waterproof
- After waiting 72 hours, a second layer of impregnation is applied to the surface.
- During the drying process of the impregnation, the walls should not be subjected to mechanical stress.
Prices for deep penetration primer
Deep penetration primer
* * * * * * *
In any case, the outer surfaces of the well walls should be covered with waterproofing up to the top edge. When the work is completed, the space around the well between its walls and the wall of the pit is filled with gravel-sand mixture to a level just below the freezing line of the soil, approximately 100÷150 mm.
At this stage, a pipe is laid from the well to the house. This stage will be discussed in more detail below.
Waterproofing the internal surfaces of the well
If external waterproofing of a source of drinking water is impossible for some reason, then in this case it is possible to protect the well from the penetration of groundwater from the inside.
With this approach, special attention should be paid to waterproofing compounds. They must be completely safe for human health.
As an example, consider products.
Coating waterproofing mixture.
"AQUAMAT-ELASTIC" is a cement-polymer elastic two-component mixture. This composition is applied by coating. The mixture is an environmentally friendly material that does not in any way affect the quality of drinking water.
Composition with increased elasticity and high adhesive capabilities.
"MEGACRET-40" is a repair mixture consisting of cement supplemented with polymer modifiers. This composition has high adhesive properties and does not shrink. The material is easy to apply, so even a master without plastering experience can handle the job.
This composition is able to quickly and reliably plug the resulting leak.
" AQUAFIX" is a cement mortar that hardens very quickly, which occurs under the influence of water. The material is used to install a “hydraulic plug” in places of possible or identified leaks. Excellent for sealing cracks and potholes formed in walls during the period of operation, as well as for sealing joints of concrete rings.
Work on internal waterproofing is carried out as follows:
- The first step is to pump water out of the well in use using a pump, so that the upper joint of the lowest concrete ring is exposed. While work is being carried out, it is necessary to ensure that the water does not rise above this level.
Internal waterproofing of a well - treatment of joints between concrete rings.
- Next, the surfaces are inspected to detect damage, dirty deposits, as well as areas of loose concrete.
- The next step is to clean the damaged areas from the loose layer to the “healthy” concrete. The cracks should be widened to a depth and width of 25÷30 mm, concrete fragments should be removed from the gaps with a metal brush.
- The gaps at the joints of concrete rings also need to be widened to a depth of 30÷35 mm. If a leak is discovered during cleaning of cracks and joints, it must be immediately sealed with a “hydraulic plug” from the “AQUAFIX” composition.
- Next, the wall surfaces are cleaned of dust and dirt. All extended cracks, joints, potholes, as well as cavities formed in the concrete, are closed with MEGACRET-40 mortar, which is leveled flush with the main surface. After completion of the repair work, the well is left until the composition completely hardens.
- The next step is to apply AQUAMAT-ELASTIC coating waterproofing to the walls. Before carrying out this procedure, the surfaces must be moistened. The composition is diluted to such a consistency that it can be applied with a wide brush.
- The composition is applied from bottom to top of the container in two layers. The second layer is applied only after the first one has completely dried. There is no need to moisten the walls before applying the second layer. Complete hardening of the composition occurs after a day.
After such waterproofing has completely dried, it becomes completely neutral for drinking water.
Let's start making a country water supply system
So, the design and determination of the water supply source are behind us. Now you need to understand how to make a water supply system at your dacha with your own hands from a well. This process can be divided into several stages.
Installation of pumping equipment
The pump is a very important element of the water supply system. You need to choose it very responsibly. Again, you need to proceed mainly not from the price, but from the following factors:
- technical parameters of the mechanism (especially power);
- energy consumption;
- noise level during operation;
- degree of protection from moisture and temperature changes;
- job guarantees;
- manufacturer's reputation.
Depending on the method of lifting water from the source, different types of pumps are distinguished:
Surface pump When building a water supply system in a country house with your own hands from a well, it is most often used. It is intended for shallow wells (up to 7-8 meters). There are 2 types of mechanisms:
- A centrifugal pump rotates water using one or more wheels. Due to centrifugal forces, water jets reach the edges, from where they go through special tubes into the main pipe of the system. In most cases, the device’s power is about 4 cubic meters per hour, and this is quite enough for summer watering of the garden and garden.
- A vortex pump works by creating cyclic vortices of water, resulting in flows rushing to the surface. Its power is approximately the same as that of a centrifugal one.
A surface pump is always installed in the house. A special pipe runs from it to the well, through which water flows to the surface.
Video: how to install a water supply system with a pump yourself
The device has a number of advantages:
- reasonable price;
- low energy consumption;
- mobile (they can be carried and placed in different places).
However, if you need to make winter water supply on your own at your summer cottage from a well, then a surface pump will not work - it does not have sufficient power to cover all water needs: from deep wells (from 10 meters), the device will not be able to lift water to the surface.
Submersible pump
This mechanism is designed for deeper water (usually up to 20 meters). It can be used in both wells and boreholes.
The mechanism is reliably protected by the housing from water ingress and has a power approximately the same as that of a surface pump (4 cubic meters per hour).
However, unlike a surface pump, a submersible pump is installed directly at depth on a special base.
At the same time, no noise from its operation will be heard in the house, and thanks to a different operating principle, it can lift water from a greater depth than a surface pump.
Video review of a submersible pump for water supply
A comparison of these two devices is shown in the figure below.
Automatic pumping station
Finally, a pumping station is often used. It differs from the first two devices in that the electric motor itself and the hydraulic system are located in different departments. A gasoline or diesel generator is used as an energy source.
The system is installed on the surface and connected to the well with a special pipe, as shown in this diagram.
The system always contains filters of varying degrees of purification, so the water it pumps out can be used at home for drinking, cooking and other household purposes.
All elements of this system are shown schematically in the figure.
NOTE. When purchasing an automatic station, first determine the location for it. It is always mounted on the surface, and for each station there is a maximum distance to the water source. This important parameter must be taken into account.
Video review of an automatic pumping station for organizing water supply in a country house.
How to install the drain valve correctly?
It is better to install the drain valve below freezing of the soil, that is, at a depth of 1.5-2 meters. If you install the valve in a well, then mount it closer to the adapter or head; if in a well, install it closer to the bend. The installation sequence is as follows:
- A hole is drilled in the HDPE pipe between the adapter and the pump
- The valve is fixed using two removable parts of the seat and mounting screws.
- The sealing ring is installed between the hole and the saddle.
You can install a homemade drain valve in the well:
— Install a tee or saddle with a tap in the well.
— Attach a 20 mm polypropylene pipe to the butterfly ball valve through a 32-20 mm adapter coupling.
— Use a grinder to make a slot in the coupling on the bottom side.
— Mount the pipe, which acts as a rod, in the well using plumbing clamps. To securely fix the pipe, two additional stop sleeves must be installed between the clamps. This is done so that the homemade rod does not “walk” vertically and fly off the tap.
However, such a winter valve has problems - the ball valves turn sour, and after some time it may not turn. We recommend periodically, for example, once a month, opening and closing the tap.
Installation of water supply in the house
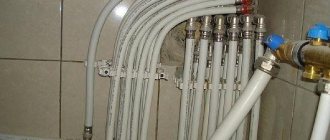
If you intend to live in a country house permanently, then the next stage of building a water supply system in your country house with your own hands from a well or other source will be the installation of an indoor water supply system. It is important to choose the pipe material. Classic metal ones have given way to plastic and metal-plastic. The main reason for this is that modern materials have a number of advantages:
- they withstand temperature changes;
- resistant to constant action of moisture both inside and outside (water corrosion);
- They are not subject to air corrosion.
You need to work with pipes using a special soldering iron, which can be purchased or rented at a very reasonable price.
Video: how to work with plastic pipes correctly.
NOTE. When purchasing pipes, try not to skimp on length. The fact is that when working with them, the cut must be made based on the calculated length plus 8-10 centimeters, which will be spent on welding.
Installing pipes is not very difficult, but requires care. First you need to draw up a detailed diagram for supplying the system to supply all parts of the room - kitchen, toilet, bath, bathhouse (if available). You can mount it either on the lower path or on the upper one. This way is especially convenient if you plan to make a suspended ceiling, under which it is convenient to hide all communications.
After installation is completed, it is necessary to install a special device that will regulate the pressure in the pipes to avoid ruptures. We are talking about an expansion tank. It automatically takes some of the water if there is increased pressure in the system, and releases it back if the pressure drops. The operating principle is shown in this diagram.
Typically, the tank can hold up to 100 liters of water, and this is quite enough for an autonomous water supply. Externally, the device is mounted to the wall in the utility room.
Installing filters
Finally, the final stage of building a water supply system in a dacha with your own hands from a well consists of installing a water filtration system. Purification of water for drinking and domestic purposes should always be multi-stage. In practice, this means installing several filters - mechanical and deep cleaning:
- A carbon filter is used at the first stage of cleaning. It filters out fine particles of sand, soil, silt, and vegetation well, which natural water certainly contains. Its principle of operation is simple - passing through it, water leaves impurities on the surface of the coal.
- Fine (deep cleaning) filters carry out multi-stage filtration using several cartridges made of special materials that perfectly separate harmful substances from water - oil residues, iron cations, heavy metals, fertilizer residues (nitrates), as well as pesticides, chlorides and other chemicals. The choice of one device or another depends on the chemical composition of the water specifically at your source.
IMPORTANT. Please note that any carbon filter is designed for a specific water pressure. Therefore, before purchasing it, if you doubt what the maximum pressure in your pipeline may be, it is better to measure it in test mode for several days, either increasing or decreasing the load. This will allow you to accurately learn about the operating characteristics of the system under high load conditions and choose the right carbon filter. And don’t forget one more important detail - the filter is used to purify only cold water.
Typically, these filters consist of several removable cartridges that need to be changed as they become clogged (the service life is always indicated in the instructions).
Video: installing filters during the construction of a country water supply system
Hydraulic accumulator
This is a mandatory element of the water supply system, regardless of the type of pump used. It is here that sensors and automation are installed that control turning the pump on and off and maintaining the required level of pressure in the system. If there is no storage tank (hydraulic accumulator), the pump will operate when any water consumer is turned on/off.
Surface pumps can be immediately equipped with their own capacity, and these models are called pumping stations.
But their hydraulic accumulator capacity is small (20-50 l), so they do not create any significant water reserve. The purpose of such a container is purely functional - the suction pump only works if there is water in the intake pipe and in it itself, and the water in the container simply “maintains” it in working condition. But even such a small reserve reduces the number of switches on/off of the station and eliminates the possibility of water hammer in the system.
Pumping station with automation and hydraulic accumulator Source home-help.com.ua
In the water supply scheme for a private house from a well with a submersible pump, high-capacity hydraulic accumulators are used. The larger the volume of the tank, the less often the automation operates when the pressure in the system decreases, and given that for any electric motor the “start” mode is the most difficult, this has a positive effect on the service life of the equipment.
When choosing a hydraulic accumulator model, take into account the volume of water consumption, which depends on the composition of the family. In addition, it is necessary to “link” its dimensions and type of installation (vertical or horizontal) to the characteristics of the room, internal pipe distribution, plus it is necessary to provide for the possibility of its maintenance.
There are also models of hydraulic accumulators that can ensure stable operation of the water supply system of a multi-family home Source remkasam.ru
Installation of a water heating system
Finally, there remains one more important step - it is necessary to provide heating of water for household needs. For this purpose, water heaters powered by electricity are purchased and installed. The diagram of this device is shown below.
One of the main parameters of this device is the maximum volume of heated water. Usually up to 200 liters of hot water is enough for a family. However, if you plan to grow a large farm or if a family will live with more than 4-5 people, then you need to purchase more spacious and powerful water heaters.
IMPORTANT. The water heater is always mounted on the wall under the ceiling. Therefore, before you begin installation, you need to be absolutely sure that the wall has sufficient strength to withstand a constant heavy load. It is also important to securely mount the device.