The construction of a country house is not considered complete if a water drainage system is not installed on the roof. It protects the facade, base and blind areas from moisture. The construction market offers ready-made solutions from various materials. Installation can be carried out by experienced specialists. However, even if you do the work yourself, it won’t take much time. In addition, this option will be much cheaper. The main thing is to get acquainted with the intricacies of the work and prepare the necessary materials, for example, a gutter and additional accessories.
What it is?
These are complex measures for collecting surface water. This means the manufacture of bends from special pipes, gutters, siphons, sand traps, plugs, storm water inlets and other elements. Its main task is to collect and drain rainwater, melted snow and similar precipitation from the house. Discharge can be carried out into a septic tank or a special container.
Advice! If a ground drainage system is being constructed on a site, then stormwater runoff cannot be directed to one place. As a rule, drainage and stormwater are laid in one trench in parallel, but water is collected in different places. Moreover, the stormwater system is located higher in level.
Planting moisture-loving plants
Another option for drying without drainage is to plant moisture-loving plants that “work” as a natural pump with an evaporator function. The root system of such plants actively absorbs water, and the abundant leaf cover evaporates moisture. Of course, the productivity of this drainage method is not high, but in combination with traditional drainage systems it has a positive effect.
As an independent method, this approach is justified only under conditions of slight swampiness or as a preventive measure. For example, in summer cottages with non-permanent residence, when there is no urgent need to remove melt or sediment water. By using trees, shrubs and grasses that absorb a lot of water, you can reduce flooding due to high water and speed up the drying of the top layer of soil after spring floods or autumn rains. Moisture-loving trees include all species that grow in nature near rivers, lakes and wetlands: willow, alder, birch. Along the perimeter, as a hedge, you can plant shrubs: rose hips, hawthorn, viburnum.
Nuances when installing on the site with your own hands
Must be manufactured in accordance with all prescribed requirements:
- Features of the landscape (slope, location of buildings on the territory, presence of reservoirs, etc.).
- Geological features (nature of the soil, its ability to absorb, etc.).
- The specifics of the building on which the external part of the rainwater drainage system will be installed.
- What is the average rainfall in your area?
- Where and how other utilities are located.
- What will be the total collection and drainage area?
Gutter (galvanized)
Until recently, galvanizing was widely used due to its affordable price and ease of execution. These elements can be manufactured not only in industrial conditions. Tinsmith specialists, popularly called tinsmiths, easily produce such structures in their workshops and garages from galvanized steel sheets of various thicknesses. In this case, fairly simple home-made equipment is used: metal shears, rollers, a bending machine, a rolling machine for making stiffeners on products. Galvanized gutter was in great demand.
But this material has a number of disadvantages. Zinc coating is easily damaged if handled carelessly. Scratches, possible damage due to bending, in the place of drilling holes for screws, rivets or fastenings. When the zinc layer is damaged, the base metal becomes easily vulnerable to environmental influences. Corrodes and rots. There is a need for replacement. Over time, paints appeared, the use of which not only improved the appearance, but also increased the anti-corrosion properties. The color range has expanded. Metal guttering is significantly inferior to plastic ones.
SNiP
Mandatory compliance with SNiP and similar standards according to GOST for its manufacture in a small area. Failure to comply with basic requirements will lead to malfunctions in its operation. Thus, the main provisions are set out in SNiP 2.04.03-85 “Sewerage. External networks and structures.”
To achieve the greatest effect, it is extremely important to have the following information at hand, preferably documented:
- Plan of the existing sewer system.
- Working drawings.
- A network profile is made in a longitudinal section.
- A statement of the work that will be carried out.
Drying methods
When purchasing a new property, the problem with excess moisture is often discovered after the deal is closed. And it must be resolved as soon as possible, before the start of construction or reconstruction of existing buildings. The first option is, of course, preferable, because it gives more opportunities - for example, to arrange wall drainage when laying the foundation or to create a comprehensive drainage system using several methods. And there are not so few such options.
The following main methods of combating site flooding can be listed:
- Surface or open drainage.
- Deep or closed drainage.
- Cut-off drainage.
- Vertical drainage.
- Backfilling the area (raising the level).
- Planting moisture-loving plants.
A related, but no less important, system is storm sewerage. It is often combined with one of the types of drainage. But this is not an axiom - stormwater can exist in parallel so as not to increase the load on the groundwater drainage system.
The lack of a full-fledged storm drainage system, a large roof area, waterproof coverings of platforms and paths, massive buried foundations of buildings and fences - all this can disrupt the water balance, worsen the natural drainage of water and lead to waterlogging of an initially healthy area.
Types of rain systems and their design
There are three main types and methods of organizing a drainage system for collecting rainwater:
- Open.
- Closed.
- Mixed.
The first option is the simplest and most inexpensive way to arrange a storm drain. This refers to a system of installed gutters on the roof. Water is collected through them. Then the drainage is carried out through semi-open special grooves.
Heating
One of the most pressing topics for owners of private houses is ensuring thermal insulation of the drainage system. There are several options to solve this problem:
- Cover the entire surface of the pipes with special material. For example, geotextile fiber. This solution is suitable for closed drains that need to be provided not with heating, but with good thermal insulation;
- Install a heating wire or board into the drain. This option is convenient and simple, but can be used exclusively for iron bends.
To heat a plastic gutter with your own hands, you will need a self-regulating cable and a casing for it. This is the simplest and most affordable method that will help combat icing of systems even in difficult weather conditions. The wire is installed in the sheath and then connected to the power supply. During operation, it regulates the temperature itself (these parameters can be configured).
Gutter heating
Why do you need a heating installation:
- PVC and steel drains can become clogged due to sudden temperature changes. Ice interferes with the normal operation of the system, causing its efficiency to be significantly reduced;
- Installing heating for gutters protects the system from cracking;
- Heating is very important not only for pipes, but also for the roof surface. This provides a good level of safety and protection of premises from freezing (especially in houses with a residential attic).
Selecting material for the system
Rainwater collection is carried out using:
- pipes;
- wells;
- receiving elements;
- gutters.
When choosing them, it is necessary to take into account some features. An important component of the system are the receiving elements. Funnels are installed on the roof and platforms. They are made from polymer concrete, polypropylene and polyethylene. Their design includes filter baskets in which various inclusions settle. To prevent the release of unpleasant odors from them, some types of receivers have siphons. Their installation is carried out under pipes when organizing a point system.
At the entrance to the building, door trays can be installed, which include a drainage outlet and a protective mesh on top. Plus, this grill allows you to remove dirt from shoes.
Mandatory elements are pipelines, gutters and trays. The most commonly used are polymer pipes and PVC. One important requirement is that all pipe joints must be sealed.
Trays for transporting sediments are made of ordinary concrete or polymer materials. The latter are much simpler and easier to install. Moreover, their smooth internal structure does not create any obstacles to the flow of liquid from the inside. As a result, the possibility of clogging is eliminated. The main thing is to install them with the correct slope.
Wells must be installed to collect precipitation. They must be sealed and reliable. Polymer wells have all the necessary characteristics.
Price overview
Let's consider how much a wall-mounted white drainage gutter PLD-02-9010-0.5 (plastic) costs in different cities of Russia:
| City | Cost of model D125 3m, cu. e. | Volgograd | 10 |
| Voronezh | 10 | Ekaterinburg | 10 |
| Krasnodar | 10 | Krasnoyarsk | 10 |
| Minsk | 13 | Samara | 10 |
| Permian | 10 |
You can buy a gutter in branded stores and construction markets; their price depends on the material from which it is made, its diameter and type.
13 November 2015 Author: Vladimir Bakaev
Calculation and arrangement
Design plays an important role in laying out an autonomous system. To calculate everything correctly, the following points must be taken into account:
- Wastewater removal rate.
- The amount of precipitation in your area.
- From what area is collection planned? The roof area is also taken into account.
- How polluted the wastewater will be.
- Features of the landscape and relief of the local area.
- The prevailing temperature in the area.
- Location of the water supply system.
Copper
The durability and uniqueness of copper is undeniable. It is a high-quality roofing material. It has also found application in the manufacture of drainage systems. Roofing manufacturers claim that copper-clad roofs can last more than 400 years. Working with such products is allowed at all times of the year, regardless of temperature conditions. But at the same time, a condition must be observed: the gutter fastening, like other parts, must be copper or made of stainless steel. This precaution prevents the formation of electrolytic vapors, leading to oxidation of copper and its destruction. Contact with galvanized surfaces and zinc-titanium is unacceptable for copper. Over time, copper products change their color. In the first ≈ 5 years they become black, then green and after 30 years they acquire a stable green color. All changes in color do not affect durability in any way.
Since zinc-titanium and copper are considered very expensive materials, maximum care must be taken when working with them. Therefore, it is better to entrust this work to professionals.
How to do it right?
Installation of the outer part of the storm drain begins with its installation on the facade of the building and the roof. First of all, it is necessary to carry out preparatory work for installing the gutter. To do this, you need to secure the hook.
Advice! Experts recommend using a short hook - one that does not need to be placed under the roofing material. This is explained by the fact that if dismantling is necessary, it will be difficult to remove the long one, since the roofing material also needs to be dismantled.
The gutter should be laid at a slope in one direction. On average, for 6 meters it is enough to make a slope of 25–30 mm. This will be enough for the water to fall well. Plus, the fastening hook should not interfere with the free flow of snow. Therefore, in the direction of the roof slope, the edge of the hook should be lower.
A connector must be used to connect the gutter. It has a special latch and a rubber seal. A plug is installed at the highest point at the end. All water flowing down the gutter should fall into the canadian and funnel. Through them, all precipitation enters the pipeline.
Based on the projection of the roof from the facade, elbows are used to connect the funnel to the vertical pipe. If the roof is hipped, then a tee is installed at the corners to connect the gutter.
As for the wall part of the drain, a bracket and holder are used to secure the pipe. The drain should be located about 50 mm from the wall. An elbow is also installed at the top of the pipe at an angle of 45 degrees and do not forget about the funnel. When the pipe is fixed to the wall, it is necessary to measure the distance from one elbow to the other. Also note that it must fit 80 mm into both links. This means that 160 mm must be added to the actual distance between the knees.
It is necessary to organize drainage from the building. The outlet of the lower elbow should be located at some distance from the foundation. A pipe branch from the building is laid in the ground. This is where all waste should go. For this purpose, a receiver is installed.
Advice! It is recommended to use roofing sealant when connecting the gutter and tees. This is important even if there is a rubber seal.
All above-ground exterior work begins with digging trenches. In the process of digging a pit, it is necessary to immediately organize a slope. The slope of the line should be 10 mm per linear meter, this is the maximum. This will be enough to prevent the pipeline from silting. It is equally important to determine the depth of pipe installation. The peculiarity of such a system is that the water inside does not stagnate, but drains. Therefore, you should not be afraid of freezing. However, it is important to think about the mechanical impact. For example, if the drain will pass in a place where vehicles move, then the depth must be appropriate. Therefore, you can focus on a depth of 70 cm.
Overhead drainage gutters on the eaves of the roof
In the drainage system described above, drainage trays-gutters are suspended from the roof eaves. Such gutters, when exposed to ice and snow, are easily deformed, displaced, damaged or clogged.
The relatively small slope of the gutter and the narrow and deep opening of the tray make self-cleaning of debris difficult.
In operation, the option of a drainage system with an overhead gutter on the eaves of the roof causes less trouble.
Unfortunately, elements of such a factory-made drainage system are not often found on sale.
| Roof installation with an overhead gutter: 1 – T-shaped crutch; 2 – wall gutter; 3 – fastening the gutter hook with a rivet; 4 – water intake funnel; 5 – cornice overhang; 6 – top layer of roofing carpet; 7 – bottom layer of roofing carpet; 8 – gutter hook; 9 – base for roofing carpet; 10 – additional layer of roofing carpet |
Usually, locally, on the edge of the roof, an apron for the eaves overhang (pos. 5) is made of galvanized iron and a wall-mounted gutter (pos. 2) is fixed on top. Water from the gutter flows into the receiving funnel of the drainpipe (pos. 4). It is clear that the manufacture of parts from ordinary gray galvanized iron, without a colored polymer coating, reduces the decorative effect of the roof.
Overhead gutters on slopes with a slight slope or low snow accumulation can serve as snow retention.
Due to the increased metal consumption, a drainage system with overhead gutters is usually more expensive.
than with hanging ones.
However, the greater durability and reliability of overhead gutters, the ability, in some cases, to refuse the installation of snow retainers and electric heating devices, make such gutters quite competitive.
How to maintain a storm drain
Designing and building it is one thing. To make it last as long as possible, it needs to be properly maintained. All work in this direction comes down to periodic cleaning. Sediment can form on the walls of gutters, gutters and pipes (for example, stuck leaves from a tree gradually collect silt). This significantly reduces throughput. The cleaning itself is performed mechanically, thermally, chemically or hydrodynamically.
So, the entire service process comes down to the following steps:
- Cleaning roof gutters.
- Cleaning receivers from sludge.
- Cleaning of ground drains.
Types of drains
The water drainage system can be created in the following options:
- Disorganized. Water flows from the roof directly onto the ground. This is fraught with the appearance of dampness and deformation of the base.
- Interior. Thanks to this type of moisture removal, it does not freeze in winter. This option is applicable in the northern regions.
- Organized. The drain is equipped with a system of gutters through which moisture is directed into the sewer system.
The design of such a system must be properly designed. The drain should also be properly secured to the wall. Only in this case will it work properly.
Types of drainage
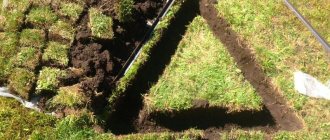
There are three types of drainage: closed, open and backfill. The easiest and simplest is an open type of drainage, or, to put it simply, a ditch.
A similar action is carried out like this:
- According to the circumference of the entire site, they dig ditches with a depth of up to one meter and a width of fifty centimeters;
- the angle of inclination of the ditch walls must be at least thirty degrees - this will facilitate maximum collection and removal of excess moisture;
- In order for drainage to be truly effective, the site must have a slight slope.
The pipes must be laid on a well-compacted sand layer and wrapped in a specially designed filter resource called geotextile. After the sand is added, the soil is filled in and the turf is laid.
The backfill drainage method, or, as it is also called, the gravel method, is used extremely rarely. But, no matter what drainage method is used, there is still a need for a collector or natural water intake where water collects.
Protecting the building foundation from groundwater
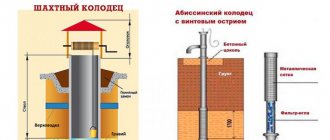
If you are looking for an answer to the question of how to properly drain water from your home, then you cannot do without making a deep drainage system. You will definitely have to lower the groundwater if it rises above the foundation of the building, and the house has a basement, ground floor or underground garage.
Signs of the need for deep drainage can be determined visually. These include:
- moisture content of building structures in the basement;
- flooding of the basement during melting snow or heavy rains;
- quick filling of the septic tank with water in the sewer system.
It is best to start making this type of drainage at the stage of building a house. In this case, installing the system will cost much less than installing it when the building has already been built.
Water from the drains will be drained by gravity into a central collector made at the lowest point of the site. Moisture can also be directed into a pond or ravine. If it is possible to connect your local drainage system to the central sewer system, you should take advantage of this. If deep drains are planned to be collected in a well on the site, then the water is pumped out or used for watering plants. It will be easier to make a drainage system if the site has a natural slope. But most often it is necessary to dig drainage ditches with a given slope or build a multi-level system of gutters.
The easiest way to protect the basement of a house from groundwater is to make a ditch around the perimeter of the building, with a depth below the foundation. Trenches are dug at a distance of 1.5 meters from the wall of the building. Their bottom is filled with concrete, not forgetting that it should have a slope towards the drainage basin. You can use concrete or plastic trays for drainage construction, which are covered with gratings on top. Only groundwater should flow into the deep drainage system. Rain and melt runoff are removed through drains not connected to them.
Rules of care
Drainage structures will function properly for many years if the basic rules are followed during operation:
- the top layer of soil must remain loose throughout the entire time so that moisture is absorbed as best as possible, which means moving heavy equipment directly over it should be prevented;
- collectors and wells must be regularly cleaned of contaminants, otherwise maintaining the system may be difficult;
- Pipelines should be cleaned every 10-15 years.
Inspection drainage well at the bend
The choice of cleaning method largely depends on the location of the drains and their design features. Contaminants from elements located on the surface can be removed manually without the involvement of professionals. If the components of the system are deepened into the ground, then the measures become more complicated. The work may require a special installation with a cleaning roller that can remove deposits from the internal surfaces of the pipes.
This pump can be used to clean drainage wells
Seals
All seals that are supplied with drainage systems are made of EPDM rubber. EPDM (ethylene propylene diene monomer) is the most modern and durable material, which is an analogue of a rubber mixture. It is used in places where it is necessary to achieve reliable and durable sealing of connections. Due to its elasticity, this material ensures high tightness of joints, and when the load is removed, it restores its original shape even after prolonged use. It is absolutely waterproof, not subject to destruction when exposed to climatic factors, its operating temperatures range from -50 to +100°C.
In most cases, manufacturers coat the seals with silicone grease at the factory, which provides additional protection for the rubber and also facilitates the sliding of the gutter during installation and thermal expansion.