Private property must be protected from environmental influences and intrusive views. Protecting a building with a horizontal fence made of boards is a budget-friendly and effective way. There is a variety of wood available on the building materials market. The price and quality of the finished product will suit every person. In addition, fencing a private building is now easy.
Are you ready to make such a fence?
YesNot yet
A wooden horizontal fence is perhaps the most affordable, easy to install and environmentally friendly structure. Installation is possible even for a non-professional. To achieve this goal, you can resort to the services of special organizations. The range of sizes and possible combinations is extensive. The service life of the finished product is ten years. Like any structure, a wooden fence has a number of advantages and disadvantages.
How to build a fence from clapboard: expert advice
To fence a summer cottage, flowerbed or lawn, you can use a wide variety of materials. So, in some cases, a mesh is used, but for others, a forged fence may be the solution to the problem. In any case, all types of fencing are aimed primarily at safety, but compliance with the appearance of the house and site is also a prerequisite. According to all the required parameters, lining is ideal at the moment. It is a specially processed board with a lock. Let's look today at the advice of craftsmen on methods for creating a fence from clapboard.
Clapboard fence
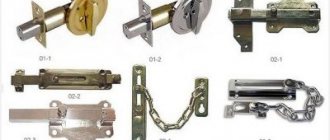
Required tools and materials
To begin with, all experts recommend preparing materials and tools. This solution will save time and make it possible to carry out the most efficient construction. For work you will need:
- board;
- wooden blocks to create a transverse base with an average size of 50x50 mm (the size depends on the height of the fence and the type of board);
- metal or wooden posts;
- axe, hacksaw (saw) and shovel;
- screws, nails or other fasteners of this type;
- drying oil, paint, primer.
If you prepare everything correctly, you won’t need to run to the store in the middle of the work process. It is worth noting that when creating a fence from clapboard with your own hands, you need to take all the components with a reserve.
Preparatory work
Such a fence is built in order to protect against both intruders and stray animals. For this reason, it must necessarily have high levels of stability and strength. We can also say that the material used (in our case, wood) is highly susceptible to environmental influences. For this reason, it is imperative to take special measures, which include the following:
- Treatment of pillars with a special primer, which has deep impregnation properties. This is necessary not so much for protection from the effects of rain and snow, but because these elements are located in damp soil, where rotting can begin within a few weeks.
- The lamellas are treated with special protective agents. They are applied to both sides. Experts advise giving free rein to your imagination and cutting out certain shapes from the upper slats. This will make the appearance of the fence more varied;
- The timber should also be treated with a special compound to prevent rotting, insects, etc.
In the photo you can see what the preparation process looks like and what is needed for a full installation.
Having prepared, you can begin building a clapboard fence with your own hands. In this case, experts distinguish two fairly simple methods:
- normal installation;
- installation with weaving.
Let's look at the process of creating a fence using them.
Normal installation
Probably everyone has encountered the most ordinary picket fence. Creating one using lining is practically the same technologically. But there are also a number of nuances that you must know.
The procedure consists of initially cutting the lamellas to length. Then everything is done in the following sequence:
- The land plot where the pillars will be located is being marked. The distance between them should be no more than 3 meters, since in the future the entire fence may be damaged by a strong gust of wind.
- At the marked places, holes are dug with a depth of at least 50 cm. Pre-processed pillars are installed in them and filled with concrete.
- The treated beams are fastened between the pillars.
- Prepared picket fences are fixed onto the beams, primed and painted.
Installation of "braid"
Here, doing the work with your own hands, all the initial work is almost the same. The difference is that the installation of the pillars must be carried out at a distance of at least 2.5 m. Additionally, longitudinal slats (2 pieces) are installed. Next, a whole lining is taken and braided between the pillars. A prerequisite is high humidity of the board, as otherwise it can easily burst. The ends are secured between picket fences installed instead of posts.
More detailed instructions for creating a fence from clapboard are in the video. Visual perception will allow you to better perceive the material and eliminate a large number of questions.
Conclusion
A large selection of clapboard fence manufacturers allows you to find a fence to suit your personal tastes and preferences.
Although the design is manufactured in a factory, the wishes of the buyer are always taken into account. There are enough varieties of lining to provide the required width and length of the fence, as well as its appearance in accordance with individual preferences. You can install a clapboard fence yourself, which will save a considerable amount on calling workers. Penetration of light through the fence can be achieved by installing the lining at a short distance. You can apply an additional decorative texture to the lining, paint or paint the fence, which will highlight your individuality and also give the fence an exclusive look.
Do-it-yourself clapboard fence - a guide for creating
Lining is standardly used for interior and exterior decoration. But, in fact, the scope of its application is not limited to this. If you have a summer house and want to update the fence, then pay attention to this material. The lining will be the ideal “edging” in this case!
Various options for finished work:
Materials and tools
If you decide to make a fence from clapboard, you need to prepare everything you need in advance.
This will help you not waste time. Having everything at hand will help your work go faster. What do we need?
- Lining;
- Bars for cross beams;
- Support pillars;
- Nails or screws;
- Screwdriver or screwdriver;
- Hammer;
- Shovel;
- Axe;
- Saw;
- Paint and varnish products;
- Primer;
- Impregnation;
- Composition against rotting, mold and mildew;
- Brushes.
Panels are selected depending on your preferences and capabilities. You can use both the standard version and the block house type.
When choosing a class of lining, be guided, first of all, by the goals being pursued. Higher classes (Extra and class A) are not worth choosing. Why simply overpay if, for example, you are going to paint a fence.
Support posts can be made of either wood or metal. The main thing is not to forget to treat them with appropriate compounds. This is necessary so that the structure will serve you for a long time.
Preparation
Whether a metal fence is used or a regular one, it must first be prepared. Let's talk about the wooden version.
If you use wood for external purposes, increased requirements are placed on the preparatory work.
Harmful environmental influences leave their mark on life expectancy.
To increase service life, you need to carefully prepare the surface. The panel can be purchased either impregnated in an industrial environment or processed at home.
To do this, the surface must be cleaned of dirt and sanded. For protection, compounds against rotting, mold, mildew and water-repellent composition are used. It is important to treat the surface against bark beetles.
After we have prepared the surface, we need to go over it with a primer and impregnation. Pillars are also subject to coating. Since they constantly have to be in the soil, it is better to initially concrete them. They are also coated with a protective compound.
The pillars are strongly influenced by external factors. Summer means heat and strong ultraviolet radiation. In autumn and spring there is high humidity. In winter it is frosty. Under these influences, the tree has to either shrink or, on the contrary, expand. A special coating will protect the material from this.
Making a fence with weaving
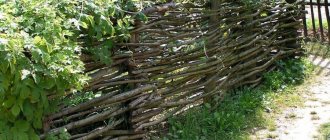
The wattle fence is an original solution to the device. It primarily performs decorative functions. It usually serves as a small fence or front garden.
For this we need a narrow board (mostly 10 cm wide). It is better to take a length of 3 m. This option is perfect for our idea. The support pillars are placed last in this option.
Manufacturing begins with the creation of a U-shaped structure. It consists of two wide elements on the outside and a narrow one on the inside. All this is held together with self-tapping screws. The length of this workpiece must correspond to the desired height of the fence.
To make the weaving “fold”, we insert additional elements (cuttings) every meter. When you have finished “decorating” one structure, let’s move on to another. When the required length is ready, you can immediately see where the support pillars will be located.
Simple option
A fence made from standard clapboard construction does not require any special experience or skills. First of all, we prepare a place for the pillars. We dig a hole, install a support and fill it with concrete.
Then you need to secure the beams to the posts. They will serve as the basis for fastening the lining. The finishing material can be cut at the top in the form of corners or a curly top can be made. It directly depends on your desire.
Video - DIY fence:
After installation, do not forget to paint or varnish the surface. This will create an additional protective layer. A little work and patience. Now your fence is ready!
The procedure for carrying out preparatory work
You can install a clapboard fence with your own hands, without turning to specialists for help. To do this, you need to perform several sequential steps.
- 1 step. The required amount of material should be calculated. The result will depend on the length and height of the fence, on the number of wickets and gates;
- Step 2. Using several stakes, mark the area and pull the rope;
- Step 3. Install supports: For metal supports, holes must be dug or drilled, posts installed and concreted;
- For brick ones, it will take more time and effort, since one support will require more than 100 bricks.
- For wood or PVC, it is enough to prepare nails or screws;
So, in just six steps you can achieve the perfection and individuality of your fence.
Return to contents
How to make a fence from clapboard? DIY construction
Lining is a processed board with a selected groove for fastening elements, used for the construction of lightweight and durable modern fences.
A clapboard fence is a beautiful, reliable fence with minimal investment.
A wooden fence made from coniferous lining is not inferior in originality and presentability to expensive structures.
Advantages
A fence made of PVC lining is environmentally friendly, easy to install, and is built from a small set of materials and tools.
It is not afraid of temperature changes, it has an aesthetic, smooth appearance, is fireproof, durable - its service life is about 90 years .
To make a clapboard fence with your own hands, prepare tools and materials. This way you will save time, because you won’t have to look for them, and the work will go faster.
So, you will need:
| Materials | Tools |
| lining, | shovel, |
| support pillars, | saw, |
| timber for crossbars, | axe, |
| screws or nails, | hammer, |
| impregnation, | screwdriver (screwdriver), |
| primer, | brushes |
| compositions against the appearance of fungus and mold, against rotting. |
To build an original clapboard fence with your own hands, you only need a little imagination, and photos of finished structures will serve as a hint and help you in choosing a design.
Photo gallery
Choose fence boards based on your own preferences and budget. You can make either a wooden fence or a fence from PVC lining or a block house.
When choosing a particular class of lining, consider the purposes for which you plan to use it. Do not buy extra-class or class A boards if you plan to paint the fence rather than varnish it.
Both wooden and metal supports are suitable for poles. To ensure that the fence lasts for a long time, carry out special treatment of the materials with protective compounds.
Preparatory stage
A fence for a home or cottage must be durable and stable. Wood in its pure form is a material that is not resistant to external influences and requires processing.
The preparation stage for installing a fence includes:
- Treatment of supports with a special compound to protect them from rotting.
- Treating the boards with a special impregnation and giving them a carved shape on one side to make the fence interesting.
- Treatment of future cross members with protective compounds.
After carrying out the preliminary work, begin building the fence.
There are 2 main ways to install it:
Let's look at them in more detail.
Normal installation
The construction of an ordinary wooden fence made of clapboard is almost no different from the construction of a fence for a site made of picket fence.
But there are a number of subtleties that are important to consider and a certain sequence of actions:
- First , the boards are cut to a length equal to the height of the structure.
- Then the area is measured and places for supports are marked - the distance between them should not exceed 3 m so that the fence does not fall under heavy gusts of wind.
- After this, holes are dug to a depth of half a meter, supports are installed in them and filled with concrete.
- Then the cross members are attached to the posts.
- And the final stage is attaching the boards to the crossbars, priming and painting them.
Installation of "braid"
With this method of erecting a fence, the procedure at the initial stage is the same as with the usual one.
To create such a fence, take wet boards so that they do not burst during the weaving process. Finally, the ends of the boards are attached to the pickets installed between the supports.
Video
To learn more about the process of constructing a clapboard fence, watch the video. This way you will better understand the work process and get answers to most questions.
Preparation of material
Since the fence is an external structure, and first of all, it must provide protection from invasion - not so much by people as by animals, the material and the structure itself must have sufficient mechanical strength. The second requirement is resistance to weather factors: moisture, low and high temperatures, ultraviolet radiation.
To increase the service life of the fence, some measures should be taken.
- Before installation, wooden poles must be treated with a primer with a deep impregnation effect. These elements are in contact with the soil and are more exposed to moisture. One more nuance should be taken into account: in winter, when the soil freezes, it expands, and when the temperature rises, it thaws. The support column will constantly experience additional compression and weakening, and as a result loses stability. Therefore, when building a fence with your own hands, it is recommended to fill the support pillars with concrete, and not just dig them into the ground.
- The slats should be treated with protective compounds on both sides or with drying oil. If necessary, the lamellas are cut to length. The upper edge of the boards can be given any decorative shape - rounded, pointed, figured.
- The wooden beam is also treated with an antiseptic composition. The photo shows lamellas prepared for installation.
Fence and PVC lining.
I ask your opinion:
and if you use PVC lining on the fence. 1.5 m (i.e. in half) vertically. panels, which are for external cladding, their walls are thick, about 1 mm,
as horizontal jumpers - galvanized profiles for gypsum boards - at the very top, at the very bottom and two every half meter. the top and bottom will not dangle, the screws are not hidden, but with caps, you can put washers, or you can put some decorative strip through them (from the same PVC, for example).
pillars - 50-60 mm pipe without concrete, to a depth of more than a meter, in increments of 1.5 m. Fasten the lintels to the pillars and PVC to the profile with galvanized self-tapping screws.
Pros (kind of)
- durability of PVC
- no need to paint PVC
- ease of construction
- easy and quick to assemble
- you can combine colors
- initial costs are comparable to a fence made of good wood, then savings on operation (impregnation, paint).
Please tell me the cons:
Yes, this is not a dacha, this is a permanent residence house within the city, to the sidewalk from the fence 7 meters and the slope from the fence to the sidewalk is 0.7 m.
I see one downside for sure: paint and impregnation are not needed - this is good, but what if someone writes something bad on the fence, the house is within the city limits? You won’t be able to paint over it; or rather, your fence will look very bad after that! Vandals will be able to ruin your fence in 5 seconds with a lighter - paint it again. There is no need to talk about strength - a kick and there is no part of the fence. By the way, I’m not even talking about the fact that I personally don’t understand how the lining will behave in relation to dirt? I just don’t know, but I don’t exclude the possibility that it will be absorbed into the plastic. If you neglect all this, then the fence promises to be beautiful (by the way, colored lining is much more expensive than white, if I’m not mistaken).
The dirt washes off easily. and the vandals of the fighter are hit with a slab of sheathing, but they can burn the slab.
In the cold it is easy to break the panel, push it through, etc.
NetIgorS wrote: In the cold it is easy to break the panel, push it through, etc.
And besides deliberately causing harm to such a fence, what are the disadvantages?
As a result of additional thoughts, I am more and more inclined towards the white color of the panels.
We sell fairly inexpensive colored lining (width 100 mm), the colors are not bright, the strip costs 35 rubles, white can be found for 28 rubles, and the idea is good, but in Russia we have a lot of BUT.
Sergey11 wrote: We sell fairly inexpensive colored lining (width 100 mm), the colors are not bright, the strip costs 35 rubles, white can be found for 28 rubles, and the idea is good, but in Russia we have a lot of BUT.
That's exactly what I mean. and our place is quiet, calm, the people are respectful, the youth are well-mannered.
A friend of mine has a fence like this. White.Horizontal. Dirt is washed with Karcher and shampoo, just like at home, once a year. If there are vandals with spray cans, I saw an anti-graffiti coating for them, a colorless grease that washes off. In my case, kicks are not considered. Minuses:
- Siding, like the façade shell of a house, is light—like a sail in the wind. Won't the sail blow away?
- According to science, its fastening is not rigid, so it should walk on the walls of the house and knock on its own. If you grab it tightly, then at the first frost it will shrink and come apart, or even crack. I've seen this more than once. At 3 meters in length, the corner shrank by 1.5 - 2 cm. In the summer there was 0 gap.
- From the inside, both the siding itself and all the cross members look sloppy. Ideally, you'll want two-sided. And the cost will be comparable to a polymer-coated profiled sheet.
Now I’m thinking about how to protect myself from my neighbors.
Mekhnet Ravshanovich wrote: A friend of mine has a fence like this. White.Horizontal. Dirt is washed with Karcher and shampoo, just like at home, once a year. If there are vandals with spray cans, I saw an anti-graffiti coating for them, a colorless grease that washes off. In my case, kicks are not considered. Minuses:
- Siding, like the façade shell of a house, is light—like a sail in the wind. Won't the sail blow away?
- According to science, its fastening is not rigid, so it should walk on the walls of the house and knock on its own. If you grab it tightly, then at the first frost it will shrink and come apart, or even crack. I've seen this more than once. At 3 meters in length, the corner shrank by 1.5 - 2 cm. In the summer there was 0 gap.
- From the inside, both the siding itself and all the cross members look sloppy. Ideally, you'll want two-sided. And the cost will be comparable to a polymer-coated profiled sheet.
Now I’m thinking about how to protect myself from my neighbors.
As I understand it, your neighbor’s fence is made of siding, but I want PVC lining. and not horizontally, but vertically. This lining also shrinks along its length in winter, but at a length of one and a half meters it is less than a centimeter, and the fasteners to the profiles for gypsum boards will allow them to walk a little.
You can attach the vertical planks alternately to the horizontal one, either from the inside or from the outside. Near one of our cafes it’s done this way, it looks beautiful and you can hardly see what’s going on behind the fence, and during strong winds it doesn’t flutter.
000000000000000000000000000000000000000000000000 1111111 1111111 1111111
Top view of this fence:
1111111 – Lining. 000000000 – Horizontal bar.
Strange, the drawing has shrunk. In short, if you look from above, the lining is arranged in a checkerboard pattern.
Well, with a crosswind, there will still be windage. Yes, and I want a solid fence.
If vandals damage at least one panel, it can be replaced in 5 seconds, but how to change it in a solid one? There will be even more pressure on the continuous wind. And so at least small gaps remain for him to escape.
magn wrote: If vandals damage at least one socket, it can be replaced in 5 seconds, but how to change it completely? There will be even more pressure on the continuous wind. And so at least small gaps remain for him to escape.
I don’t expect vandalism: our place is quiet, calm, the people are respectful, the youth are well-mannered.
Let the wind jump over the fence, there is no point in climbing into the cracks.
But how is it in terms of ultraviolet radiation? If it's for interior work, then probably not very good.
Vic wrote: how is it in terms of ultraviolet radiation? If it's for interior work, then probably not very good.
I'm talking about the one for cladding facades.
magn wrote: You can attach the vertical planks alternately to the horizontal one, either from the inside or from the outside. Near one of our cafes it’s done this way, it looks beautiful and you can hardly see what’s going on behind the fence, and during strong winds it doesn’t flutter.
000000000000000000000000000000000000000000000000 1111111 1111111 1111111
Top view of this fence:
1111111 – Lining. 000000000 – Horizontal bar.
Great way! I myself, apparently, will make a fence at the dacha in this way, only, of course, from wood, as from a material proven for the construction of fences. But in relation to the lining - how will it look? The lining has technological seams and seals on the side for fastening to the wall. As I understand it, all this is proposed to be “exhibited” for everyone to see, both inside and outside? It seems to me that it will look like a cellophane greenhouse next to a greenhouse (a normal fence).
The would-be electrician wrote: Excellent method! I myself, apparently, will make a fence at the dacha in this way, only, of course, from wood,
There is one drawback to this method, which is especially relevant with a wooden (but not only) crossbar; snow will be well retained on top, and water too (if you can make a bevel on one side of the crossbar, in the direction opposite to the pickets).
The would-be electrician wrote: Excellent method! I myself, apparently, will make a fence at the dacha in this way, only, of course, from wood, as from a material proven for the construction of fences.
It will be difficult to organize a good drainage system. This means it will start to rot faster.
The best option is corrugated galvanized sheet or painted tin. You can make a fence from panels when you get them for free, but it’s a waste of money; the panel won’t last longer than 3-5 years; it will be full of holes and darken; and these panels also spread fire
sergeydubrovin wrote: The best option is a corrugated galvanized sheet or painted tin. You can make a fence from panels when you get them for free, but it’s a waste of money; the panel won’t last longer than 3-5 years; it will be full of holes and darken; and these panels also spread fire
I don’t want corrugation - galvanized corrugated sheets. tired of it. ugly. Who told you that PVC lasts so little? I’ve had my Masandra sheathed with it for five years now – and there are no holes, fragility or crumbling. PVC does not spread fire. So that it burns, it must be burned. When you take it out of the fire, it goes out. I checked it on scraps in the fire.
Dear Patsak+, your arguments are ironclad and very convincing! But try to take, for example, a chair. It can also be made from different materials: wood, plastic, etc. You've probably seen very comfortable plastic chairs that are used in outdoor cafes. Yes? Do you want such a chair for home? I don’t and I can’t tell you why, apparently because the person is moderately conservative. You want a beautiful “screen”, not a fence! Your clapboard version of the screen is very good, but there is no fence, this is what people are trying to tell you. If you don’t have bad people, vandals and crazy drunken youth, then probably this symbolic will be enough for you. and a beautiful (I admit) fence! Go ahead, you don’t want to see objective and non-technical disadvantages. I personally don’t find any technical disadvantages that may not meet your requirements. I would be glad to see a photo of the masterpiece!
The unfortunate electrician wrote: Dear Patsak+, Your arguments are ironclad and very convincing! But try to take, for example, a chair. It can also be made from different materials: wood, plastic, etc. You've probably seen very comfortable plastic chairs that are used in outdoor cafes. Yes? Do you want such a chair for home? I don’t and I can’t tell you why, apparently because the person is moderately conservative. You want a beautiful “screen”, not a fence! Your clapboard version of the screen is very good, but there is no fence, this is what people are trying to tell you. If you don’t have bad people, vandals and crazy drunken youth, then probably this symbolic will be enough for you. and a beautiful (I admit) fence! Go ahead, you don’t want to see objective and non-technical disadvantages. I personally don’t find any technical disadvantages that may not meet your requirements. I would be glad to see a photo of the masterpiece!
I agree with the definition of “screen”. it suits me. Indeed, the main purpose of the structure I am planning is to shield ourselves from prying eyes, and not to resist military operations using armored vehicles and flamethrowers.
The photos will be taken after the idea is completed, and will be carried out after the ground has thawed, I think in May, not earlier, especially since most of the “screen” route is shaded.
Installation of poles
After studying the thematic section of the forum, the craftsman decided to abandon concreting in favor of butting. I drilled holes with a hand drill (200 mm) in increments of 3 m, to a depth of 1.3 m, filled in a 10 cm layer of crushed stone, compacted it and installed the pillars. Layers of sand and crushed stone with tamping and pouring filled the holes to the top. The pillars became strong, “like stone.”
As often happens, practical thoughts come late: after installing his pillars, the craftsman began to think about the durability of the supports and how he would have to change them in ten years due to insufficient wall thickness. For those still preparing, he advises the following:
If you need a fence that will last for decades, immediately think about the appropriate supports. What I came to: it is optimal to cover tubing pipes with a wall thickness of 5.6 or 7 mm, cover them with soil and protect them with bitumen. It's practically forever. If it’s cheaper, use a 100×100 mm wooden beam, burn it intensively and do not coat it, but actually soak it in pine tar and linseed oil. During installation, there is no need for concrete, only backfilling with crushed stone for “ventilation”. There is no need to fight the forces of frost heaving - it is easier to neutralize them.
How to make a fence from plastic and metal lining?
Content:
Fences can serve a variety of functions. In addition to protecting the territory and dividing it into certain zones, they should also have an attractive appearance and not require special operating conditions. All these characteristics are met by a clapboard fence, which is becoming increasingly popular in suburban construction. It is distinguished by its versatility of use, a very wide selection of materials, shapes and colors and reasonable cost.
PVC fencing
Types and benefits
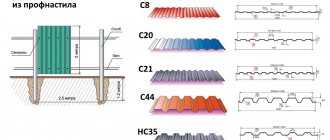
Lining is a universal material, for the manufacture of which metal, wood, PVC, etc. are used, as can be seen in the photo. Lining can be used as cladding for a house, finishing individual landscape elements, and can also be used to construct a fence.
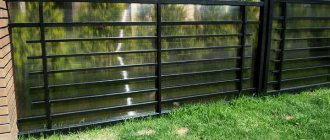
Metal lining for fences is quite common, which has the following advantages:
- high level of strength, reliability and rigidity, which is ensured by the special design of the material, as well as its relief shape;
- ease of installation and operation;
- fencing made of this material is easy to clean without the help of additional chemicals;
- resistance to corrosion, which is achieved by coating the material with zinc or polymers;
- wide selection of shapes and colors;
- resistance to various negative environmental factors;
- a light weight;
- possibility of quick dismantling if necessary;
- beautiful appearance;
- the ability to use vertical or horizontal direction for placing strips of material.
- long period of operation;
- versatility - the lining combines well with other materials and fits the design of any site;
- good protective performance;
- optimal ratio of quality and adequate cost.
Interesting! Wooden linings are also widely used. This is an environmentally friendly material that is highly decorative and durable. Thanks to the use of special impregnations, wood is also not afraid of moisture, fire, insects and bacteria. Using wood provides another advantage - uniqueness. Each type of wood has its own unique pattern and texture.
An alternative to metal and wood is plastic. PVC fences do not contain hazardous substances, are quite durable, and their artificial origin allows them to acquire any color, shape and pattern. This material can imitate wood, stone, brick, etc.
Beautiful fence made of metal lining
Installation features
- Before making a clapboard fence, you need to calculate the required amount of building material . This depends on the length and height of the structure, as well as the presence of a certain number of gates, wickets, etc.
- This is followed by marking the territory , which is carried out using several stakes and a stretched rope.
- The next step is installing supports . They can be metal or brick. The first option is easier to install. You just need to dig holes, secure metal pillars and concrete them. The second option is more difficult because it requires certain skills. But in the end the fence has a more attractive appearance.
- The spans of clapboard are attached to the support pillars . The method of fastening depends on the chosen material; if we are talking about wood or vinyl, then these are screws or nails; metal elements are attached using a welding machine. Lining with a special lock is also quite common. Such structures are installed quite quickly, and the structure itself is dense and solid.
- Finished fences can be treated with various substances , which will give the material additional qualities, or decorated with drawings or other elements.
For installation work you will also need the following tools:
- measuring tool;
- shovel or drill;
- nails, screws or welding machine;
- cutting tool for removing unnecessary parts of material;
- various substances for surface treatment - impregnation, primers, paints, etc., depending on the selected material.
Photo.Modern gate and fence
Conclusion
Clapboard fencing is a universal option that is used in suburban construction. The design is characterized by strength, durability, a wide selection of materials and design solutions, ease of operation and reasonable cost. Constructing a clapboard fence with your own hands is quite simple. Installation does not require special knowledge or skills, however, before direct installation, it is advisable to familiarize yourself with the basic stages of construction, this allows you to use material more economically and avoid the most common mistakes.
The installation method depends on the materials used - wood, metal, vinyl, etc. The materials have a different set of functions and differ in appearance, but absolutely all of them are resistant to external irritants, safe for health and have a long service life, which is explained by their demand and popularity .
Advantages
- Simplicity and ease of installation, suitable for a beginner.
- The material is environmentally friendly and does not cause harm to the health of the owner and family members.
- Examples of possible installation options are so varied that a horizontal fence will be a wonderful decoration and addition to a private building.
- With the right approach, installation will take no more than a day.
- The fence protects the owner from prying eyes, and there are no barriers to the penetration of clean air.
- Installation is possible from different types of wood, the main thing is that the quality is appropriate.
Does this fence suit your site design?
YesNot sure
Wood burning technology: historical background
Burnt wood has long been popular in some countries, while in others it is just beginning to come into fashion. Japan is considered the birthplace of the technique, where they used the so-called simmering of cedar: they burned the wood over fires, then removed the soot, washed it and applied tung oil. This made it possible to give the material shine, a noble silver-black hue and increase its service life to 80 years. The history of the technology dates back to the beginning of the 15th century, when, when burning cedar plantations for fire-fighting purposes, the unique properties of the resulting wood were accidentally noted.
On the island of Naosami in Japan, charred wood is still widely used for the construction of various objects, and is also widely used for interior decoration. The technique has long been known in Europe and America, where it was practiced along with tarring - impregnation of lumber with hot resin. If previously wood blanks were burned with an open flame using torches, now special vacuum furnaces are used for this purpose.
Application of burnt lumber
Finished burnt lumber and products made from it are highly valued by builders and designers. Doors, windows, gazebos and terraces, benches and tables, garden furniture and technical buildings are made from such wood. After firing, the wood is perfect for building fences and other enclosures, decorating floors and balconies, and exterior decoration of houses.
Using burnt wood in interiors
Flame-treated wood is perfect for many interior styles, especially country. After special varnishing or painting, it can be used in retro, vintage, Provence and other styles, which involve the use of artificially aged furniture and decorative items. Most often in the interiors of apartments and residential buildings you can see the following products made from burnt wood:
- caskets,
- panel,
- baguettes,
- chairs and tables,
- chests of drawers,
- lockers.
In addition, the complete decoration of walls with burnt wood or the design of beams and ceilings looks beautiful in the design of the premises. The unique type of material will provide a luxurious look to the entire house.
Structural changes in wood under the influence of firing
As the subcortical layers grow, new pores form in the wood. This causes the death of fibrous cells and leads to an increase in the porosity of the structure. The result is an invariable property of any wood - hygroscopicity, or the ability to absorb and release water when the environmental humidity changes.
Wood has an uneven texture due to the presence of cellulose polymers, resins, sugars and other organic components. The material is also highly flammable and prone to the proliferation of fungi and other microorganisms that constantly live inside and begin to actively multiply at the slightest dampness.
Firing technology using autoclave heating (thermolysis) or creosote boiling can reduce all of the listed disadvantages of wood, while leaving it environmentally friendly.
During the work, the material is heated to +300...+400 degrees, which makes it possible to destroy unstable hemicellulose formations. Since the latter cause the appearance of flammable pyrolysis gases, their removal immediately reduces the flammability of wood.
Burning wood at home has a less pronounced effect and removes fewer unstable compounds. However, this is enough to improve the performance properties of the material. Firing also leads to partial clogging of the pores with resin and soot, narrowing of the channels in the outer layer of wood, so bacteria, sunlight, and moisture will practically not penetrate inside. After firing, loose wood also acquires fire-fighting properties, becomes immune to rotting, and is less damaged by precipitation and wind.