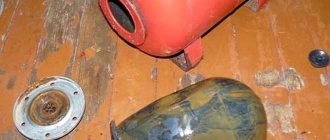
Over the weekend I redid the heating and moved the expansion tank into the attic. The old one was made from a plastic canister into which a special brass adapter was screwed so that a pipe could be connected, I don’t know what it’s called correctly, in order to screw the brass adapter into the canister I had to cut a hole like this (see photo below), at first the heating was imperfect and somewhat since my system boiled, so the canister from under the primer began to leak a little, this is clearly noticeable, but nevertheless, for two winters the canister faithfully served as an expansion tank.
This canister was hanging in an unfinished room and confused me, I had long wanted to take it out into the attic, and suddenly I came up with a way to make a hole in the canister and attach a brass fitting without cutting a huge hole for a hand to insert it from the inside. We take a canister from under the primer, I took 10 liters, this is enough for my heating with a reserve:
We make a hole in the right place, I made it just above the bottom, so that if suddenly some debris gets in, it won’t get into the heating system and will simply settle to the bottom. The hole is easily made using a utility knife; I periodically check whether the fitting fits in and cut off the excess.
Now there are two holes in the canister, one standard and the second made by me, we insert a piece of wire into both, and the fitting slides along it directly to the hole made
I push the fitting into the hole, put on the rubber gasket
I put on the nut and tighten it, the expansion tank is ready
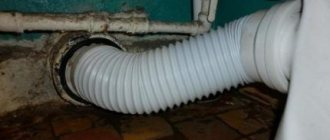
My heating tank is connected by a piece of rubber hose with clamps, but you can solder an American pipe to a plastic pipe and connect it more thoroughly, but as my two years of experience have shown, it’s quite reliable.
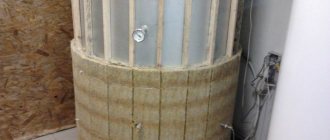
After moving the tank into the attic it looked like this:
Heating equipment
The expansion tank compensates for the increase in the volume of heated coolant, reducing the pressure in the wiring. Therefore, such a unit must be present in both open and closed heating systems. Moreover, you can even make a tank for a closed system with your own hands, using homemade or ready-made containers.
Purpose of the expansion tank for the heating system
The coolant (this is water) circulates throughout the system continuously and this movement occurs because there is pressure inside. It is created under gravity or forcibly if an electric pump is connected. In any case, the heating system cannot be considered complete if there is no expansion tank.
It can be of 2 types:
- Open.
- Closed or sealed.
An expansion tank is simply necessary in a water heating system, because when heated, the liquid tends to increase in volume. There is more water and the pressure in the system increases. Sometimes the pressure can be so strong that the system cannot withstand the load. But nothing can be done with water, because it cannot be compressed. If you install a heating system without an expansion tank, the water can rupture the pipes. To prevent this from happening and to ensure that the pressure in the system remains stable, it is necessary to install a container so that this reservoir compensates for pressure drops when heating the water. This is the expansion tank. It turns out that without this reservoir the heating system cannot operate fully.
An expansion tank can be purchased at a specialized store or made independently.
About additional capacities
Manufacturers equip wall-mounted heat generators with built-in tanks that absorb excess heated coolant. The dimensions of the tank do not always correspond to the house heating wiring; sometimes the capacity is not enough. To ensure that the coolant pressure during heating is within normal limits, the displacement is calculated and an additional expansion tank is installed for the wall-mounted boiler.
For example, you converted an open gravity system into a closed one without replacing the mains. The new heating unit was selected according to the heat load. The built-in boiler tank is not enough to expand such an amount of water.
Another example: heated floor heating of all rooms of a two- or three-story house plus a radiator network. Here, the volume of coolant will also be impressive; a small tank will not be able to cope with its increase, and the pressure inside the system will increase. A second expansion tank for the boiler is needed.
Note. The second tank to help the boiler is also a closed membrane container, located in the furnace room.
When the hot water supply at home is provided by an indirect heating boiler, a similar problem arises - where to put the excess sanitary water from the storage tank? A simple solution is to install a relief valve, as is done on electric water heaters. But an indirect heating boiler with a volume of 200...300 liters will lose too much hot water through the valve. The right solution is to select and install an expansion tank for the boiler.
Reference. Buffer tanks (heat accumulators) from some manufacturers also provide the ability to connect a compensating tank. Moreover, experts recommend installing it even on large-capacity electric boilers, as shown in the video:
Main functions of the expansion tank
The first and main thing that the expansion tank must cope with is:
- Stabilize instrument readings (pressure gauge) by compensating for the expansion of liquid in the system.
- Remove air from the system.
- Accumulate hot liquid.
Before you start making an expansion tank, you need to find out how it copes with increased loads. When the liquid in the system heats up, it increases more than we would like. The excess of this liquid must flow into a separate tank, then the operation of the heating system will be stable. It is into this reservoir that the excess heated liquid enters. When the water cools down, it flows back into the heating system. If the tank is sealed, then the membrane handles this part of the work, and in an open system, by gravity the water cools and returns back to the circuit.
Thanks to the expansion tank, the water in the system always remains in the same amount, as well as the pressure. This is the main task that the expansion tank copes with. There are also auxiliary functions that this tank can also handle - removing air pockets. Therefore, it is best to install the tanks at a high point in the system with a slight slope so that the water helps push the air upward.
Operating principle
There must be coolant circulation in the expansion tank so that the water does not stagnate. For this, a special circuit is assembled between the tank and the heating system. Its design includes an expansion and circulation pipeline.
The entrance to the circulation pipe is located 50 mm lower in the tank. If the system uses a forced method of coolant movement, then the corresponding pipeline is inserted in front of the pump in the return line.
This allows air to escape freely from the water. To prevent the container from overflowing, a float is sometimes installed in it, as in toilet flush tanks, or a light alarm relay, which ensures safer operation of the heating system.
How to make an expansion tank for heating with your own hands
It is very difficult to make a sealed tank at home. As experts say, it is better to pay and buy a quality item than to make it yourself.
But if you have a great desire, then you can make an expansion tank for the heating system with your own hands:
- First you need to make a body or frame. It must be made of 2 metal parts;
- a flange must be attached to each part to screw the membranes and connect both halves;
- there will be 2 chambers inside - air will enter into one, liquid will accumulate in the other. Both halves should not be interconnected, otherwise nothing will work;
- you need to insert a pipe into one of the parts to allow excess liquid to flow in, and insert a nipple into the second part to regulate the amount of free air in the system (to bleed air);
- the body should be metal, but the membrane should be rubber. It must be installed between the two halves of the chamber, and the flange must be bolted together. We remind you once again that absolute tightness must be observed;
- All that remains is to install the tank in place, turn it on to the heating system and check the operation;
- and another very important thing is that the pressure in the tank must be adjusted individually, according to the parameters of the boiler.
Making an expansion tank with your own hands: photo
You should begin work by creating a drawing or sketch of the future product. At the same time, the materials and tools available to the home craftsman for making the expansion tank are evaluated.
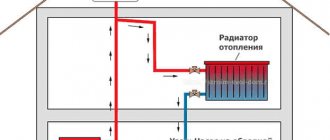
Photo 1. This is what the diagram of an open expansion tank with a float water level control system looks like.
Tank volume for the heating system of a separate house or apartment
Only during operation will it be noticeable how the coolant quickly evaporates. It will require frequent filling. Many people think that a small volume is needed. There are recommendations that it is enough for an expansion tank to have a capacity of 5-7 liters. Of course, such a volume is easier to find or produce.
When the boiler operating mode changes (even in winter there are thaws when the coolant is heated to a temperature of only 40-45 ° C ). From the expansion tank, water can completely escape into the system.
Reference! In practice, it has been proven that the minimum requirement is to have this capacity of at least 10% of the total volume of the entire system.
Calculating the volume of the expansion tank is easy. The length of the pipelines is determined, as well as the number of sections in all batteries. For example, for a house with an area of about 100 sq.m. The volume of the heating system is 120-140 liters. Then the expansion tank should be at least 12-14 liters. You can use a little more to add water less often.
Direct production
When a home master starts work, he has the following options:
- a ready-made container is used, for example, a large-volume saucepan, a milk flask or a can of 12-15 liters or more;
Photo 2. An expansion tank can be made from various containers, including a similar aluminum flask.
- Sheet metal and welding machine are available
How to make it correctly from a plastic canister
It’s easier with ready-made containers. You need to have an electric drill with a set of drills. The process boils down to drilling a hole into which a pipe with a diameter of 21-27 mm can be inserted.
- to find a drill of such a large diameter at home. Therefore, a circle is marked, and then holes are drilled along the contour.
- Using a file, the jumpers and the hole is given an acceptable appearance.
- Use wide washers, rubber gaskets and nuts with the required pipe threads.
- The future structure is assembled and installed higher , preferably in the attic.
- To prevent intense evaporation, cover with lids .
- To avoid freezing in winter, they are additionally insulated . They use disused warm clothes or various insulation materials, for example, Ursa.
This method of manufacturing an expansion tank is the least expensive.
Important! If you have a milk flask with a volume of 40 liters, then it is most convenient to use it to create an expansion tank for the heating system. During operation, the lid does not close tightly and the rubber gasket is removed.
Manufacturing from sheet material
There are certain requirements for the source material. The thickness of the sheets must be at least 4 mm. When using a sheet with a thinner thickness, the service life may be limited to only a few seasons.
After acquiring the material, they begin to develop a sketch of the expansion tank.
Making an open expansion tank for heating with your own hands
You can make an open type expansion tank with your own hands. Not so long ago, when not many people knew about installing individual heating, there was no talk about an expansion tank - it was attached at the last moment from what came to hand. A large diameter flower pot or any suitable container was used as a tank. Today, an expansion tank can be purchased in a store or you can make an open-type expansion tank with your own hands. This is much easier than making a closed tank.
- marker;
- ruler;
- Metal sheet;
- Bulgarian;
- basalt wool;
- welding machine;
- gloves and other protective equipment.
How to make a tank:
It is better to make the tank from stainless steel, then the tank will last for many years. If there is no such material, then use any metal.
- We make the markings: the dimensions of the tank depend on the length of the heating system circuit. If this is a standard, then you need to cut 5 squares measuring 30 by 30 or 30 by 40 cm. These are the walls for the tank and the bottom.
- The workpieces must be assembled, placed at right angles and welded with a welding machine.
- The design is ready, you need to drill a hole in the bottom of the tank to insert the pipe. Through it, water from the system should flow into the tank. The pipe must be connected to the heating system (looped).
- It is advisable to insulate the expansion tank, because often the highest point of the circuit is in an unheated room in the house (the attic). Therefore, it is necessary that the expansion tank be insulated so that the water in it does not freeze. You can use any insulation, for example, basalt wool. It is resistant even to the highest temperatures.
- You need to be prepared for the fact that in an open tank (open circuit) the water reaches the boiling stage. Therefore, when choosing insulation, take these nuances into account.
DIY expansion tank for heating. Photo
How to install the tank correctly
When installing an open tank in the attic, a number of rules must be followed:
- The container should stand directly above the boiler and be connected to it by a vertical riser of the supply line.
- The body of the vessel must be carefully insulated so as not to waste heat heating a cold attic.
- It is imperative to organize an emergency overflow so that in an emergency situation hot water does not flood the ceiling.
- To simplify level control and make-up, it is recommended to install 2 additional pipelines into the boiler room, as shown in the tank connection diagram:
Note. It is customary to direct the emergency overflow pipe to the sewer network. But some homeowners, in order to simplify the task, take it under the roof straight to the street.
Installation of a membrane-type expansion tank is carried out vertically or horizontally in any position. Small containers are usually attached to the wall with a clamp or suspended from a special bracket, large containers are simply placed on the floor. There is one point here: the performance of a membrane tank does not depend on its orientation in space, which cannot be said about its service life.
A closed-type vessel will last longer if it is mounted vertically with the air chamber upward. Sooner or later, the membrane will exhaust its resource and cracks will appear. When the tank is positioned horizontally, air from the chamber will quickly penetrate into the coolant, which will take its place. Installing a new expansion tank for heating will have to be done urgently. If the container hangs upside down on the bracket, the effect will appear faster.
In a normal vertical position, air from the upper chamber will slowly penetrate through the cracks into the lower one, just as the coolant will reluctantly go up. As long as the size and number of cracks do not increase to a critical level, the heating will work properly. The process takes a long time, and you will not notice the problem right away.
A sure sign of critical wear and cracking of the membrane in a closed expansion tank is a drop in pressure in the home heating network. Periodically monitor the pressure gauge readings on the safety group.
But no matter how you place the vessel, you should adhere to the following recommendations:
- The product must be located in the boiler room in such a way that it is convenient to service. Do not install floor-standing units close to a wall.
- When wall-mounting the expansion tank of the heating system, do not place it too high so that during maintenance you do not have to reach the shut-off valve or air valve.
- The load from the supply pipelines and shut-off valves should not fall on the tank pipe. Attach the pipes and taps separately, this will make it easier to replace the tank in the event of a breakdown.
- It is not allowed to lay the supply pipe along the floor through a passage or hang it at head height.
DIY expansion tank from a canister
Metal makes a reliable and durable structure, but not everyone knows how to work with this material, so we suggest you read the step-by-step instructions and learn how to make a tank from a canister:
- We immediately draw the reader’s attention to the fact that a plastic canister will not last long, a maximum of 2 winters. Therefore, although this option is fast, it is not durable. In any case, the time will come when you have to replace the old tank with a new one.
- You will need a canister with a volume of 10 liters; there is no need to cut a huge hole, but in the lower part, closer to the bottom to the right, we cut out a neat hole. This can be done easily with an ordinary construction knife. Check whether the fitting fits well into the finished hole; if not, then you need to cut off a little more excess plastic.
- The canister has 2 holes - the first is factory-made, the second we made at the bottom. You need to insert a wire and a fitting into both holes so that it slides along the wire directly into the lower hole.
- You need to insert the fitting and install the rubberized gasket, then the nut and tighten the thread thoroughly.
- You can connect such an expansion tank to the heating system using a piece of rubber hose (install clamps) or take a piece of plastic pipe and make the structure solid.
DIY expansion tank. Photo:
Expansion tank for heating from a plastic canister
Over the weekend I redid the heating and moved the expansion tank into the attic. The old one was made from a plastic canister into which a special brass adapter was screwed so that a pipe could be connected, I don’t know what it’s called correctly, in order to screw the brass adapter into the canister I had to cut a hole like this (see photo below), at first the heating was imperfect and somewhat since my system boiled, so the canister from under the primer began to leak a little, this is clearly noticeable, but nevertheless, for two winters the canister faithfully served as an expansion tank.
This canister was hanging in an unfinished room and confused me, I had long wanted to take it out into the attic, and suddenly I came up with a way to make a hole in the canister and attach a brass fitting without cutting a huge hole for a hand to insert it from the inside. We take a canister from under the primer, I took 10 liters, this is enough for my heating with a reserve:
We make a hole in the right place, I made it just above the bottom, so that if suddenly some debris gets in, it won’t get into the heating system and will simply settle to the bottom. The hole is easily made using a utility knife; I periodically check whether the fitting fits in and cut off the excess.
Now there are two holes in the canister, one standard and the second made by me, we insert a piece of wire into both, and the fitting slides along it directly to the hole made
I push the fitting into the hole, put on the rubber gasket
I put on the nut and tighten it, the expansion tank is ready
My heating tank is connected by a piece of rubber hose with clamps, but you can solder an American pipe to a plastic pipe and connect it more thoroughly, but as my two years of experience have shown, it’s quite reliable.
It was like this:
After moving the tank into the attic it looked like this:
dom.dn.ua
Purpose and types
In a heating system, the temperature of the coolant constantly changes, which leads to changes in its volume. It is known that liquids expand when heated and contract when cooled. The expansion tank for heating is precisely designed to absorb excess liquid during heating (expansion) and return it to the system when cooling. Thus, it maintains stable pressure in the heating system.
Heating expansion tank painted red
Open type
There are two types of expansion tanks: open and closed. Open type containers are usually used in gravity systems (with natural circulation). It is called this because it is a non-sealed container. This could be a barrel, a pan, or a specially welded tank. In order for the coolant to evaporate less, a lid is installed, but the container itself is not airtight. The principle of operation of an open expansion tank is simple: it is a container into which excess coolant is forced out when the temperature rises and is supplied back when it cools.
Open type expansion tank - any container, for example, a plastic canister
When calculating open-type tanks, take a significant reserve in volume: you can add coolant and not check its level for some time. The container is not airtight, so there is constant evaporation of liquid and a supply will not hurt. If there is a lack of coolant, air will enter the system, which can stop it. The consequences can be sad - if the boiler’s automatic system works (if it has one), there is a possibility of defrosting. If there is no automation, the boiler may rupture due to overheating. In general, this is the case when the stock is really justified.
If the heating system is filled with water, you can make an automatic replenishment based on a float from the toilet cistern. The principle of operation is exactly the same: when the level drops below a certain point, the water supply opens. When the required level is reached, the supply is shut off.
Expansion tank for open type heating with float
The advantage of this solution is that there is no need to control the amount of coolant, the possibility of airing is minimal. The downside is that you have to pull the water pipe. Since open systems usually operate on natural circulation, the expansion tank for heating is placed at the highest point of the system. Very often this is an attic, so the route turns out to be long.
And these are not all possible emergency situations. Floats sometimes do not shut off the water supply. If this happens to the toilet, the water simply runs into the drain. In the case of heating, water will flow into the attic, flooding the house... To avoid such a situation, it is necessary to control the overflow. In the simplest case, it is a pipe welded/attached at the required level with a hose connected to it. The hose can be led into the sewer, but then you also need to come up with an overflow alarm (at the same time, the level will drop below critical). You can simply lead the hose a meter away from the house or run it into the drainage system. In this case, “traces” of overflow will be visible and it will be possible to respond in a timely manner without an alarm. So an open expansion tank for heating requires some retrofitting.
Container design
The shape of the tank can be round or rectangular, it doesn’t really matter. It's just that a rectangular tank is a little easier to make. At the same time, with large volumes of liquid, a square tank will require reinforcement of the walls, which makes the entire structure heavier. But it needs to be lifted into the attic. A round vessel can be made from a pipe, but it is more difficult to attach a lid to it, and its capacity will be less. The choice is yours.
Note. Often, homeowners, in order to avoid fiddling around for a long time, make an open-type expansion tank from all sorts of plastic containers - buckets, cut canisters, and so on. But we need a good-quality metal tank, so we won’t talk about canisters.
In general, the tank is a metal container with an open top, closed with a lid. There are pipes cut into the body of the product for connecting the heating system and the overflow hose. There is also a more advanced design, where there are 4 pipes, the functions of each of them are indicated in the diagram:
There is a supply and return branch, connected to the return line, so that the water does not stagnate, as well as a minimum level control pipe. The latter function is very convenient to use; there is no need to climb into the attic to make sure there is water. True, with this option the installation becomes more complicated; you will have to lay additional pipes through the ceilings yourself.
Many homeowners make do with two pipes - for coolant and overflow. When adding water to the system, open the tap and monitor the hose leading outside. The make-up tap is closed when water runs out of the hose, but then the tank is full to the brim and when heated, coolant flows out of it through the overflow for a long time.
There is another design for a homemade container, although it can hardly be called open. The interior of the tank does not communicate with the atmosphere and is only half filled with water. The remaining part is occupied by air, which plays the role of a damper during the expansion of the coolant. This heating system tank has a pipe for replenishing water, draining and connecting to the piping network. The design is shown in the figure:
It’s not worth making and using such a container and here’s why. When the system operates, excess pressure will appear inside it, since there is no outlet for air, only an emergency valve. This means that under pressure, active diffusion of oxygen into the coolant will begin, which is something that manufacturers of polymer pipes are constantly struggling with. Oxygen-saturated water primarily destroys the steel parts of the boiler.
Determining the volume of the expansion tank and its selection
For normal heating operation, the expansion tank must have sufficient volume. There are two ways to determine it: you can calculate it using a formula, or you can use empirical data.
The volume of the expansion tank for heating is selected for each system
Empirical path
Let's start with the empirical method. Based on operating experience, it was concluded that if the volume of the expansion tank for heating is about 10% of the total volume of the heating system, this is sufficient. The question is how to determine the volume of the system. There are at least two ways:
- Count when filling (if it is filled with water and there is a meter, or when filling with coolant from canisters, you will know exactly how much liquid was pumped in).
- Calculate by volume of system elements. You will need to find information about how many liters fit in one meter of pipe, in one section of the radiator. With this data you can already find out the volume of the heating system.
Coolant volume in pipes of different diameters
Knowing how many liters of coolant are in your heating, it is easy to calculate the required volume of the membrane tank - it should be at least 10% of this figure. In the case of an open type tank, the actual volume can be at least doubled - there is less chance that the tank will be empty. At a minimum, you should add half - you will still underfill it by at least 1/3.
A membrane expansion tank for heating is usually taken without overestimating the calculated figure. The fact is that the larger the capacity, the more expensive the expander costs. And the price increase is significant. However, you should not take a smaller one - the pressure will “jump”, which will lead to early wear of components or even shutdown of the system. It is most likely that the heating will fail in cold weather, because in cold weather the coolant is hotter, which means its volume is larger. And it is at these moments that the volume of the expansion tank may not be enough. If you notice such symptoms and the calculation confirms that your membrane tank is of insufficient size, it is not necessary to change it to a larger one. You can put a second one. It is important that their total capacity is not less than the calculated value.
If there is antifreeze in the system
Heating antifreeze has greater thermal expansion than water. Moreover, different brands have different characteristics. Therefore, for this type of coolant, it is advisable to pre-calculate the volume of the expansion tank.
There are two ways: determine how for water, make an adjustment for greater thermal expansion. It depends on the percentage of ethylene glycol (antifreeze). For every 10% glycol, add 10% volume. That is:
- 10% ethylene glycol - must add 10% of the found volume of the water tank;
- 20% ethylene glycol - add 20%, etc.
This calculation is usually justified, but more accurate figures can be found using the formula (shown in the figure).
Formula for calculating the volume of an expansion tank for a heating system
Once you have decided on the volume, it's time to buy an expansion tank. But in the store they are in different colors. At a minimum, there are blue (cyan) and red. So, the membrane expansion tank for heating is always red . Blue ones are for plumbing, and for cold water. They are much cheaper, but the membrane there is made of rubber not suitable for high temperatures. So it will not last long in the heating system.
Manufacturing and installation
To make an expansion tank for a heating system yourself, you need to have sheet metal, pieces of pipes of different diameters and a couple of corners in case you need to strengthen the wall or secure the container in place. Tools and equipment you will need:
- welding machine;
- angle grinder;
- drill;
- a set of metalwork tools;
- tape measure, square.
Note. You can often hear advice that it is better to weld the container from stainless steel. This is good advice; it is relevant when the system is installed from polymer or stainless steel pipes. If everything is made of metal, then there is nothing to worry about; you can cook it from simple “black” steel.
Any home craftsman with welding skills knows how to weld a box. Then the pipes are cut into the open expansion tank and sealed hermetically. The lid is made loose so that air can pass inside freely. When everything is ready, all that remains is to check the welding seams for permeability and install the container in place, as shown in the diagram:
To avoid unnecessary heating of the attic space, after installation the tank body must be well insulated; mats or slabs made of mineral wool are suitable for this purpose. Or you can cover the body with sheets of foam plastic. Some other craftsmen automate tank refilling using a “toilet” float kit, but this is not a very reliable option. Remember how often the toilet gurgles in your home and you will understand what we are talking about.
Pressure in the membrane tank and checking it
For a closed heating system to work properly, the pressure in the expansion tank must be 0.2-0.5 Bar lower than in the system. The larger the system, the greater the pressure difference. But, as already said, at the factory they are pumped up to 1.5 Bar, so before installing the expander, it is better to check it and adjust it to your heating system.
The spool is often hidden under a plastic cover
We check the pressure with a pressure gauge by connecting it to the outlet with the spool. If the pressure is higher than you need, bleed off a little. This is not difficult to do - press the petal in the nipple with something thin. You will hear the hiss of escaping air. When the pressure reaches the desired level, release the petal.
If the membrane tank is inflated too weakly (this also happens), it can be inflated with a conventional pump. But it’s more convenient to use a car one, with a pressure gauge - you can immediately control the pressure. After verification, you can install it on the system.
Connection methods
It is correct to connect the tank hydraulically at a point located on the return line in front of the boiler and circulation pump (if viewed in the direction of water flow). The tank can also be installed on the supply side, but under one condition: the pump must be located on the supply line and still stand in front of the compensating tank.
The best place to connect a membrane tank is the heating return in the boiler room, but always before the pump, and not after it
Point two: when a solid fuel boiler overheats, the tank connected to the supply will begin to fill with steam. Air and steam are compressible media, in which case the rubber “bulb” will no longer compensate for the expansion of water.
The correct connection of the expansion tank to the heating system is always carried out through a shut-off ball valve with an American connection. Then the tank can be taken out of service at any time and quickly replaced without waiting for the coolant to cool down. If you install a tee and a second tap on the supply line, as shown in the connection diagram, then the container can be emptied first:
Recommendation. When connecting an indirect heating boiler with a boiler and DHW, connect the expansion tank to the cold water supply line at the inlet to the storage tank. Here a special tank is used that can withstand the pressure of the water supply network. A heating tank or hydraulic accumulator is not suitable. How to distinguish them, watch the video:
Calculation of container volume
If you know the total volume of coolant in the heating system, then calculating the required tank dimensions will not be difficult. In addition, it should be taken into account that when 100 liters of water are heated to 90° C, its quantity will increase by 3.5 liters.
That is, this figure practically coincides with the proposed 5% of the total volume of liquid, but in reality this reserve may not be enough. During the initial period, the container must be filled to at least ¼ volume to prevent airing of the system. Then the amount of liquid compensated for expansion is taken into account.
At the border of this total volume, an overflow pipe is cut in, above which there should be free space to the edge of the container or lid. The total result will be more than 5% , so it is recommended to take the volume of the tank equal to 10% of the total amount of coolant.
Factory models
Having calculated the required volume of the expansion tank, you can choose a ready-made suitable model. The price depends on the size of the structure and the material used. Popular models include:
- ORB-30 is a rectangular expansion tank from the STEN company. The tank volume is 30 liters, which allows it to be installed in a system using up to 600 liters of coolant. The tank is equipped with several threaded pipes for connecting pipelines.
- ORB-10 is a small vertical container of 10 liters from manufacturers in Taganrog. The design is made of food grade stainless steel and has a tight lid that allows the tank to withstand pressure up to 5 bar.
- Teplodar-10 is a vertical tank produced by the popular company Teplodar. The design has two fittings, which allows the use of different connection schemes. The material used for the product is stainless steel.
The cost of these structures ranges from 1500-2500 rubles.