Technology for drilling an artesian well for water
When ordering the drilling of an artesian well, it is advisable to monitor the entire drilling process from beginning to end in order to understand what the drillers are doing and whether they are cheating, making their work easier. This article is intended to make the land owner understand the technology of drilling artesian wells for water (limestone) in order to correctly accept the work from the drillers and not waste money.
The technology for drilling an artesian well for water includes 3 stages:
- Rock destruction.
- Removing rock from a well.
- Arrangement of well walls with casing pipes.
For drilling wells, mobile drilling rigs based on MAZ, ZIL and KamAZ trucks are used (imported drilling rigs are also based on tracked vehicles for difficult terrain). The drilling method is called rotary because a rotor on the drilling rig is used to rotate the bits.
A roller bit of different diameters is used as a drilling tool. Transportation of drilled rocks to the surface is carried out using a special solution entering the well through the drill rod.
The upper rocks are drilled with a large bit (it is not known whether one, two or even three pipes will have to be used to casing an artesian well, and to place them one inside the other, a larger drilling diameter is needed, so they first drill with a large bit).
In the process of removing soil rocks, the driller must record changes in the rock in the drilling log.
When passing through unstable rocks, a clay solution is used to flush the well. If drilling begins immediately from clay layers, then the solution itself will turn out to be clayey. To make clay mortar artificially, bentonite clay is used (sometimes with a small addition of cement).
When the drill reaches solid limestone, drilling is stopped for a while and the well is equipped with a casing pipe of the largest diameter to protect against the collapse of the well walls and the penetration of surface water from the overlying soil layers.
Depending on the types of soil, up to three casing pipes can be used to equip an artesian well (for example, if there are clay veins in the hard limestone rock). The design of three casing pipes is called telescopic.
After the well is cased to the limestone in the casing, the limestone is drilled with a smaller diameter bit (in this process, the limestone is washed with clean water to prevent dirty solution from entering the clean aquifer when drilling is completed). Then a production perforated pipe is lowered into the drilled hole. The pipes are washed until clean water appears.
A very important point when drilling an artesian well is the isolation of the lower clean layers of water from the upper ones. Compactonite material is used for high-quality insulation. These are granules of dry clay, which, when encountering a moist environment, swell several times, preventing moisture from penetrating into the well. This insulation method is reasonably more expensive than others. Before ordering drilling, be sure to check what kind of insulation the drilling company uses.
Upon completion of all work on drilling an artesian well, the drillers take all the necessary measurements and check the well. Then the owner is issued a passport, which indicates the depth of the well, flow rate, water level height and other characteristics.
Pipes for an artesian well
For artesian wells, steel pipes are usually used as casing, but now metal-plastic pipes are also becoming popular. Welding was previously used to connect pipes, but it proved to be a risky joining method. Therefore, pipes with threaded connections are now produced. Pipes made of plastic and its types, as well as steel, are used for operational purposes.
Sequence of work performed
There are two types of well pumping. Internal pumping involves cleaning the pores of a reservoir using a thorough rinsing method. During external rocking, deposits are removed from the wall surfaces of the tank.
Always start flushing the well with the external method, and then with the internal method.
To ensure that all technological processes are followed during pumping, you should stock up on the following tools and equipment:
- two pumps (vibration and centrifugal);
- timer-regulator;
- construction drill;
- liquid drain pipe.
Recommendation! The above list indicates that pumping up the well yourself can become very problematic. The best solution would be to contact specialists who have the necessary equipment as well as the appropriate skills.
The first stage is usually the use of vibration equipment, which pumps out water with solid moving particles.
If pumping out water for two days does not lead to complete removal of sand, then it is not recommended to use the unit further.
An example of a well being cleaned by professionals Source oboiman.ru
See also: Catalog of companies that specialize in engineering systems and related work
The next step is to install a centrifugal unit.
When pumping, you should not take all the water and drain the filter devices. This will lead to clogged pores.
Carrying out the following activities will answer the question of how to properly pump a well:
- Placing the pump in a reservoir and then locking the liquid. The device is turned off when air bubbles appear.
- As water accumulates, measurements of the height of its level are recorded.
- Before programming the timer, it is important to know the source debit. This is the ratio of the total volume of liquid to the time it enters the well. If the pump efficiency is good, the operating time of the unit is determined so as not to drain the reservoir.
- If there is no timer, holes are drilled in the outlet pipes so that the water partially returns to the reservoir. The power of the unit is compensated.
After drilling, you need to flush the well so that a clean stream comes out. The cleaning procedure begins immediately after creating, filling the well and completing the installation of the casing, without delay. Otherwise, declaying will require addition to cleaning work.
Professional well cleaning using special equipment Source remont-skvajin.ru
An essential factor is to properly secure the pump for pumping up the well after drilling. It is installed so that it does not reach the bottom of the well by about 80 cm.
High-quality operation of the unit requires periodic lifting and washing. It is better if the pumping equipment operates in periodic interruption mode.
The main mistakes when pumping up wells are:
- The pump is placed too low, which causes it to become clogged with sludge particles. It is not uncommon for equipment to be pulled into quicksand.
- The placement of the pump is too high, which leads to treatment of the top layer of the well and sedimentation to the bottom. Water purification in this case will be of poor quality and will require repetition.
- The pouring of water in the immediate vicinity of a reservoir, which leads to the return of liquid through the soil into the well and erosion of the soil.
Advice! Pumps usually come with cords. Practice shows that they are not durable. Therefore, their use is categorically not recommended by knowledgeable people. It is better to separately purchase a high-quality, reliable cable for lowering the unit.
The preparation process for cleaning a well using a vibration pump Source tvplaneta.ru
Pumping water with all kinds of impurities (clay, silt) from a deep artesian well can be carried out for several months. When this happens, you should analyze whether the errors listed above have been made, namely: the pump for pumping the well after drilling is not lowered to a sufficient depth, or vice versa - it is buried in silty or sandy masses, the pumped water is drained very close to the well mouth, polluting it again.
Before pumping a well after drilling, you should check the exact depth of the shaft and avoid making the above mistakes.
Well insulation
To prevent the water in the well from freezing, the concrete walls of the tank are insulated with polystyrene foam. Foam plastic is also used to insulate the well. After insulating the concrete walls, you will be able to receive water from the well all year round.
Proper arrangement of a well - video
Immediately after the well drilling installation has completed its work, several more actions are performed, which in no case should be postponed for several days.
First, casing pipes for the well with a filter must be installed immediately. And the second work that cannot tolerate any delays is filling the well with gravel.
All this is done to strengthen the walls and fix the casing pipes, as well as for the normal functioning of the well. One filter located on the last section of pipes does not guarantee the supply of clean water. Filling the space between the walls of the well and the outer surface of the filter with a sand-gravel mixture enhances its effect.
An additional filter layer traps large soil particles that flow along with water to the holes in the filter.
It is necessary to take into account that the casing pipes for the well are located in a dense water-resistant layer, and the filter itself is directly in the sandy aquifer. Therefore, backfilling of the lower part of the well should be done with a sand-gravel mixture of a coarse fraction, no less than 4 times higher than the fraction of the natural layer.
It is possible to use crushed stone of 2-4 mm fraction, but this material is much more expensive than sand mixture. It is necessary to ensure that there are no particularly large particles in the sprinkling, which could cause voids to form in the space being filled.
Sprinkling is carried out to the entire height of the filter and about a meter higher to increase the filter layer. After this, a clay castle is installed, also no less than a meter thick.
Read also Natural tile roof photos
After this, the wellhead can be filled with ASG of a finer fraction. At this point, the urgent work ends and the piping (or arrangement) of the well can be done in a few days.
Hello! We drilled a well, and the question arose of what to fill it with, since there were gaps of 4-5 cm on each side between the casing pipe and the soil (the diameter of the trunk is 200 mm, and the pipe is 125 mm).
LiveInternetLiveInternet
—Categories
- Vedrussky Million (26)
- Meaningful Video (5)
- Video Thoughts (4)
- Log carving (1)
- Photo of the day (18)
- Thailand (6)
- Green building (17)
- Natural Nutrition (9)
- Strategy (15)
- Fertility of the Earth (20)
- Beekeepers (4)
- Karelian Zalesie (13)
- Arrangement (11)
- Autonomous farming (9)
- Promotions, competitions and prizes! (5)
- Mobile saunas (11)
- Negative (6)
— Regular readers
-Statistics
Insulation materials
To insulate a DIY water supply system in a dacha, several options for special materials are used. The first variety, called “pipe shell,” is a pipe-shaped shell.
The second type is a variety of insulating materials, manufactured in rolls of various widths and lengths.
“Pipe shells” are made from polystyrene foam, extruded polystyrene foam and polyurethane foam. It is a product in the form of a semi-rigid cylinder, which consists of two halves. It is put on the pipe and fastened with overlaps, special glue, clamps and foil tape.
Typically the length of such a “shell” is one meter, but can reach two meters. Such products can be produced with additional coatings made of foil, fiberglass or galvanization. This type of insulating material is quickly and easily installed, as well as removed and replaced during repairs. The “shell” covered with fiberglass can be used for all types of water pipes or pipelines that are located in the ground, outdoors and indoors.
It will be useful to read:
Methods for drilling a well for water Water has always been and is one of the necessary elements of life. And even the very first settlements tried to be created on...
Foam plastic is called foamed plastic in the form of small white balls (known to absolutely everyone), which, when making a “shell,” are pressed into the shape of a pipe and then treated with steam. Interestingly, this material is almost 97-98 percent air. The advantages of polystyrene foam are lightness, practicality and low cost. Disadvantages include fragility and fragility.
Styrofoam
Extruded polystyrene foam is a type of foam plastic, the production of which uses pressure and high temperature. The result is a material that is stronger than polystyrene foam. I like this material for its resistance to environmental influences (does not rot). It does not absorb moisture, has a long service life, is lightweight and easy to install.
Polyurethane foam is a foamy plastic material consisting of numerous cells filled with gas
It attracts attention with the best noise insulation characteristics, good mechanical strength, ease of use and low weight.
Polyurethane foam
Among the insulating materials that are produced in the form of rolls, it is worth mentioning stone wool, foamed polyethylene and glass wool.
Glass wool is an insulation material consisting of glass fibers
It attracts attention with its noise and heat insulation characteristics, durability and price. The disadvantages include the fact that when working with glass wool it is necessary to follow safety precautions, since this material is prickly
During isolation work, the respiratory organs and skin are protected with protective equipment (special work suits, gloves and masks).
Glass wool
Stone or basalt wool
Stone or basalt wool fibers are made from molten rocks of volcanic origin, slag and silicate materials
This insulating material attracts attention due to its high resistance to various loads and impacts, its non-flammability, and the fact that products of various shapes and densities are made from it.
Foamed polyethylene is obtained by processing ordinary high-density polyethylene using propane and butane. It is an elastic porous material consisting of a large number of cells. Foamed polyethylene stands out among other insulating materials for its highest resistance to water, and it is also unaffected by fungi and bacteria. It tolerates the effects of petroleum products, alkalis and acids well.
Horizons and types of wells: affordable and not so
Before you start preparing for such large-scale work, you need to know where to drill, but without geological exploration you won’t be able to find the exact answer.
Horizons have boundaries
The water is located at different horizons; these sources do not communicate with each other. This is provided by layers of impermeable rocks - clay, limestone, dense loam.
- The shallowest source is perched water, which is provided by precipitation and ponds. It can start at a depth of 0.4 m and end 20 m from the surface. This is the dirtiest type of water; it always contains a lot of harmful impurities.
- By drilling a well up to 30 m deep, you can “stumble upon” cleaner groundwater, also fed by precipitation. The upper limit of this horizon can be located at a distance of 5 to 8 m from the surface. It is also recommended to filter this liquid.
- The underground water source, located in the sand layer, is already filtered with high quality, therefore it is optimal for water supply. It is this horizon that those who want to drill their own well need to reach.
- Depths of 80 to 100 m are an unattainable ideal with crystal clear water. Artisanal drilling methods do not allow one to reach so deep.
Since the occurrence of horizons is influenced by relief and other factors, the boundaries of perennial water and groundwater are conditional.
Full range of wells
Manual drilling of water wells depends on the type of future well. The types of structures cannot be called numerous, because there are only three of them:
- Abyssinian;
- on the sand;
- artesian
Abyssinian well
This option is optimal when the water in the area is 10-15 m away from the surface. It does not require much free space. Another advantage is the relative simplicity of the work, which allows even a beginner just learning the science of drilling to cope with the task. This is a needle well, which is a column constructed from thick-walled pipes. A special filter is installed at the bottom of it by drilling holes at the end of the pipe. The Abyssinian well does not require drilling as such, since the bit is simply driven into the ground. But the most common way to make such a well is still called impact drilling.
Well on sand
If the aquifer lies at a depth of 30 to 40 m, then it is possible to build a sand well, with the help of which water is extracted from sands saturated with water. Even a 50-meter distance from the surface does not guarantee the purity of drinking water, so it must be submitted for laboratory analysis. Since in this case there will be no insurmountable obstacles on the way - hard rocks (semi-rocky, rocky), manually drilling water wells does not involve any special difficulties.
Artesian well
This aquifer can be located at a depth of 40 to 200 m, and water must be extracted from cracks in rock and semi-rock, so it is inaccessible to mere mortals. Without knowledge and serious drilling equipment, the task of constructing a well on limestone is an impossible mission. However, it can serve several areas at once, so drilling services ordered together promise significant savings.
Specifics of pumping
The result of the buildup will be the washing out of particles both from the pipe and from the outer layer. A correctly carried out procedure will lead to the presence of an absolutely clean reservoir around the source.
Essentially, pumping is the process of pumping out water, while simultaneously removing all impurities. Carrying out such a procedure is impossible without answers to a number of questions:
- How long does it take to pump a well after drilling?
- Required type of pump.
- How to properly pump a well to clean water.
The best option for pumping would be to choose a vibration pump. It should be centrifugal, submersible and inexpensive. Once the pumping process is complete, you will no longer be able to use this pump. Therefore, it is strictly not recommended to use the main pump used for water injection for swinging.
Continue pumping out the liquid until the drainage pipe produces a stream of clean water.
The continuous swing time may vary. It is necessary to take into account the throughput of pipe products, the depth of the well and the type of soil.
Option for cleaning a well from sand using a compressor Source usamodelkina.ru
DIY thermal insulation stages
The future fate of the entire water supply system will depend on how well the thermal insulation is carried out. Therefore, it is better to entrust it to professional companies with extensive experience. However, every private homeowner has the right to know how to insulate a well and water supply system for the winter on the surface - a turnkey well for their own home for the entire cold period with their own hands.
For a clear overview of well insulation, watch this video:
In the standard case, the procedure consists of sequential thermal insulation of the following main elements:
Caisson
Stages of work:
- The required amount of polystyrene foam or other heat insulator is prepared.
- Next, the material is cut into the necessary fragments, based on the shape and size of the caisson.
- The outer part of the caisson is waterproofed with bitumen, unless it is made of plastic or iron.
- The prepared fragments are applied to the outer walls and secured with wire, stops, mesh or tape.
- The joints between the sheets are filled with polyurethane foam for sealing.
- Upon completion of fastening, the structure is covered with a layer of expanded clay.
Casing and cap
Subsequence:
- A box is made from pieces of chipboard, boards, plywood, sheets of metal or rigid insulation for the external closure of the casing and head.
- The box is installed on top of the casing and cap.
- Its internal space is filled with parts of mineral wool, glass wool or natural components (hay, straw, paper).
As an option, instead of a box, a cylinder is formed from a chain-link mesh with a diameter exceeding the head by 0.3 m.
Do-it-yourself well insulationSource kimberia.ru
Street water supply
Sequence of work:
- At the outlet of the pressure pipe of the well, at the point of connection to the home water supply, a piece of heating cable is wound or a special tee with a gland is installed.
- Next, the water pipe is placed in an EPS shell or in a sewer pipe of larger diameter, which creates an air gap.
- The structure is laid in a pre-dug trench and then filled with expanded clay, then a layer of sand and previously removed soil.
Connection to the house
Due to the fact that the wellhead is already heated by a heating cable, and the supply water supply is insulated with a shell, there is no need to do special heating of the liner. As a standard, it is thermally insulated together with the supply pipe.
Watch in this video how to install a heating wire inside a pipe
Causes of pollution
- The presence of sand with large crystals indicates the initial stage of destruction of the well trunk. At the moment, pumping is useless.
- If the design has two columns, this means that the filter can be changed. The filter is installed inside a pipe that goes outside.
- A single pipe system will not be saved by replacing the filter. After this, the well may become contaminated again. In this case, dismantling will be difficult and the success of such work is in question.
- In the case where the water intake was drilled in limestone, the presence of sand there is minimal. If impurities are present, it means that the casing was damaged when passing through the sand layer. Repairs will be very expensive. But there may be another reason. The sand could have slipped from the upper level due to a breach in the seals of the levels or joints connecting the pipes. The cost of repairs directly depends on how far the bottom of the well is and what diameter the well has.
Briefly about the main thing
Depending on the frequency of operation, there are the following ways to insulate a well on the street:
- Seasonal, when the well is not operated, but is simply drained and turned off for the winter.
- Periodic, when water is collected on weekends or once every few days. To maintain performance, heat-insulating materials and heaters are used.
- Constant, when the well is practically never idle, so the flow never stops for long. However, in cold weather, icing may begin. Therefore, professional insulation is required.
At the same time, 4 technologies are used for thermal insulation - using insulation, with a coffered structure, without it and with the installation of a heating cable. In most cases, combined methods are used. Thermal insulating materials are polystyrene foam, penoplex, polyethylene foam, mineral or glass wool, as well as penoizol, polyurethane foam and expanded clay. You can do the thermal insulation yourself, but it is better to entrust the job to a professional team.
Preparing for long periods of downtime and pumping after it
If visiting a summer cottage in the winter (or for another long period) is not expected, and the well will also not be used, then you should take care of this in advance. It is necessary to think about preparing the device for inactivity and how to pump the well after winter or long periods of inactivity.
Preparation comes down to installing a heating cable inside or using any available materials to insulate the device.
Pumping the well after winter is carried out using standard methods, which are described above, and is used only if necessary.
Recommendation! You should absolutely not leave the water supply pump inside the well for the winter.
An example of insulating a well for the winter Source tildacdn.com
Without caisson
Water supply equipment, filters and related electronics are located in the house or a separate room - this does not mean that the shaft does not need to be insulated. There are several ways to insulate a source without a caisson:
- Thermal protection of the mine shaft with wood chips or sawdust. The pipe is dug around its entire circumference to a depth of 2 - 2.5 meters. The width of the trench is 30 - 40 centimeters. Then a mesh with a large cell is wound to provide an air gap between the wall and the insulation. Next, the material (sawdust or peat) is gradually filled in. You cannot compact the insulation; it is better to let it stand for a while, and after shrinking, add more. A durable lid made of wood or metal is placed on top.
- Thermal insulation with mineral wool. They dig a trench in the same way and stretch the mesh. Then several layers of glass wool or mineral wool are wound onto the pipe. It is better to use a 5 cm thick mat. The final insulation layer is 35 cm.
- Insulation with liquid polyurethane foam is a little simpler. No need to wrap the mesh. A special device is simply lowered into the pit and polyurethane foam is sprayed layer by layer onto the surface of the pipe.
- Heating with electric cable. The principle is to use a special heating cable, which is tightly wound to the well pipe. A non-flammable film must be wrapped over the heating element and additional waterproofing is provided.
Sand wells
Sand well diagram.
They are drilled using an auger method - penetration is carried out in soft rocks: loam, sand and pebbles. Excavation diameter ≥100 mm.
There are 2 types of sand wells based on depth:
- up to 40 m - on the upper layer with a flow rate of 1 m³;
- 40-90 m - deep trunks with water consumption 2 times greater.
A casing made of metal or plastic pipes with a filter in the bottom-hole part of the well is lowered into the drilled opening. The water is lifted by a submersible pump.
Advantages and disadvantages
The main advantage is the auger drilling method, which allows you to build a well in 1-2 days without much effort. The mechanization of all operations is ensured by the design of the drilling rig on a self-propelled or mobile chassis.
Other advantages:
- water purity;
- a permit for the construction of a water intake is not required;
- service life - up to 30 years.
Disadvantages are noted in shallow wells: dependence of the flow rate on precipitation, sensitivity of the water composition to surface contamination in the excavation area. Another disadvantage has already been indicated - the tendency for the water intake to silt.
Preventive measures
To prevent the well from producing sand over time and causing trouble to its owner, it is important to take a number of preventive measures.
- Completely pump (flush) the source after drilling it. It is important to do this until the water comes out completely clean.
- Correctly calculate the fraction of filter mesh cells based on the size of sand grains. This can be done by experienced professionals.
- Monitor the strength and reliability of all connections of the casing pipe during its installation.
- Use a pump whose technical characteristics correspond to the performance of the source. A unit that is too powerful will either deplete the well or drive sand.
- Operate the hydraulic structure regularly (even in winter). Seasonal downtime leads to silting of the filter. If it is impossible to avoid seasonal operation of the well, it is advisable to come to the site once a month and pump out at least 100-150 liters of water.
It is always easier to prevent a problem than to solve it later.
What are the sources underground?
Geological sections of land plots are not the same, but patterns in aquifers exist. As underground water moves deeper from the surface into the depths, it becomes cleaner. Water intake from the upper levels is cheaper and is used by private homeowners.
Verkhovodka
The water resource located in the ground close to the surface above the impermeable layer of rocks is called perch. Waterproof soils are not available in all areas, and it is not always possible to find a suitable site for organizing shallow water intake. There is no filtration layer above such lenses; harmful substances, organic and mechanical impurities with rain and snow penetrate into the soil and mix with the underground reservoir.
Verkhovodka is characterized by the following indicators:
- Depth. On average 3-9 m depending on the region. For the middle zone - up to 25 m.
- The area of the formations is limited. Manifestations do not occur in every area.
- The reserves are replenished by precipitation. There is no water inflow from the underlying horizons. During dry periods, the water level in wells and boreholes drops.
- Use - for technical needs. If the composition does not contain harmful chemical contaminants, the filtration system improves the water to drinking water.
Verkhodka is well suited for watering the garden. When drilling shallow wells, you can save money: drilling can be done independently. An option is to construct a well with reinforcement of its walls with concrete rings. It is not recommended to draw water from upper deposits if fertilizers are used near the land plot or if there is an industrial zone.
Primer
Verkhovodka is a disappearing resource, in contrast to the primer, which is the first permanent underground reservoir. Extraction of perched water from the subsoil is carried out mainly through wells; wells are drilled to collect the primer. These types of groundwater have similar characteristics in terms of depth -
Features of the soil variety include:
- Filter layer of rocks. Its thickness is 7-20 m, it extends directly to the formation located on a waterproof platform of rocky soil.
- Use as drinking water. Unlike perched water, for which a multi-stage cleaning system is used, mechanical impurities are removed from the primer using a well filter.
Groundwater recharge is stable in forested and temperate regions. In dry areas, moisture may disappear in summer.
Sources between layers
Groundwater diagram.
The name of the second permanent source of water is the interstratal aquifer. Sand wells are drilled to this level.
Signs of lenses interspersed with rocks:
- water is pressurized because it takes on the pressure of surrounding rocks;
- There are several productive water carriers; they are distributed in depth in loose soils from the upper waterproof layer to the lower underlying cushion;
- Supplies of individual lenses are limited.
The quality of water in such deposits is better than at the upper levels. The depth of distribution is from 25 to 80 m. Springs make their way to the earth’s surface from some layers. Underground water discovered at great depths, due to the stressed state of the liquid, rises along the wellbore to its usual proximity to the surface. This allows water intake to be carried out by a centrifugal pump installed at the mouth of the mine.
The interstratal variety of groundwater is popular when constructing water intakes for country houses. Sand well flow rate is 0.8-1.2 m³/hour.
Artesian
Other features of artesian horizons are:
- High water yield - 3-10 m³/hour. This amount is enough to supply several country houses.
- Purity of water: penetrating into the depths through multi-meter layers of soil, it is completely freed from mechanical and harmful organic impurities. The host rocks gave rise to the second name for water intake workings—limestone wells. The statement applies to porous varieties of stone.
On an industrial scale, artesian moisture is extracted for commercial purposes - for the sale of drinking water. In areas located in lowlands, there is a possibility of finding a pressure reservoir at a depth of 20 m.
Concept of a well
A borehole is a mining opening in the earth's crust that has a small diameter compared to its length. The base of the well (on the surface) is the mouth, the bottom of the well is the bottom. Wells are divided into two categories:
— exploration (drilled to estimate oil reserves in a new field);
— operational (for extracting oil from the reservoir).
An oil well is a capital structure that is built according to a pre-compiled technical specification. project. The basis of the project is the well design.
Well design refers to the number of casing strings that need to be lowered into the well for successful drilling and subsequent long-term operation. The concept of well design also includes the optimal heights of rise of cement slurry in the annulus. The diameter of the well must be minimal, but at the same time sufficient to ensure the descent of casing strings to the designed depth, as well as to ensure reliable isolation of productive formations from aquifers and from the mutual influence of formations from each other. The drilling speed and cost of well construction depend on the chosen well design.
The well design is selected based on factors:
— geological;
— technical and technological;
- economic.
What kind of pump is needed for pumping wells
For work, special attention should be paid to the correct selection of pumping equipment. There is no need to use brand new models, as there is a high probability of the equipment being clogged with silt. It is more advisable to use an old unit for pumping in order to avoid unnecessary costs for expensive repairs of new equipment.
The submersible pump is suspended at a height of no more than a meter from the bottom of the well. This achieves the maximum possible cleaning of the bottom from any fine sand that has settled there. For this, it is preferable to choose centrifugal rather than vibration devices - they are more durable and less sensitive to clogging.
The main thing is that before pumping a new well, you need to carefully read all the rules.
How to remove a pipe from a well?
If the decision to pull out the pipe is nevertheless made, you can use one of several possible methods for this.
- Contact professional drillers. They use special equipment (pipelines, overshots, taps, etc.), saving site owners from headaches and a certain amount of money.
- Secure the end of the pipe, for example, with a loop or a crimp clamp, secure it to the short arm of the large lever and gradually remove the pipe.
Alternatively, you can remove the pipe from the well using a large railroad jack.
This is a homemade device
Another way to remove the pipe is to make a special tool.
To do this, you will need channel No. 10, from which two racks in the form of an inverted letter “T” are made. The height of the structure should be one meter, and the width - 0.6 m. A bearing is welded to the top of each rack, the internal diameter is 40 mm.
Now you need to make an axis on which the handles and drum are attached. The edges of the axle are inserted into the bearings and the device can be considered ready. To lift the pipe, it is fixed with a steel cable, which is wound on a drum. To secure long structures, it is recommended to use a special chock to hold the pipe when intercepting the cable. To pull out the plastic pipe without damaging it, you will need a crimp clamp.
Ensuring the tightness of the casing pipe
To keep the water clean, it is necessary to protect the casing. Tightness is achieved using a well cap - a steel cap. The device has communication holes. Additionally, there is a hook on the hatch - the pumping unit is hung on it.
The size of the cover is selected based on the size of the pipe. A rubber cuff is included. It is the main sealant. In addition, the lid has sealing gaskets for inserting the electrical cord and water pipes.
Important! The casing pipe is cut at a distance of at least 30 cm from the bottom of the caisson.
What are the dangers of sand in a well?
Water pollution is an emergency, since such water cannot be drunk, it is quite problematic to filter it well, and it is not suitable for any other needs. However, the list of undesirable consequences does not end with inconvenience.
- Really significant reduction in well productivity. Filling the casing with sand is inevitable. In this case, due to a clogged sump, water access is severely limited.
- Sand particles are an abrasive, therefore, passing through the pump, they will cause harm - they will wear out the impeller material. The inevitable consequences are the rapid failure of expensive equipment.
- Sand in the well contributes to the rapid occurrence of blockages in fine water purification systems. Filters clog in them much faster. The result is their frequent replacement, which means additional expenses.
- Pipeline clogged. Sufficiently heavy particles of sand will be regularly added to the already existing “deposits”, so sooner or later problems will arise with the throughput of the pipes. Another unpleasant moment is the increasing weight of the most critical components and sections of the pipeline.
- Inevitable contamination of faucets and siphons of plumbing equipment. It faces not only problems during operation, but also failure. This also includes clogging of elements of household appliances, expansion tanks and automation. The consequences of serious sanding of a well are similar for them.
The most serious result of sand blasting is a reduction in the life of the well. If the installation of the casing pipe was carried out according to all the rules, and the filters were selected correctly, then the first clogging can be expected only after 3-5 years. Some equipment can operate for a record period of up to 40 years without washing or problems.
Connecting a hydraulic accumulator, automation
Connection diagram for a pump with a hydraulic accumulator:
- make a connection to the battery, power all the nodes in series. Use fum tape;
- place the “American” on the thread. Attach an adapter with wiring to it;
- connect a relay and a pressure gauge to the branches;
- connect the pipe and the end of the adapter;
- secure one end of the pipe to the pump with a fitting;
- lay the pump and supply pipe on a flat area;
- there is a hook on the body of the device; attach a safety belt with a length of at least 3.5 m to it;
- Attach the cable and cable to the pipe at a distance of 1.5 m. Secure the second part of the insurance to the casing;
- carefully lower the equipment into the well;
- pull the safety rope;
- cover the pipe head - this will protect the device from debris getting inside;
- power the electrical cable;
- connect the device, release the remaining air - open the tap. If everything is done correctly, the accumulator will begin to pump water;
- close the valve. Check the pressure gauge readings. The pressure standard is 2.8x1.5 atmospheres.
A surface pump with automation is mounted according to a similar scheme. The difference is as follows:
- a pipe with a diameter of 2.5-3.5 cm is connected to the pump;
- a check valve is fixed to the opposite end using a fitting. Lower the unit into the well so that the pipe is 1 meter below the water surface level;
- before starting, the engine is filled with water;
- The equipment is switched on simultaneously with the automatic pumping of water.
Types of materials
There is a fail-safe way to insulate and improve a well in a country house without the use of additional heating equipment - this is to cover all its components and protective structures with thermal insulation material. For professional installation, the following 4 types are used:
- Expanded polystyrene and penoplex.
- It is characterized by low thermal conductivity, strength and moisture resistance. Suitable for lining both inside and outside caissons, as well as external and underground pipes.
- Foamed polyethylene.
- It is characterized by good thermal insulation and low load resistance. Therefore, it is used for lining internal walls of rooms and external pipelines.
External insulation of a well with foamed heat insulatorSource pechiexpert.ru
- Mineral or glass wool: the main feature is its high moisture absorption capacity. In view of this, it is used only during the inactive stage of water intake - for the period of winter conservation.
- Penoizol or polyurethane foam: applied in liquid form through a special sprayer. The main disadvantages are the need to use equipment, low density and unevenness of the surface formed.
- Expanded clay: a fairly free-flowing, moisture-resistant material. Used for backfilling water supply trenches and caissons at a level below the ground surface.
Content
- Why is pumping necessary?
- Technical features of the process
- Why does water become polluted after drilling operations?
- Why is pumping needed?
- Preparing for pumping
- How to choose a pump
- Causes of pollution
- Methods of cleansing
- Compressor pumping
- Basic pumping mistakes
- How long does it take
- How to flush a well yourself?
- Abyssinian well
- How to flush with a submersible vibration pump
- Basic recommendations when flushing a well
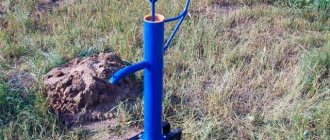
Abyssinian well
Abyssinian well for water.
The tube well got its name from the area in Africa where the technology for extracting groundwater from the depths of the earth without the use of special equipment was first used.
Self-drilling of wells is done in this ancient way. Water intake is carried out from a depth of 8-13 m.
Sequence of work:
- A drill string is assembled from 1-2 m sections of Ø2″ pipes, which will also serve as a casing. The filter drill is made by flattening the downhole end of the first pipe or by attaching a cone to the rod for better penetration into the soil. 6-8 mm holes are drilled into the walls of the drill so that water can flow into them, and they are wrapped in a metal filter mesh.
- The impact head is made from a Ø100 mm guide pipe, 1 m long, weighted with metal weighing 10 kg, and handles are welded on both sides.
- The drill-filter is driven entirely into the ground, after which the next section of the column is attached to it by welding or a threaded connection. Having hammered the pipe after the drill, the operation is repeated until the filter penetrates into the aquifer.
- A manual or electric vacuum pump is connected.
The tube well is pumped until clean water appears. The quality of the liquid is checked in the laboratory of the sanitary and epidemiological station.
Advantages and disadvantages
The advantage of the Abyssinian water intake is the ability to build it yourself with minimal investment. The needle well is completely isolated from the influx of perched water. A tube well can be driven into the ground from the basement of your house.
There are few disadvantages:
- impossibility of using a submersible pump due to the small diameter of the column;
- the need to clean the well from sand and silt;
- restrictions on soil properties: the method is used on soft rocks and coarse sands.
The service life of the water intake is ≥30 years. A prerequisite for long-term performance is the periodic removal of silt and sand from the casing. This is done using a bailer - a cylindrical vessel with a valve seal.
Pump installation
Before installing the unit, prepare:
- pressure gauge;
- steel fixation unit;
- fittings - optionally - clamps;
- back pressure valve;
- valve for shutting off the water.
Selecting a suitable pump. Fastening at the right depth
Which pump to choose depends on the specific situation. Experts recommend centrifugal-type submersible models. They explain this preference by the natural vibrations that vibrating structures cause. This leads to soil destruction and equipment failure. Avoid vibration pumps when the well is installed on a sand base.
The power of the equipment depends on what kind of performance you expect. Remember, the greater the depth, the more powerful the pump will be required.
Read also: 5 ways to get into trouble with the law because of a well on your property
A separate selection criterion that also needs to be taken into account is the quality of drilling. There are special models of pumps that are used in wells dug without the help of professionals.
It is important to correctly calculate the depth of immersion. The device must be kept in water at all times. In this case, the device is mounted remotely from the bottom of the water intake. Otherwise there is a risk of clogging.
Standard pumps are fixed at a depth of 8-10 meters, injection pumps - 18-20 m, special ones - 35-40.
Surface pump
The main disadvantage of the models is their limited application. The device is only suitable for shallow wells. The advantage is ease of installation.
Work according to the scheme:
- mount the device in a stationary room or an individual caisson;
- connect a hose of the required size to the suction pipe;
- Secure the check valve on the other side of the hose. It will perform a protective function and prevent water from draining after the equipment is turned off;
- Place a protection filter on the valve - it will not allow debris fragments to penetrate inside;
- lower the hose into the well.
Submersible pump
Such structures are installed directly in wells. They do not require a caisson or permanent premises. The device is assembled, a water pipe and an electrical cord are connected to it, and the equipment is lowered into the well.
Note! In most models, water is supplied through plastic pipes. But there are also those that use a rubber hose.
The optimal immersion depth is 1.5-2 meters.
Submersible pump installation diagram:
- preparation of materials and equipment;
- immersing the device into the well;
- calculation of the operating point of the unit.
Arrangement of eyeliner
The power supply is provided by a separate line. It is equipped with an automatic power cut-off device. Don't forget about grounding. Before starting the equipment, the pump is filled with liquid. Observe the required pressure parameters.
After connecting the power, bleed the air by opening the valve. After a couple of minutes, the water supply starts. If this does not happen, turn off the device and add more water.
Turn on the device again. Set up the relay. By turning special screws, the required indicators are set.
How to make a well in the country
Almost every owner of a country house, and even a rural resident, wants to have a well on his property. Such a source of water from which it would be possible to constantly obtain high-quality water.
It is worth noting that if the water is at a depth of up to ten meters, then such a well can be drilled independently. This is not as labor-intensive a process as it might seem at first glance. We need a standard pump. It will pump out water and at the same time, in a sense, drill a well.
Video on how to drill a well in a country house
Let's move on to the drilling process itself. It should be noted that the pipe that we will lower into the well must be located vertically. Water will be pumped into this pipe using a pump. The teeth should be located at the lower end of the pipe. You can make these teeth with your own hands. Water, which is under pressure from the lower end, erodes the soil. Since the pipe is heavy, it sinks lower and lower, and soon reaches the aquifer.
Video on how to properly drill a well under water
In order to actually drill, we only need a steel pipe. The radius of such a pipe must be at least 60 mm (preferably more). Such a pipe will serve as a casing pipe. The length of such a steel pipe must be no less than the depth of groundwater. We close the end of the pipe, which is at the top, with a flange and a special fitting.
To do this, we use a pass-through fitting. Water will pump through this element through a hose. We also need to use a welding machine. Using it we will weld four “ears” with special holes. These holes must fit M10 bolts.
We will take a 200 liter barrel as a water tank. In order to speed up the drilling process somewhat, we need to rock the pipe and turn it a little, either clockwise or counterclockwise. Thus, we will wash out a large amount of soil. To make it easier to rotate the pipe, we can use a gate. To do this, take two metal tubes and attach them to the pipe. For these purposes, we can use special clamps.
Drilling requires several people (two are possible). A hole is dug in the area designated for the well. The depth of such a hole must be at least 100 cm. A pipe is lowered into this hole. Moreover, the jagged end is downwards. Next, using a gate, the pipe is deepened. It is worth noting that the pipe must be in a vertical position. Next we turn on the pump. The pit will fill with water. We scoop it out. Then it can be poured through a sieve and poured back into the barrel. It is quite possible to drill six meters in a few hours.
You can read here:
how to properly drill a water well, how to properly drill a water well video, how to properly drill a well, how to properly make a water well, how to properly make a water well on a site video
Well protection from atmospheric influences
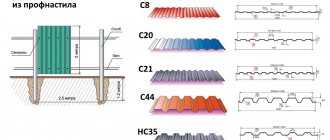
To protect the water source from negative external influences, above-ground and underground structures are used:
- above-ground superstructure - most often used to protect industrial wells. In private homes, the use of pavilions is not functional. They take up useful space and spoil the design. If you still decide to build a house, place it above the drainage system. To minimize heat loss, cover the recess with soil;
- installing a well inside a building - use a basement or an insulated technical building. The only difficulty is in the drilling process. The well is dug before the construction of the building begins;
- underground caisson - the well has a closed structure. Only a small part of it remains visible - the hatch. Factory underground wells are made of metal or polymers.