It is quite difficult to disassemble an Electrolux washing machine for spare parts or for repair purposes without having the skills and experience of such work.
Errors made during the disassembly process can become the final verdict for the further operation of the household appliance.
For those who are faced with such work for the first time, detailed step-by-step instructions on how to disassemble an Electrolux washing machine will come to the rescue.
By adhering to it, disassembling and reassembling the washing machine will be done as quickly as possible and without any problems.
Preparing for disassembly
To make the process of disassembling the washing machine go as quickly as possible, you need to prepare the following set of tools in advance:
- wrenches;
- slotted and Phillips screwdrivers (a good option is screwdrivers with a magnetized tip that holds very small fasteners);
- pliers (when working with household appliances, it is better to choose a tool with rubberized lining on the handles);
- WD-40 liquid (an irreplaceable assistant in situations where it is necessary to unscrew scale-covered and rust-covered bolts).
In addition to tools, you should always have rags and a basin at hand (necessary for collecting the remaining water in the tank, drain hose).
Having prepared the necessary tools, household appliances are disconnected from the water supply, sewerage, electricity, and placed in an open, free space so that nothing interferes with the disassembly process.
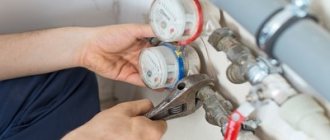
Required Tools
You can disconnect the machine from the water supply without using tools at all. It all depends on the method of connecting the washing machine to the water supply, as well as on the type of inlet hose of the machine.
Installation and dismantling of the inlet hose is done by hand if there are plastic nuts and fittings at both ends. Plastic parts are fragile and need to be handled without tools.
This type of hose is more common than others. It is supplied complete with washing equipment. However, it is often changed to another.
There may be a metal nut at the end of the hose. It may rust to the pipe or tee. In this case, you will need a wrench of the required size or pliers. Screwdrivers (straight and Phillips) may also be required if the connection is tightened with a clamp.
Electrolux washing machine diagram
Understanding what the main elements of a washing machine look like and where they are located will help you quickly diagnose and repair household appliances.
So: all elements of the internal structure are hidden behind the metal panels of the case (front, rear, side) and the lid. To extend the life of the washing machine in conditions of high humidity, the panels are coated with a special protective enamel.
Depending on the location of the hatch, there are Electrolux washing machines with vertical loading (laundry is loaded by opening the lid) and front loading (the hatch is located on the front panel).
The internal structure (a certain set of parts and mechanisms that ensure uninterrupted, high-quality operation of the washing machine) includes:
- The control module is one of the main elements that controls and controls the functioning of all mechanisms of the washing machine.
- The control panel helps you select the desired program, start or pause the washing process.
- Pressure switch and inlet valve (provide control of the process of water intake into the tank).
- The motor is the driving force that ensures the rotation of the drum.
- Tach sensor (controls the rotation speed of the drum).
- A tubular electric heater (TEH) is located in the lower part of the washing machine body, under the tank, and heats the water to a set temperature.
- Thermistor (built into the heating element, determines the degree of water heating).
- Damper and springs are elements that reduce vibration of the washing machine drum during the washing, rinsing or spinning process.
- Heavy concrete or plastic blocks are counterweights (they help dampen the vibration that occurs during operation of the washing machine).
- The rubber seal around the hatch is a cuff (ensures the door fits as tightly as possible and prevents water from leaking).
- Hatch blocking device (protects the washing machine from leaks).
- The drain pump, filter, and pipes are the main elements of the system for draining waste water from the drum.
On the rear panel there are: power cord, drain and inlet hoses.
Algorithm of actions
For each type of Electrolux washing machine (depending on the loading method), a specific parsing algorithm is prescribed.
Horizontal loading household appliance
The body of a front-loading washing machine consists of two halves (back and front, connected by fasteners along the side line).
Taking into account this design feature, the Electrolux washing machine is disassembled as follows:
- We find two screws located on the back wall of the case and unscrew them. We slightly push the cover towards the back wall, lift it and remove it from the body.
- On the left and right side panels, unscrew the two screws that secure the rear panel.
- At the bottom of the rear panel, unscrew the two fasteners.
- On the sides, after opening the plugs, unscrew the fixing bolts.
- Unclench and lift the plastic holders that secure the panel in the upper part of the case.
- Remove the back panel.
- Inside the powder receptacle we find a plastic tab, press it, and carefully pull the dispenser out of the washing machine body.
- We unscrew the fastening bolts and remove the hatch door along with the hinge.
- Carefully prying up the clamp spring with a slotted screwdriver, pull the metal ring off the cuff. We put the rubber seal inside the drum.
- We unscrew the screws located on the left side of the control panel, carefully use a screwdriver to open the latches on the top and sides of the panel, without disconnecting the wiring, remove the control unit.
- We unscrew the screws located around the hatch lock, under the control panel and around the drain filter, and remove the front panel from the body.
- Hold the pulley with one hand and remove the drive belt with the other.
- We unscrew the fasteners holding the motor, disconnect the terminals of the power wires, move the motor slightly toward itself, and remove the mechanism from the housing.
- Disconnect the wires from the drain pump, unscrew the fasteners, carefully turning clockwise, and remove the pump from the housing.
- We disconnect the wiring from the heating element, unscrew the central bolt (located between the contacts) and, using gentle rocking movements, remove the heating element from its seat.
- Having unscrewed the central bolts, we dismantle the counterweights.
- Using pliers, pull out the pin holding the shock absorbers and remove the paired elements from the bottom of the tank and the body of the washing machine.
- In the upper part of the housing, we disconnect the powder receiver pipes, the wiring of the filling valve, the springs, after first disconnecting the tube, we dismantle the pressure switch.
- Carefully lifting it, remove the tank from the springs and remove it from the housing.
At this stage, the analysis of the Electrolux front-loading washing machine is completed.
From vertical
Algorithm of actions:
Carefully prying the latches on the right and left sides, lift the control panel, disconnect the wiring from the board connectors, and remove the panel from the case.
Before you disconnect any wires, you need to take a photo of their connection diagram.- Disconnect the wires, unscrew the fasteners, and remove the electronic board.
- Having previously disconnected the pipes and wiring, we dismantle the fill valve.
- Having unscrewed the fixing elements located on the rear panel and one at the bottom of the front panel, we dismantle the side walls of the case.
- From the opened space we pull out the engine, drain pump and water level sensor (all elements are located under the tank). To do this, unscrew the fasteners, remove the wiring, and pull the mechanisms out of the housing.
- We block the pulley wheel with a wooden block. Carefully remove the drive belt.
- Raise the top panel (cover), take out the powder receptacle (fixed with latches).
- Unscrew the bolts holding the cover.
- We pull back the rubber cuff, under which we have access to the screws that secure the plastic strip. They also need to be unscrewed. Remove the top panel.
- We unscrew the hardware holding the shaft, close the tank doors, and remove the tank from the housing.
At this stage, the disassembly of a top-loading washing machine can be considered complete.
How to disassemble an Electrolux vertical washing machine
Disassembly of vertical washing machines occurs as follows:
- Use a slotted screwdriver to pry up the control panel, pull it up and slide it back.
- Tilt it a little, take a photo of the wire connection, disconnect them, and move the panel to the side.
- Disconnect the remaining wires from the electronic board, unscrew the fasteners, and remove the board.
- Remove the fill valve by first disconnecting the hoses from the clamps and disconnecting the wires.
- Unscrew the fasteners and remove the side panels.
- The fasteners holding the front panel in place are now visible. You need to unscrew it, remove the cover and put it aside.
Now the user has access to all important components of the washing machine, including bearings. There is no need to disassemble the Electrolux vertical tank to troubleshoot the problem.
How to put it back?
In fact, reassembling the washing machine after complete disassembly is very simple. You need to do everything the same as during analysis, only in reverse order.
The main rule of high-quality reassembly is that there is no need to rush! In a hurry, you can forget about installing any (even very small) part. Haste often leads to mistakes that require you to disassemble the washing machine again.
At each stage of reassembly, it is necessary to check the notes, photos or videos that were made during the disassembly of household appliances.
Washing machine malfunctions
The most common malfunctions of Electrolux washing machines are:
- Water heating does not work.
- The Electrolux machine does not fill with water.
- The drain does not function.
- The rinse program does not run.
- Spin does not work.
- No powder is collected.
- The equipment does not turn on.
- Knocks out the machine gun.
These are the most common faults; in fact, there are many more of them. To solve some of them, for example, to replace a pressure switch, only partial disassembly of the device is necessary. Others will require more serious work to eliminate. So, to replace the bearings, in addition to the housing, it is necessary to disassemble the tank.
What difficulties might arise?
The main difficulty that arises in the process of disassembling a washing machine is soured, rust-covered fasteners and mechanism components.
As a rule, it is very difficult (almost impossible) to unscrew or dismantle such parts the first time.
A special product will help solve the problem - WD-40 . It is enough to treat the soured element, wait from five to thirty minutes (the length of the wait depends on the density of limescale or rust), and then, with a little effort, unscrew the desired element.
How to remove the back panel?
LG front-loading washing machines have a service hatch on the rear wall. It is behind it that provides access to such elements of the internal structure of the washing machine as: engine, tank, pulley and drive belt, heating element. In terms of size, the service hatch occupies almost the entire rear panel .
Removing the back cover is easy. It is enough to unscrew all the screws located around the perimeter of the service hatch.
To prevent numerous bolts and screws from getting lost during disassembly of the washing machine, they must be cut off and put into small boxes after unscrewing. Along with the bolts and screws, a piece of paper indicating the panel for which the fastener is intended is placed in the box.