DETAILED CONSTRUCTION INSTRUCTIONS
1. Development of drawings.
The main element in the whole work is the roof and its unusual structure. A common occurrence is the installation of skylights. The uniqueness lies in the fact that it is located at a certain angle. To build a roof, you will have to completely rebuild everything.
2. Designing the shape for the roof.
Already at the initial stage, you need to clearly know what the future roof will be like and how it will be located. There are several options: broken, classic and lean-to. Carry out careful work on the drawings, from all sides, clearly describe every detail.
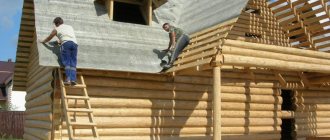
3. Construction process.
It is the largest in volume. You'll have to ask someone for help; you can't do this job with your own hands. A mauerlat is laid across the entire upper area of the house. After which the side posts are attached to them using corners. We make a jumper in the upper area of the racks.
4. Arch.
We stretch the cord, when an arch is formed, an internal frame will be created. We carefully compare the sizes. Fastening with brackets and corners. We install the sloping part of the roof at an angle. We nail down slats and boards on the outside, but don’t forget to leave space for the future window.
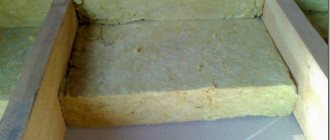
5. Insulation.
An important element in the construction process is the use of insulation for the attic. The best option would be to use a membrane-type film, mineral wool. It covers the sheathing and is attached from the inside of the entire structure. We lay it so that no gaps appear.
6. Roof decking.
There is a huge selection of roofing materials , everyone chooses to their taste.
7. Window and interior decoration.
The final stage is the installation of the window frame and finishing on the inside.
Using the above recommendations, you can easily build an attic with your own hands.
Cabinet shape
For attics it is necessary to make structures of various shapes; the most popular include:
- Cabinet furniture . Common types: linear sliding wardrobes, radius (concave and convex), corner models (L-shaped), trapezoidal (symmetrical and asymmetrical). Such products are inferior to their built-in counterparts in terms of capacity and ease of use.
- Built in furniture . The popular ones include both a trapezoidal model (with two bevels in the upper part) and models with one bevel, or angular. The door leaves follow the shape of the structure - the side facades have bevels.
Built-in model Source pinterest.com
WHAT MATERIALS TO USE
The following may be required during the construction process:
- Wooden slats.
- Wooden beams.
- Wooden boards.
- Metal corners.
- Elements for fastening.
- Metal brackets.
- Mineralized wool.
- Waterproofing material.
- Window frame.
- Ladder.
In addition to this list, you will need the basic tools that are used for construction.
INSULATION OF THE ATTIC
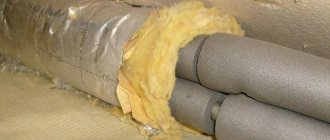
In a residential building, heat losses are absolutely inevitable: heat evaporates through the outer walls, through the roof, and through floors, windows, and doors. All surfaces in the room are heated by the heating system and immediately begin to exchange heat with the external environment. If in a city apartment heat loss occurs mainly due to the cooling of the walls, then in a private house, along with the walls, the roof also cools down. Its area is sometimes comparable to the area of the walls, so you can imagine how important the task of high-quality roof insulation is. And you cannot save on this, otherwise the purchase of cheap thermal insulation materials or a frivolous approach to insulation will subsequently lead to increased heating costs. Thermal insulation of the roof with your own hands or with the help of specialists is necessary if you have a used (living and heated attic). The roof of a non-residential attic does not require insulation, but in this case it is necessary to insulate the floor, which is also the ceiling of the room below. When insulating a used attic, in addition to thermal insulation, several layers are used - vapor barrier, waterproofing, and an air gap. This design of the roofing “pie” allows the insulation to remain dry. This is especially important for mineral wool and glass wool. If mineral wool gets wet, it will no longer cope with its functions.
Regardless of climatic conditions, time of year and operating characteristics of the building, it is necessary to create such a structure in the under-roof space so that moisture has the opportunity to be removed outside on its own. If the humidity of the insulation increases by at least 5%, its thermal insulation capacity will decrease by half. In addition, when wet, mineral wool begins to lose its shape - cracks form between the plates of this insulation and the seal is broken. When installed correctly, mineral wool should last a long time. She is not afraid of temperature fluctuations, rodents, or chemical exposure. The only thing you need to be wary of is the penetration of steam rising from the living space into the thickness of the insulation. For this purpose, after installing the mineral wool slabs, a vapor barrier film is installed. On the upper side the material is protected by a waterproofing layer.
First you need to dwell on the issue of wall insulation of the attic floor. Initially, in order to protect the attic from moisture entering and accumulating in it, waterproofing must be placed along the roof slopes and gables. Rolled waterproofing is attached overlapping and over the mounted insulation using a stapler or slats. Mineral wool is considered the best option. The first type of wall placement involves strengthening the insulation with a thick layer between the rafters with a gap for air circulation. The result is that attic insulation consists of waterproofing, insulation and waterproofing on top of them. In the second option, the installation of the insulating layer varies depending on the material of the partition. Brick requires installation of insulation on both sides. A vapor barrier is added from the inside. Only waterproofing is attached to the slopes.
Floor insulation involves the use of thermal insulation (glass wool, mineral wool) with a thickness of at least 100 mm. Waterproofing is placed on top and under thermal insulation. The best insulation for ceilings in the form of a monolithic slab is screed.
Professional builders, when choosing materials for insulating an attic from the inside or outside, usually give preference to mineral wool, ecowool, polyurethane foam, polystyrene foam and expanded polystyrene.
The final decision largely depends on the priorities and budget of the cottage owner. We will consider the properties, advantages and disadvantages of each of these insulation materials.
What is an attic floor?
The attic floor is a separate room under the roof, from which you can make a utility attic-storage room and a full-fledged living room. They began to appear in the seventeenth century, and are named after the architect Francois Mansart, who contributed to the emergence of a new trend.
Modern attics can be different in construction and design. For example, vertical, made from the same material as the house, or inclined, when a rafter roofing system is used as a frame. In fact, this is the room above which the main facade of the building intersects with the roof.
Sometimes the attic can even protrude beyond the boundaries of the lower floor, or, on the contrary, it can be a small element of a complex multi-level roof. The specifics of construction allow you to create any shapes and lines, so here designers can run wild.
An additional level increases the usable living space, and not the main but useful rooms can be moved upstairs: an office, a home theater, a games room, a billiard room or a workshop. With proper insulation, due to the presence of an additional air gap, heat loss throughout the building is reduced. And visually the attic floor gives the house a complete, harmonious look.
The main problem of construction is compliance with strict standards of heat, sound and waterproofing, otherwise the premises will be unsuitable for use. It must be taken into account that moisture condenses under the roof, and rain beats outside and precipitation accumulates. You will also have to spend time searching for suitable windows that will fit into the geometry and compensate for the lack of light.
MINERAL WOOL AND ECO WOOL
Mineral wool and ecowool are good insulation materials. They are quite lightweight, environmentally friendly, fireproof, sold in a convenient form - exactly what you need. Mineral wool is less susceptible to shrinkage, but it is much more expensive than glass wool. In turn, glass wool does not like to be crushed or wrinkled and can significantly reduce its thermal insulation properties when wet.
A common drawback of both materials is difficulty in installation. When laying the insulating layer, joints and cracks are formed that require high-quality sealing. In addition, both glass wool and mineral wool need additional waterproofing or vapor barrier.
POLYURETHANE FOAM
Polyurethane foam is an excellent modern material; in fact, it is a plastic foam that must be sprayed onto the insulated surface from a cylinder. It is very easy to use, moisture resistant, has a very low weight and high noise insulation and vapor barrier properties. In addition, polyurethane foam forms a continuous coating and fits tightly to the sheathing, which completely eliminates the appearance of seams and heat leakage. An important advantage of polyurethane foam is that it does not rot and provides an unfavorable environment for the development of bacteria and fungus. Polyurethane foam has high strength characteristics and a high degree of penetration into wood. There is no need to use any fastening devices when “laying” it.
" Important. Perhaps the only drawback of polyurethane foam is its high cost.
Interesting wardrobe layout options
The main feature of the attic floor is the presence of a slope from the roof, which can create certain difficulties when planning the design. It is recommended to think through all the details in advance and provide an area for all things.
First of all, you should draw up a floor plan
Sloping along the wall
It is recommended to place shelves for shoes and accessories along low walls. It is recommended to use the opposite side for hanging long clothes. Shelves for folded items should be placed between long and high walls. Good lighting plays an important role. The windows should be covered with opaque dark-colored curtains, which will protect things from fading. The lightest area should be the area in which the mirror is located. Installing multi-colored lamps on shelves and niches will help you find the things you need faster.
The photo shows an example of placing a dressing room along the walls of a children's room
Combined with a room
The attic is suitable for arranging a bedroom, study, living room, children's room. These rooms can be perfectly combined with a wardrobe. The best option is to build a wardrobe around the door from floor to ceiling, which will provide significant space savings. Another option is a small corner dressing room, which can be placed in any convenient place.
In the photo there is a dressing room separated from the bedroom by sliding doors made of tinted glass.
Expanded polystyrene (PENOPLEX)
Expanded polystyrene is an improved and more expensive version of polystyrene foam. This material is characterized by high strength and moisture resistance. Typically, in construction stores, polystyrene foam is offered in the form of slabs with grooves for tight joining, which allows you to create light thermal insulation without gaps. Like polystyrene foam, penoplex is a flammable material that emits dangerous toxic compounds when burned.
SAWDUST
Sometimes, when insulating yourself, they use the “old-fashioned” method - sawdust. This is an environmentally friendly and very cheap material - sometimes you can get it absolutely free. However, sawdust is susceptible to getting wet and rotting. In addition, they are highly flammable and are a favorite habitat for rodents. If you use a sawdust-cement mixture rather than pure sawdust as insulation, many disadvantages can be avoided - such insulation does not burn, does not rot, and does not attract mice and insects. However, the sawdust-cement mixture is heavy enough to be used to insulate an attic space in a wooden house, and can overload the supporting structure and floors.
Conclusion
Now you know how the cabinets that can be installed in the attic are constructed. If you still have questions about choosing and using wardrobe furniture, you can ask them in the comments to the article.
Did you like the article? Subscribe to our Yandex.Zen channel
June 15, 2021
Accessories, Roofing, Attic
If you want to express gratitude, add a clarification or objection, or ask the author something, add a comment or say thank you!
HOW TO CORRECTLY INSULATE AN ATTIC
If you do not plan to subsequently turn the attic into a residential attic, you can limit yourself to only insulating the floors. In any case, it will be possible to properly insulate the roof at another time.
To independently insulate the roof from the inside in a wooden house, it is recommended to adhere to the following sequence: 1. Empty the attic space from things and debris. 2. Treat the floor and beams for sheathing and joists with an antiseptic. 3. Inspect the floor for cracks, if necessary, coat the cracks with clay or caulk. 4. Cover the floor with waterproofing material with good vapor permeability properties. Otherwise, moisture will condense on the ceiling, causing it to rot. 5. Strengthen the logs and sheathing for laying the thermal insulation layer (if necessary). 6. Lay thermal insulation material. All joints and gaps must be sealed. 7. Cover the insulation with waterproofing material (this time vapor-tight). 8. Perform final flooring. The recommended thickness of the gap between the vapor barrier and the finishing flooring is 20-30 millimeters.
Insulating the roof of a wooden house is not a whim, but a necessary measure. Most Russian regions are characterized by cold winters, so it would be very imprudent not to take care of the comprehensive insulation of a private home.
How and with what to insulate is up to you. Choose what suits your budget and your goals.
Choosing an interior style
The only limitation when choosing an interior style for an attic is the specifics of its design. Small cottages look best with laconic and minimalist interiors that create a sense of space. And it is most convenient to work with directions that allow you to leave open beams, communications and complex shapes.
Modern style attic
Modern style balances between solid classics and elegant high-tech. This is what you need to design an elegant and at the same time functional attic. Natural materials are combined with artificial ones, and laconic colors are combined with complex and varied textures.
Classic style attic
The classic style is suitable only for large and spacious attics, so in a small room it is better to combine it with modern elements. Use wood, tiles, stone finishes and textured expensive textiles. This is the best way to recreate the atmosphere of a luxurious country mansion.
Attic in Provence style
When decorating an attic, Provence is not only aesthetically pleasing, but also practical, because it solves several problems at once. Light pastel colors give a feeling of light, air and space even in a small attic room. Natural wood preserves the homely atmosphere, and the beams from the rafter system effectively complement the style of the French province.
Attic in Scandinavian style
Attics are often characteristic of Scandinavian-style houses, so this interior will fit here like home. Keep all shapes and outlines, use natural materials, a light background and a few color accents. Stick to minimalistic furniture and create an atmosphere with cute handmade accessories.
Loft-style attic
Creating loft attics is very convenient, because all communications, beams and complex shapes become an interesting advantage, and not a problem. You don't have to mask the roof structure or completely sheathe the ceiling. The walls also do not have to be leveled and hidden behind plasterboard structures or panels.
80 design ideas for a small children's room (photo)
FINISHING THE ATTIC
Finishing work in the attic of a wooden house is not an easy task, requiring an integrated approach. To make rooms cozy and attractive, you will need high-quality materials and the experienced hands of professionals.
You can cover the walls with clapboard, imitation timber, or a block house made of larch, pine, or spruce. This is a budget and simple option.
First, preparatory work is carried out - several days are needed to acclimatize the wooden panels. Then the surfaces of the walls must be treated with an antiseptic to protect against fungus and insects. After this, the sheathing is installed, the heat-insulating material is mounted, its thickness must be at least 50 mm. Next, you need to install a vapor barrier film.
INSTALLATION OF PARTITIONS
To place partitions, boards with a width of 20 to 100 mm are lowered from the outer beam of the ceiling base to the floor, serving as the base of the partition. Then additional bars are placed horizontally. The space for the doors is arranged in the same way. The reverse side is covered with horizontal boards with a gap of 0.5 mm. Next, waterproofing is attached inside and finishing material is installed.
A house with an attic involves placing in it an interior partition 10-15 cm wide, which can be made of wood or channels. The channel is attached to the wall on all sides with self-tapping screws. Inside the installation, a channel descends from the ceiling to the floor with a running start. Wooden beams are screwed to the channels with self-tapping screws, drywall - with self-tapping screws to a metal structure, lining - with nails to horizontal bars.
Video description
About coplanar cabinet sliding systems in the following video:
- Variety . Often, owners give preference not to a wardrobe, but to open shelving sections. In this case, not metal systems, but laminated chipboards (laminated chipboards) can be used to make furniture.
There are also some disadvantages to using built-in wardrobes:
- Inability to move . Built-in furniture is designed to fit the dimensions of a specific opening in the attic; You won't be able to move it to another location.
- Increased assembly cost . The sliding wardrobe does not have a back wall and other planes, which makes it cheaper than its cabinet counterpart. However, installing a built-in structure takes five hours or more, while assembling a cabinet product takes an average of three to four hours.
- Attention to quality finishing . If you decide to install open shelving, you need to make sure that practical (non-staining and wear-resistant) materials are chosen for the finishing of the room.
Paneled facade Source eduinfoline.com
WALL FINISHING
Various materials can be used for interior upholstery: lining, block house, imitation timber, plywood, plasterboard, plastic or hardboard. If you use drywall, then after covering it you can only cover it with wallpaper or paint it with water-based emulsion, so choosing wood for decoration may be the most convenient and attractive option.
Projects of houses with an attic often involve dividing the attic floor into rooms using partitions or adding built-in wardrobes. Initially, you need to sheathe the roof slopes and gables, then the ceiling. When decorating the slopes, the bars are horizontally fixed to the rafters with a difference of 1 m, and plasterboard is attached on top and all the cracks are filled with putty. The lining is installed on a wooden base with nails in the joint areas, and then varnished. When covering, you need to constantly check the correct placement using a level.
Color solutions
Due to the complex geometry and lack of light, when decorating attics, it is best to use light shades: white, milky, beige or gray. No less relevant is natural wood with its expressive texture and patterns. If you have a large and spacious attic, feel free to choose bright or dark colors, depending on the chosen style.
FLOORING
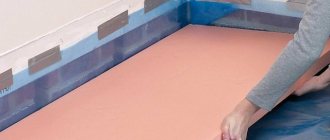
The base of the floor is a coniferous plank flooring at least 4 cm thick on joists with beams laid on top. There must be a gap between the boards and the insulation, and between the boards - no more than 2 mm, from the wall - at least 1 cm. To make it convenient, it is better to number the boards and lay them in order; installation is carried out using self-tapping screws.
" Important. Dry boards are treated on the back side with antiseptics against rot, fungus, insects, and in order to increase fire resistance.
Plank flooring has many advantages. Among them are excellent strength and elasticity. It is cheap, durable, if installed correctly, and can be easily repaired.
It is recommended to lay a plank floor in the attic room only after all planned construction work has been completed. When the windows are installed, the doors are installed, the plastering and painting work is completed, you can start working on the floor.
The flooring is made from boards made from various types of wood - pine, spruce, fir, cedar, birch, and larch. Their standard sizes are: 28-45 mm in thickness and 119-135 in width. The dimensions of the logs depend on how they are laid; as a rule, their width is 70-100 mm, and their thickness is from 40 to 70 mm. The thickness of the lining should be 20-50 mm.
Next, joists are supports for floors and platforms. They can be metal beams, logs or beams located horizontally.
Before you start laying the floor, all materials used for this are subject to mandatory treatment with antiseptic agents, and the boards are only on the bottom edges, and the lining and joists are completely on all sides. Nails are used to attach boards to the joists. But for convenience during further repairs, it is better to use self-tapping screws.
Carefully carried out preparatory work will greatly facilitate the installation of the floor. First of all, you need to get rid of the old floor, if there is any. Then proceed to leveling and cleaning the surface, sealing the gaps between the floor slabs and walls well, without leaving any gaps. And, of course, remove construction waste.
Despite the fact that wooden floors themselves are very warm, you can use foam insulation if desired. It is placed in a layer on waterproofing material.
Finally, the final operation is the actual installation of the floorboard. Having finally removed the construction debris, they begin laying the boards on the joists - with ridges in one direction in one layer. The boards should fit snugly against each other. The ridges are driven into the grooves using a hammer. Nails or screws are attached to the base of the ridge so that they do not protrude. At the end, you need to check the floor again for unevenness and protruding nails.
And one more detail. When laying floors along the entire perimeter of the room, a small gap, about a centimeter, is made between the walls for laying sound insulation. Aesthetics will not suffer - the baseboard will help. But in the future, with thermal expansion of the base, curvature of the floors can be avoided.
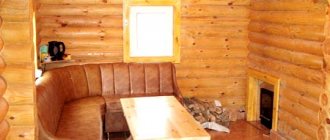
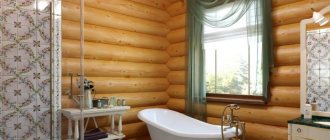
Living room
By the way, in the attic you can arrange a good recreation area, you can receive guests in it, that is, it will turn out to be a kind of living room. The room should have a lot of space, and the furniture you can use are sofas, armchairs, and poufs. Other furniture here will be superfluous.
You can lay laminate on the floor, this will give the room a certain rigor. If space allows, you can use a billiards table.
To decorate the living room, you can hang photographs, landscapes, etc. on the walls.
FINISHING THE ATTIC CEILING
The desired ceiling height is from 2.2 m. To do this, a measurement is made from the flooring to the rafter ridge, and a mark must be made at the point with the achieved height. A block is placed between the opposite rafters, attached only on one side, and the other (unfastened) is installed to the mark and secured with self-tapping screws. After placing all the rafters, the base of the ceiling can be considered ready. It will be more reliable if you additionally attach cross beams. Sometimes it is also allowed to place vertical bars from the outermost to the floor, which serve as the basis. The finished structure is sheathed with boards with a gap of 0.1 mm or plasterboard. Waterproofing is nailed on top of the boards and a thick insulating layer is laid. The decoration of the ceiling depends on your own desire.
STAIRWAY TO THE ATTIC
To access the attic, the best option is a staircase. If space allows, you can install a full-fledged structure, but you can also choose an option with a retractable attic ladder and hatch. Another option is a staircase outside.
Initially, you need to plan the staircase, but it is worth considering that its width varies from 80 to 100 cm, balusters and handrails are placed in mandatory steps. The railings are installed at a height of 90 cm, the step should be 19-26 cm in height.