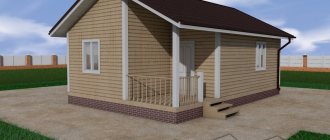
The base is a transition from the foundation directly to the structure itself. Its correct construction plays a key role in the quality of the future home. For this reason, it is very important to draw up a competent project and strictly follow it. When building a basement, you should think in advance about what material you will use. Laying a brick plinth is the preferred choice because it can be laid on a foundation of any material. From the article you will learn everything about the features of this type of masonry, as well as how to do it yourself.
Kinds
Types of brick basement structures:
- smooth. The identical thickness of the wall and the permanent structure is observed. Improving the aesthetics of the external design of the facade is achieved by decorative borders or cornices. Achieve a visual distinction between the foundation and the building;
Smooth
- protruding façade of the base. It is distinguished by its effectiveness, a clear distinction between the base and the structure. Low tides are required;
Speaker
- sinking. Due to the aggressive influence of precipitation on the surface of the base, a sinking type of structure is provided. Recommended for areas with frequent, heavy rainfall. The basement wall is thinner than the foundation.
Sunken
Ventilation
The plinth will not perform its function if ventilation holes are not provided. If the base is made of bricks, then it is not necessary to make them round; it is easier to lay them out rectangular or square. Sheet material can be used as a lintel: steel or reinforcement.
They must be placed on all walls, even on internal partitions. It is not recommended to close the openings during the winter, since the humidity in this room is constant. It is better to install ventilation with decorative grilles during construction.
Necessary building materials, tools
The arrangement of the basement structure of a permanent structure can be carried out in 1 or 2 bricks. An identical set of tools and materials will be required, but in different volumes.
Building materials:
- construction reinforcing mesh;
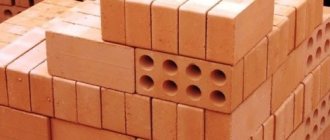
- red solid brick;
- cement;
- lime;
- waterproofing, heat-insulating material;
- sand.
If the foundation is laid in winter, an additional plasticizer is purchased.
Tools:
- building level, plumb line to control the horizontality and verticality of brickwork;
- construction cord for marking;
- ordering that allows you to create a beautiful facade;
- hammer with pickaxe;
- trowel;
- shovel;
- container for mixing the solution.
Calculation of the number of bricks
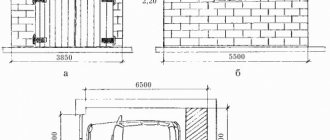
Calculation of the amount of brick will need to be made at the stage of creating an estimate for a brick plinth. But it happens that in practice the calculation is made when planning the construction of a basement. To calculate, you will need to know the thickness and height of the base. Such indicators are multiples of the size of the material used for laying, taking into account the thickness of the seams (usually they are 10-12 mm). Usually the base is built with a thickness of 380 or 510 mm. Laying a base of 1 brick is used in the main process of construction of wooden buildings, summer houses, bathhouses and other things. Laying half a brick is relevant for cladding the basement.
The height is set after determining the type of brick. It is important to take seams into account during the calculation process. Material consumption depends on thickness, but the specific value should be determined individually. It is necessary to purchase bricks with a margin of 5-7%.
Material selection
The material must be:
- durable;
- environmentally resistant;
- decorative, allowing you to make the facade of the building aesthetic;
- frost-resistant, capable of maintaining technical and operational characteristics through many cycles of freezing and thawing;
- must be poorly absorbent and allow moisture and water to pass through;
- safe for humans and the environment;
- have good adhesion to the solution. The formation of cracks and surface defects are excluded.
It is necessary to exclude deformation of the building material upon completion of the construction of a capital structure, with an increase in the load level. Attention is paid to identifying the strength of building materials.
Allowed to use brick:
- silicate. It has poor resistance to high levels of humidity. Should not be used for tape-type bases. An increased degree of humidity will lead to swelling of the building material. The brick will lose strength and collapse. The problem can be eliminated with waterproofing material. The foundation is completely finished with it;
Silicate
- red with heat treatment. Durable, moisture resistant. Choose M150 brand products. For areas with high levels of air humidity, grade M250 is used;
Red
- ceramic. Optimal for creating a base. Brick production is made from a special type of clay baked at high temperature. It is characterized by resistance to humid environments, frost resistance, and good load-bearing capacity.
Ceramic
Decorative cladding is optional.
Red sand-lime brick needs additional protection. The durability of the structure will increase. The possibility of deformation of the base will be minimized.
Basement insulation.
In unheated basements, heat escapes through the basement floors. The more costs are invested in the thermal insulation of the basement, the less costs will be required for heating the house in the future. To insulate the base from the inside, non-moisture-absorbing materials with closed pores are used that can retain their heat-shielding properties in a humid environment, for example, extruded polystyrene foam boards. The slabs are mounted with glue or cold mastic, since hot bitumen mastic will only spoil the material. In addition, adhesive compositions should not contain acetone, solvent, etc. additives that dissolve polystyrene.
Thermal insulation is also installed on the outside: rigid insulation is glued and plastered over a mesh.
The design of the basement insulation in a wooden house from bottom to top is as follows: outside the blind area, inside tar, slag, soil (all this is covered with a cement screed); the outside top of the base is covered with warm concrete to ½ the height of the crown (warm concrete: 1 part each of cement and lime, 9 parts of fine slag); warm concrete covered with a sheet of roofing iron; the interior is insulated with roofing felt at ½ the height of the crown; the wood is insulated with felt.
“zavalinka” design is a relatively inexpensive and lightweight plinth device, common in private construction.
The plinth-fill is the following structure from bottom to top: there is a pile with a blind area in the sand, a layer of slag between the pile and the log wall, the pile is covered with sheathing, which goes behind it at an angle to the log wall (like a protruding plinth).
Preparation of the solution
The amount of cement composition depends on the bricklaying technology. The builders made calculations for 1 cubic meter:
- 1 block will require 0.221 m3;
- 1.5 bricks - 0.234 m3;
- 2 bricks - 0.245 m3.
You can use online programs to calculate building materials.
Masonry involves the use of cement grades M300, M400, M500. The sand chosen is purified river sand of the middle fraction. Additionally, lime is used. Adding clay will make the solution more elastic.
The consistency of the cement mortar should be uniform and plastic. Large ingredients such as shell rock and gravel are excluded.
Before adding, the sand is sifted through a sieve.
Carrying out masonry with additional insulation of the structure allows you to use a standard version of the mortar without impurities. The composition for the foundation of the house is made with fillers.
Achieving a uniform consistency of the cement mortar is done with a construction mixer using a drill attachment.
The proportions of the components of cement, sand and water depend on the brand of brick. Correction for soil moisture is being considered.
Cement ratio table
Basement finishing.
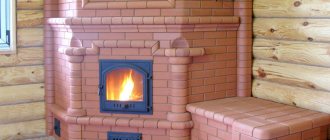
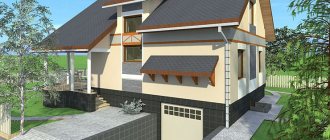
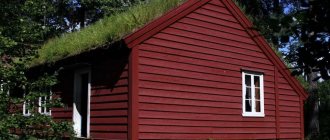
The base can emphasize the architectural appearance of the house and there are some rules for this. For example, a smart solution would be to finish the plinth in a dark color that matches well with the color of the roof. If you have something special in mind for the exterior design of your home, then when choosing the color shade of the base, be guided by the principle of combining colors that are close to each other or, conversely, contrasting shades. If your house is made of log or smooth plastered walls, then it would be appropriate to cover the base with natural or artificial stone - this will visually make the building heavier from below. You can avoid highlighting the base at all and cover it with the same material as the walls. Below are the options for finishing the plinth:
- Plastering and painting is suitable for a brick plinth. Plaster can be used to hide flaws, irregularities, or, conversely, to create a decorative relief surface. The plaster allows air to pass through and protects the base from moisture and temperature changes. The process of finishing a brick plinth: to reinforce the plaster, a metal or fiberglass mesh is attached to the plinth with dowels, plastering is carried out over it, and then the top can be painted with facade paint. Such finishing then needs to be closely monitored, since freezing and thawing at different times of the year, as well as the accumulation of moisture, will contribute to cracking and crumbling of the plaster. The base needs to be periodically plastered and tinted, especially closer to the blind area.
- Concreting is suitable for brick and block plinths. This is a more durable finish than plastering. The process of concreting the base: securing the metal mesh, installing the formwork into which the concrete is poured. To achieve a monolithic coating, it is recommended to carry out such finishing simultaneously along the entire perimeter of the house. When the concrete has hardened, you can remove the formwork and paint the surface with facade paint.
- Tiles and artificial stone are suitable for monolithic, brick plinths and concrete slab plinths. Tiles can be different: polystyrene foam, asbestos-cement, cement-stone mixture. However, such finishing will require considerable experience and skill. The tiles are attached to the facade with an adhesive solution or with dowels. Concrete for artificial stone is based on ground natural stone and cement. Artificial stone can completely imitate natural stone. When the stone is attached to forged nails, steel guides with a diameter of 6-8 mm are hung. A wire mesh with a diameter of 1-1.2 mm with cells whose size does not exceed 40 mm is stretched between the guides. The base can also be finished with facing bricks.
- Natural stone is a very beautiful type of finish, suitable for a monolithic plinth and a plinth made of concrete slabs. A perfect stone finish requires skill. Installation may take several days. What stone will be used in the cladding of the building depends on the overall style of the building; it can be marble, calcareous slate, crushed cobblestone, dolomite stone or others.
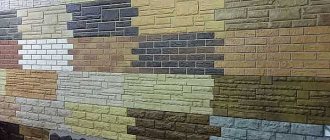
- Basement siding is a universal facing panel made of polymers, with a thickness of 2 mm. They are attractive because they can have a wide variety of textures, colors or imitate natural materials, and also because of their light weight. Siding is designed for a temperature range from -50 to +60 degrees. Durable material, not subject to fading and corrosion. It is convenient not only for cladding the base, but also for various transitions, pipes, etc. Base siding is easy to install, as it has a very simple fastening system with spikes and clamps. Some types of siding can even be installed without sheathing, if the surface of the base is flat; in other cases, siding is installed using metal profile sheathing on a clean, high-quality wall, as when installing drywall. The nails should be driven exactly in the center of the hole. Horizontal elements should be hammered from the center to the edge, and vertical elements from top to bottom. The lining is specially left movable in order to drain condensate. To decorate the corners, the siding must be bent; to do this, it is first heated to 120° on the unpainted side and then bent. The fold should extend 1-2 cm further than the corner line of the building.
Checking horizontal levelness
Pouring a concrete base requires a mandatory water level check. One edge is fixed in the corner of the building. The second end moves between the remaining corners. Only the absolute flatness of the surface on all sides allows you to begin laying.
Errors are leveled out with a solution. If there is a discrepancy of 10-20 mm, the base is leveled with a small amount of the initial joint. A drier composition is created, otherwise the seam will separate under the weight of the brick layer. The corners are set correctly by driving in pegs. The construction cord is being stretched. This allows you to check the geometry of the structure.
Facing
Let's move on to the last question, how to cover the base or what finishing you can choose from. In principle, the choice is huge. But we must take into account that the main requirement for a finishing material is its ability to withstand external loads. This mainly concerns natural loads: precipitation, sun, wind, high and low temperatures.
Therefore, a small list of materials that are most often used in finishing work today:
- Facing brick.
- Stone.
- Clinker.
- Porcelain tiles.
- Decorative concrete slabs.
- Siding.
- Cement based plaster mixtures.
But it is necessary to add that in such types as a protruding base that is level with the walls, one more decorative element must be taken into account, which carries, in addition to a decorative and protective load. These are ebbs that protect the cladding from precipitation. They are installed along the upper horizontal plane of the base part.
Construction site waterproofing
Purpose of waterproofing:
- preventing the aggressive influence of the environment on the base structure;
- ensuring moisture permeability;
- increasing the service life of the basement structure;
- protection against cracks and other types of deformation.
The main task of the waterproofing coating is to remove cavities in the base. The passage of water and moisture in the presence of through cracks is prevented. If there is a hole in the base cavity and water gets into it, it will destroy the structure when it freezes.
High-quality waterproofing of the foundation involves laying the material in horizontal and vertical directions.
Popular building materials for waterproofing purposes:
- liquid rubber;
- roofing felt The sheets are stacked in two balls. Connected together with bitumen mastic;
- glass insulation
To protect the structure from rain, an overhang is installed. The low tide gives the structure a protruding appearance. Its size is 70 mm.
The concept of “basement” in the construction of a house and general aspects of its arrangement.
The foundation has a continuation of 50-70 cm above the ground, and this transition from the foundation to the walls of the house is called the basement. The word "base" is of Italian origin. “Zoccolo” is translated from Italian as “the foot of a building located on a foundation.” The primary purpose of this barrier is to protect from environmental factors, so the base needs careful selection of material. But the base can also take part in the design of the external appearance of the house, serve in the architectural design, so the appearance of the material from which it is made is also important. A basement is a protective fence around a house with an underground floor. When the floor lies on the ground, the plinth, as a support, takes the pressure of the backfill and the load from the walls.
Important:
- The minimum height of the basement must be no less than 50 cm. In a house with a basement, the height of the basement can be one and a half to two meters;
- There is always ventilation in the basement. The ventilation parameters are as follows: 15x25 cm not lower than 15 cm from the ground level. There is 1 hole per 3 m of foundation. During frosts, the holes are closed;
- Installation of a blind area around the entire perimeter of the base is necessary to protect it from moisture. The width of the blind area should be at least 600 mm, slope: 2–3% in the direction from the wall of the house. Materials for blind areas: concrete, asphalt, paving with natural or artificial stone.
It is not always worth building a base. For example, under light structures, such as a veranda, porch, terrace or shed, there are columnar supports, and it is not at all necessary to install a plinth between the supports in these places, otherwise you will disrupt the air circulation in the underground, deprive it of ventilation and excess moisture will begin to accumulate.
Laying differences
The procedure is not complicated, but there are some nuances:
- The brick is first soaked in water. This will prevent it from absorbing moisture from the solution;
- lime is added to the solution;
- the consistency of the cement should be medium so that it does not spread and lies easily on the surface;
- laying of the reinforcing mesh is carried out every two orders. For a low base, the use of metal to strengthen the structure is not necessary;
- It is recommended to start laying from corners diagonal to each other;
- It is recommended to control the correctness of the masonry using a stretched construction cord.
Construction of the blind area
Creating a blind area is a mandatory step in the construction of a basement. The fact is that it protects it from the penetration of moisture, namely melt water and precipitation. Its maximum width should be no more than 60 cm, but at least 20 cm higher than the roof extension level.
Construction of the blind area.
Excellent materials for blind areas can be stone, asphalt and concrete. If you are installing it yourself, start from the corners. Treat them with sealant and begin installation.
Recommendations
Recommendations from professionals:
- the horizontal thickness of the seam joint should be within 12 mm, in the case of reinforcement - 16 mm;
- You can get a high-quality seam using a metal rod with a cross-section of 12 mm. Its location is in the corners of the future basement structure;
- laying the mortar is done with a trowel. It also removes excess cement. It is better to do it right away before the composition hardens;
- after checking the verticality and horizontality of the laying, errors are eliminated by tamping with a hand trowel;
- a cord stretched between opposite corners of the future structure will allow for even ordering;
- For beginners, it is recommended to lay the first order dry. Then, proceed to bandaging with cement mortar;
- You need to ensure that the surface of the walls is neat and clean. Produce seam joints in a timely manner. While the cement is not dry;
- the process of reinforcing walls will increase their strength. Reinforcing material is laid every 4 rows;
- facing building materials at the final stage of construction will protect the structure from precipitation and other aggressive environments;
- double waterproofing protection ensures the stability of the structure from the influence of external weather factors and groundwater flows;
- The main rule for arranging the foundation is the correct alignment of the corners.
The service life and safety of the building depend on the correct execution of the plinth. You need to follow technology and not neglect safety precautions.
Average score of ratings is more than 0
Share link
Comments There are no comments yet, but you could be the first...
Recessed plinth finishing options:
- Decorative finishing of the base made of concrete blocks with natural stone when the wall of the house is brick. Around the base, at a width of 50-70 cm, you need to remove the soil with a shovel and make a trench 10 cm deep. Then fill it with crushed stone or gravel, water it well and compact it after 1-2 hours. Thus, around the house at ground level you will get a “cushion” for slopes. Stones are selected with a thickness of no more than 10 cm and with one flat side. For thinner stones, a thicker layer of cement will accordingly be needed to level the overall plane of the masonry. Before laying, the stone and plinth are moistened with water, then cement mortar is applied to the plinth over the area of one stone. When the stones are laid, they are tapped. Try not to get the solution on the outer surface of the stones; if this happens, wait until the solution dries and then remove it with a dry, stiff brush. Laying begins from the bottom row, and the lower edge of the stone rests on a crushed stone/gravel “cushion”. The plinth is faced with stone at a rate of 1 row per day. The fastening solution of one row hardens in about a day, then proceed to the second. Each subsequent row of stones rests on the previous one. In dry weather, previously laid rows are watered. After securing each row, metal jointing is used to smooth the mortar between the stones. The seams should go 1 cm deep. After the last row is ready, you can begin to create a slope that will drain water from the house. The slope will go at an angle of 5-10° from the base to the ground. When creating a slope, stones are hammered into the cement mortar and adjusted to each other so that an even slide is obtained.
- Decorative finishing of the base made of liquid concrete with natural cobblestones. First, formwork is made and stones are selected (as in the description above). The stones are placed in the formwork with their flat surface facing the wall of the formwork and fixed with cement. After completing the first row, it is poured with concrete and left for 2-3 hours, after which another row is repeated and so on until all the rows have been assembled. The formwork can only be removed after a few days. After removing the formwork, the surface of the stones is cleaned, a colored cement mortar is prepared with the addition of color or crushed red brick, which will decorate the base, and the space between the stones is filled with it. After a few hours, you can use a trowel to unstitch the seams (as in the previous method) and complete the final cleaning of the masonry surface. Another design option is to reassemble the formwork after its first removal, but this time on a wider scale. A gap appears between the base and the formwork, into which you can pour expanded clay mixed with water-cement mortar (solution 0.7-0.8; expanded clay 5 parts), and then spill it with cement water. Instead of expanded clay, crushed granite stone, marble chips, etc. are also suitable.
Carrying out repairs
The basement of the house is constantly exposed to aggressive factors.
For this reason, it is periodically repaired. First of all, you need to remove the old finish and plaster . The surface is completely cleaned, even if damage is observed in individual areas. After the preparatory work, the wall needs to be dried.
Then the surface is treated with an antiseptic, insulation and waterproofing are laid. The final stage of repair is applying plaster. If necessary, install a new decorative covering.
You can find out how to properly repair a basement yourself and how much it will cost here.
This will definitely interest you:
- Monolithic strip foundation for a house made of gas silicate blocks Reinforcement of strip foundation
- Laying walls from blocks. The first row is the foundation for all subsequent ones
- Blind area around the house. How to properly make a blind area around the house with your own hands.
- Foundation for a house Types of foundations
- How to make a blind area correctly: insulating the blind area.
- Insulation of the basement of a country house or cottage
- Wall insulation with polystyrene foam (expanded polystyrene, EPS) Wall cladding with bricks
- Reinforcing frames: types of frames, production of reinforcing cages. Mounting rings
- Bitumen, bitumen mastic
- External sewerage for our house - pipeline, pipe slope, two-chamber septic tank
Decorative plaster
Decorative plaster is the most economical finishing option. Plastering does not require any special construction skills. The work can be done independently.
But the disadvantage of this finish is its fragility. The plaster is destroyed by moisture and may soon require repairs.
Installation of ebb tides
The protective canopy protects the base, which extends beyond the perimeter of the main building, from premature destruction. To organize the casting, copper, polymer, galvanized, stainless or steel castings are used.
Installation can begin after finishing the base. Particular care is taken to connect internal and external corners.
Weather-resistant polyurethane foam is placed under low tides to reduce noise caused by gusts of wind or rain.
It is necessary to make markings for the installation location . Then installation on the wall is carried out. The ebbs are attached to the foundation using roofing screws. Pre-drill holes in the ebb material, after which dowels are inserted through the holes. To create reliable protection, it is important to pay special attention to the corners.
What are flashings for a foundation plinth and how to install them yourself can be found out here.
Natural or artificial stone
Stone is the most expensive finishing material. The process of stone finishing itself is the most labor-intensive, which makes not only the cost of the material expensive, but also the cladding work. But this finish is the most durable.
The stone has increased strength and is resistant to mechanical damage. Cladding the basement with stone gives the whole house a unique decor.
Drainage arrangement
If the site has a high groundwater level, it is necessary to arrange drainage. A drainage pipe is laid around the perimeter of the house from ordinary sewer pipes.
Connect the pipe to the drainage well. Water is pumped out from the well and drained downhill from its site. At the same time, the perimeter of the house is backfilled with gravel and sand.
Level leveling
If the base has an uneven surface, the waterproofing will not adhere tightly to the surface.
As a result, the protective characteristics of the structure are reduced. To correct defects, it is necessary to level the horizontal part . If the difference in height does not exceed 3 cm, it is necessary to make a zero design elevation of the building. To do this, use a level. Concrete mortar is used to level the surface.
If the difference is within 4 cm, use a cord beating and arrange the formwork to form a new height of the plinth. If the height exceeds this parameter, brickwork followed by plaster is used for leveling.
Ways and methods of how to level the foundation base are discussed in this material.