Home |Construction |Facing the base with natural stone
Date: June 13, 2017
Comments: 0
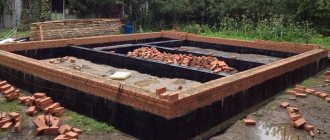
When building private houses, much attention is paid to arranging a strong, reliable base. Base – the upper part of the foundation, located above the soil layer. The main task of this part of the structure is to protect the walls of the house from precipitation. The basement part of the building also carries a rather large architectural load. Therefore, it is worth taking a responsible approach to the choice of finishing material. Natural stone for plinth cladding is the most popular material today.
Along with natural minerals, other materials can be used for finishing: ceramic tiles, artificial composite, siding, decorative plaster. Each material has its advantages and disadvantages, including natural stone. But if the owner of the house wants to get not only a strong, but also a presentable structure, it is worth choosing natural stone.
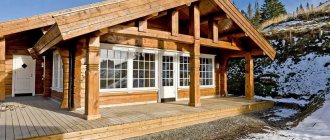
Cladding the base with natural stone is an opportunity to give the house a respectable and beautiful look
Natural stone for finishing the base
The use of natural materials for finishing buildings allows you to give a building a respectable appearance and create an original design with a creative approach. For finishing, preference should be given to frost-resistant types that do not crack under temperature fluctuations. It is better to finish with minerals of dark shades - to maintain them in a presentable form, a minimum of effort is applied. The most commonly used natural massifs:
- Granite.
- Shungite.
- Quartzite.
- Slate.
- Shell rock.
- Sandstone.
Natural stone for finishing the base is used in two types:
- natural (unprocessed);
- factory processed.
The use of untreated solid layers, pebbles, and cobblestones allows you to achieve an original design and create textured patterns. But we must remember that working with such material requires skill, as well as artistic taste. Fitting untreated stones is a labor-intensive and physically difficult task.
Frost-resistant, dense natural stone is suitable for cladding the base
Industrially processed natural minerals are more often used. They are divided into the following types:
- tiled option. The source material is cut into elements of equal thickness. The length and width can be arbitrary;
- tumbled stone. Using special machines, sharp edges and corners are rounded;
- finishing in the form of strips of a certain width. The natural massif is split and cut into strips using special tools.
Frame mounting
Products that have suitable fastenings are mounted on the frame.
Laying sequence:
- A sheathing is made of a metal profile or wooden beam. Fastening is carried out directly or through special hangers. The design should be reliable and durable.
- The parts are fixed using self-tapping screws. They are screwed into the eye of metal elements that protrude beyond the edge of the stone.
You should know! Another method can be used, which involves pre-installing clamps; they securely fasten the fragments.
It is the frame method that allows you to get a base with ventilation. This is necessary quite often, especially if there is a basement.
Finishing the base with natural stone - advantages and limitations
Finishing the base with natural stone has a number of advantages over finishing with other modern materials:
- Durability.
- Frost resistance.
- Decorative.
- Environmentally friendly.
- Resistance to mechanical damage.
- Possibility of replacing individual elements.
- Easy to maintain finished surface.
According to its characteristics, natural stone of igneous origin is best suited for this task - gabbro, labradorite, granite and related ones.
A few disadvantages include:
- high price.
The cost of a natural mineral differs significantly from its artificial counterpart; - the complexity of the masonry process.
Due to incorrect geometric dimensions, a lot of time is spent on adjusting the elements.
Cost of raw materials in Russia
The cost of natural stone depends on various factors - the strength and stability of the material, the complexity of installation, and decorative qualities. The region where the customer is located is also taken into account.
The price per square meter is set depending on the type of stone:
| Moscow | Saint Petersburg | Krasnodar | Novosibirsk | Ekaterinburg | |
| Granite | 1700 rub. | 1500 rub. | 1500 rub. | 1600 rub. | 1500 rub. |
| Marble | 3500 rub. | 4000 rub. | 3200 rub. | 3600 rub. | 3000 rub. |
| Shell rock | 750 rub. | 650 rub. | 500 rub. | 600 rub. | 500 rub. |
| Flagstone | 450 rub. | 380 rub. | 250 rub. | 400 rub. | 500 rub. |
| Quartzite or slate | 850 rub. | 740 rub. | 500 rub. | 800 rub. | 600 rub. |
| Rubble | 1500 rub. | 790 rub. | 600 rub. | 1300 rub. | 1000 rub. |
| Sandstone | 600 rub. | 550 rub. | 400 rub. | 500 rub. | 400 rub. |
The exact price depends on:
- the required amount of material,
- its external execution,
- thickness,
- size of slabs.
When choosing, take into account the option of finishing the facade and roof.
Important and useful information about finishing the base with natural and artificial stone is presented in this section.
Material selection and basic recommendations
When choosing a cladding option, you need to realistically assess your financial capabilities. If you are on a limited budget, you should not chase expensive granite or rubble. You can achieve an attractive appearance using shell rock and sandstone. In terms of durability, they are, of course, inferior to minerals of igneous origin, but with proper processing and care they will last quite a long time. Don’t get carried away with marble - over time it loses its attractiveness and needs additional processing.
The finishing color scheme is chosen in accordance with the taste preferences of the owner. It is worth remembering that a dark-colored surface requires less maintenance. On light-colored finishes, dirt stains are more noticeable.
An important nuance is the compatibility of facing materials. Carbonate and silicate rocks cannot be used in the same masonry. The interaction of the substances contained in them leads to a violation of the integrity, and, consequently, to the rapid destruction of the coating.
It is not recommended to use loose sedimentary rocks of stone - shell rock, dolomite, limestone - for cladding the base.
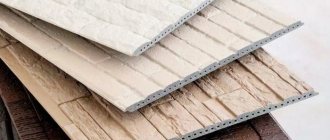
How to install plastic (PVC) plinth panels
This type of finishing is called differently: basement or facade panels, basement siding. They have a varied appearance: to match different types of stone, tile, brick.
To install PVC panels on the base, you need to assemble a frame. It is made from wooden beams 50*50 mm. Since the finishing will be outdoors, the wood must be protected with impregnations that prevent rotting and protect against pests.
The sequence of actions is as follows:
- Using a level (laser or hydraulic level), the required finishing height is marked at all corners of the house.
- Nails are nailed in these places (screws are screwed in), a marker (string) is pulled between them, which marks the height of the base finish.
- A beam is nailed along this cord around the entire perimeter of the house. Its top edge should be precisely directed along the cord.
- If the height of one panel is not enough, you will need to make another row of timber on which two sheets will be joined, and you will also need the same strapping for the lower end of the panel.
Another finishing material for the plinth is PVC panels, which are also called “basement siding” - After about 50-60 cm, short transverse bars are packed in - they will prevent the PVC panels from sagging.
- Start installation from one of the corners. There are special elements to decorate the corner. They are secured to the sheathing with wood screws.
- The edges of the sheets of plastic facade panels are uneven - with protrusions. The edge of the first from the corner must be cut off evenly. This can be done with a jigsaw or grinder, a hand saw with a metal blade (fewer teeth, you get a smoother edge).
- The cut edge is inserted into the corner element. At the top and bottom of each panel there is perforation for fasteners. This is where the self-tapping screws are secured. But they don’t need to be tightened all the way: there needs to be some play for thermal changes in size. That's why the perforation is made of an oblong shape, and it is better to install the self-tapping screw in the middle: when changing sizes, the panel will move freely and will not burst.
- The next element is joined with a special lock and secured in exactly the same way.
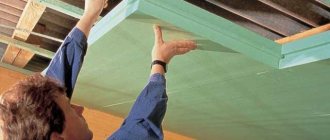
Assembly is easy. Only after fastening will it be necessary to make ebbs on top: the sheathing and panels have a fairly decent volume and a gap remains at the top. You can cover it with roofing iron, as in this video. Immediately look at the technology of finishing the base with plastic panels.
In the same way, the base can be finished with corrugated board. There is only one note: it is advisable to lay insulation in the voids between the sheathing. The house will be much warmer.
Cladding the base with natural stone - preparatory stage
Construction activities must begin with the preparation of tools. To cover the base you will need:
- Master OK;
- building level and square;
- putty knife;
- rubber mallet for compaction;
- grinder for finishing the dimensions;
- electric drill with a nozzle for mixing masonry mortar;
- metal brush;
- a brush or spray bottle used to wet the surface.
Having prepared the necessary tools, carefully inspect the surface to be treated and perform the following work:
- Use a metal brush to remove uneven surfaces, smudges, and cement deposits.
- Treat the entire area with primer.
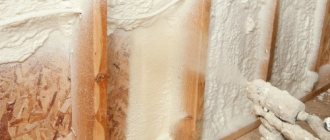
When laying stone, it will create additional traction. Apply the composition with a paint brush or, for larger areas, use a roller. When finishing the base with natural stone, you need to pay special attention to sealing masonry joints - Prepare the cement mortar. Add a plasticizer to the mixture to promote a tighter fit of the natural mineral to the surface of the base. You can use heavy tile adhesive as a masonry mortar. The glue will ensure a strong connection.
All measures to prepare the basement surface are carried out after arranging a blind area around the perimeter of the entire building, designed to protect against the destructive effects of moisture.
How to fix porcelain tiles or clinker tiles
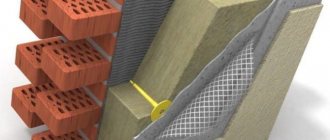
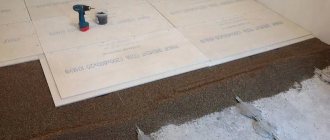
If heavy materials such as porcelain tiles or clinker bricks are simply placed on glue, on a plastered surface with grooves, perhaps they will stick normally. And they can even stand for some time. Even several years. But then they will begin to fall off along with the solution. Especially in places where there are no grooves or they are of insufficient depth. To improve adhesion, you can apply a layer of impregnation that improves adhesion (grip), but this is not a guarantee, especially if the material is heavy.
The same picture will happen if you glue the materials directly onto the insulation. The surface is smooth, easy to glue. But after a while the finish will fall off. Faster than with a plastered surface. There is a video about this.
To prevent this from happening, it is necessary to secure a metal painting mesh, preferably galvanized. It is secured with dowels, placing a piece of galvanized steel on the dowel-nail, the size of which is larger than the size of the cell. They are attached at the top, bottom and in a checkerboard pattern in the middle. This creates a reliable basis for material of any weight.
Glue is applied to the base and to the tiles. On the tile, remove it with a notched trowel, put it in place, tap the trowel handle and put it in place, leveling the plane. The distance between the tiles is maintained using crosses, only their thickness is taken to be significant 3-5 mm.
In general, the installation technology is similar to laying tiles. The only difference is that the glue must be special for outdoor use. The second difference: finishing materials for the plinth begin to be laid from below: they are heavy and need support. You rest the bottom row on the blind area, the second row on it, etc.
Natural mineral laying technology
As a rule, the plinth is faced with natural stone from left to right and from bottom to top. You can work independently, the main thing is not to rush, and be meticulous in the selection of each element to be laid. The process technology is simple and consists of the following points:
- Select an element that is suitable in size and shape. First attach it to the surface and check for any gaps.
- Using a grinder, remove sharp protrusions and irregularities.
- Apply masonry mortar to the facing material and install the element in the selected location. Make sure that the outer part of each subsequent element is in the same plane as the previous one.
- Tap the array with a rubber mallet to eliminate air pockets and create a tighter fit.
The greatest danger to natural stone is moisture penetrating into the cracks between individual pieces
Further work is carried out according to the described algorithm, assembling a mosaic from facing stones. Fitting the elements is the most difficult moment, requiring a creative approach. The gaps between large fragments can be filled with smaller ones or using finishing stones of other types.
Having laid out one side of the plinth, you should immediately clean the seams and remove excess masonry compound. Only after this proceed to lining the next side. After a day, when the solution has set, go through the seams with a metal pin. This will add texture and volume to the base surface and make the design more expressive. During hot periods, carry out periodic heavy wetting for better setting and to prevent the formation of cracks in the solution.
Closing events
Natural mineral is the most resistant material to negative factors. However, the base surface covered with it requires additional care and treatment. After the solution has completely set, you must:
- Carry out final cleaning of excess masonry mixture. Use liquid cement removers for final cleaning. Avoid mechanical cleaning to avoid damage to the front side of the coating.
- Clean the surface of natural minerals from contaminants with water and detergents that help preserve the natural appearance of the array.
- Treat porous materials with special compounds that block the access of dirt and moisture inside the array.
To avoid additional costs, you can refuse finishing. But the use of specialized grouts, coatings, and varnishes will help preserve the original appearance of the cladding for many years and protect the base from the appearance of salt stains, mold and moss.
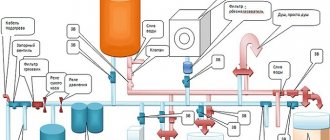
What to choose: glue or cement mortar
The traditional technology of cladding the facade and foundation of a house with natural stone with your own hands involves the use of cement-sand mortar. However, as an alternative, a mixture of glue and cement is also used. The industry also produces special frost-resistant mixtures that are characterized by increased elasticity and adhesion. How to properly use substances of this type for finishing the foundation and walls of a house is indicated on the packaging. It should be noted that the use of ready-made mixtures ensures more reliable retention of the stone. Here the technology will also depend on the type of material itself. All stones are usually divided into three categories, differing in the degree of water absorption:
- Low porosity (moisture resistant) - slate, quartzite, dark granite. Due to the small number of pores on the surface of such stones, they are equally suitable for laying on adhesive mixtures and cement mortar.
- Medium-porous stones - black marble, sandstone and light-colored granite. These materials are characterized by an average degree of water absorption. Do-it-yourself installation of them is carried out using a mixture of a light shade or a colorless adhesive composition. In this case, the amount of water should be limited.
- Porous stones - they all do not tolerate moisture well. These rocks include limestone, travertine, thin white granite and white marble. When laying the foundation with your own hands, these stones can only be laid on a dry, light-colored mixture. If you use cement mortar for finishing, it will leave dark traces in the pores, which will then be impossible to remove.