Everyone furnishes their home based on their own taste preferences and idea of comfort. Even if you do not touch on the early stage of finishing work, but immediately move on to the selection of furniture, many will have difficulties with its implementation. Furniture items can be purchased or made yourself. The first option is faster, and the second is cheap, interesting and exciting. We invite you to learn how to create a kitchen with your own hands from furniture panels, a master class from experienced craftsmen.
How to choose the right furniture panel for the kitchen
Before you start developing a design or drawing up a diagram, you need to decide how to choose the optimal wood. Today, manufacturers offer a wide range of tree species used in the manufacturing process of furniture panels. In most cases, property owners prefer pine, oak, cherry, beech, poplar, and yew.
Most people mistakenly assume that furniture board is made from waste wood products or pressed wood.
IMPORTANT! Softer material is intended for creating interior elements that will not be subject to heavy loads, for example, facades, decor, top cabinet lids. Hardwoods (yew, beech, oak) are intended for the construction of frames.
Its production is based on the process of gluing wood lamellas, which subsequently undergo several stages of surface polishing.
The selection of furniture panels based on the type of wood depends on the required functions, financial capabilities and purpose of the finished product. In addition to these characteristics, it is important to pay attention to the following parameters:
- absence of knots, cracks, chips on the surface of the workpiece;
- uniform distribution of annual rings.
Furniture made from furniture panels belongs to the category of deep-processed products.
An equally important parameter is the grade of furniture panels, which is determined depending on the number of defects on their surface. Traditionally, products are divided into varieties such as Extra, A, B, C. Sometimes the sides of the shield are represented by two varieties, in which case a double meaning is used. According to the requirements for the quality of furniture, the use of class “C” products is prohibited, so we suggest considering the features of only the first three types.
The final product is not inferior in density even to solid wood.
"Extra"
These furniture panels are characterized by the absence of visible defects and damage. They are made from a single lamella. Property owners can select products based on appearance and texture, which significantly affects the overall appearance of the room.
A rich assortment will allow you to choose the material that best fits into your existing interior.
"A/B"
This designation indicates that one side of the product is represented by grade “A”, and the other “B”. A shield with such characteristics in terms of the number of damages, on the one hand, is practically not inferior to the “Extra” category. When choosing, you must remember that solid or spliced lamellas can be used. The second side of the product may be represented by small defects, knots and minimal cracks.
Furniture made from this material is considered durable and of high quality, its service life is very long.
"IN"
This type of material can be made from spliced or solid lamellas. The presence of minor errors is allowed, for example, knots, cracks and other types of defects that do not significantly affect the quality of the board. The selection of products is made exclusively by color.
Wooden furniture panels are extremely resistant to moisture, while the surface structure is completely preserved.
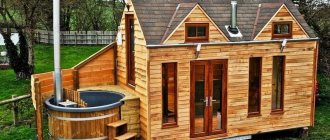
Step-by-step instructions for building a bar counter
The easiest way to transform your kitchen space and make it more stylish and comfortable is to install a bar counter. Let's look at the step-by-step instructions to answer the question “How to assemble a bar counter for the kitchen?”
Having decided on the type and taking the necessary measurements, the future structure must be sketched on paper in the form of a sketch or drawing.
- First you need to determine the dimensions - height, length and width so that they are comfortable for family members.
- The next step is creating the frame. To ensure proper rigidity, corners can be made from a solid profile. To do this, you need to cut two walls and bend everything else in a straight line. It can be strengthened with self-tapping screws or a cutter.
- After the walls have been made, it is necessary to secure them to the floor. Between them you need to install a transverse profile for rigidity, taking into account the required distance. Using crabs, you need to connect the profiles perpendicular to each other.
- The wiring going through the frame must be thought out in advance if you plan to make a backlit stand. Safety precautions require that the cable be insulated and kept away from any parts and metal.
- If you are confident in the strength of the frame, then you can begin covering it with plasterboard. It is necessary to cut pieces of material in accordance with the dimensions of the frame and, using a screwdriver and self-tapping screws, screw them into the profile with a short pitch. The caps can be placed as deep as possible so that at the next stage they can be hidden using putty.
- All joints must be sealed and the ends sanded with a float. In those places where there are recesses from self-tapping screws, you can use putty. After it dries, you need to go over it with sanding paper and prime it.
- Next you can start painting. For convenient use, experts advise choosing a roller. In hard-to-reach places you can paint the surface with a brush.
- If the fit is not tight, you can install skirting boards; it is important to treat the seams with sealant.
- One of the final stages is connecting the lighting. It is necessary both for convenient work at the counter and for visual highlighting of the structure. Lighting fixtures can be placed in a beam that is installed above the tabletop, or a traditional chandelier can be installed. What lamps can be like will be discussed in the next part of the article.
- It is important to take care of the availability of sockets. If there are none nearby, an extension cord with a filter can be a way out of the situation.
This design turns out to be functionally rich and solves both the issue of cooking and guest meetings.
Kitchen drawings and diagrams with dimensions
Creating kitchen drawings from furniture panels with your own hands is an important process that can subsequently become a lifesaver for any craftsman. The plan of the kitchen space must be created taking into account the dimensions of the furniture. The document displays information about the size of the room, communication diagram, ventilation system, electrical wiring, and the presence of sockets.
To draw up a drawing, you need to take measurements of the kitchen.
It is also important to indicate in the drawing the location of the entire furniture set, indicating their sizes, for example, a table, a wardrobe with shelves for storing food, chests of drawers and bedside tables, a refrigerator, a gas or electric stove, a sink and other components.
You should always start from these initial data when developing the sizes and names of furniture.
Dresser
This type of furnishing item can be ideal for the kitchen area. For this reason, it is necessary to consider its location in the room, design features, size and number of shelves, compartments, and dimensions of the upper surface. All these parameters are indicated in the diagram in order to avoid problems and troubles later.
When choosing a specific option, consider all factors.
Closet
Many craftsmen believe that creating a wooden cabinet is difficult and time-consuming. But with sufficient experience and carpentry skills, its production will take very little time. The drawing must indicate the type of structure and its dimensions (height, width). It is very important to include in the diagram information about each element that makes up the cabinet - depth, width, height of shelves, doors, partitions and other components. This approach will allow you to clearly calculate the amount of material needed, as well as correctly carry out all planned work so that the product fits harmoniously into the room.
You immediately need to make a list of elements indicating their quantity and material of manufacture.
Table
A DIY table made from furniture panels or any other material is one of the most important elements of the kitchen. It can be made in the form of a square, rectangle, circle, corner shape, as well as folding or sliding. A prerequisite for this piece of furniture is a flat tabletop. On the kitchen diagram, it is necessary to indicate the shape and dimensions of the table; for example, in most cases, rectangular structures have dimensions of 270x60 centimeters.
Not only the list of items, but also the comfort of use also largely depends on the location of the furniture.
The main purposes of the bar counter
As a rule, this design is installed in the kitchen or living room. The functions that it will perform can be very diverse.
- The most common use of a bar counter is as a place for morning coffee, quick snacks or cozy conversations over a glass of wine. Most often this option is used in large kitchen spaces.
- Zoning. If the kitchen is combined with the main room or living room, then such a counter can act as a conditional demarcation between two different zones.
- Instead of a dining table. The best option for small spaces. In this case, the stand is adjacent to the window or wall.
- Additional work surface. It is also an excellent option for small rooms where it is not possible to install a large kitchen set with a countertop area sufficient for work processes.
The choice of the type of bar counter will depend entirely on the conditions that apply to it.
Preparation of all materials and tools
An equally important step is creating a work plan. This document specifies such important parameters as:
- the type and composition of the future furniture set;
- list of fittings and accessories;
- necessary tools and materials.
You need to have a full set of carpentry tools, a workshop, basic furniture making skills and a great desire.
In most cases, the following components may be required:
- furniture panels in the required quantity to create all planned interior items;
- special impregnation, varnish, stain, paint;
- plywood sheets;
- fittings, doors, handles and other decorative details;
- sandpaper or grinder;
- electric or conventional drill;
- wood saw or electric saw;
- screwdriver;
- boards;
- screws, nails;
- measuring instruments (large ruler, centimeter);
- a pen or pencil for recording measurements;
- screwdrivers, hammer.
It is possible that other adaptations may be required. The final list depends on the preferences of the master, the planned design of the kitchen and the assembly features of the furniture set.
Useful videos
In this video you can see how to solve the problem if you want to install a bar counter outside, within an open summer kitchen. It is enough to find a snag in the forest, as well as dry thick branches and install a board on them.
BAR COUNTER MADE OF WALNUT SLAB, STABILIZED WITH EPOXY, PRIMER AND VARNISH
Many people are interested in the question of how to make a countertop for a bar counter yourself. The next video shows a tabletop in the form of a mosaic. Here it is shown and explained how it is done.
9 mistakes in a kitchen with a breakfast bar
Cutting panels to required sizes
Cutting must be carried out taking into account safety precautions in order to prevent injuries and other troubles. When buying furniture panels, it is important to remember that they can be available in different thicknesses. In most cases, manufacturers offer 15, 20 and 25 millimeters.
Products that are 15 mm thick are used to decorate the back wall of a furniture set. Products with parameters of 25 millimeters are intended for creating more complex design structures; other types are used for other elements of a rack or cabinet.
Cut the furniture board to size. You can work with an electric circular saw, but it is better to do this operation on a circular saw.
The wood is cut according to the created drawing. It is important to carry out cutting very carefully and carefully, because even a slight inaccuracy can lead to deformation of the entire furniture. An electric jigsaw is used for this.
INTERESTING! There are construction stores that offer their clients an additional service - cutting the board into the necessary components. This option is ideal for beginners who have not worked with a jigsaw or have not carried out such work.
After completing this procedure, the master must have all the components for each cabinet and shelf, as well as doors, countertops, fittings, and sink.
If you do not have the opportunity to do the cutting yourself, then do it in the store.
Types, depending on the material to which it is attached
Modern manufacturers today use not only chipboard to make furniture. Glass, metal parts, and plastic elements are widely used. Fastenings for furniture made of chipboard were discussed throughout the material, and options for fastening objects made from other raw materials are discussed below:
- Glass - screw-type holders are used that are screwed into a wall made of concrete or plasterboard. They are used to fix shelves and mirror surfaces without damaging the coating of the part. For glass doors on the cabinet, the use of furniture hinges is suitable;
- Metal – screw fastenings are used to connect the shelves of metal racks. They are screwed into the racks using a drill or screwdriver. An attractive cap is installed on the front side;
- Plastic – plastic parts can be secured using any chipboard fasteners.
Separately, it is worth highlighting the dovetail fastening - it is used to connect drawers. The essence of the connection is to cut out a comb surface on each part, which is inserted into another part, resulting in end-to-end fixation. Choose only the type of fastening that suits you best. Before purchasing, be sure to calculate the thickness of the material so that during the assembly process screws and screws do not protrude on the surface.
We assemble the kitchen and install it
Now you can assemble the kitchen furniture set. Before you begin this important event, you need to make sure that all additional components are present: handles and door hinges, guides, legs and other elements.
The cabinets can be coated with wax or varnish; painting is not recommended so as not to hide the beautiful structure.
Next, each detail of all modules is laid out step by step. Be sure to do this in the order in which the connection will occur. This approach will avoid confusion and troubles with the loss of elements. The process should be carried out from below, from the base, and then proceed to creating a frame and filling it with components.
Now that you have a little furniture making experience of your own, you can begin making more complex base cabinets with drawers, desks and tabletops.
A kitchen made from furniture board is a great opportunity to add a creative touch to the room. The creation and assembly of such a furniture set can be implemented in any living space. The quality of the material contributes to the durability of the kitchen, functionality and compliance with any interior design style.
The main thing is not to be afraid of work and carefully calculate the consequences of each step.
Choosing a style
When choosing any piece of furniture, it is important to focus not only on its quality and functional characteristics, but also on aesthetic ones. The countertop must fully correspond to the style of the room and fit organically into the interior design, becoming its continuation and inseparable part. Let's look at what bar counters can look like in accordance with different design styles.
Non-standard kitchen equipment makes it easy to update its interior and give it a modern and stylish look.
- Classic. This model is based on consoles, the height of which is 1.1 - 1.2 meters. The tabletop is located on these consoles. The design can be complemented by high chairs made from natural wood.
- Combined. This is a stand that connects, for example, a table and a work surface. Thus, the structure becomes a connecting link or continuation of any element of furniture. The height of such a structure will be similar to the height of the products of which it is a continuation.
- Two-level. This design is also called “2 in 1”. Due to its compactness, it is perfect for a small kitchen. This rack consists of two levels. The one located above serves as a counter, and the second level can be a good and ergonomic replacement for a dining table. For comfortable sitting, you can place chairs of different sizes on different sides: on one side - bar chairs for the first level, on the other - standard height stools for dining.
- Central. This design is a separate island. It will look good if the kitchen is spacious enough and well lit. A hob or sink can be built in here, and cooking processes can also be carried out here. The option is very convenient and stylish, however, few will be able to afford its implementation.
Eccentric coupler
This type of fastening element is used when assembling furniture in a factory environment, due to the complexity of drilling holes for its installation.
The main advantage of the eccentric screed is its concealability, which prevents the appearance of the cabinet or other cabinet furniture from being spoiled.
Also, using this fastening method, it is possible to fix the parts at an angle relative to each other.
As mentioned above, the installation of eccentrics is carried out in the conditions of factory furniture production, since the sampling depths for their installation are at least 12 millimeters. And this despite the fact that the wall thickness of the laminated particle board has a size of 16 millimeters. Therefore, without the use of special equipment, which is impractical to purchase for a one-time installation of interior items, installation of such fasteners is practically impossible.
WHAT YOU NEED TO GLUE WOODEN BOARDS INTO A SHIELD
- Plane;
- A circular saw;
- Clamps;
- Hammer;
- Gauge for marking;
- Measuring and drawing instruments;
- Equipment for wood processing (surface grinding and belt units). If they are not available, then you can use sandpaper, but then leveling will take longer;
- Wood material;
- Wood glue;
- Electric planer.
IMPORTANT: You need to use good glue to ensure that the boards are joined together well.
- Impeccable high-quality wood glue Kleiberit 303.2. It has excellent moisture resistance and is characterized by powerful fixation. Suitable for both indoor and outdoor use, for gluing various types of wood. Product price starts from 6,600 rubles per unit of 28 kg.
- Kleiberit pur-glue 501. Excellent quality glue suitable for all types of wood, slabs, and ceramics.