Supply and return in the heating system are separate systems designed to supply heated water to heating radiators and remove cooled liquid to the boiler or other heating equipment in order to further increase the temperature of the coolant. In what ways can you organize supply and return in modern conditions, read on.
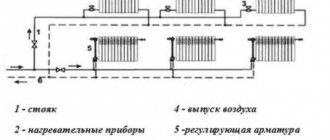
Location of supply and return in the heating system
It sounds confusing, but in reality everything is very simple: where is the supply and return in the heating system
The comfort of the family in winter will depend on how efficiently the heating system in the house operates .
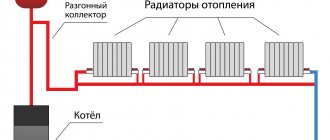
If the batteries heat up poorly, it is necessary to eliminate the malfunction, and for this it is important to know how heating works in general. Water heating of space is a heat source and coolant, which is distributed through radiators . Supply and return are present in one- and two-pipe systems.
In the second, there is no clear distribution; the pipe is conventionally divided in half.
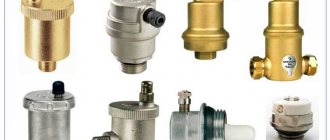
Safety valves
Any boiler equipment is a source of danger. Boilers are considered explosive because they have a water jacket, i.e. pressure vessel. One of the most reliable and widespread safety devices that reduces the danger to a minimum is the safety valve of the heating system. The installation of this device is due to the protection of heating systems from excess pressure. Often this pressure occurs as a result of boiling water in the boiler. The safety valve is installed on the supply pipe, as close to the boiler as possible. The valve has a fairly simple design. The body is made of good quality brass. The main working element of the valve is the spring. The spring, in turn, acts on the membrane, which closes the passage to the outside. The membrane is made of polymer materials, the spring is made of steel. When choosing a safety valve, it should be taken into account that full opening occurs when the pressure in the heating system increases above the value by 10%, and full closure occurs when the pressure drops below the response value by 20%. Due to these characteristics, it is necessary to select a valve with a response pressure higher than 20-30% of the actual one.
Methods of organizing a heating system
A heating system with a return pipeline can be organized in several ways:
- Water supply from above: under the roof of the building, in the attic or on those floors. On the contrary, the pipeline check valve is located in the lower part of the house: under the floor or in the basement. A reverse design is also provided: the supply is at the bottom and the outlet is at the top of the house.
- The supply and return water pipes are routed inside the basement.
In modern new buildings, heating and water supply are arranged on the principle of continuous functioning of fluid along circuits. This ensures a constant temperature of the pipes in the building and rapid heating of the liquid during removal.
Elevator unit
The minimum gentleman's kit for a simple elevator unit consists of:
- Pairs of input valves - on the supply and return threads.
- Mud on the supply and, less often, on the return.
- Essentially an elevator with a nozzle and suction.
- House valves that shut off the house heating system.
- A pair of resets allowing the system to be completely drained.
- Control valves for temperature and pressure measurement.
Optionally there will be:
- Warm water supply taps (one or two for each thread). In the second case, to ensure constant circulation through the DHW circuit, the flange between the taps on each thread is equipped with a retaining washer.
- Insertions of individual consumers (trade kiosks, shops, etc.). Here the insert itself is washerd on the flange in front of the shut-off valve; the washer limits the water flow through a separate circuit.
Types of radiator connections
The main methods of connecting heating system devices are several types:
- Lateral (standard) connection;
- Diagonal connection;
- Bottom (saddle) connection.
Side connection
Lateral radiator connection.
Connection from the end of the device - supply and return are located on one side of the radiator. This is the most common and effective connection method; it allows you to remove the maximum amount of heat and use the entire heat transfer of the radiator. As a rule, the supply is at the top and the return is at the bottom. When using a special headset, it is possible to connect from bottom to bottom, this allows you to hide the pipelines as much as possible, but reduces the heat transfer of the radiator by 20 - 30%.
Diagonal connection
Diagonal radiator connection.
Connection diagonally to the radiator - the supply is on one side of the device from the top, the return is on the other side from the bottom. This type of connection is used in cases where the length of a sectional radiator exceeds 12 sections, and a panel radiator is 1200 mm. When installing long radiators with side connections, there is uneven heating of the radiator surface in the part furthest from the pipelines. To ensure that the radiator heats up evenly, a diagonal connection is used.
Bottom connection
Bottom connection from the ends of the radiator
Connection from the bottom of the device - supply and return are located at the bottom of the radiator. This connection is used for the most hidden installation of pipelines. When installing a sectional heating device and connecting it using the bottom method, the supply pipe approaches on one side of the radiator, and the return pipe on the other side of the bottom pipe. However, the heat transfer efficiency of radiators with this scheme is reduced by 15-20%.
Bottom radiator connection.
In the case when the bottom connection is used for a steel panel radiator, then all the pipes on the radiator are located at the bottom end. The design of the radiator itself is made in such a way that the supply flows through the manifold first to the upper part, and then the return flow is collected in the lower radiator manifold, thereby not reducing the heat transfer of the radiator.
Bottom connection in a single-pipe heating circuit.
Horizontal intra-apartment wiring
In many new buildings it is possible to find a relatively exotic scheme: outlets from risers enter the apartment, allowing heating devices to be installed to suit any layout. Along with this, the diameter of the risers and outlets is selected so that the horizontal contour in your apartment does not set the heating parameters in the apartments higher or lower.
In addition to an arbitrary layout, a horizontal circuit with an output and one input allows for the establishment of thermal energy metering. As the price of heating per square meter increases, the installation of meters becomes more and more urgent.
How to correctly install heating in the horizontal circuit of a separate apartment?
According to the author’s humble point of view, the most reasonable thing would be to adapt the Leningrad or barracks wiring diagram to this situation.
- An unbroken ring of DN25 size is laid around the perimeter of the apartment. Under the doorways it is sunk into the screed or laid under the flooring.
- Heating devices cut parallel to the ring without breaking it. The size of the eyeliners is DN20. The connection diagram for a separate radiator is bottom or diagonal.
- Any radiator is equipped with an air vent in one of the upper plugs. Optionally, chokes or thermal heads and shut-off valves on the connections can be installed.
Risers
The distribution of coolant through heating devices in a private house is possible horizontally and vertically (stand-up). In multi-apartment buildings in different areas, these schemes are side by side: if the bottling is always a horizontal layout, then the riser is a vertical layout.
What is useful to know about risers in an apartment building?
- On no floor, except for the top floor in a house with bottom filling, should radiator inserts interconnect paired risers. If you insert a heating device between the supply and return risers on the fifth floor of a ten-story building, the inhabitants of the upper floors will freeze: the circulation above the insertion will actually stop.
- In buildings of new projects, one of the paired risers is often made idle (in other words, it is not connected to the batteries). The heating wiring diagram with single risers allows the transfer of paired risers from the basement, without the participation of residents. It is enough just to install a relief valve on the idle thread instead of a plug and move it to the discharge: the air plug will completely fly out at the water front.
- In stalinkas, two radiators are often connected to one riser in parallel, without changing the diameter. Along with this, the riser itself is a jumper between their connections. Such
The heating system wiring is fully operational, but only with a huge (DN25) diameter of the connections.
Practical consequence: if you want to replace the interior wiring yourself, either use heating pipes of the same diameter, or throttle the jumper. The instructions are due to the fact that with a jumper diameter of 25 mm and connections with a nominal diameter of 15-20, the batteries will simply be cold.
Terminology
First, to avoid confusion, let's define the terms.
- An elevator or heating unit is a place where the control of the heating system and hot water supply of a house or part of it is concentrated.
In addition: the elevator unit brings the pressure and temperature of the coolant to optimal values for the operation of the heating system. Thus, the difference between the supply and return lines of the highway reaches 4 kgf/cm2, while at the same time, a difference of 0.2 kgf/cm2 is sufficient to circulate water through the batteries.
- The water-jet elevator is the main element of the elevator unit, a mixing chamber in which warmer supply water is mixed with the return water involved in repeated circulation.
- Suction is a pipe connecting the supply and return in the elevator unit. Through it, the colder water of the return pipeline enters the repeated circulation cycle.
- Bottling (bottling) is a horizontal pipe that supplies coolant from the elevator unit to the risers.
- Risers are vertical sections of the heating system that supply water specifically to heating devices.
- Connectors are pipes connecting the riser to the battery.
So, what specific wiring diagrams for heating systems can be used in multi-apartment buildings? What specific elements do they include?
Penalty for excess return flow Blog of a heating engineer
Hello, dear readers of the blog teplosniks.ru! On my blog I previously wrote about overheating of the heating return. The most unpleasant thing in such a situation is when you are given a specific bill for overheating in the return pipeline. No one wants to part with money, especially when the volume of heat consumption is calculated in the form of penalties. You have to pay the meter and more. So, how exactly does the energy supply organization calculate the fine?
The first point determines the contractual flow of network water through the heating unit. It is determined by the formula:
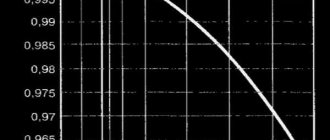
where Qdog is the heat load for heating under the contract (this figure must be in the contract, look). Let's take a specific figure of 0.332 Gcal/hour.
C—heat capacity of water, kcal/kg °C
t1 — supply temperature according to schedule, °C
t2 — return temperature according to schedule, °C
We substitute specific numbers. Usually the temperature graph is 150/70 °C (but it can also be 130/70 °C and 105/70 °C, etc.). In our case t1 = 150°С; t2 = 70°C. The heat capacity of water can be taken to be unity, C = 1. In fact, the heat capacity will be slightly different from unity, but we don’t need such super-precision. So, we calculate the figure, the consumption of network water, which should be according to the contract.
Consumer choice: cast iron or aluminum
The aesthetics of cast iron radiators is the talk of the town. They require periodic painting, since the rules require that the working surface have a smooth surface and allow dust and dirt to be easily removed.
A dirty coating forms on the rough inner surface of the sections, which reduces the heat transfer of the device. But the technical parameters of cast iron products are excellent:
- are slightly susceptible to water corrosion and can be used for more than 45 years;
- have high thermal power per section, therefore they are compact;
- are inert in heat transfer, so they smooth out temperature changes in the room well.
Another type of radiator is made of aluminum. Lightweight, factory-painted design, does not require painting, and is easy to maintain.
But there is a drawback that overshadows the advantages - corrosion in an aquatic environment. Of course, the inner surface of the heater is insulated with plastic to avoid contact of aluminum with water. But the film may be damaged, then a chemical reaction will begin with the release of hydrogen, and when excess gas pressure is created, the aluminum device may burst.
The temperature standards for heating radiators are subject to the same rules as batteries: it is not so much the heating of a metal object that is important, but the heating of the air in the room.
In order for the air to warm up well, there must be sufficient heat removal from the working surface of the heating structure. Therefore, it is strictly not recommended to increase the aesthetics of the room with shields in front of the heating device.
Connection diagrams for boilers, radiators, piping in home heating
You can make a heating system for your home yourself if you have the skills to do plumbing and construction work. In other words, you need to be able to solder pipes, cut them, connect them, and also tighten nuts, know the purpose and technical characteristics of the equipment used, have an understanding of hydraulics and heating engineering, and much more...
Then, using standard proven schemes and solutions, you can create a heating system for a small house only with your own hands.
But if you don’t have the skills to do the work, you will have to watch how specialists make the heating system. At the same time, it is also highly advisable to familiarize yourself with the basic rules for creating a system, equipment layout diagrams, etc., in order to monitor the progress of work and eliminate errors in a timely manner, if any are made.
Below are some nuances of creating a heating system in a private home, which you should always pay attention to first. Let's start with connecting the boiler, since many mistakes are often made in the boiler room.
Connecting a wall-mounted boiler
Wall-mounted boilers are usually automated; they contain two important elements of the heating system:
- safety group, which usually consists of an air valve, pressure gauge, emergency overpressure valve;
- circulation pump, which ensures the movement of fluid in the heating system;
Therefore, connecting a wall-mounted boiler is the simplest; it should be done according to the following scheme (we consider the direction “from the boiler”):
Supply: – tap with American connection for connecting the boiler; - transition fitting for pipes - American.
The tap is required and is placed immediately in front of the boiler so that the boiler can be serviced without draining the system.
Return: - tap with American connection for connecting the boiler; — dirt filter; - tap; — a tee with an expansion tank, a shut-off valve, a drain and fill valve for the system. - transition fitting for pipes - American.
A dirt filter is a mandatory element of any heating system. It is installed with the sump facing down, or, in extreme cases, horizontally. Dirt from the system will accumulate in the filter and is periodically removed from the sump. When installing, you must observe the direction relative to the stream.
The taps near the filter are required; only by closing both taps can you service and clean the filter.
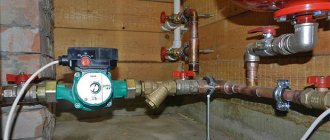
Next, let's look at the piping of a floor-standing boiler. It is more complicated, since a floor-standing boiler does not have a safety group and a pump. Therefore, they are installed independently, like elements of a boiler room.
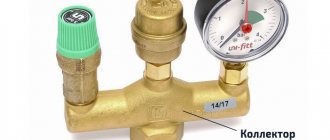
Safety group, circulation pump, expansion tank
For the safety group, it is better to purchase a special tee and mount the devices listed above on it. It is important to select devices in accordance with the parameters of the heating system, usually the maximum pressure is 4 MPa, the operating pressure is 1.5 - 2.0 Atm.
The pump is purchased according to the characteristics of the system. For an ordinary small house (up to 150 sq. m.), a circulation pump with a pressure of up to 4 m (0.4 atm) will always be sufficient for the heating system (often for radiators up to 250 sq. m.)
Accordingly, the pump is marked 25 - 40, where the first number indicates the thread diameter of the connection pipes, in this case 25 mm - 1 inch, but it can be 32 mm or more. The second number 40 is a designation of the pressure created - up to 0.4 atm, and therefore, indirectly, the power of the pump.
Each circulation pump has a rotation speed adjustment in at least 3 positions, which will determine the volume of liquid pumped and the actual power consumption.
In the first adjustment position, the circulation pump 25-40 will consume no more than 30 W of electricity. More often, for a properly designed heating system in an insulated house up to 150 sq. m. There will be enough thermal energy that can be supplied by this pump at first speed.
Pressure norm
Effective transfer and uniform distribution of coolant for the performance of the entire system with minimal heat loss is possible at normal operating pressure in the pipe lines.
The coolant pressure in the system is divided according to the method of action into types:
- Static. The force of influence of a stationary coolant per unit area.
- Dynamic. Force of action during movement.
- Maximum pressure. Corresponds to the optimal value of liquid pressure in the pipes and is capable of maintaining the operation of all heating devices at a normal level.
According to SNiP, the optimal indicator is 8-9.5 atm , reducing the pressure to 5-5.5 atm . often leads to heating interruptions.
For each specific home, the normal pressure indicator is individual. Its value is influenced by factors :
- power of the pumping system supplying coolant;
- pipeline diameter;
- remoteness of the room from the boiler equipment;
- wear of parts;
- pressure
Pressure control is possible using pressure gauges mounted directly into the pipeline.
All about plumbing
Tips for using your heating system
Navigation
Glossary of terms
Publication rating:
Hello. Today I want to talk about some details, ignorance of which can cause many problems.
So, after completing the installation of the heating system, first of all, try to carefully examine all the mounted components, radiators, and boiler. It often happens that we missed something, or made some mistake. If we notice something, it’s better to fix it right away, don’t wait for something to happen.
Powering the system
If everything is in order, then you can start powering the system. What's the best way to do this?
In general, it is correct to feed it through the return line (a pipe that removes cooled coolant from the radiators), which is what we will do. To do this, you need to close all the valves on the radiators, then gradually add water to the system, go to the end radiators (those that are the last or farthest from the boiler), and open the valve on the return line, while simultaneously opening the Mayevsky valve (air vent from the radiator). After water flows from Mayevsky’s tap, open the radiator supply tap (of course, before closing the air vent). Next, we repeat this procedure with the next radiator, moving towards the boiler.
When all the radiators are powered, we check that the air is vented at the top point of the system (there should be a safety group, or just an air vent, depending on the type of system), then we turn on the pump, and after 5-10 minutes, we go and go through each radiator, venting the air through the vent valve (before venting the air, be sure to close the supply valve, open it after venting), and refuel the system as necessary. This will have to be repeated until there is no air left in the radiators.
What is needed for installation
Installation of heating radiators of any type requires devices and consumables. The set of necessary materials is almost the same, but for cast iron batteries, for example, the plugs are large, and they do not install a Mayevsky valve, but instead, somewhere at the highest point of the system, they install an automatic air vent. But the installation of aluminum and bimetallic heating radiators is absolutely the same.
Steel panel ones also have some differences, but only in terms of hanging - they come with brackets, and on the back panel there are special arms cast from metal, with which the heater clings to the hooks of the brackets.
These are the arms that hook the hooks
Mayevsky crane or automatic air vent
This is a small device for releasing air that may accumulate in the radiator. Placed on the free upper outlet (collector). It must be on every heating device when installing aluminum and bimetallic radiators. The size of this device is significantly smaller than the diameter of the manifold, so you will also need an adapter, but Mayevsky taps usually come complete with adapters, you just need to know the diameter of the manifold (connection dimensions).
Mayevsky crane and method of its installation
In addition to the Mayevsky crane, there are also automatic air vents. They can also be installed on radiators, but they are slightly larger in size and for some reason are only available in a brass or nickel-plated case. Not in white enamel. In general, the picture is unattractive and, although they deflate automatically, they are rarely installed.
This is what a compact automatic air vent looks like (there are more bulky models)
The side-connected radiator has four outputs. Two of them are occupied by the supply and return pipelines, on the third they install a Mayevsky valve. The fourth entrance is closed with a plug. It, like most modern batteries, is most often painted with white enamel and does not spoil the appearance at all.
Where to install the Mayevsky plug and tap for different connection methods
Shut-off valves
You will need two more ball valves or shut-off valves that can be adjusted. They are placed on each battery at the input and output. If these are ordinary ball valves, they are needed so that, if necessary, you can turn off the radiator and remove it (emergency repairs, replacement during the heating season). In this case, even if something happens to the radiator, you will cut it off, and the rest of the system will work. The advantage of this solution is the low price of ball valves, the disadvantage is the impossibility of adjusting heat transfer.
Radiator taps
Almost the same tasks, but with the ability to change the intensity of the coolant flow, are performed by shut-off control valves. They are more expensive, but they also allow you to adjust the heat transfer (make it less), and they look better externally; they are available in straight and angular versions, so the piping itself is more accurate.
If desired, you can install a thermostat on the coolant supply after the ball valve. This is a relatively small device that allows you to change the heat output of a heating device. If the radiator does not heat well, you cannot install them - it will be even worse, since they can only reduce the flow. There are different thermostats for batteries - automatic electronic ones, but more often they use the simplest one - mechanical.
Related materials and tools
You will also need hooks or brackets for hanging on walls. Their number depends on the size of the batteries:
- if there are no more than 8 sections or the length of the radiator is no more than 1.2 m, two mounting points on top and one on the bottom are sufficient;
- For every next 50 cm or 5-6 sections, add one fastener at the top and bottom.
You also need fum tape or linen winding and plumbing paste to seal the joints. You will also need a drill with drills, a level (preferably a level, but a regular bubble one will do), and a number of dowels. You will also need equipment for connecting pipes and fittings, but it depends on the type of pipes. That's all.
Consequences of cold return
Circuit for heating return
Sometimes, with an incorrectly designed design, the return flow in the heating system is cold. As practice shows, the fact that the room does not receive enough heat with a cold return is half the trouble. The fact is that at different supply and return temperatures, condensation may form on the walls of the boiler, which, when interacting with carbon dioxide released during fuel combustion, forms acid. It can also damage the boiler much ahead of time.
To avoid this, it is necessary to carefully consider the design of the heating system, special attention must be paid to such a nuance as the return temperature. Or include additional devices in the system, for example, a circulation pump or boiler, which will compensate for the loss of warm water.
Radiator connection options
Now we can more than confidently say that when designing a heating system, the supply and return must be perfectly thought out and configured. If the design is incorrect, more than 50% of the heat can be lost .
There are three options for inserting a radiator into the heating system:
- Diagonal.
- Lateral.
- Bottom.
The diagram shows a diagonal inset
How to regulate the temperature in the heating system?
In order to regulate the temperature of the radiator and reduce the difference between the supply and return temperatures, you can use a heating system temperature controller.
When installing this device, do not forget about the jumper, which must be located in front of the heating device. If it is absent, you will regulate the temperature of the batteries not only in your room, but throughout the riser. It is unlikely that the neighbors will be happy with such actions.
The simplest and cheapest option for a regulator is to install three valves: on the supply, on the return and on the jumper. If you cover the valves on the radiator, the jumper must be open.
There is a huge abundance of different thermostats that can be used in apartment and private buildings. Among the wide variety, each consumer can choose a regulator that will suit him in terms of physical parameters and, of course, cost.
We hope that the article was useful to you. We will be grateful if you share it on social networks. The buttons for this are located a little lower. We wish you a nice day, come visit us again.
The return of heating batteries is cool - device, causes, solutions
The good functioning of the heating system determines how comfortable the temperature in the house will be during the cold season. Sometimes situations arise when hot water is supplied to the system, but the batteries remain cold. The main thing is to determine the cause and remove it. In order to solve the problem, it is necessary to know the design of the heating system and the causes of cold return during hot supply.
The heating system consists of an expansion tank, batteries, and a heating boiler. All important parts are connected to each other in a circuit. A liquid is poured into the system - a thermal carrier. The liquid used is water or antifreeze. If the installation is done correctly, the liquid is heated in the boiler and begins to rise through the pipes. When heated, the liquid increases in volume, the excess enters the expansion tank.
Heating system design with expansion tank
Since the heating system is completely filled with liquid, the hot coolant displaces the cold one, which goes back to the boiler, where it is heated. Gradually, the temperature of the coolant increases to the required temperature, heating the heating devices. Liquid circulation can be natural, called gravitational, or forced, using a pump.
The return is a heat carrier that, having passed through all the radiators included in the circuit, gives off its own heat and, cooled, enters the boiler again for the next heating.
Batteries can be connected in three ways:
- 1. Bottom connection.
- 2. Diagonal connection.
- 3. Lateral connection.
In the first method, the heat carrier is supplied and the return is removed from the bottom of the battery. This option is best used when the pipeline is located under the floor or baseboards. With a diagonal connection, the coolant is supplied from above, the return is discharged from the other side from below. This connection is best used for batteries with a very decent number of sections. The most common method is a side connection. The hot liquid is connected from above, the return discharge is carried out from below the heating device on the same side where the coolant is supplied.
Return in the heating system
Heating systems are distinguished by the method of laying pipes. They are laid in two-pipe and single-pipe methods. The most popular is the scheme consisting of one wiring pipe. Very often it is installed in high-rise buildings. It contains the following advantages:
- some pipes;
- low price;
- ease of installation;
- Methodical connection of heating devices does not require the organization of a separate riser for liquid drainage.
The disadvantages usually include the inability to adjust the intensity and heating for a separate heating device, and a decrease in the temperature of the coolant as heat is removed from the boiler. To increase the efficiency of single-pipe distribution, bypasses are installed.
For organizational work of autonomous heating, a two-pipe pipe branching scheme is used. Hot feed is carried out through one pipe. In the second, cooled water or antifreeze flows back into the boiler. This circuit allows for parallel connection of heating devices, ensuring equal heating of all devices. Moreover, the two-pipe circuit allows you to change the heating temperature of each radiator separately. The downside is the difficulty of installation and the high consumption of materials.
Sometimes, when the return flow is hot, the heating radiators still remain cool. There are several main reasons for this:
- the installation was done incorrectly;
- the system or one of the risers of a separate heating device is airborne;
- insufficient fluid flow;
- the pipe cross-section through which the coolant is supplied has decreased;
- The heating circuit is dirty.
Adjusting the check valve in the heating system
Cool return is a big problem that must be eliminated. It entails many unfavorable consequences: the temperature in the room cannot reach the desired level, the efficiency of heating devices decreases, and there is no way to correct the situation with additional devices. In the end, the heating system does not work as it should.
The key problem with cold return is the large temperature difference that appears between the supply and return temperatures. In this case, condensation appears on the walls of the boiler, reacting with carbon dioxide, which is released when the fuel burns. As a result, acid is formed, which corrodes the walls of the boiler and reduces its service life.
If it is discovered that the return flow is excessively cool, it is necessary to perform a series of actions to find the causes and eliminate the breakdowns. First you need to check that the connection is perfect. If the connection is not made correctly, the lower pipe will be hot, but should be slightly warm. The pipes should be connected according to the diagram.
Sometimes it may be necessary to demolish the control valve to increase the cross-section
To avoid air pockets that interfere with the movement of the coolant, it is necessary to plan the installation of an air vent or vent for air removal. Before bleeding the air, it is necessary to close the supply, open the tap and release the air. Then the tap is turned off and the heating valves open.
Often the cause of cold return is the control valve: the cross-section is narrowed. In this case, the crane must be dismantled and the cross-section made larger using special tools. But it’s more convenient to buy a new faucet and replace it.
The reason may be clogged pipes. It is necessary to check them for passability, remove dirt and deposits, and clean them thoroughly. If the patency cannot be reconstructed, the clogged areas must be replaced with new ones.
If the speed of movement of the coolant is insufficient, it is necessary to check whether there is a circulation pump and whether it meets the power requirements. If it is not there, it is better to install it, and if there is a lack of power, change or improve it.
Knowing the reasons why the heat supply may not work efficiently, you can personally detect and repair breakdowns. Home comfort during the cold season depends on the quality of heat supply. If you do the installation process and check the heating system yourself, you can save on hiring outside labor.
No circulation or poor circulation in the heating system
The boiler is working, the pump is definitely working, but there is no circulation in the heating system. Again, the first thing we do is check the air in the radiators. Then, we check the shut-off valves (taps), which may have been closed somewhere due to inattention. The next step is to clean the filter in front of the boiler and in other places, if any. This will solve the issue in 90% of cases, even if the heating system has been recently installed. If not, then we check the heating pipes for the possibility of air pockets in the pipes (see installation of the heating system). If there are such areas in the heating distribution, then the problem can be temporarily solved by draining the water from the radiator under pressure. which is located behind the loop, the flow of water will expel the air from the loop. If possible, an automatic air vent should be installed on large hinges. This will eliminate the problem in the future. If, as a result of the above measures, circulation is not restored, then you need to contact a specialist.
Discuss this article, leave a review on Google+ | VKontakte | Facebook
The battery does not heat up
If one or more radiators do not heat or heat poorly, then the first thing you need to do is check if there is air in them using air vents. If water flows from the drains, but the radiator still does not heat, then you need to make sure that both taps of this radiator are open (such inattention can often occur). The next step is to check if the radiator is clogged. To do this, other heating radiators that heat and are on the same branch as the non-working one must be shut off so that all the water flows through this radiator. If it starts to warm up, it means it is not clogged. In this case, it is necessary to hydraulically level the branch. In simple terms, it is necessary to cover the remaining radiators on the branch so that the one who is not working gets more. You need to be prepared that leveling will take more than one day, because the heating system may be slow to respond to changes in settings. If the taps in front of the radiator are completely open, and it is cold, then it is clogged (extremely low probability). Basically, the last radiators on the branch may not heat . But this can always be eliminated by hydraulic leveling. If someone tells you that “it’s not pumping there” or “the pump’s power is insufficient,” don’t rush to believe and touch the pump or pipes. In order to prevent the pump from pumping too much, you need to try very hard when installing the heating system. If one or more of the last radiators does not heat up even after working with the taps, then there may be an air lock in the pipes (see circulation disturbance in the heating system).
Best answers
SamTrest:
horizontal - the supply is closer to the wall, the return is correspondingly further away - this is in the basement, but in the apartment as it turns out (rules for the development of heating systems)
Solodky Vitaly:
There are no regulatory documents on this matter! But historically, it so happened that in horizontal sections the SUPPLY is from above, above the RETURN, and also with lateral and diagonal connections, the supply always enters the radiator from above, the return from below, with a bottom connection through monoblocks, the supply enters the radiator through the left tap, and the return through the right. On vertical sections, the feed can be either from the right or from the left, depending on how it was more convenient to lay down.
Why is a pipeline buried?
Backfilling of the pipeline is carried out after the final installation of the water supply system. Such backfilling is carried out in order to hold the laid pipes in a stationary position.
Fixing pipes with backfill is carried out in several stages.
- Manual filling with shovels. This is the initial stage. It is carried out on both sides.
- Backfilling after compacting and joining pipe joints.
- Sprinkling of pipes. This is also done on both sides.
Temperature
There are a number of restrictions and regulations related to temperatures inside a living space.
- SNiP sets the following temperature standards: living rooms - 20C, corner rooms - 22C, kitchen - 18C, bathroom and combined toilet - 25C. It is better to focus on them if you are planning to switch to autonomous heating.
- In no utility service inside a residential building should the temperature exceed 95 degrees. For preschool educational institutions, the norm is even lower - 37 degrees. This is why in kindergarten groups you can see batteries of such a terrible size.
However: in the heating main at the same time there may be 140C at the supply.
Results
If the system is not very complex and branched, the diameter of the heating system pipes can be calculated independently. To do this, you need to have data on the heat loss of the room and the power of each radiator. Then, using the table, you can determine the cross-section of the pipe that will cope with supplying the required amount of heat. It is better to entrust the cutting of complex multi-element circuits to a professional. As a last resort, calculate it yourself, but try to at least get advice.
| Thermal load, kW | Required internal diameter of the pipe, mm | Selection of pipe for the required internal diameter: | ||
| VGP steel | Polypropylene | Cross-linked polyethylene | ||
| 50 | 39 | 1.5 inches (40mm) | 50 | 50 |
| 40 | 35 | 1.5 inches (40mm) | 50 | 50 |
| 30 | 30 | 1.25 inches (32mm), inch and a quarter) | 40 | 40 |
| 20 | 25 | 1 inch (25mm) | 32 | 32 |
| 15 | 21 | 1 inch (25mm) | 32 | 32 |
| 12 | 19 | 3/4 inch (20mm) | 25 | 25 |
| 10 | 17 | 3/4 inch (20mm) | 25 | 25 |
| 8 | 16 | 3/4 inch (20mm) | 25 | 25 |
| 6 | 14 | 1/2 inch (15mm) | 20 | 20 |
| 5 | 12 | 1/2 inch (15mm) | 20 | 20 |
| 4 | 11 | 1/2 inch (15mm) | 20 | 20 |
| 3 | 10 | 3/8 inch (10mm) | 16 | 16 |
| 2 | 8 | 3/8 inch (10mm) | 16 | 16 |
| 1 | 6 | 3/8 inch (10mm) | 16 | 16 |
| Thermal load, kW | Required internal diameter of the pipe, mm | Selection of pipe for the required internal diameter: | ||
| VGP steel | Polypropylene | Cross-linked polyethylene | ||
| 50 | 55 | 2 inches (50mm) | 63 | 63 |
| 40 | 48 | 2 inches (50mm) | 63 | 63 |
| 30 | 43 | 2 inches (50mm), or 1.5 inches (40mm) | 63 | 63 |
| 20 | 35 | 1.5 inches (40mm) | 50 | 50 |
| 15 | 30 | 1.25 inches (32mm) | 40 | 40 |
| 12 | 27 | 1.25 inches (32mm) | 40 | 40 |
| 10 | 25 | 1 inch (25mm) | 32 | 32 |
| 8 | 22 | 1 inch (25mm) | 32 | 32 |
| 6 | 19 | 3/4 inch (20mm) | 25 | 25 |
| 5 | 17 | 3/4 inch (20mm) | 25 | 25 |
| 4 | 16 | 1/2 inch (15mm) | 20 | 20 |
| 3 | 13 | 1/2 inch (15mm) | 20 | 20 |
| 2 | 11 | 1/2 inch (15mm) | 16 | 16 |
| 1 | 8 | 1/2 inch (15mm) | 16 | 16 |
| Thermal load, kW | Required internal diameter of the pipe, mm | Selection of pipe for the required internal diameter: | ||
| VGP steel | Polypropylene | Cross-linked polyethylene | ||
| 30 | 48 | 2 inches (50mm) | 63 | 63 |
| 20 | 39 | 1.5 inches (40mm) | 50 | 50 |
| 15 | 34 | 1.5 inches (40mm) | 50 | 50 |
| 12 | 30 | 1.25 inches (32mm), (inch and a quarter) | 40 | 40 |
| 10 | 28 | 1.25 inches (32mm), (inch and a quarter) | 40 | 40 |
| 8 | 25 | 1 inch (25mm) | 32 | 32 |
| 6 | 21 | 3/4 inch (20mm) | 25 | 25 |
| 5 | 19 | 3/4 inch (20mm) | 25 | 25 |
| 4 | 17 | 3/4 inch (20mm) | 25 | 25 |
| 3 | 15 | 3/4 inch (20mm)) | 25 | 25 |
| 2 | 12 | 1/2 inch (15mm) | 20 | 20 |
| 1 | 10 | 1/2 inch (15mm) | 20 | 20 |