A high-quality heating system is a mandatory factor to ensure a comfortable life for people in an apartment building. In order for energy efficiency to be at a high level, it is necessary to comply with the requirements for the installation and placement of radiators. There are established standards for the location of heating devices, following which you can ensure optimal temperature in the house and reduce heating costs. Before starting installation, you need to know how far the window sill should protrude above the battery, at what distance from the battery to the wall and floor to install the heating circuit, and which circuit is best to choose.
Recommendations for placing radiators
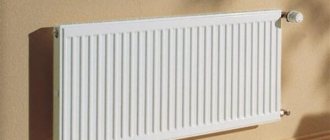
The efficiency of a radiator depends on its location.
Experts pay great attention to the correct location of heating devices. In this case, the room will be heated with the greatest efficiency.
Basic recommendations for choosing a location for installing batteries:
- For high-quality air circulation near the battery, it is necessary to maintain a distance of 3-4 cm between the thermal insulation layer and the heating device. When this gap decreases, air exchange becomes difficult and the efficiency of the system decreases.
- If it is impossible to create insulation, the inner surface of the wall is covered with a layer of foil. It serves as a heat reflector that directs flows into the room.
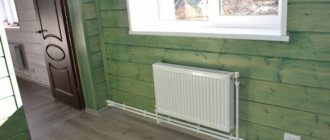
- When installing batteries under the window sill, a gap of up to 10 cm must be maintained between the radiator and the floor. The distance from the radiator to the window sill must be at least 8 cm. This is due to the fact that the board is an obstacle when warm air rises upward.
- If the house has large windows, batteries 30 cm high are used. Then condensation will not form on the glass.
- The radiator is installed at an angle of 90°. If there is a deviation from the norm, air will accumulate and corrosion will form.
- The battery should be installed exactly in the middle of the window. Then it will cut off cold air flows and will not allow them to penetrate into the room.
For decorative purposes, radiators can be protected with special screens. They must block the radiator, therefore they reduce the efficiency of the system, since they prevent the flow of thermal energy into the room. For this reason, it is important to pay special attention to the choice of decorative grilles for batteries.
GOST and SNiP requirements
Correct distance from the floor to the radiator and window sill
Depending on the type of window, the distance from the window sill to the floor may vary. But GOST sets the coefficient at which heat is best retained in the room. It is 0.55 W/°C sq.m. For better effect, use plates with low thermal conductivity. Also, during installation, you need to figure out whether the window sill should cover the battery.
The provisions of SNiP regulate the following values for the distance of the battery to the window sill:
- The window sill must have a slope of at least 1°.
- There must be a layer of thermal insulation between the battery and the wall. It will protect the house from heat loss and extend the life of the heating system.
- The battery should have a protrusion compared to the window sill.
- All window sills must be located at the same level. The distance from the floor to the radiator depends on the shape and size of the device.
- The maximum length of the window sill is 3 meters.
- There must be at least 8 cm of clearance between the battery and the window sill.
The installation standards for heating radiators must be observed to ensure good heat retention in the house. If the distance between the window and the floor is insufficient, a low radiator with an increased number of sections should be installed. Then heat loss will be reduced.
a brief description of
Today, buyers have a huge selection of batteries on the heating systems market. They differ in design options, as well as in materials of manufacture. It should be noted that radiators are:
- Floor-standing. They are installed directly on the floor, as they are equipped with small legs, which are made taking into account the standards for the gap between the floor, window sill and radiator.
- Mounted. Their sections are attached using special metal hangers to the internal walls of the house near the window openings.
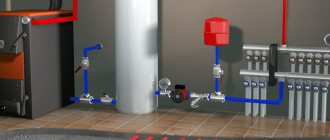
Connection
The importance of the gap between the wall and the battery
The minimum distance between the wall and the radiator is 25 mm; no thermal insulation layer is laid on the wall.
When installing radiators, it is important to create a distance between the heating device and the wall. The outer wall is constantly in contact with the surrounding air, causing significant cooling. When the battery is mounted on the inner surface without a gap, most of the heat will be spent on heating the wall material rather than the room. The low thermal insulation properties of concrete walls do not allow creating an optimal microclimate; about 70% of thermal energy will be wasted. By moving the heating system a short distance, air insulation will be created, increasing heating efficiency.
There are other reasons why it is necessary to create a gap according to the given standards:
- Creating a sufficient level of air mass circulation. If this condition is violated, part of the energy will be lost.
- When placed close to the wall, the device begins to heat up faster. As a result, the radiator may fail.
- Dust and debris will accumulate between the wall and the battery, which also impede heat transfer.
- In the absence of a heat-reflecting plate, the radiator will waste heat on the external walls.
- If an electric battery is installed, there is a risk of short circuit. Hydronic heating systems can be susceptible to corrosion if there is no clearance.
When installing heating devices, you must adhere to the following recommendations - the greater the radiator power, the wider the gap should be. Its specific dimensions are made up of two important parameters:
- Window sill width, niche dimensions. The possibility of creating distance depends on these individual characteristics.
- The power of the battery itself.
You can reduce the distance from the wall to the radiator by gluing foil heat-reflecting material to the wall. Then the gap can be 2.5-3 cm. In other cases, this value is approximately 6-8 cm.
What to do if there is no other way out?
In addition to purchasing a built-in refrigerator and insulating the unit, there are several other methods of protecting equipment from warm air. There are several options, so everyone will be able to find their own way.
A cheap way to protect your refrigerator from the stove and radiator. A budget option.
Alternative installation options
Refrigeration equipment can be installed not only in a small kitchen area, but also used for placement in other rooms and places in the apartment:
- Pantry. Typically, the room is used for storing supplies or unnecessary things, without considering the pantry area as a place to place the refrigerator. This option may not seem entirely convenient, because you will have to regularly go to the pantry for groceries and it may not be possible to carry everything away at once. But if convenience and efficient, long-term performance of household equipment are in the balance, then it is more advisable to choose the second method.
- Loggia . Usually the room is adjacent to the kitchen, so you don’t have to go far for groceries. With this placement, one condition must be adhered to - the loggia must be glazed and heated.
- Hallway . In standard apartments, the room is located in close proximity to the kitchen. There are practically no inconveniences in terms of walking for food. To make refrigeration appliances look advantageous in the hallway, you can install it in a closet.
- Hall . Few people will appreciate this method of placing a refrigerator, because the hall is a recreation area and the main room from an interior point of view, but in the absence of other options, this solution will help save space in the kitchen and keep the unit in working order.
- Staircase (the place under it). This option is suitable for owners of houses or two-story apartments. If you are concerned that a free-standing appliance will be conspicuous, you can surround it with cabinets and drawers for storing groceries, dishes or other items. The built-in model can be conveniently hidden in a custom-made cabinet.
- Corridor. In this case, you need to make calculations before installation. The equipment should not interfere with free movement, because often hallways are narrow.
- Bedroom. A refrigerator is installed in the sleeping area in extremely rare cases. It's not entirely convenient. But with a little imagination, the equipment can be successfully integrated into the interior of the room. The neighborhood does not interfere with sleep, because... modern models operate silently and do not harm human health.
If part of the wall needs to be dismantled to install refrigeration equipment, you must obtain permission from the housing inspection, as problems may arise when selling the apartment. It will not be possible to hide the fact that changes have been made. The owner will have to pay a fine.
What to do if there are no other options?
How to protect a refrigerator from a battery if it is nearby
Repair service specialists admit that if the kitchen is small or has an inconvenient layout, it is allowed to place refrigerators near heating radiators, but only if the appliances are isolated from the heating pipes.
You can protect the unit in ways that are accessible and acceptable to everyone:
- Turn the side of the refrigerator toward the heater. In this case, more than half of the radiator should be closed. Fence it off with a panel. It should rise above the heat source by more than 20 cm. The partition can be created from the following materials: Foil. Has reflective properties. It will “unfold” the flow of warm air, thereby reducing the degree of heating of the surfaces of the refrigerator. Use plywood, drywall or other similar products as a base.
- Modern thermal insulation materials: polystyrene foam or polyurethane foam.
In order to install a refrigerator using the methods described above, you will have to invest financially. But the unit will work more efficiently and longer, and there will be no need to spend money on repairs in the event of a breakdown. You will be able to save on electricity, because... A working refrigerator does not consume a lot of light.
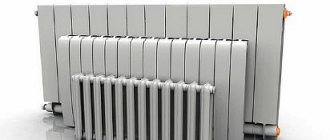
Recommendations for installation and operation of radiators
In order for the radiator to warm up well, air is removed from it through the Mayevsky tap.
The efficiency of heating and the service life of the heating system depend on the correct installation of the battery. There are a number of recommendations that you should use during installation:
- It is recommended to lubricate the gaskets with silicone sealant before installation. This is an optional step, but it will help protect the joints.
- Do not open the valves suddenly when filling the heating battery with liquid. Otherwise, water hammer may occur, which will damage the system.
- If thermostatic valves are installed in a single-pipe system, a bypass must be installed. Without it, the entire riser will be regulated, for which the owner may be fined. Ball valves are placed in front of the valves, allowing the supply and return to be shut off.
- If the radiator has more than 12 sections with a one-sided lateral connection, place the flow guide at a length equal to two-thirds of the battery (it is better to do it up to the last section). This will allow the radiator to fully warm up.
- If the radiator fills with water, it is necessary to bleed air from it. If this is not done, the device will not warm up. The air is removed every year at the beginning of the heating season.
After installing the radiator, pipes are connected to it. They are selected in advance by material, cross-section and length.
Connection diagrams
There are several radiator connection diagrams that comply with the requirements and standards of GOST and SNiP. They are represented by the following varieties:
- Lateral connection. Characterized by maximum heat transfer. With this connection, the input is made from the top of the battery, and the output is from the bottom on the same side. This is the most popular connection diagram.
- Diagonal connection. Produced with significant system dimensions. Water enters the radiator through the top and is discharged from the bottom on the opposite side.
- Lower connection or “Leningradka”. It is produced in small one- and two-story houses, as well as when installing pipes hidden under the floor. The efficiency of such a system is 5-15% lower than with a lateral connection.
Diagonal
Lower
Lateral
When pipes are in a rough screed, heat loss increases due to contact with concrete and the ceiling covering of the lower floor.
Step-by-step installation algorithm
Silicone tape promotes better sealing of connections.
After calculating all the necessary values and choosing a connection method, you can proceed to installing radiators. All work must be carried out in accordance with the requirements of SNiP. You must also follow the manufacturer's instructions. If the instructions are violated, there is a risk of loss of warranty service. According to regulations, you do not have to remove the protective film from the devices during installation. This way the device will be protected from dust and scratches during installation work.
Items required for connection:
- Hooks with plastic dowels - at least 3 pieces. Needed for mounting to a wall or floor.
- 2 side plugs with right-hand thread. They are designated D.
- 2 plugs with left-hand thread with the letter S.
- Stub.
- Silicone sealing thread or flax.
- The elements required by the scheme are taps, valves, valves.
- Pipes. Metal or polypropylene are selected. Metal products are distinguished by high quality, durability and long service life. Polypropylene pipes are cheaper.
Tools you will need:
- Electric drill and drill bit. Selected according to the hardness of the wall.
- Screwdriver.
- Building level.
- Key.
- Tape measure and a simple pencil.
Depending on the design of the radiator, an air vent is selected.
The general installation procedure for various parts of the heating system is also regulated by SNiP.
- Making markings for brackets. This is done using dowels or cement mortar. There must be at least three brackets in total.
- Installation of plugs, adapters, Mayevsky taps and other parts.
- Installation of the radiator itself. It is necessary to connect its pipes to the heating system.
- Installation of an air vent. It should be automatic.
- Removing the protective film.
If these requirements are met, the installation of the system will be of high quality and durable.
For efficient operation of the heating circuit, it is important to make the connection correctly, which varies depending on the type of mounting. There is wall and floor.
Wall mount
Wall mounting material
Wall mounting is easier to make than floor mounting.
Installation is carried out as follows:
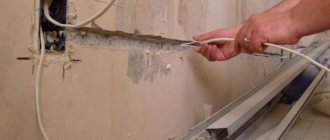
- Preparing the mounting site. First, the heating circuit pipe is connected. The wall behind the radiator needs to be covered with foil material.
- Preliminary marking of the mounting location for the clamps.
- Installation of fasteners using dowels. The depth into the wall must be at least 6 cm to securely fix the battery.
- Mounting the radiator onto the brackets. Fixing and leveling the device.
- Connection to pipes. Checking the tightness of all connections.
- Test run of the system.
During installation, it is important to make horizontal alignment of the battery. Otherwise, air will accumulate in the device, which reduces the heating intensity and leads to corrosion.
It is also important to comply with the location of the battery. It must be installed strictly in the center of the window.
Fastening elements are different. They can be made in the form of suspensions, brackets and other structures. Regardless of the type, they have the same task - securely fixing the radiator to the wall. Instructions for attaching the clamps are included along with the elements themselves.
Installation standards
The rules for installing gas stoves or built-in gas panels are described in detail in the instructions from the manufacturer. The technical characteristics of each type of burner are also given there.
Important! Installation of any gas-using equipment, including stoves, is carried out by a specialized organization that has a license for this type of work. If the device is connected by unqualified personnel, there is a risk of gas leakage and explosion. Independent installation and connection of gas-using equipment, which includes stoves, is considered a violation. The consumer is only allowed to perform actions that are performed without a tool.
The work is carried out according to the manufacturer's instructions, taking into account the existing technical connection conditions and the requirements of the local gas service in the following order:
- Make sure that the stove complies with GOST 33998-2016 and is equipped with a “gas control” system that stops the gas supply to the burner when the flame goes out.
- Before installation and connection, check that the type and pressure of gas in the local gas network are compatible with the settings of the device. If necessary, adjust to a different type of gas by replacing the nozzles.
- The device is placed in a strictly horizontal position using set screws and legs.
- Connect the equipment to gas using certified flexible hoses, which should not touch the heated back wall of the appliance and the top of the oven.
- A dielectric insert is placed between the gas tap and the hose, meeting the standards for interrupting the current and passing the full gas flow.
- Seals are used only once.
- After installation, check the tightness of the connections made with a soapy sponge. Apply soap foam to the connection points and see if air escapes.
- Light all burners, checking the stability of the flame at low and high temperatures.