The creation of residential building projects, from the general design to the calculation of the placement of heating radiators, is regulated by state building codes and regulations. It is SNiP that is the main document on the basis of the provisions of which the building design is developed. But this is for new buildings, but what about houses built back in the 40-50s of the last century? Or with the projects of multi-storey panel high-rises that were so popular in the 70-80s? Especially when apartment owners replace old wooden windows with plastic ones with new window sills. In this case, you need to carefully study the regulatory documents and, in accordance with them, plan work on how to install a heating radiator under the window.
Why are heating radiators installed under windows?
When using central heating batteries to heat a room, it is important to correctly place the heating devices so that they have the greatest heat transfer efficiency. There are several reasons for installing heating devices under window openings.
The main reasons for this arrangement are considered to be the physical processes of thermal energy transfer in the room:
- air convection;
- thermal radiation.
The window opening in the structure of the room has a large space equipped with a window block through which outside air enters the room. No matter how much the thermal insulation of the walls is enhanced, the building loses from 25 to 35% of heat through frames and glass. This is a very large indicator of heat loss. In this case, it is through the cracks in the frames that fresh but cooled air enters the room.
Therefore, to keep the room fresh and comfortable, it is more convenient to provide heating for the incoming fresh air. Create a heat shield in the opening, which would ensure normal temperature conditions in the room and its natural circulation throughout the entire apartment or house.
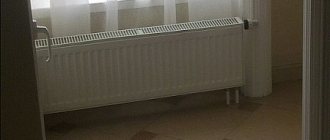
When installing a radiator under a window opening, the heat released heats the air, lifts it to the window sill, where fresh cooled and heated air from the radiator is mixed.
The wall near the window opening freezes especially hard. The large area of glass does not help retain heat, so the wall, reaching half the height of the room, freezes especially hard here. If the load-bearing walls to the right and left of the opening are more powerful, then the thickness of the wall underneath is 10-15 cm less. This means that here the wall will freeze faster, and therefore installing a radiator to heat the masonry with radiation is quite justified.
Requirements for the location of the radiator in a private house
Radiators should be installed in places of greatest heat loss in the house (window openings and entrance doors).
As a rule, heating devices are installed under each window of the home and in the hallway on the wall, next to the front door of the house, as a thermal curtain and dryer for wet things.
For maximum heat transfer from the heating device, there are the following optimal distances from the radiator:
- To the floor 8-12 cm;
- to the window sill 9-11 cm;
- to the wall 5-6 cm;
- protrusion of the radiator beyond the window sill is 3-5 cm (so that the heat from the radiator warms the window unit).
Requirements for wall and floor construction:
- The wall on which the heating device will be mounted must be plastered.
- When attaching to a plasterboard wall, a reinforcing frame made of timber is first installed in it.
- Floor mounts for the radiator are installed on the finished floor.
Installation Tool:
- Drill or hammer drill,
- Drill 10 mm,
- Hammer,
- Screwdriver for screwing self-tapping screws when using corner brackets,
- Construction level with spirit level or laser level,
- Pencil,
- Roulette,
- Plastic radiator spanner,
- Key for American.
Types of heating radiators
To equip your home, you can choose different models of heating devices - you can have an aluminum radiator, an electric wall heater or a cast iron radiator made of several sections. The question is whether such a battery can effectively heat a room that has large windows.
Building codes regulate at what distance the battery must be placed under the window. But at the same time, these standards do not indicate which batteries should be hung under stained glass windows or under panoramic structures. The fact is that modern technologies offer several options for organizing heating in an apartment. Including in such a non-standard situation as installing a heating radiator under a panoramic window, to the entire height of the room.
Depending on the material of manufacture, the following can be selected for installation in a central or autonomous heating system:
- cast iron sectional batteries;
- aluminum radiators;
- bimetallic radiators;
- steel models;
- radiators made of copper.
In this place you can also place convectors for connecting to the electrical network in a wall position or install them in the floor under a decorative cover.
Heating devices can be:
- in the form of full-size radiators;
- low radiators for panoramic windows;
- floor batteries;
- copper batteries for installation in the baseboard;
- convectors for panoramic windows for placement in the floor.
What sizes are there?
Radiators are available in the following sizes.
Cast iron
According to the specification, standard dimensions:
- Width - 93 or 108 mm.
- Depth from 85 to 140 in increments of 5.
- Height - 588.
Sections made to order can have almost any size.
Knowing the length, the dimensions of the assembled device are determined, since a paronite gasket 1 cm thick is placed between the parts.
If installation is carried out at a point with insufficient space, add the size of the flushing tap.
Important! The distance between the axles is usually 500 mm. Small batteries with a value of 350 are rare
Each section is capable of delivering from 160 W if the average daily air and coolant temperatures differ by 70 degrees. Cast iron can withstand operating pressure up to 9 atm.
Aluminum
Different models have similar internal dimensions. The width is 80 or 88 mm. Depth varies in the range of 10-90 mm. The height is 50 or 35 cm. Models for the bathroom reach three meters in length.
Photo 1. Aluminum radiator model Indigo 500/100 with side connections, section power 196 W, , Russia.
The power of the sections depends not only on the dimensions, but also on the fins of the structure. Low ones develop 150-170 watts, and 500 mm - 185-220. Aluminum can withstand almost twice the pressure than cast iron.
Bimetallic
Standard values are in the ranges:
- Width 80-82 mm.
- Depth 75-100.
- Height 400-420, 550-580.
Power depends on the size, but rarely exceeds 200 watts. This type of section is known for its ability to withstand high pressure, which is due to the steel core. The operating value reaches up to 30 atm, and the test value is 50.
Standards for installing batteries in residential premises
According to building codes and regulations, the battery under the window opening must be installed taking into account the following requirements:
- the heating radiator should be installed at a height of 80-100 mm from the floor;
- relative to the window sill, the radiator is placed 100-120mm lower;
- The battery must be placed at a distance of 30-50 mm relative to the wall;
- the battery should be located in the center of the window opening.
How to properly hang a heating radiator determines how easily you can maintain order in the room and how well it will warm up during the heating season. The distance above the floor level and from the window sill during the heating season ensures natural air convection. As it rises, it cuts off the cold flow from entering the room and creates a heat shield in the window opening. The gap between the floor and the lower edge of the heating radiators makes it possible to carry out cleaning, which is very important for residential premises.
The convector under the window sill should be 3-5 cm lower than it. This ensures air circulation, on the one hand, and on the other hand does not allow dust to accumulate in this space. The central location of the radiators allows the window units to be covered with a flow of warm air, blocking the penetration of cold into the room.
How far should the window sill protrude from the wall?
The width of the model has a functional and aesthetic meaning, which participates in heat exchange, increases the usable area and is the finishing touch of the renovation.
In the kitchen, this element is used as an additional countertop. In other rooms this is a place for plants, so choosing the optimal width is very important.
When replacing window structures, owners want to make maximum use of the usable area and do not know how far the window sill should protrude from the wall.
A model that is too wide will interfere with normal air circulation, the room will not warm up properly, and the glass will fog up.
If non-radiator type heating is used, then you can install a model without a protrusion or a wide 0.5-0.7 m element.
The best arrangement for a PVC and wood slab is to extend it by 6 cm. For wider models, manufacturers provide technological holes for the circulation of warm air with a diameter of 1.0-1.5 cm.
Installation with a protrusion of more than 6 cm is possible by covering the radiator with special ventilation grilles or by choosing a battery with a horizontal flow of heat output. Installing a model made of stone, which does not transmit heat well, requires a protrusion of no more than 5 cm.
Features of installing heating radiators for different types of window structures
Correct installation of the heating radiator depends on the type and design of the windows. For window units of different designs, batteries are used, the dimensions of which correspond to the dimensions of the space underneath them.
Based on this, we can distinguish several main options for how to place a convector under a window:
- Standard placement relative to the battery window.
- Installation of convectors near the walls in balcony blocks with a doorway.
- Flat plate convectors for panoramic windows.
- Convector in the floor under the stained glass window.
- Hidden installation of a radiator under the window sill.
- Floor batteries under the panoramic block.
Most of these methods are not clearly regulated in SNiP, so in order to hang a heating radiator correctly, it is necessary to take into account the recommendations of manufacturers and builders.
Standard battery placement
The correct location relative to the battery window is determined by building codes. However, professionals recommend hanging the radiator so that it protrudes beyond the window sill by ¼ of its width. This will create the most effective thermal shield around the window.
In addition, it is recommended to choose a convector for a large window opening with internal fins so that the convection process is maximized.
In balcony blocks
It is recommended to install the convector under the double-glazed window of the balcony block across the entire width of the window sill. It is recommended to place the edge of the battery facing the unit door at a distance of 3-4 cm from it. It is not recommended to install shut-off valves or temperature controllers in this location. For installation, a device is selected whose power is 10-15% greater than the calculated one for this room.
Special convectors for panoramic windows
Heating radiators for panoramic windows are selected based on the size of the space under the window. It often happens that a panoramic window starts at floor level, without a window sill. In this case, it is recommended to install the battery near the window in a floor-standing version. If the floor arrangement of the radiator does not fit into the interior concept, you can install a convector under the floor, covering it with a decorative grille.
Convector in the floor under the stained glass windows
Stained glass windows have recently become increasingly popular not only for decorating staircases and winter gardens, but also work offices and living rooms. And if there is such a window in the room, then it is recommended to install radiators for stained glass windows so that they do not distract attention and fit harmoniously into the interior. The specificity of installing such devices is to ensure the direction of warm air onto the stained glass window as efficiently as possible.
Traditional stained glass with a lead or tin rim of glass lets in much more cold than a regular double-glazed window. Therefore, in addition to a conventional radiator, an additional electric heater is often installed in a niche under the window sill.
Hidden installation of radiators under the windowsill
Not many people enjoy the pleasure of having a wide window sill and looking at the falling snow. Typically, such wide window sills are installed in old houses with wide walls. Therefore, in order for the bed to be not only comfortable, but also warm, there must be a massive radiator under the window sill, capable of heating a large area of the window sill. And in order for heat to penetrate into the room, holes are made in the body of the window sill.
Floor batteries
For full-height windows in a room, there is often a lack of an element that visually limits the space. And this is where it’s worth remembering floor radiators. In such devices, instead of wall mounting, ordinary legs are provided, so during installation there is no need to look for a support point for the bracket. The battery is simply installed on the legs, which are fixed to the floor with dowels.
How to install correctly
Now about how to hang the radiator. It is very desirable that the wall behind the radiator is level - this makes it easier to work. Mark the middle of the opening on the wall, draw a horizontal line 10-12 cm below the window sill line. This is the line along which the top edge of the heating device is leveled. The brackets must be installed so that the top edge coincides with the drawn line, that is, it is horizontal. This arrangement is suitable for heating systems with forced circulation (with a pump) or for apartments. For systems with natural circulation, a slight slope is made - 1-1.5% - along the flow of the coolant. You can’t do more - there will be stagnation.
Correct installation of heating radiators
Wall mount
This must be taken into account when installing hooks or brackets for heating radiators. Hooks are installed like dowels - a hole of a suitable diameter is drilled in the wall, a plastic dowel is installed in it, and the hook is screwed into it. The distance from the wall to the heating device is easily adjusted by screwing in and unscrewing the hook body.
Hooks for cast iron batteries are thicker. This is a fastener for aluminum and bimetallic
When installing hooks under heating radiators, keep in mind that the main load falls on the upper fasteners. The lower one serves only to fix it in a given position relative to the wall and is installed 1-1.5 cm lower than the lower collector. Otherwise, you simply will not be able to hang the radiator.
Specifics of connecting and installing different systems
Redevelopment of old houses or simple renovation of an apartment with the replacement of old heating radiators is always associated with the need to study the peculiarities of laying pipelines and methods of connecting batteries. With the open installation method, it is enough to select the correct parameters of the device and shut-off valves, calculate the mounting locations for the brackets and install the battery.
When installing hidden, work is carried out on laying communications, equipping the installation site, and adjusting the decorative grille. It must be remembered that hidden installation requires more space than the size of the convector. For air movement, it is necessary that there is at least 3-5 cm of free space around the radiator around the perimeter and the same amount below it.
In addition, the decorative grille should have an inclined arrangement of the blinds. This element plays an important role in shaping the direction of the flow of warm air. If the sashes are turned towards the frames, then a heat shield will be created effectively. And if the blinds are turned in the opposite direction, then the flow of heated air will be used ineffectively.
Ways to increase heat transfer
From the point of view of releasing the maximum amount of heat into space, it is less effective than a pipe, perhaps a ball. It has an even worse surface to volume ratio.
What did the ancestors do to make these monstrous heating devices warm?
How to increase the heat transfer of a pipe?
Increased infrared radiation from the heating device. Simply painting the register with matte black paint gave a noticeable warming effect in the room. By the way, the current chrome plating of modern bathroom coils looks impressive, but from the point of view of the heat transfer of the device, it is pure idiocy.
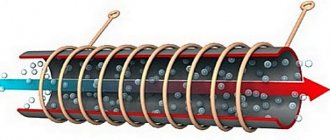
The heat transfer of steel pipes can also be increased due to fins welded or otherwise mounted on the outside of the pipe. The final stage of implementation of this method is a convector, a coil of pipe with transverse plates. Of course, in this case, all methods for calculating the heat transfer of a pipe are not applicable - the pipe gives off a smaller portion of the heat in this device.
Built-in devices
Heating radiators built into the floor are used to heat office, retail and residential establishments. They can be used in greenhouses and conservatories to create temperature conditions that are comfortable for plants. The operation of the device is based on the principle of convection. Built-in units promote intensive air circulation, so they heat the room faster and more efficiently, which reduces heating costs.
Worth knowing! There are built-in radiators on sale with automatic temperature control, condensate removal function, and the ability to program the microclimate in the room.
The unit has a simple design. Inside the metal housing there is a heat exchanger with convective plates. The body of the device is built into the floor, and is covered with a durable decorative grille on top.
Floor convectors
Another common way to heat a room with panoramic windows is to install floor convectors. This option is simpler than in-floor ones in terms of installation - you don’t need to prepare a special niche on the floor, just place the model in the area next to the power source.
Among the advantages of floor heaters are:
- compactness and stability. Many models are equipped with durable legs that support the entire structure;
- small dimensions. Thanks to the design features, it is possible to create very miniature models;
- ease of operation and maintenance. There are no difficulties, everything is very easy.
But there is also a drawback: such heaters do not provide enough heat; they can be used as auxiliary equipment.
Washing
If you want to get a modern kitchen design, washing under the window is an excellent solution that has many advantages. Most often, the window is not involved in space optimization. By placing a sink underneath it, you will free up some space for other tasks. You can also save a little on electricity by getting more natural light from the window.
Frosted glass is an excellent analogue to curtains
Having made the choice to place the work area along the window, you need to pay special attention to the curtains. As a rule, it is very difficult to maintain perfect cleanliness where people cook.
Therefore, textiles should be practical and not interfere with the cooking process. Short curtains or blinds are perfect for this.
Modern sunny style
Colorful elements in a bright kitchen make it more interesting
The disadvantage of placing the sink under the window is the additional costs involved. The main costs are the transfer of communications. For example, the most pressing issue will be battery transfer. What can be done to successfully implement such a project?
Work order
To properly replace heating radiators in an apartment, you must:
- Coordinate the modification with the operation service.
- Purchase the necessary materials.
- Perform preliminary assembly of components.
- Prepare tools.
- Agree with the team (if you do not plan to do the work yourself).
- Register the alteration with the Housing Office and decide on the date for the work.
- Remove old radiators.
- Install brackets.
- Hang new batteries.
- Make connections to heating pipes.
- Check the system operation.
During the preliminary assembly of the units, all the necessary elements are installed: plugs, gaskets, Mayevsky taps, etc. In addition, you can mark in advance the places where the pipes will be cut. In this case, you should use a plumb line and level to ensure that the new radiator is level.
If the supply pipes also require replacement, it is necessary to prepare these elements: cut pieces of suitable length, attach tees, etc. All this is done in order to quickly complete the installation after draining the water from the heating system. This measure will be more than relevant if the need to replace old batteries arises during the heating season.
Welding is used to replace metal pipes. The edges of the structures will need to be threaded to securely connect them to the radiator
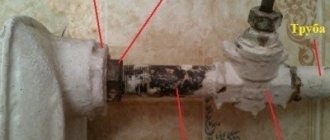
The procedure for removing old batteries depends on whether the pipes also need to be replaced. If the supply lines need to be preserved, you will have to carefully unscrew the old battery
At the same time, it is important to maintain the squeegee - a sufficiently long thread on the edge of the pipe. The radiator is fixed with a nut and coupling, which will have to be unscrewed
The procedure can be quite complicated. If the parts do not budge, you can try to loosen the connection using anti-corrosion compounds. In the most extreme case, the radiator is simply cut off with a grinder. There should be at least 10mm of thread left. Burrs should be removed from it.
If you decide to leave the old steel pipes, then dismantling the radiator must be carried out carefully so that the threads on the pipes remain intact
If it was not possible to maintain the flow, you will have to extend the pipes and also cut new threads. The removed locknuts can later be reused when installing a new radiator. It is much easier to dismantle the radiator if the pipes are also replaced. In this case, they are simply cut off in a suitable place. This is usually where the system turns toward its neighbors above and below.
Now you need to install the brackets and then hang the new radiator on them. At this stage, it is sometimes necessary to adjust the length of the supply pipe. All that remains is to restore the threaded connection
It is very important to perform the compaction correctly. For this, flax or plumbing thread is usually used.
Some craftsmen do not recommend using FUM tape on such connections. The seal is wound clockwise so that it forms a cone growing from the edge of the thread. Then screw on the connecting nut. If some of the seal remains outside, this is normal. But its layer should not be too thick.
Such work generates a lot of waste. They are best done during major renovations, after the windows are installed.
To achieve maximum tightness, sometimes the seal is impregnated with paint, after which the lock nut is screwed on. Then the protruding insulation is also impregnated with paint. A water-based composition is not suitable for these purposes. Once the paint has dried, it is very difficult to unscrew the connection.
Once the connection is complete, remove the protective film from the radiator. It is also necessary to check the position of the air vent. Its hole should be directed upwards. To check the quality of work, you need to ask plumbers to pump water into the heating circuit under pressure.
It is better to remove the film in which the new radiator is packaged after it is installed, so as not to accidentally damage the coating
This will allow leaks to be identified and repaired immediately. During operation, it does not hurt to observe the radiator for the first time, and also check the condition of the connections to make sure that they are not leaking.
Device installation
Development of an architectural project
It should be noted right away that built-in heating radiators are quite complex equipment from an installation point of view. Therefore, you can only take on work with your own hands if you are 100% confident in your strengths and skills.
The possibility of using such heating devices should be laid down at the stage of architectural design of the building.
It is advisable to take into account the following nuances:
Make sure that the created drawing meets the requirements of sanitary and other services
Here it is important to maintain the required thickness of the floor on the first floor or the strength of the reinforced concrete floor slabs on the second. Indeed, in addition to the radiators themselves, pipelines supplying and removing coolant will also be installed there. It is important to prepare the channel of the right size
The deeper and longer it is, the more powerful the battery you can install. However, a niche in the floor of this size affects the strength characteristics of the structure, therefore the engineer performing the calculations must provide for the possibility of installing a radiator under the floor.
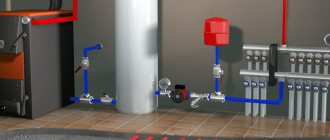
Arrangement of the heating system
In addition to the structural elements of the building, the climate system itself is also subject to design. In particular, it is necessary to correctly place the pipes that supply the coolant, as well as determine the installation locations of air valves that remove accumulated air from the pipes and radiators.
Otherwise, the thermal energy generated by the radiators will not be enough to warm the air in the room to the desired temperature.
It is advisable to provide automatic control of radiators using electronic valves and sensors. This will allow you to more accurately regulate operating modes depending on external conditions, which will not only add comfort, but will also make it possible to more economically use energy resources (gas, diesel fuel, electricity, and so on).
Niche installation
The most important stage is making a niche for the radiator. The instructions for its construction are simple.
Here it is important to observe only one very important condition - to ensure a continuous waterproofing layer (especially if the installation of the niche is carried out on the ground floor, where the subfloor is laid “on the ground”)
For ease of presentation, we will divide the work process into several successive stages:
- A niche of the required length and width is prepared. If the floor has not yet been poured, this is easy to do. But you can also make the necessary recesses in the finished floor covering. It won't take much longer.
Diagram of a niche for intrafloor covering in the interfloor ceiling
- Water protection is provided using coating or roll materials. Make sure that when heated they do not emit substances harmful to the human body.
- The next stage is insulation. You can line the niche with polystyrene foam or other material with a low thermal conductivity coefficient.
- After this, you need to decorate the niche with decorative material. You can simply plaster it or cover it with ceramic tiles, which were used to lay the floor of a terrace or veranda. In the first case, it is necessary to reinforce the surfaces with mesh to avoid cracking or crumbling as a result of temperature and shrinkage movements of the base.
Scheme for arranging a niche in the floor “on the ground”
The upper edge of the recess for the convector can be decorated with corners and brackets can be provided to hold the decorative and protective grille.
Combined solutions
In cases where it is necessary to heat very large rooms where large windows are installed, you can combine duct heaters with other climate control equipment:
- classic heating radiators;
- floor heating system.
In this case, it is necessary to install and correctly configure an automatic microclimate control system, which will independently coordinate the operation of all installed devices, achieving the most efficient and economical result.
Combined solutions can also be used for heating
Dependence of section capacity on center distance
The center-to-center distance of a bimetallic radiator determines an important parameter - the section capacity, on which the thermal power of the device ultimately depends :
Minimum required thermal power
Typically, thermal calculations of houses are done infrequently, so calculations have to be done room by room. The power of all radiators should be 20% higher than the power of the boiler. For a house insulated according to GOST, heat loss is 10 kW per 100 sq. m. with a ceiling height of up to 2.7 m.
Determining the number of radiators in each room by area is not always reasonable. Heat loss depends on walls, windows, doors. You shouldn't hang too many batteries either. But there should be enough of them so that the system is not hot (>70°C).
Here is an example of power distribution:
- The inner room is heated by the neighboring ones and can be equipped with a minimum number of radiators.
- External wall and window – 1 kW per 10 m2.
- A long outer wall and two windows - multiply the previous figure by 1.2.
- Two external walls and a window - multiply by 1.3.
- Two external walls and two windows - we multiply the primary data by 1.4 or 1.5.
This definition of power is relative. Much depends on other characteristics of the house: layout, size of external walls and windows. But for more than 90% of standard Russian houses, such a simple calculation is quite enough.
Criterias of choice
Water systems are more difficult to work with; several additional factors may influence the purchasing decision, in addition to the dimensions and material from which the body, fins and pipes are made.