Buying a new wooden country house usually involves many problems and worries. However, if your home design includes a bathroom, consider that the lion’s share of all problems have already been solved. A bathroom in a wooden house is the most difficult part of construction; no other living space requires as much attention and labor. Literally everything matters: the location of the bathroom and shower, the size of the room, proximity to water, good ventilation. In addition to designing sewerage and ventilation systems, it is necessary to carefully consider the design of waterproofing and issues of further finishing of the room.
Content:
- Finishing a bathroom in a wooden house
- Finishing the floor in the bathroom
- Wall decoration in the bathroom
- Ceiling decoration in the bathroom
- Choosing the location of the bathroom in a village house
- Choosing the optimal type of bathroom
- Combined bathroom
- Separate bathroom
- Selecting drain type
- Optimal bathroom sizes
- Features of arranging a hygienic room in a wooden building
- Supplying water to a bathroom in a wooden house
- Sewage connection
- Organization of ventilation
- Instructions for self-arrangement of a bathroom in a wooden house
- Video on the topic of a bathroom in a wooden house
A bathroom is an important component of any room, providing its residents and guests with the proper level of comfort. A bathroom in a wooden house, like in any other type of housing, has its own subtleties in organization and operation. This part of the interior can be equipped either on your own or with the help of qualified specialists. In any case, home owners are advised to familiarize themselves with the basic principles of proper organization of this place.
Communications
There are two options for the layout of water pipes in a wooden house - upper and lower.
In the first case, a storage tank is used at the top “point” of the house - in the attic. This option has such a feature as mandatory insulation of the attic and storage tank. But there are also advantages - the possibility of gravity water supply, the presence of an emergency water supply, hidden horizontal laying of pipes along the ceiling.
With bottom routing, pipes can be laid openly or hidden - under the floor. The open method is simpler and provides control over the condition of the pipes and the tightness of the connections, which is important for pressure water supply in case of leaks. Hidden installation is more aesthetically pleasing, but there is no visual control, and during installation it is necessary to take into account seasonal changes in humidity and the reaction of the wooden structure to this. And here a certain degree of freedom in the location and fastening of pipes is necessary:
- if pipes pass through through holes in walls and joists, then they must be of large diameter with elastic seals that do not interfere with their displacement;
- if pipes are installed in the basement on hangers, then they should not be rigid.
Installation of sewerage and water supply is one of the first types of work Source mendig.ru
See also: Catalog of companies that specialize in water supply and sewerage.
When laying water pipes hidden, it must be taken into account that the water from the well (or from the collective village water supply system) comes in quite cold, and this creates the preconditions for condensation and moistening of joists, beams, and other wooden elements of enclosing structures. Therefore, it is imperative to provide insulation of the water supply along the entire length of the horizontal distribution under the floor in the bathroom of a wooden house, and the vertical part if the pipe runs through the wall cladding.
Sewage pipes do not experience such large “internal” loads as pressure water pipes, but the strength of the connections between themselves and with fittings is not as high. Therefore, they can only be rigidly attached to a solid base that is not subject to shrinkage. But in a wooden house it can only be a strip foundation or a concrete slab for the first floor. In all other cases, fastening to wooden structures should ensure the “mobility” of the pipe without compromising the tightness of the connections.
The sewer pipe is rigidly attached only to the floor Source nl.decorexpro.com
Finishing a bathroom in a wooden house
Decorating a bathroom in a house made of wood requires compliance with certain rules, which primarily concern the materials used for coatings. Each surface of a given room is subject to different loads, so the choice of materials is based not only on the future appearance of the interior, but also on its practicality.
Classic style
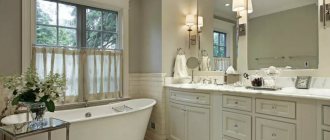
The design of a bathroom in a classic style involves the use of calm colors. It is recommended to complement the white ceiling with spotlights.
Plumbing elements and furniture should be selected in accordance with the general direction, and textiles are preferable in soothing colors.
Finishing the floor in the bathroom
The base of the floor is a concrete screed, which has a slight slope, allowing moisture to drain into the drain hole. For screeding, liquid compounds, multilayer systems (dry screed), or solutions prepared with your own hands are used.
The following materials are most often used as flooring:
- Ceramic tile;
- Laminate;
- Board or sheets of moisture-resistant wood;
- Linoleum.
Regardless of what design of a bathroom in a wooden house will be chosen, the main criterion that the finishing material will have to meet is moisture resistance. The most practical among the products presented is ceramic tiles. It does not allow water to pass through, washes well and keeps its shape. The most affordable in terms of cost savings is linoleum. All hard coverings must have a small (up to 2cm) gap to the walls to compensate for subsequent movements of wooden structures.
How to make a floor
The floor in a bathroom in a wooden house can be made of any waterproof material. Traditionally, this is ceramic tiles or porcelain stoneware, but you can put linoleum (an economical option), PVC tiles (the quality and characteristics of the coating are similar to commercial-grade linoleum), adhesive plug (it is 100% airtight, as it is covered with several layers of varnish). You can even make a wooden floor, but the board will need to be treated with special compounds and care must be taken to ensure ventilation of the underground space.
Bathroom in a wooden house - room for imagination
All coatings except wooden boards are compatible with heated floors. This can be water or electric heating. Only when choosing a floor covering, pay attention to its compatibility with heated floors. In this case, it is better to take ceramic tiles that are not very thick - to speed up the heating of the array, but in principle, any one is suitable. The characteristics of other materials must indicate compatibility with heated floors.
A bathroom in a wooden house is most often finished with tiles. In any case, the floor is made mainly from this material. It is practical and easy to care for. Ceramic floor tiles or porcelain tiles can be laid on a cement or dry screed. Moisture-resistant plywood, gypsum fiber board, and chipboard are used as a base for dry screed. There is also a new material that can be used in dry screed - Aquapanels from Knauf.
If necessary, you can lay a film heated floor on a dry screed, and the selected finishing material on top. You can lay water heated floors or cable mats in the cement (you can just use a heating cable). It is not advisable to use a film floor in a screed, since the film in concrete quickly breaks down and heating simply stops working.
How can a bathroom be made in a wooden house?
For all other types of bases, these two types of base can also be used. There is only an additional requirement for the screed: for linoleum, PVC tiles and cork, the base must be strong and level. The permissible deviation is 2 mm per 2 meters. Therefore, a regular screed is also filled with a self-leveling mixture. Otherwise
Cement screed on wooden floor
Typically, finishing the bathroom begins after the subfloor is ready. If you decide to make a cement screed, the procedure is as follows:
- A waterproofing roll material is laid on the base. This can be rolled Gidroizol or other similar materials. Thick polyethylene film (density 250 g/m or more) is suitable as an economical option. Waterproofing is installed according to all the rules: with overlaps of one sheet over another, carefully gluing the joints with mastic. In addition, the material extends about 20 cm from the walls (they are also coated with mastic).
Waterproofing laid on the subfloor and screed poured over it - A reinforcing mesh is laid on top of the waterproofing. Since the room is small, a ready-made reinforcing mesh made from a rod 5-8 mm in diameter is sufficient. You can attach water heated floor pipes or a heating cable to this mesh.
- The mesh is placed on special stands (pebbles about 3 cm high can be used). The point is that the reinforcing mesh should be in the thickness of the concrete and not rust, and a 3 cm layer of concrete can protect it.
- Fill with concrete and level. The minimum thickness of the concrete screed is 5 cm.
After the concrete has gained strength (one to two weeks depending on the temperature), you can glue the tiles to the floor or lay a suitable other type of flooring.
There are some other points. To avoid water flowing between the screed and the wall, it is advisable to first seal the joint around the perimeter with waterproofing tape (available from Knauf), or you can coat it with liquid waterproofing. The next point: before starting to lay the tiles, the surface is dust-free (cleaned well with a vacuum cleaner), then primed (for cement bases under the tiles). The soil reduces the absorbency, which allows the glue to gain strength rather than dry out due to the fact that all the water has gone into the concrete. In this case, a bathroom in a wooden house will not create problems for its owners - the tiles on the floor will lie for years and will not bounce off.
Dry screed
To make a tile floor in a bathroom in a wooden house, it is not necessary to use cement. You can make a so-called dry screed. Moisture-resistant sheet material is laid on the subfloor. It can be plywood, chipboard or gypsum fiber board. The best option is plywood with a thickness of at least 14 mm. Chipboard can also be used, but it is more susceptible to warping when humidity increases. GVL has not shown itself very well in operation - it does not tolerate shock loads well (it can crack upon impact). Therefore, it is advisable to still lay plywood.
This is how to lay plywood on the floor correctly
It is laid staggered so that the seams do not match. A gap of 3-4 mm is left between the sheets. It is needed to compensate for thermal expansion as the temperature rises. Fasten the plywood along the perimeter with nails to the subfloor, then in the middle in a checkerboard pattern (the distance between the fasteners is about 15 cm). The seams are sealed with a moisture-resistant sealant, which does not become rigid after drying.
Since tiles require a rigid base, a second layer of the same plywood is often laid. They lay it according to the same principle - with staggered intervals, but so that the seams of the first and second layers do not coincide. The rules are the same, only the second row is attached to the first, and not to the subfloor.
A waterproofing tape is glued along the perimeter of the made base (Knauf has it). In addition, even though plywood is moisture resistant, it is advisable to cover it with a layer of liquid waterproofing. Just choose the composition on which you can lay the tiles. After drying, you can immediately begin laying the tiles.
Wall decoration in the bathroom
Basically, moisture-resistant plasterboard attached to a metal frame is used to decorate the walls in the bathroom of a wooden house. This allows you to easily cover the walls with any suitable material in the future.
The following claddings are considered the most common:
- Tiles are the most practical materials that are not afraid of deformation under the influence of changes in temperature and humidity;
- Moisture-resistant wooden lining, treated with special coatings, perfectly emphasizes the naturalness and environmental friendliness of the building as a whole;
- Plastic in the form of panels is available in a wide range, but requires good ventilation.
Carrying out interior work
When organizing an internal sewerage system, many prefer to use independent frames. Communications are laid directly in the frame base.
When making such a design, you should consider:
- To secure the frame material, special profiles (U-shaped) are required;
- Parts of the structure should be attached to the main walls using brackets with grooves, but there should be no strong tightening in screw connections;
- Communications and electrical wiring are laid in the resulting gaps;
- You can assemble the frame structure yourself, because there are many options for this product.
Before finishing finishing work, you need to level the walls and floor.
Experienced craftsmen advise using polypropylene products to install water supply and sewer systems. Such materials are lightweight and highly durable. You can easily assemble the chosen scheme, because the individual parts fit perfectly together and are easily connected.
When organizing pipe turns, care should be taken to install an inspection designed to clean the pipeline. To increase the strength of the internal network, all seams and joints of the structure must be sealed.
Ceiling decoration in the bathroom
When thinking about how to cover a bathroom, you should pay special attention to the ceiling. This part of the finishing is made suspended from moisture-resistant plasterboard and lining, or tensioned from polyvinyl chloride. Suspended structures make it easy to install almost any lighting, and also perfectly retain moisture. In addition, it is easier to organize ventilation under a suspended ceiling.
Lighting
The room requires full lighting. To do this, you can use point light sources and additional lighting elements. It is important that the lighting elements are designed for the special conditions of the bathroom.
Conventional ceiling lights require a protective shade.
Choosing the location of the bathroom in a village house
The placement of a bathroom in a private house is discussed at the design stage of the building. If the house has two floors or more, then the placement of the bathroom is primarily carried out on the first floor, and subsequent tiers are supplied with similar rooms as needed. In this case, it is advisable to arrange bathrooms strictly vertically to reduce the number of pipelines in the house.
If the housing will have several bathrooms, then when planning it is important to pay attention to the floors between floors. The large load created by filling such a room requires special strength from the load-bearing elements of the entire structure of the house.
It is recommended to place a bathroom in a dacha in a wooden house, the layout of which can be completely different, near the kitchen, as this will reduce the cost of effort and money on additional communications in the form of water supply, sewerage and ventilation.
Toilet in a country house
Many people think about how to make a toilet in the country; most summer residents still have lonely houses in their gardens. Some are trying to arrange a toilet modeled after a city one. That is, a toilet is installed, and the waste discharge passes through the sewer pipe to the drainage settling point. There should be dug or concrete rings, and a special container installed. And at least once a year you will have to call a vacuum cleaner to clean the cesspool. And in between there have appeared many options for arranging country toilets. More on this below.
Some summer residents go a different route. They simply attach an outdoor toilet to an existing house, but before attaching a warm toilet to a wooden house, they need to see how the structure of the house as a whole behaves.
Combined bathroom
The main advantage of this type of room is the saving of usable space, which in a separate structure is wasted on the partition. Here you can install additional equipment such as a washing machine, dryer and other content. Staying in such a room is relatively comfortable due to the larger space, and maintaining order is carried out in a simpler way than in separate bathrooms.
Another important point in favor of joint construction is the cost savings on building materials. In this case, there is no need to build and finish an additional wall on both sides.
Do-it-yourself sewer system organization
When creating an individual sewerage system in a village building, it should be taken into account that the transportation of waste liquid can be gravity or forced.
They are characterized by the following:
- The gravity system operates under the influence of gravitational forces. It is enough to install the pipeline at the required angle, and the drains freely penetrate into the cesspool.
- For the pressure (forced) system, a special fecal pump is used, through which the wastewater moves.
Both of the above options can be used to create an individual sewer system.
If you decide to use a gravity sewer, it is important to maintain the slope correctly. The digging of the pipe is carried out in compliance with a uniform slope. Experts recommend not making a very steep slope. In this case, the pipeline will not have time to fill with water, resulting in poor flushing of the pipe walls.
A drain slope that is too level is also not suitable for sewerage. Often, due to low speed, the pipeline becomes clogged.
If you are not confident in your abilities, then it is better to hire a specialist to carry out sewerage.
A pressure system for transporting wastewater is often used if it is not possible to organize gravity drainage of liquid. By means of a fecal pump, forced movement of waste occurs. The equipment fits well into any toilet and ensures trouble-free operation.
Separate bathroom
A separate bathroom in a private wooden house is more convenient to use than a combined one if two or more people live in the house. In such an environment, you won’t have to wait for your turn in the bathroom if it is occupied by a person with completely different purposes.
A very significant advantage of such a project is more precise control of humidity in both rooms, which makes it easier to maintain order in each of them. In addition, a divided bathroom can be decorated in different styles.
The disadvantage is the excessive crampedness of the room with the toilet, which usually saves usable space.
Bathroom layout
The first step in decorating a bathroom is careful planning of the space. Based on individual needs and preferences, you need to decide on the types and quantity of plumbing fixtures that will be equipped in the room.
If a large family has a two-story house at its disposal, then it is possible to arrange two rooms on top of each other.
When developing a plan for your future bathroom, you need to take into account the basic rules for room design:
- When installing a sink, for ease of use, you must leave at least 20 cm of free space on the sides,
- The height of the sink is usually 80 cm, in front of it it is necessary to plan about 70 cm of empty space,
- the free space in front of the toilet should not be less than 60 cm, and on both sides no less than 40 cm,
- In front of the shower stall or bathtub, you also need a free space of at least 70 cm.
Compliance with these rules will help you plan a comfortable room and place the necessary elements of equipment in the most rational way.
Selecting drain type
Depending on the method of waste disposal, bathrooms can be divided into dry toilets, powder closets, and backlash closets.
A dry toilet consists of a toilet seat and a reservoir installed underneath it, in which, as a result of chemical or biological reactions, human waste products are converted into water or compost.
Powder closets are connected to boxes in which peat must be periodically added to convert waste into dry matter. The boxes are cleaned as they are filled.
Backlash closets are insulated toilets attached to the house. The drain is organized into a pit.
Choosing plumbing fixtures and furniture
The choice of furniture and fixtures leads to the completion of the bathroom design. At this stage, you should be guided only by your wishes. You only need to take care of strengthening the wooden floorboards so that they can withstand the load of a full bath.
A standard set of plumbing fixtures for comfortable use of this room:
- toilet (for a combined bathroom);
- sink;
- bath or shower.
What types of equipment to choose and how to place them in the room depends on the size of the bathroom.
The choice of furniture and fixtures leads to the completion of the bathroom design
For a large room, you can choose a corner bathtub, or place it in the middle of the room.
If the floorboards are not reinforced, to reduce the load on the floors, plumbing fixtures are placed along the wall.
For a small room, it is more important to choose a shower stall that will save space. And if you choose a wall-hung toilet, you can save another couple of centimeters of usable space.
The sink in the bathroom should be deep; if the area of the room allows, you can install a double sink. Additional furniture and accessories are also important in the bathroom. Additional elements should match the interior of the room, but it is also important that they are useful.
Relaxing atmosphere
If the room is spacious, you can place a closet for linen and towels, shelves or a chest of drawers for toiletries. A mirror is an essential element of the bathroom. If there are children at home, do not forget to have a special ladder that will help them easily reach the washbasin.
Thoughtfulness of all details is the advantage of any room. A heated towel rail or hooks for towels and bathrobes must be installed in the bathroom. A full-length mirror will be an effective element of the interior.
Don't forget about the laundry basket. In a spacious room it can be a separate interior detail. In a small room, the laundry basket is usually hidden in the closet.
When it's spacious but cozy
It is important to remember that many of us also have household appliances in the bathroom: a washing machine and dryer. It also needs to be conveniently placed so that there is open access to it. The laundry basket should be located nearby.
Optimal bathroom sizes
When wondering how to make a bathroom in a wooden house as ergonomic as possible, you first need to think about its size. The dimensions of the bathroom are mainly dictated by its contents (plumbing, appliances, appliances) and the space available according to the design. If the bathroom is separate, then an area of up to 3 square meters will be enough to install a washbasin and toilet in the toilet. For a separate room with a shower, the same space is enough.
A combined bathroom, which will contain a toilet, shower and sink, requires an area of 4 sq.m., taking into account the fact that no household appliances will be located here.
To equip a room with a bathroom, an additional cabinet and, for example, a washing machine, its dimensions must be at least 5 square meters. In addition, both the shape of the room itself and the way all elements are placed are very important, so it is recommended to think in advance about the location of the water supply and sewerage for a more successful arrangement of all objects.
Location and dimensions
Ideally, a room for a bathroom is chosen at the stage of preparing the house plan. In practice, everything can be different; quite often it is necessary to rebuild an already completed building. When choosing a room in which the bathroom will be located, you should follow the recommendations:
- the toilet should be located next to the living room, on the floor below it, but not above it;
- one of the walls should be external, which will simplify the creation of ventilation;
- in a multi-storey building, bathrooms are installed one above the other, this will facilitate the laying of communications and their subsequent maintenance.
The dimensions of the room are determined individually for each specific project. This is influenced by a number of factors:
- type of bathroom (separate or bathroom with toilet);
- number of bathrooms;
- dimensions of a residential building;
- physical characteristics of people.
Important! When planning a bathroom, it is necessary to proceed from construction standards. The dimensions of the toilet must be at least 0.8 × 1.2 m, the size of the toilet with washbasin must be 1.6 × 2.2 m. A full bathroom with a bathtub can be located in a room measuring at least 2.2 × 2.2 m.
It is mandatory to make a schematic drawing of the room allocated for the bathroom. The dimensions of the plumbing fixtures and their installation locations are marked on it. It is also important to consider the location of the pipelines. The bathroom must be planned in such a way that the distance from the toilet to the sewer riser does not exceed 1 m, and from the bath – 3 m. Otherwise, you cannot do without pumping equipment.
In the case of a country house with several floors or a cottage with an attic, it is worth considering the option of placing a toilet and bath under the stairs. This will make it possible to significantly save space without sacrificing convenience. The bathroom can be attached to the main building, since the design of a wooden house makes this easy to do.
Features of arranging a hygienic room in a wooden building
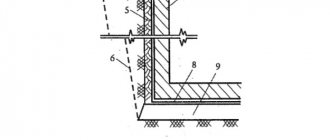
An important feature of arranging a bathroom in a wooden house is the waterproofing of the room. The porosity of wood causes it to constantly absorb and release moisture, so insulating it from the high humidity of the bathroom is mandatory.
Despite the success of protecting the tree from steam, it still absorbs water from the atmosphere, so it is in a constant mode of expansion and contraction. This produces linear movements of the entire structure of the house, so the bathroom is integrated into the house on the basis of a sliding frame. This method eliminates the interaction of the bathroom with the main structure of the house, which will protect its owners from the destruction of hard and fragile elements of the interior decoration of the room.
Country style
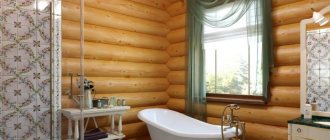
Finishing the room with wood and its derivatives will allow you to actively use country style when decorating a bathroom.
You can play up the country style by choosing ceramic floor tiles in appropriate shades and adding wooden shelves to the room.
Note!
Self-leveling floor in the bathroom - TOP 170 photo and video options. Advantages of self-leveling flooring in the bathroom. DIY pouring instructionsChest of drawers in the bathroom: 165 photos of stylish models and videos of current options for placing chests of drawers
Sliding curtains for the bathroom - 165 photos + video instructions on how to choose and install sliding curtains correctly
The window opening can be decorated with checkered curtains, matching them with towels and robes of similar colors.
By choosing the Provence style, you can combine wooden finishing elements with white surfaces made of other materials, white plumbing fixtures and light window curtains.
Supplying water to a bathroom in a wooden house
Having chosen a suitable place in a wooden house for arranging a hygienic room, you should proceed to the issue of supplying the appropriate communications to it. The easiest way to connect a bathroom is in a wooden house, the planning of which is at the initial stage of implementation. An important point in this matter is the choice of material from which the pipes are made.
It should be remembered that wood is very sensitive to moisture, so it is recommended to exclude metal pipes from the water supply system, on which condensation constantly forms. Plastic products must be used.
To maintain the integrity of the wooden elements, it is necessary to ensure their minimal contact with the pipes. It is also recommended to use thermal insulation for pipes and clamps with rubber gaskets.
Insulation
To insulate a room, foam plastic or mineral wool is usually used.
Polystyrene foam is a very fragile material. For this reason, it is reasonable to give preference to mineral wool. It is not capable of absorbing moisture, so it does not require additional processing or waterproofing.
It is possible to insulate the room using cork plates.
Sewage connection
The wooden structure of the house is very sensitive to leaks, so particularly strict requirements are put forward for sewerage in such housing. You should choose reliable drain systems with strong joint locks.
An important point is to prevent the drain from freezing. If pipes pass near ventilation ducts, then in severe frosts outside, severe cooling of the drain may occur. In such cases, thermal insulation is used, as well as drainage as far as possible from the street, digging it as deep as possible into the ground.
Briefly about the renovation
Sooner or later you have to start renovating your bathroom. It’s better not to make do with half measures, but to open the skin completely to assess the condition of the waterproofing and wooden elements.
The affected areas of the sheathing are replaced, and the wood is treated comprehensively. The damaged canvas is sealed with adhesive sealing tape, and in no case with tape. It is advisable to use products from the same manufacturer, due to possible chemical reactions.
For local repair of wet joints, ready-made KNAUF latex waterproofing is suitable. Before any work, the room and structures should be dried. Wet insulation loses its properties.
Remember the difference between a vapor barrier film and a vapor-windproof membrane. The first is to prevent vapors from entering the house structure. The second one works in a mirror way: it does not allow street moisture to pass through, but releases air to the street; do not confuse the sides when replacing.
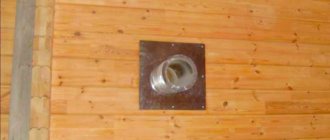
Organization of ventilation
Air exchange in the bathroom plays an important role in maintaining the cleanliness and integrity of finishing materials. Here it is necessary to ensure effective air flow from the main room. To do this, select doors with holes at the bottom, allowing air to enter into the lowest point of the bathroom.
To draw air from the house into the upper part of the wall opposite the door, an exhaust hood is mounted. As part of fire safety regulations, this device is equipped with a special valve.
Air exhaust is organized directly to the street, or through a channel passing under the attic.
Bathroom finishing
A responsible approach to finishing a room is required. It is important to select all finishing materials taking into account the special operating conditions of the bathroom.
Materials must be resistant to increased air humidity and temperature due to steam and water, wash well and not be afraid of the effects of household chemicals.
When choosing options for decorating a room, preference should be given to high-quality finishing materials.
Instructions for self-arrangement of a bathroom in a wooden house
In order to successfully provide a wooden house with a bathroom with a toilet, or separate toilets, it is not necessary to resort to the help of specialists. By following the recommended steps, you can arrange a bathroom in a wooden house with your own hands:
- Determine the location of the bathroom;
- Organize drainage;
- Provide ventilation;
- Connect the water supply;
- Ensure waterproofing of the room;
- Install plumbing;
- Finish the work done.
Despite some difficulties associated with arranging a bathroom in a wooden house, this task is within the power of even the homeowners themselves. A variety of ways to organize and design the interior allows you to make the room as ergonomic and comfortable as possible.
Sewerage using a cesspool
The simplest way to organize sewerage in a country house is to use a cesspool. Before starting work, it is necessary to determine the location of the waste container. The cesspool should not be located close to the water intake point (less than 20 m), this will help prevent wastewater from mixing with water.
When building a cesspool with your own hands, you should follow the sequence of work:
- When digging a hole, make sure that its depth is at least 1.5 meters;
- It is recommended to make the bottom at a slight slope, due to this, heavy inclusions will settle in the bottom part;
- It is important that the design provides high-quality waterproofing;
- In order for a pit in the village to last a long time, the walls of the tank should be lined with bricks, and the bottom can be filled with concrete;
- To reduce hygroscopicity, the entire surface should be treated with a primer, and then the inside should be finished with waterproof plaster;
- It is preferable to make a double lid for the cesspool, where the inner part is made of wood and the outer part is made of metal;
- Care should be taken to insulate the structure; insulation (glass wool, peat) is located between the covers.
Plastic pipes are well suited for sewerage.
When organizing the pipeline, it is important that there is a slope along which the drains can easily penetrate into the pit.