Cinder block is a popular, inexpensive material for the construction of any structures. Very often, a foundation for a garage is built from cinder block - this material is used for the construction of walls, block fences, outhouse sheds, and so on. The most basic and important stage in any construction is the arrangement of the foundation - the durability and stability of the structure depends on this design.
An example of a cinder block foundation
The foundation transfers the load to the soil, distributing it evenly over the entire surface. The foundation for any structure must be made strong, and this directly depends on the material for construction and adherence to technology.
Arrangement of the foundation is the most expensive item in private construction, and of course, many private developers want to save money, without sacrificing quality. It is the price that is the main criterion when choosing cinder blocks for the construction of foundations for any buildings from private developers.
Existing types and sizes of cinder blocks
To be completely confident in the possibility of using this material for the construction of foundations and structures, you need to consider the technological features of cinder blocks.
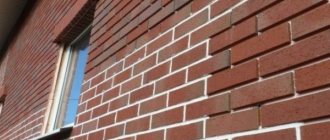
Types of cinder block masonry
There are four ways to lay cinder blocks:
- Laying cinder block in two stones.
Often used for the construction of foundations or plinths. Walls with such masonry will be warmer due to their thickness.
- Laying one and a half stone cinder blocks.
This type of masonry is used for laying load-bearing and external walls of a house..
- Laying cinder block in one stone.
Both the exterior walls and the wall partitions inside the house are built using one cinder block stone.
- Laying cinder block in the stone floor.
It is recommended to build only internal wall partitions into the stone floor. They are quite thin and cannot perform a load-bearing function in the structure.
masonry in one, one and a half and two blocks
Advantages
Let's consider the positive aspects of using solid cinder blocks for the construction of foundations:
This is what forms for pouring cinder blocks look like
The cinder block laying process
- it is not difficult to equip a base from this material, without outside help, with your own hands;
- the material has proven itself to be strong and durable during construction;
- construction time is reduced; unlike a concrete, monolithic base, there is no need to wait until the material acquires the required strength;
- reduction of construction costs - no need to spend money on purchasing material for formwork - in this case it is not needed;
- the material does not shrink;
- no need to mix a large amount of solution;
- suitable for the construction of not only foundations, but also small buildings.
Cinder block design option Important! If you buy large solid cinder blocks, then you should understand that they weigh one and a half tons, and you need to take care of a crane to install them. Cinder block material cannot be used in the construction of large buildings with complex projects.
Cinder block laying tool
To carry out cinder block laying work you will need the following tools:
- Cord - mooring for marking.
It is desirable that the color of the marking cord be bright and conspicuous, for example red. Some people use graph paper to mark the line. But it is not particularly practical, since it is transparent and difficult to see during operation.
- Building level and plumb line, tape measure.
It is advisable to also stock up on a hydraulic level (water level) and a metal building rule. A must-have tool for any repair and construction work. Using a level and plumb line you will control the evenness of the masonry, both vertically and horizontally.
- Construction pencil or chalk.
- Tool for preparing the solution. These are containers and buckets for mixing and carrying mortar, a concrete mixer, and a construction trolley. The listed equipment is necessary for delivering sand, cement, water to the container for mixing the solution. If you have the opportunity to use a concrete mixer, this will make the process of preparing the solution easier. But a couple of metal buckets are definitely needed to transfer the solution to the masonry site. Plastic containers will suffice for water. It is advisable to use metal containers, since plastic buckets can be quickly damaged by a metal trowel and shovel.
masonry tool
- Construction trowel (trowel). Necessary for collecting and applying the solution to the cinder block. There are three forms of the metal part of the trowel. A trapezoid-shaped trowel is considered the most convenient for masonry.
- Hammer or pickaxe.
A cinder block is a heavy stone and it is not always possible to lay it perfectly straight in a row. Using a hammer, the stone can be leveled with a level and string. In addition, the geometry of an ordinary cinder block is not always perfectly smooth and may arise.
- Grinder with a circle of at least 150 mm . A grinder is needed to cut a cinder block; otherwise, it is almost impossible to cut a cinder block. See the article below for how to cut a cinder block.
- Perforator with mixer attachment. Necessary for mixing the solution if you do not have a concrete mixer.
- Shovels: shovel or bayonet. Ideally, have both shovels. They are needed to load sand and cement into buckets, a mixture container or a concrete mixer. In the absence of a concrete mixer, shovels are needed to mix the solution.
- Template for laying cinder block. It is not required, but its presence will greatly facilitate and speed up the laying if you plan to lay out a large area. The template can be easily made independently from lumber, metal corners, or purchased at hardware stores.
- Overalls and construction gloves. Gloves are a must since your hands are constantly working with mortar and cinder block. When laying or carrying blocks, you can inadvertently damage the skin of your hands, legs and abdomen. It is recommended to protect body parts with durable used clothing or construction clothing.
blank for laying mortar
Options for cinder block fences
Numerous modern decorative techniques will help you get rid of the boring gray color of cinder blocks.
- Professionals advise painting the fence with high-quality and durable oil paint. However, some of us are stopped by a costly nuance - a large consumption of paint, because the porous surface of the cinder block greedily absorbs it and we will need to apply all 3, or even 4 layers.
- Designers offer high-quality waterproof paint from the latest brands for painting a nondescript gray cinder block fence. And yet, before painting, experts advise first coating the fence twice with a primer. Or better yet, plaster it.
Combined fences are spectacular and fashionable.
- The classic combination of cinder block with forged or wooden elements is interesting.
- Modern dictates the fusion of polycarbonate with cinder block.
- Brick looks traditional with cinder block.
- Cinder block fences with inserts made of natural or artificial stone look luxurious.
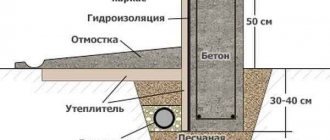
Preparing the foundation for laying cinder blocks
- Elimination of foundation unevenness.
Before starting masonry, the surface of the foundation should be cleared of excess debris and dust. Knock down and eliminate existing irregularities as much as possible in those areas of the foundation where the masonry will be done. This can be done with a pick, hammer, or special spatula. Then thoroughly sweep away all debris and dust from the surface of the foundation.
- Foundation waterproofing.
If your foundation has not been waterproofed. Then the places for masonry need to be covered with mastic or a layer of waterproofing material. This protects the cinder block from excess moisture from below.
- Height and width of the foundation. Ideally, the width of the foundation on which the cinder block will be laid should be 40 cm wider than the width of the wall itself. And the height of the foundation under a cinder block wall should be at least 70 cm from the ground level. This height is necessary so that the cinder block, which absorbs moisture well, is as high as possible from the ground. In practice, such proportions are often not observed. If the facade of a cinder block building is additionally protected from the external environment, then the proximity to the ground will not cause harm to the cinder block, or it will be insignificant.
- Provide easy access to cinder block laying areas. Access to the perimeter of the masonry must be free both from the inside and from the outside of the foundation. This will make it easier to bring the cinder block and mortar to the masonry areas, and will make it easier to work with masonry on both sides of the wall.
waterproofing the foundation before laying
Clay red
If you decide to make the ground floor of a house from red clay bricks, then you have chosen the best option. In technological terms, this material is most suitable for constructing foundations and plinths. The brick plinth can be used for a long time without fear of exposure to environmental factors.
However, even high-quality red brick will absorb moisture, so when choosing, be sure to check the brand of material. For example, the M-150 brand can withstand no more than 60 freezing cycles, so it is recommended to look on the market for types with higher frost resistance. If the area experiences high humidity and constant precipitation, then attention should be paid to the M-250 brand.
Why are strength and moisture resistance so important for red and sand-lime bricks? First of all, this is due to the fact that water, getting into the cracks and pores of the material, expands when freezing and begins to destroy it from the inside. Accordingly, the entire basement floor directly suffers from this.
Even if you are building the house itself from silicate (in a dry climate), it is still recommended to lay the base with traditional clay bricks.
The most popular option.
The use of red brick on a plinth can often be determined by many economic considerations: it is a traditional inexpensive material that is sold everywhere.
When purchasing a material, no matter how beautiful it may be, you must ask the seller for the relevant documents that will confirm its quality. Making a plinth from red brick (no matter what type) is the right and rational decision.
Mortar for laying cinder block
Making your own mortar is the cheapest masonry option. Purchasing ready-made families, to which you just need to add water, will make the masonry noticeably more expensive.
We will take the size of one bucket per measurement portion.
Composition of masonry mortar
- One bucket of cement
- Three buckets of sand
- Half a bucket of water. The indicated amount of water is not strict. The amount of water is regulated by the viscosity and liquid of the resulting solution. If the sand is wet, less water may be needed.
- Strength plasticizers. Additional fastening liquids and mixtures can be added to the solution. But they are not required.
- It is recommended to add one cap of dishwashing detergent along with water for one batch of cement mortar. This additive will make the solution elastic and stretchy, which will make it easier to work with.
If you mix the solution manually, using a shovel, then pour the cement and sand into one container and mix them well until the mass is as homogeneous as possible.
Before adding it to the dry mixture, add a portion of dishwashing detergent and a plasticizer to the water. After mixing everything until a homogeneous liquid, the water can be poured into the central part of the container with the dry mixture.
Requirements for mortar for laying cinder block:
- Uniformity of color. The solution must be stirred until it reaches a uniform gray color.
- The solution should be of medium viscosity, not too thick, but not too liquid, so that it adheres ductilely and well to the masonry and does not drain under the pressure of the cinder block.
- If unmixed fragments of yellow sand are visible in the solution, then it must be continued to be stirred. If you find solid fragments of soil, stones, or some kind of vegetation that accidentally got into the solution, then they should be removed from the mixture. Poor homogeneity with sand stones and other substances will lead to cracking of the masonry in the future.
In order to reduce the cost of effort, it is advisable to use a concrete mixer. But for a mixture of small volumes of solution, it is more practical and faster to mix the solution by hand.
in a well-mixed solution no sand should be visible
Silicate
Sand-lime brick is produced using a technology that does not involve operating the material in conditions of high humidity. With prolonged exposure to moisture, such a brick will swell, lose its performance characteristics and collapse over time. Laying a plinth made of sand-lime brick is permissible only if the climate in the area is arid and there is little precipitation.
In addition, for sand-lime bricks on the plinth it is best to provide high-quality waterproofing. The grade of sand-lime brick determines its strength, which, in turn, affects the reliability of the entire structure.
The choice of sand-lime brick, among other things, allows you to save a little on the work.
This option is suitable for laying a plinth only in very dry climates.
The use of sand-lime brick will significantly reduce the labor intensity of work, and will also solve many problems with the use of traditional hydro- and heat insulators. If there is high humidity in the area, then making a plinth from this type of brick is highly not recommended.
Cinder block laying technique
Laying the first row of cinder blocks.
After completing all the above steps, you can proceed directly to laying the cinder block. The most important step after correct marking is laying the first row of cinder blocks.
- Laying the first row of cinder blocks begins from the corners of the foundation to the middle of the wall row.
- The prepared cement mortar is laid out on the foundation along the width and length of the cinder block. The optimal thickness of the solution is 1.5-2 cm. The solution is also applied to the end of the cinder block.
For laying mortar, especially for beginners, it is convenient to use a special construction device: a template for laying blocks. You can construct this device yourself or purchase it in a store.
template for laying mortar using the example of brickwork
- The cinder block, along a stretched cord from the corners, lies on the already laid mortar. Using a hammer or pick, the top is knocked into the same plane as the corner cinder block. The correct horizon from above is measured by the building level.
In the same way, the walls are laid from other corners of the foundation, towards each other.
- After the blocks are as close as possible in the central part of the row. It is necessary to measure the length of the last block along the foundation and cut it with a grinder to a suitable size. In the same way, lay the remaining block in a row along the cord and horizontally.
How to cut a cinder block
The easiest way is to cut the cinder block into the required size using a grinder. The circle used must be at least 150 mm - 200 mm. The cinder block is marked over the entire surface, on all sides, with chalk or pencil. Then, using a grinder, the cinder block is sawed around the entire perimeter. A wooden wedge is inserted into the cuts and thus the block is split in the middle. When working with an angle grinder, be sure to take safety precautions: use a mask or goggles, cut on a solid surface, secure the cinder block well.
cutting cinder block with a grinder
- Having laid the block flat and to size, remove excess mortar from the seams and from the bottom of the cinder block.
- The first row of cinder blocks must be reinforced with mesh or reinforcement.
Ceramic
If we compare silicate, red and ceramic bricks, the latter can boast of maximum durability. Today, ceramic plinth bricks are offered by many manufacturers, so it’s easy to get confused about its types. Materials of this type include clinker bricks, from which you can make both the basement of a house and other structures in any climatic conditions.
Clinker brick is made from special types of clay, which is baked at high temperatures. The material is practically inert to moisture. At the same time, it has good strength characteristics.
You can also use ceramic bricks to lay other structures on your site. For example, gazebos, baths, saunas and extensions built from it look very good, which, among other things, will have excellent performance characteristics.
Regardless of what type of brick you choose for the basement (red, silicate or ceramic), you must definitely consult with specialists about waterproofing and thermal insulation of the basement of the house, as well as other structures of the building. It is very important that the floor of the basement of the house (whatever it may be) is also well insulated, otherwise the base will be subject to additional influence from below.
What to look for when purchasing
When choosing bricks for the foundation, you need to pay attention to the accompanying documentation. The grade of stone must be higher than M150, frost resistance from F25, geometric dimensions must comply with GOST.
During transportation, unloading and storage, edges often break off, which is not a significant defect. In most cases, plaster waterproofing is used for brick foundations. Unevenness will only increase the adhesion of the protective layer.
When you tap a ceramic brick with a metal object, there should be a clear ringing sound, not a muffled dull sound. The ringing indicates the quality of the raw materials used, the correctness of the firing technology, and the absence of microcracks and voids.
Advantages of vibropressed brick assortment and membrane waterproofing
- Despite the hundred-year assigned resource, the use of clinker bricks in foundations is not economically feasible. The desire to use a more advanced and fairly durable material is realized by purchasing vibropressed bricks.
The dense moisture- and frost-resistant structure of the material allows, with low-cost maintenance, to operate the foundation of the house for several decades. The assigned resource of paving stones identical in composition is 30 years.- The best material for creating a durable foundation hydrobarrier is a polymer geomembrane with a thickness of 0.7-1 mm, which maintains operating parameters throughout 40-60 years of operation.
The budget combination of coating and roll fused insulation on a bitumen-polymer basis produces an assigned 15-year resource only with favorable use.
Why does the brick in the base wear out faster?
The plinth is erected directly on the concrete foundation and ends at the floor level of the first floor. This is the basis of the whole house, as well as additional protection from cold and moisture. Because of these features, the brick in this area is exposed to very significant environmental influences.
Main negative factors:
- proximity to the earth's surface promotes longer contact with moisture;
- accumulation of snow in winter also contributes to excess moisture in the brick;
- the masonry is subject to significant load, since it bears the weight of the rest of the house structures;
- additional pressure is exerted from the soil, which also contributes to premature wear.
Contact with moisture is the main cause of premature wear of the base. Over time, any material begins to get wet. If water penetrates into the thickness of the masonry, in winter it freezes and, expanding, contributes to the destruction of the structure. The next year there is more moisture, the cycle repeats increasing. That is why it is so important to carefully select a brick for the plinth, and also pay maximum attention to high-quality waterproofing.
Basic principles for choosing bricks for a plinth
Before talking about specific types of bricks and the possibility of using them to build a basement, it is necessary to understand the basic principles of choosing building materials for this section of the building. Choosing a cheaper option means soon dooming yourself to a full-fledged repair, which will end up being much more expensive.
Here are the main points to keep in mind:
- standard dimensions (makes laying easier);
- no harmful emissions;
- very good moisture resistance;
- good adhesion to the solution (minimizes the risk of cracks);
- resistance to temperature changes and frost;
- high degree of rigidity and strength (it is necessary to withstand the weight of the house);
- aesthetics;
- acceptable price.
Brick fully meets all requirements, which is why it is most often used in the construction of a basement. However, there is plenty to choose from, since manufacturers offer options that differ significantly in composition, properties and price. Let's take a closer look at the most popular types.
Clinker brick for plinth
The strongest clinker brick available at the moment is very well suited for building a basement. It is made from very refractory clay, which is fired at extremely high temperatures, much higher than the firing temperature of ordinary ceramic and sand-lime bricks. The result is a product that has virtually no pores or air voids, which is very important given the very frequent contact with moisture.
Advantages of clinker bricks as a base for a plinth:
- very high mechanical strength, which lasts for a long time;
- resistance to adverse weather effects, including wind, any precipitation, temperature changes;
- frost resistance - the minimum number of freeze-thaw cycles for clinker bricks is 50, and with good additional finishing it increases significantly;
- waterproof - the absence of pores minimizes the absorption of moisture even with prolonged contact with it;
- aesthetic appearance and easy maintenance - if the base becomes dirty, the brick can simply be washed with a brush.
Accordingly, clinker brick is one of the ideal materials for building a basement. Its main drawback is its rather high price.
Ceramic brick
Ceramic brick can be used not only for the base; it is appropriate in any structure of the house from the foundation to the internal partitions. Depending on the number of voids, different types of material are distinguished, but for increased loads, solid brick is optimal, in which voids are either absent altogether or make up no more than 13% of the total volume.
Ceramic brick is very convenient for building a base; its main advantages:
- high strength;
- exact dimensions, which are regulated by GOST (for a single brick they are 250x120x65 mm);
- slight porosity of the edges, ensuring good adhesion to concrete;
- moisture absorption no more than 8% (this indicator is also determined by GOST);
- high resistance to low temperatures and temperature changes;
- aesthetic appearance.
Conclusion
So we found out why a base is needed in general, and made of brick in particular. And the last piece of advice from our experts is to choose only high-quality materials for the basement, because the reliability and service life of your home directly depends on the quality of this structure. Also, you shouldn’t do the masonry yourself if you don’t have at least minimal skills: it’s cheaper to hire specialists than to carry out a major overhaul in 5-10 years, at best of the base, or at worst, along with the foundation.
(75 votes, average: 4.7 out of 5)
Help us make the article better, tell us what is the reason for the low rating?
Share with your friends:
Material selection criteria
The standard size of cinder blocks for a fence is 390×190×188 mm. These characteristics are clarified at the stage of calculating the required amount of material. When purchasing please rate:
- Appearance of cinder blocks. High-quality products have smooth, defect-free walls.
- The accuracy of the geometric dimensions will determine the quality of the masonry.
- Frost resistance coefficient. The F index is considered ideal for external structures.
- Water absorption coefficient or hygroscopicity. Recommended values are within 9%.
- Manufacturer. Give preference to products that have already passed quality tests and have the appropriate certificates.
What properties should a brick have for laying a foundation plinth?
Wondering why there is a brick on the foundation, you begin to look for information about the characteristics of this building material that it must have to protect the house. Among the main requirements it is worth noting:
- proper environmental performance;
- resistance to moisture - if the brick strongly absorbs liquid, it will not be suitable for the base, since in winter the moisture will turn into ice, destroying the support of the house;
- relief coating - such a surface promotes better adhesion to the solution;
- high marking indicators (at least 200 MPa for compression);
- Lack of exposure to temperature changes - seasons will change each other, but the brick should remain unchanged;
- standard size - this criterion has a greater impact on the aesthetic appearance of the base, which should not diverge in design from the house.
Formation of support pillars
The next step after the foundation has dried is the construction of supporting fence posts. The foundation for them is laid at the stage of pouring the foundation itself and consists of metal pipes. To give the supporting columns the final appearance and properties, it is necessary to cover them with cinder block. In this case, you can use both standard pieces of material and hollow figures specially produced for these purposes. If the latter are used, the process of constructing support columns is greatly simplified.
The supporting columns of the fence serve two main purposes: firstly, they significantly increase the strength of the entire structure, and secondly, they play a decorative role. The spans, interspersed with solid pillars, look more solid and presentable than a monotonous cinder block wall.
Main characteristics of the material
Cinder block is a building material made from sand, cement, lime and water. The pressing method is used in its production.
Sand-cement mortar with various fillers is poured into a special form: crushed stone, gravel, brick waste. The operational and decorative characteristics of the block depend on the filler.
Advantages and disadvantages of cinder block
The popularity of cinder blocks is due to the following advantages:
- Strength and durability combined with low cost.
- Ease of construction. Building a fence requires minimal masonry skills.
- Environmental friendliness. Cinder blocks are made from pure components that do not contain harmful substances.
- Ease. Cinder block is 2 times lighter than natural stone and brick of the same size.
The disadvantages of the material are its high hygroscopicity and low decorativeness. However, this disadvantage can be easily overcome by applying a special coating to the constructed fence.
Calculation of the width and height of the base
Before you start laying the base, you need to decide on its dimensions. The width depends on the thickness of the grillage and wall structures. The following types of plinth are possible:
- Protruding outwards - in this case its thickness exceeds the wall thickness. Because of this, precipitation falls on it, destroying the brick. This design must be protected with a special trump card and casing.
- Located on the same level with the wall plane. After installing the sheathing, it thickens and begins to protrude slightly.
- Sunken - with a slightly smaller thickness than that of the wall. After laying the base, it can be sheathed, ensuring alignment with the plane of the wall.
The width is chosen by comparing the load-bearing qualities of the materials and the dimensions of the foundation. The latter create certain restrictions on the possible thickness of the structure. The height depends on the floor level and the severity of snow cover in winter, characteristic of the area.