Wallpaper selection
What should be the wallpaper for the arch? This is not an idle question, since the opening is actively used - the edges wear out and crumble, especially if the structure is made of thin plasterboard. The covering for the vault must be strong and durable. Suitable options can be classified according to the following criteria:
- Classic paper ones. The type includes structural, embossed, smooth, photo wallpaper. You can paste over an arch in an apartment with any of them - they are the lightest and do not require a “monolithic” binder composition to hold the weight of the paper on the arch.
- Practical and washable. This includes silk-screen printing and types of vinyl - foam, heavy, flat. They are durable, and the variety of colors allows you to decorate the doorway to suit every taste. With them, the arch looks clean and well-groomed. Decorative corners for framing are best adhered to such wallpaper.
- Two-layer - textile, non-woven, bamboo. The first option is paper with a layer of fabric, the second is cellulose and polymer, the third is eco-material and fabric. The last option requires a special ethnic style of the countries of the East; if the doors are decorated with bamboo wallpaper in rooms that do not correspond to this, then dissonance cannot be avoided. The appearance of the material is impeccable, the structure is durable due to its multi-layered nature. Absolutely environmentally friendly.
- Liquid wallpaper. It is quite simple to paste over the arch with them. There are several options - cellulose fibers, decorative plaster. Both types are diluted with water to a certain consistency and gradually placed on the surface of the opening. The advantage is the instant replaceability of a damaged or outdated area - the piece is simply removed, and a new portion of the liquid mass is placed in its place. Disadvantage - they wear out quickly.
The difficulty of choosing lies in balancing the decor of the walls and the arch - wallpaper with a pattern will not look harmonious in the arch, and it is almost impossible to match the lines exactly. Therefore, it is important to choose plain materials or with small inclusions, for example, companion wallpaper that combines one background and a different pattern. Covering the arch with wallpaper of this type is the right decision.
Plastic panels
The method of finishing windows with plastic lining is very popular. It is attached to the opening with polyurethane foam, which does not require the use of special tools, and this is an absolute advantage of the method. But, as in the case of plaster, it will not be easy for a person who does not have special skills to achieve an ideal result. The work time is about three hours for one opening.
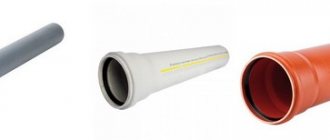
PVC panels
PVC panels are a composition of plastic sheets connected by stiffening ribs, with free space in the gap between them. Nowadays, specialized PVC slope systems are sold in stores. Their parts are purposefully manufactured taking into account the parameters of both conventional and non-standard window openings. Therefore, almost anyone can do window cladding with their own hands using this method. The only drawback of ready-made PVC systems is their high cost.
Sandwich panels
Unlike simple PVC panels, sandwich panels have a structure consisting of three layers of plastic, between two of them there is an insulating material. Polyurethane foam is often used as insulation, which meets all safety and environmental friendliness parameters.
Among the advantages of sandwich panels, it can be noted that when installing them, there is no need for insulation of slopes, because these panels have excellent thermal insulation properties. But these panels are also imperfect and can delaminate when exposed to humid air.
Finishing window slopes with plastic panels is a popular and multi-purpose method. Such slopes:
- you can quickly do it yourself;
- under the influence of sunlight they do not change color and are not deformed;
- easy to wash;
- resistant to static electricity and other negative factors;
- they look quite presentable (you can very easily choose a material that perfectly matches the color of the window frame).
Slopes are faced with PVC panels without unnecessary steps: puttying and painting. They have a good ability to keep steam out.
The resistance of the PVC panel material to temperature changes within ±20 degrees Celsius is another positive quality of such slopes.
Let's look at how the basic steps for lining slopes with plastic panels are performed.
How to do it right
To make the result pleasing, before starting work you should prepare tools and materials, as well as prepare the walls and arched opening. You will need:
- Tape measure, square, scissors, pencil or marker.
- Special glue and PVA composition for proportional mixing - when gluing wallpaper near doors and inside the vault, you need a reliable mass.
- Corners – leveling, decorative.
- Soft brush, roller, spatula.
Depending on the type of wallpaper, a clean rag will be useful to smooth out the stripes. Stages of work:
Preparing the opening
To properly wallpaper an arch, you should carefully prepare the future vault. For this purpose, leveling and decorative corners are proposed. The first are a strip of plastic or metal with “petals”. It is installed exclusively under plaster, secured with self-tapping screws or glue. The second ones are fixed after finishing the arch.
Before covering the plasterboard structure with decorative material, it is cleaned of dust and covered with base plaster. Without waiting for complete drying, fix the corner coated with glue on the inside, rubbing the squeezed-out mass over the perforation with a spatula. The steel decor is immediately installed in a dry opening using self-tapping screws, since it weighs much more and will not be supported by putty alone.
It is important not to overdo it with fixation - the heads of the fasteners must be flush with the surface of the arched opening, otherwise the corner will go in waves and a lot of plaster will be required for leveling. The finished surface is coated with a finishing compound and allowed to dry completely. Then the surface is cleaned with emery cloth - this is the key to good adhesion of drywall with primer, glue and wallpaper. Drying oil is chosen as a base; its layer is given time to absorb and dry.
How to attach trims to doors
It is advisable to begin installing the platbands after the wallpaper has completely dried, otherwise they may become deformed from moisture.
First you need to decide on the cutting angles. Shaped platbands are sawed at 45 degrees, and platbands with a rectangular cross-section can be sawed at 90 degrees. In this case, the top strip is cut to the width of the door frame, and the side strips cover the cuts during installation. When cutting, use a miter box and a very fine-toothed hacksaw or miter saw.
Platbands are attached to the door frame in various ways, depending on what material they are made of. Most often, thin nails with cut heads are used as fasteners. The fasteners are slightly recessed, and the holes are masked with wax or sealant. It is also acceptable to use liquid nails
, but in this case the walls must be smooth enough so that there are no gaps between them and the platbands.
In MDF trim, it is advisable to pre-drill thin holes for nails with a diameter of about a millimeter. In this case, flaws will not be visible on the surface. Liquid nails are also a great alternative.
If you choose plastic trim, glue is used as fasteners. After dismantling such platbands, they cannot be reused.
What comes first - wallpaper or doors?
Candidate of Sciences, site expert.
The quality of a major renovation of an apartment and the durability of the finishing coating are largely determined by the order of work performed (this thesis fully applies to new buildings, where apartments are rented without finishing). In this regard, builders adhere to the golden rule: first the ceiling is finished, then the walls, and only after that the floor is laid , although Russians are accustomed to doing everything the other way around: half-wall-ceiling, and then deal with difficulties head-on. This is clear. How to plan work if it relates to walls? For example, what comes first - wallpaper or doors?
Let us immediately note that neither among specialists nor among those who carried out repair work on their own, there is no consensus on this matter: some believe that wallpaper needs to be glued first and give reasons for their point of view, others - on the contrary, that doors first, and then wallpaper.
Let's try to critically evaluate all the pros and cons and figure out whether they glue wallpaper first or install interior doors.
A few tricks from the professionals
Where do professionals start gluing wallpaper? Where they want it, where it’s easier and faster for them. With novice masters they can be done with some nuances and tricks, for example:
- It is better and easier to cut canvas with a kitchen knife - it is easier to control. Trim off the remains using a clerical tool.
- Hanging wallpaper in the kitchen, living room - in any other room, it is better to cut it off after a day.
- Where to properly glue vinyl wallpaper from, a novice master will ask. An experienced one will answer - from where any others come from.
- If your eyes are a little blurry and the bubbles formed on the wallpaper are invisible, you can run your palm over them and listen. If you hear a rustling sound, that means it is located in this place.
- Drafts for wet canvases are the most dangerous enemy. In principle they should not exist.
The question: where to start gluing wallpaper has been discussed by us. Using and following the recommendations given, every novice master will be able to complete his work easily and quickly. The main thing is to adhere to the gluing technique, prepare the base correctly, create an appropriate microclimate in the room, avoid drafts, and where it is better to start is a matter of taste and possibilities.
Advantages and disadvantages of the “wallpaper first” option
Apartment owners who have installed wallpaper themselves know very well how difficult it is to get through an interior door. The complexity of the work is not inferior to pasting corners. Therefore, the absence of a door frame is a definite plus - there is no need to trim wet wallpaper directly on the wall.
The second, main advantage: the door frame and leaf will not swell as the wallpaper glue dries. Let us explain: according to wallpapering technology, there should be no drafts in the room. Therefore, experts recommend tightly closing windows and doors.
Drying lasts about three days. During this time, the humidity in the room rises several times, as a result of which the door frame swells and increases in size up to 5 cm. The consequences can be different:
- Drying slowly, the door will take its previous shape, i.e. everything will work out;
- the door frame will warp;
- The door leaf will be damaged and cracks will appear.
If the frame or panel is damaged, the door will have to be replaced, which is what proponents of the “first the wallpaper, then the door” cycle put at the forefront.
The attentive reader will immediately notice: everyone talks about the need to avoid drafts, but how to do this if the interior door is not installed? The answer is simple: tightly close the windows in the entire apartment while the wallpaper is drying.
The disadvantages include the following:
- installation of doors is accompanied by dust that settles on the wallpaper. There are two points here: it takes time and effort to vacuum the walls, however, dust cannot be removed from all types of wallpaper;
- during the installation of the door frame, there is a very high probability of damage to the wall (potholes appear) and the wallpaper itself, which will require re-gluing it in the area of the door;
- in most cases, after installing the doors, an additional, unpasted area of the wall appears near them - a large gap between the door frame and the wall is closed with a slope made of a cement-sand mixture. It needs to be glued, since the standard platband is not able to hide the emerging wall. The results of such work will be noticeable for a long time;
- When constructing slopes from a cement-sand mixture, it is very difficult (in practice, impossible) to protect the wallpaper from splashes of the solution. In addition, the wallpaper will have to be torn off the wall along the perimeter of the doorway so as not to damage or get wet.
General recommendations
- If the doorways are not completely level, then you need to use a laser level or improvised devices in the form of a thread and a plumb line.
- Coat all corners with glue most thoroughly. These areas may take the longest to dry, so they need to be given special attention.
- You need to carefully iron the corner with a spatula.
- Do not use blunt objects to trim wallpaper: you can damage the materials and ruin an entire strip.
- You can smooth out the coatings with a rubberized roller (it is sold in hardware stores).
- If possible, level the surfaces in the corners that are adjacent to the doorway. This will make it easier to paste the wallpaper so that they do not overlap each other.
- It is better to leave more allowance for the strip you are going to glue at the door than to leave it short.
- Do not take rolls with a complex pattern and many curls, and if you choose, then entrust the gluing to professionals. It is very difficult for an untrained person to correctly glue the canvas and beautifully join all the patterns in hard-to-reach places.
- Among all similar materials, it is better for a beginner to take vinyl: they fit easiest on uneven surfaces and are more durable.
- Wallpaper with large textures or prints is more difficult to glue than ordinary wallpaper.
If the renovation of a room has just begun and the doors have not been installed, remember: all work must be carried out from top to bottom . First make the ceiling, then glue the wallpaper, and only then install the doors. Then you won’t have to worry about carefully covering the surface near the platbands.
Anyone can hang wallpaper on walls, regardless of their professional skills. It is necessary to study the instructions and follow them strictly.
Source: okcomfort.com
Advantages and disadvantages of the door first option
Proponents of the option of first installing doors and then gluing wallpaper justify their position with the following argument: installing doors is a rough job, gluing wallpaper is a finishing touch. Naturally, they should go in the same sequence.
To support their point of view, they give the following arguments:
- nothing interferes with the installation of doors - there is no need to constantly monitor the process so as not to damage the wallpaper, which speeds up installation time;
- installed doors will help avoid drafts in a room with wallpaper;
- dust from installing doors will not settle on the wallpaper;
- an increase in the area of the walls to be pasted near the doors will be easily hidden by wallpaper;
- Interior doors constantly go through swelling-drying cycles during operation due to changes in humidity in the apartment. Because of this, they had to be changed in isolated cases.
Disadvantages of this order:
- in the process of drying the wallpaper, the doors swell;
- When pasting walls, you will have to spend time carefully trimming the wallpaper near the trim, and then tuck the wallpaper behind the decorative strip.
An analysis of all the pros and cons in this dispute allowed the editors of the StroyGuru portal to develop their point of view regarding what is done first, doors or wallpaper. In our opinion, the doors are installed first, then the wallpaper is glued. The following arguments serve as justification:
- dust on the wallpaper after installing the doors really poses a problem for the owners. Therefore, it is preferable to glue wallpaper after installing the doors;
- changing the doorway during the installation of an interior door is also in favor of our conclusion - there is no need to additionally re-glue the wallpaper;
- during the installation of the door there is no risk of damage to the wallpaper or the wall underneath it, which will require re-gluing the wallpaper in this place;
- when installing slopes, the wallpaper will not be stained with plaster;
- swelling of the door while the wallpaper glue dries is not a serious argument. Firstly, during current (cosmetic) repairs, when wallpaper is replaced, no one dismantles the door frame. And no one talks about serious problems due to its swelling at this time. Secondly, if you can dry the walls without installing an interior door, just by closing the windows, why can’t you regularly open these doors to reduce the humidity in a room with newly hung wallpaper, or even leave them open for the entire drying time - the ventilation ducts will pull out moist air without creating drafts .
Advantages and disadvantages
In the question of what comes first, wallpaper or doors, each option has its own advantages and probable risks of poor quality work. It is very important to take into account the structure and type of wallpaper, the quality of the finish and the presence of protective coatings on the doors. Let's try to evaluate these indicators and figure out what is better and more correct - finishing the walls first or installing interior doors right away.
Doors first
Craftsmen who claim that you need to install the doors first and then glue the wallpaper base their opinion on the following factors:
- if you don’t install the trim right away, then nothing will interfere with the gluing, the wall won’t be covered with glue;
- most of the doors sold have a high-quality coating against moisture - the material will not swell;
- dust that appears when installing the box, especially in brick walls, will not settle on the wallpaper;
- closed doors will eliminate the creation of drafts, wallpapering will be of better quality;
- gluing the trellises under the platband will be neat and beautiful;
- simple adjustment of the existing opening to the door block.
Among the disadvantages are:
- the remaining likelihood of wood swelling from moisture;
- installation of platbands only after finishing the walls.
Looking at the pros and cons outlined above, we can say that installing doors before wallpapering is more preferable and is unlikely to create trouble . But possible dust settling and drafts can create problems. With the door already installed, all cracks are sealed with foam and closed. This option eliminates the possibility of damage to the wallpaper near the door, as, for example, when installing a box. The installation of slopes will not lead to the plaster mortar getting onto the covered wall.
And if it’s not wallpaper, but painting the walls - is there a difference?
In the ongoing debate among experts and amateurs, what comes first: laying laminate flooring or installing doors; wallpapering or installing a door frame; laminate or wallpaper, etc. there is no question about when to paint the walls: before or after installing the doors. It turns out that no one questions the current practice: first you need to make the doors and only then paint the walls .
The explanation for this fact is simple. Firstly, the risk of swelling of the door frame and leaf after painting is reduced to zero. Secondly, painting will hide visible marks from the installation of doors. Thirdly, there are no difficulties when painting the wall near the platbands. In extreme cases, they can not be installed until painting or dismantled while the work is being carried out.
Finish options
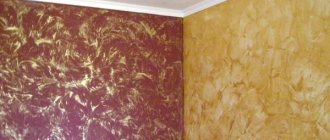
Using stucco in the design of slopes will be a win-win option. This design will highlight the architecture and beauty of the window. You can choose a stucco motif based on personal preferences; it can be geometry, folk or floral patterns, etc.
If you decide to paint the window slope, it is better to use glossy paint in a snow-white shade - this will visually expand the space of the window and add shine to the surface.
Wallpaper Tricks | Part 2
Hello, friends! Not long ago, the site published an article “Wallpaper Tricks | Part 1”, in which I talked about all sorts of subtleties in a seemingly trivial task - wallpapering.
But after a few days I had accumulated material for one more lesson. In it we will consider questions such as:
- Fighting air bubbles with little blood
- Fighting protruding edges of canvases and external corners
- Wallpapering door slopes
- How to join different types of wallpaper at outer corners in the least ugly way
As you can see, the questions are really important and worth looking into. So let's not hesitate.
Common mistakes
In cases where the finishing technology is not followed, serious shortcomings may soon appear. The window structure does not receive the required degree of resistance to adverse factors, and the slope elements wear out very quickly and require new repairs. To avoid such troubles, let’s look at the most common mistakes encountered during work:
- inaccuracies during measurements;
- ignoring such an important stage as applying an antiseptic and sealant;
- applying too thick a layer of plaster.
In addition, you should be very careful when choosing a finishing material so that it is suitable not only in terms of external parameters, but also in terms of performance properties. Saving in this case is also not always beneficial, since you can run into low-quality material that is hazardous to health.
Fighting air bubbles
Let's say we covered a wall in a room. The next morning we arrived and under different lighting we noticed a couple of air bubbles. Maybe there wasn’t enough glue underneath them, maybe they just didn’t pay attention when they were gluing them. What to do? Go to the pharmacy. But not for Validol, as you might think, but for a syringe. You already understand what the point is, don’t you? Yes, we will pump wallpaper glue into a syringe and insert it under the canvas through a tiny puncture. That's the whole secret!)) All that remains is to distribute the glue, and the excess will come out through the micro-hole.
If there is no pharmacy nearby, or you are simply too lazy to leave the house, you can act a little more barbarically. You need to take a sharp utility knife and make a neat vertical cut along the bubble. If you have wallpaper with vertical stripes, cut straight along the strip, preferably along a dark one. The knife should go at an acute angle to the plane of the wall - this will make the cut thinner. Then we simply bend the edges and use a small brush to push the glue in there. This method carries the risk that the cut on some wallpaper cannot be completely hidden. There's no escape here.
Don’t forget to wipe the glue off the wallpaper with a damp sponge afterwards.
Decorating
Now let's figure out how to stick wallpaper on room doors using various technologies:
Idea #1: simple wallpaper
If you don’t complicate things, you can simply cover the door leaf with regular wallpaper, which will also give an interesting visual effect:
| Photo | Description |
| We dilute the wallpaper glue in a clean, convenient container. | |
| apply the paste to the door leaf. | |
| |
|
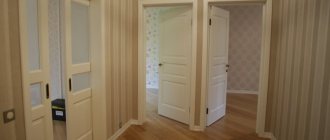
If you have pieces of wallpaper left after pasting the walls, you can use them to decorate the door. This will give a very interesting effect in the form of an invisible door, unnoticeable against the general background of the wall to a quick glance.
An invisible door under the wallpaper can be placed very easily with the help of leftover unused canvases
We deal with undefined edges of canvases and external corners
I’ll say right away that the method I propose is the most natural collective farm, but it works, it has been tested repeatedly.
So, it happens that you glue a strip, everything goes fine, but for some reason its edges just don’t want to stick to the wall. Accordingly, the wallpaper seams look simply terrible. Or, for example, glue a wide sheet to the outer corner, but it always sticks out, no matter how hard you try. Liquid nails or (which is better) acrylic sealant will come to your aid. For non-stick edges, you will only need to apply the sealant evenly to the wall below the edge. That’s it, he’ll stick to you like he’s cute. In the case of an external corner, glue the entire sheet heightwise first to one part of the wall, then also apply a strip of sealant to the corner (here it’s already quite generous) and you can glue the rest of the sheet. Now it’s not the wallpaper that will stick to the corner, but the corner to the wallpaper)) It’s a joke, of course, but acrylic sealant really works.
There is a hypothetical risk that the sealant will show through the wallpaper if it is thin and light-colored. I don't know if this is possible. Most likely, no, because it is distributed under them in a very thin layer and is unlikely to affect anything.
In general, there are special types of glue for corners, borders and joints in the form of a thick paste. But no one really buys them. I’m not advocating my method, but it works.
Necessary tools and consumables
Slopes are installed using different technologies, hence the different list of materials for work. Plastic options require a galvanized profile for the frame, screws and dowels for fixation. PVC strips are framed with corners, starting strips, and after installation the seams are sealed with acrylic sealant to match the color of the surface.
The tools also depend on the type of finish. Prepare for plastic:
- tape measure, building level, pencil, square;
- hand hacksaw, knife, miter box;
- hammer drill, screwdriver;
- sealant gun, screwdriver.
Decorative stone is placed on adhesive mixtures, which are sold in the form of a dry powder. Grouting compounds are used to treat the joints between tiles. Drywall at the joints is glued with a sickle mesh, which is installed on the finishing putty. The materials for plaster depend on the type of composition used; it is better to take ready-made mixtures with improved qualities. The surface is primed with adhesive compounds, painted with acrylic paints, and sometimes oil paints are used.
We glue wallpaper on door slopes
Basically, it's unfashionable. It is better to paint the slopes, but there are different situations. Therefore, it is advisable to know the best way to glue wallpaper on them. This method is well suited for wallpaper without a pattern. And those with a pattern, it’s better not to glue them onto the slopes at all - it won’t turn out very well.
This means that we glue, as usual, one canvas after another. We reach the slope, glue the whole sheet over the doorway:
It is very good if the sheet extends beyond the outer corner to a distance greater than the width of the slope. If not, you will have to add a narrow butt strip to it. In general, we have to wrap the canvas onto the slope with an approach to the door frame. To do this, we make a horizontal cut (or slightly inclined) along the line of the upper outer corner. Due to the fact that the slopes almost always narrow, this fabric will slightly overlap the upper slope.
So we leave it. Now we cut the canvas vertically, going beyond the corner line by 2-3 cm, and remove the excess:
Then we repeat all the steps with the canvas on the other side of the opening:
Next, cut out a piece (or 2 pieces, depending on the width of the roll) for the space above the opening.
Its length should allow it to be wrapped around the slope and slightly overlap the door frame. We will cut the width of the piece already glued. How - we already know, through 2 layers of wallpaper:
Now all that remains is to do this with the corners inside the opening. We cut through, remove the excess and enjoy the brilliant job done:
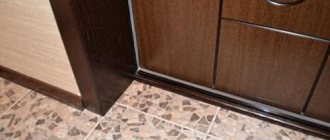
Don’t look at the foam, it’s not our jamb) There will be a foam baseboard there.
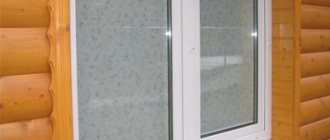
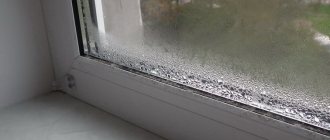
The need to finish the slopes of plastic windows
Slopes provide hydro- and noise insulation and hide installation gaps.
It is a common belief that the cladding serves to decorate the window opening from the inside and outside of the apartment, but the elements of the opening have many other purposes. Initially, the material hides mounting fixtures, foam residues, fasteners, and uneven brick or concrete.
Other functions of window coverings:
- provides thermal insulation, protects against drafts;
- protects from noise;
- prevents the development of fungi, microorganisms, and mold;
- extends the service life of window frames.
The windows are placed in the opening so that there is an installation gap between the frame and the walls in case of shrinkage or distortion. This distance is foamed, after drying, the protruding residues are removed with a knife.
When the foam hardens, it forms a protective film; if it is cut off, the inner layer begins to decompose from moisture and temperature changes. Facing the slopes creates a closed microclimate, so the destruction process stops. The cladding helps to equalize the external and internal temperatures; condensation does not form on the slopes.
We join different types of wallpaper on the outer corner
In principle, a unique case. You can't do that. Because if you simply trim the wallpaper in height at a corner on both sides (especially if it is curved), this corner will be perfectly visible, and they will lag behind it over time. If you touched it with your elbow, the edge of the wallpaper came off or fluffed up. In any case, the picture is deplorable.
Just recently, a customer asked me to do something similar. The wallpaper had already been purchased, there was really nowhere to go. Of course, in my case the corner was ideal, but it was slightly rounded due to the installed protective corner:
Well, well, I covered first one wall, then the second. The result, of course, was “no ice”. The memory was perfectly visible, especially since the wallpaper was light. But you may have realized by now that I am a fan of acrylic caulk. It was decided to use it, thereby killing two birds with one stone. The first plus is that the corner becomes white, the second is that the wallpaper on it will never come off, this thing glues very powerfully. How exactly did I use the sealant?
Using a special pistol, I squeezed a small amount directly onto my finger and pushed it into the gap between the sheets. Of course, the wallpaper gets dirty, so without hesitation, I wiped it with a wet sponge. Most of the sealant remained in the gap. I applied about 10-15 linear centimeters of acrylic at a time and wiped it off so that it did not start to set. You can see the result in the photo (for some reason it seems dark in the photo, but in reality it is not).
I didn’t cut the left panel quite correctly, because of this the gap turned out to be a bit wide (the first and, I hope, the last time I did something like this), but, on the whole, everyone was happy with the result. However, this tricky method is only suitable for ideal angles. Therefore, make ideal angles, do not damage the collective farm! After all, it’s not difficult at all. All you need to do is install a protective corner. If you don't, be prepared to run to the store for this:
This concludes the second part of the article on wallpaper tricks. The release of a third part is not excluded. To avoid missing it, subscribe to the latest articles. Like, share interesting materials with your friends, and so on.)) Still, I sometimes write useful things.) And see you on the pages of the site!
How to paste wallpaper around windows and doors - pasting methods
From our new article you will learn how to paste wallpaper around windows and doors yourself. Do not try to cut out the wallpaper panels in advance to adjust them to the size of windows and doors. Apply the entire wallpaper directly over the trim, then smooth it out before trimming the edges along the door or window. Make diagonal cuts to fit the wallpaper to sharp corners. To prevent damage to wooden structures when making diagonal cuts, use scissors, but not a knife with replaceable blades. If short strips of wallpaper are pasted directly above and below the opening, make sure that they hang strictly vertically and that the pattern on them matches the pattern on the next whole panel.
- Glue the panel onto the wall so that it goes over the window casing. Connect it butt to the edge of the pasted wallpaper.
- Use a brush to smooth out any flat areas of the wallpaper. Press the panel tightly against the trim.
- Use scissors to make a diagonal cut from the edge of the panel to the corner of the casing. If the wallpaper is glued around the window, then make exactly the same cut in the lower corner.
- Trim the excess wallpaper around the trim with scissors, leaving an allowance of approximately 2.5 cm. Smooth out the panel and squeeze out any air bubbles.
- Press the wallpaper onto the trim with a wide spatula and trim off the excess with a sharp wallpaper knife. Trim the allowances at the ceiling and at the crown. Wipe the wallpaper and trim with a damp sponge.
- Cut short pieces to cover the areas above and below the window. You can find suitable scraps. Glue small pieces of panels strictly vertically so that their pattern matches the next whole panel of wallpaper.
How to wallpaper around windows and doors
- Trim and prepare the next whole strip of wallpaper. Hang it on the wall and butt it with the edge of the previously pasted panel so that the pattern matches.
- Read paper wallpapering here
- Use scissors to make diagonal cuts from the edge of the panel to the top and bottom corners of the casing. Trim any excess trim around the window or door casing, leaving an allowance of approximately 2.5 cm.
- Butt the bottom half of the panel end-to-end with the edge of the previously glued panel. Cut off the excess with scissors, leaving an allowance of approximately 2.5 cm. Smooth the wallpaper with a brush.
- Press the wallpaper onto the trim with a wide spatula and cut off the excess with a sharp wallpaper knife. Trim the remaining allowances at the ceiling and baseboard. Wipe the wallpaper and trim with a damp sponge
How to wallpaper around a window located in a niche
- Paste the wallpaper panels so that they cover the niche. Smooth out the wallpaper and cut off any excess from the baseboards and ceiling. To fold the wallpaper for the top and bottom of the niche, make a horizontal cut in the middle, not bringing it to the wall by about 1.5 cm.
- From the end of the horizontal cut (step 1), make vertical cuts to the top and bottom of the niche. Make small diagonal cuts to the corners of the niche.
- Fold in the top and bottom cut edges and glue them to the surface of the niche. Smooth out the wallpaper and trim it at the back edge. Tuck the wallpaper along the vertical edge of the niche. If necessary, apply wallpaper around the window.
- Measure, cut and prepare a piece of wallpaper that is suitable in size and pattern for covering the side surface of the niche. The piece for the side surface should extend slightly over the top and bottom of the niche and onto the folded vertical edge. To join overlapping seams, use vinyl-to-vinyl adhesive.
Methods for wallpapering pipes, heating radiators and fittings
When wallpapering areas near sinks, pipes and other obstacles, you need to cut the wallpaper. Glue the wallpaper so that the patterns match, and make a cut from the edge closest to the reinforcement.
If possible, make the cut along the line of the patterns so that it is invisible. At the end of the cut, cut a hole that will match the size of the reinforcement.
How to wallpaper around a pipe
- Connect the masking flange of the pipe from the wall. Paste the panel onto the wall so that the pattern matches the previously pasted wallpaper. From the closest edge of the wallpaper, make a cut to the pipe.
- Smooth the wallpaper down to the pipe using a brush.
- Cut a hole at the end of the cut to allow the wallpaper to fit around the pipe. Bring the edges of the cut together and smooth them with a brush.
How to wallpaper around a wall-mounted sink
- Use a brush to smooth the panel down to the edge of the sink. Make horizontal cuts in the wallpaper, leaving approximately 0.5 cm allowances at the top and bottom of the sink.
- Trim the wallpaper around the side of the sink, leaving a slight allowance.
- Smooth out the wallpaper. If possible, tuck the remaining allowances into the gap between the sink and the wall, or trim them.
How to paste wallpaper behind a radiator
- Straighten the uncut cloth and hang it on the wall. Smooth the wallpaper from the ceiling to the top of the radiator. Use a flat wooden ruler to straighten the panels behind the battery. Using the same ruler, peel back the wallpaper at the baseboard.
- Pull out the bottom of the wallpaper from behind the radiator. Cut off the folded part of the wallpaper. Tuck the wallpaper behind the radiator again and smooth it there with a ruler.
Source: remontfor-you.ru
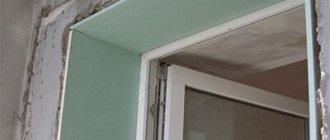
Plaster
In fact, finishing brick slopes using a plaster mixture comes down to conventional surface finishing, followed by applying the desired pattern and coloring. Naturally, the slopes themselves are pre-finished using plasterboard or other material, which will serve as the basis for applying the plaster composition. It is better to choose decorative plaster rather than simple cement or gypsum.
The filler included in such mixtures will make the surface more natural and similar to the texture of baked clay. The main thing is to choose the correct filler fraction so that the texture of the resulting surface is similar to masonry. Then everything is simple - the plaster mixture is applied to the slope and while it is not yet completely dry, the contours of the stones are drawn directly along the coating layer. For greater realism, after drying, the traced bricks are painted, and the seams between the elements are either rubbed with a suitable grout or painted in the color of the masonry mortar.
Types of artificial stone depending on external design
Modern manufacturers offer the most common textures and shades of this artificial material. Below are samples of some of them.
| Alpine slate | Rock formation |
| Under the brick | Bassoon |
| Marbled | Granite |
| Rocky Pile | Old fortress |
Types of masonry
Today, modern craftsmen are ready to offer their services for laying decorative bricks in a variety of types. The most common are block, Gothic and cross methods. Of the presented options, the block method has the simplest installation technique. You don't need to make a drawing for this. The bricks are laid in a straight line, taking into account the differences in the lower strip. In simple words, a whole copy should stand above the seam between two laid bricks. The seams should not overlap each other.
Surface preparation
In addition to beauty and originality, covering with decorative bricks allows you to hide flaws in the walls. Therefore, there is no need to level the base before installation. Otherwise, surface preparation must be carried out using special technology.
- The walls are thoroughly cleaned, old wallpaper and peeling paint are removed.
- Next, you need to get rid of any remaining fat. To check for the presence of greasy deposits, use water.
- If decorative brick is glued to a wooden or metal base, then the surface will have to be treated with insulating material. In some cases, a lightweight cement-based mortar can be used.
- To increase adhesion strength, frequent scratches are required across the entire surface of the substrate.
After preparing the base, you can begin installing decorative bricks. In order for the result to exceed all expectations, you need to remember several important rules.
- To ensure an even seam between the bricks, you must use special crosses. Nails can serve as an analogue of crosses.
- Upon completion of the installation work, the seams between the bricks must be sanded. The ideal composition would be a special grout mixture or gypsum.
- To preserve the appearance of the finished decorative surface, use wood varnish.
- You can decorate any room in your apartment with brick decorations. For example, varnish the surface in the hallway, and paint the rooms with paint that matches the interior.
Choosing stone cladding for work
High-quality decorative stones of artificial origin are difficult to distinguish from similar natural materials with the same texture. However, natural stones differ in their pattern and texture, which are not repeated, and may contain various inclusions and foreign additives. But the strength of natural materials is much higher. This ensures the durability of the coating, which can last up to 150 years.
Artificial stones have advantages:
- Light weight, which greatly simplifies installation and lightens the entire masonry. In multi-storey buildings, these materials do not create a significant load on the supporting structures.
- The price of the material is lower than natural analogues with the same texture, installation will also be much cheaper.
- Due to the same size of all elements, the amount of waste and operations to adjust the shape and pattern is significantly lower.
- It can be used in different rooms, even for wall cladding in the bathroom, bathroom, kitchen and other rooms with extreme conditions: high humidity, temperature fluctuations, fat deposits, and other influences on the surface.
- Maintenance is very easy due to the dense surface, which allows you to use different detergents.
The disadvantages of artificial stone compared to natural stone are:
- less strength, durability;
- since scratches, chips, cracks as a result of mechanical damage appear more easily, repairs of artificial slabs will be carried out more often;
- gabbro, diorite and granite may have a small degree of radioactivity because they are of igneous origin.