The gutter helps protect the roof and walls of the house from excess moisture. Nowadays it’s easy to purchase your favorite drainage system in a store. Well-known brands offer protection from moisture, and specialized companies offer installation guarantees.
The costs for this are considerable, the amount comes out to be large. You can purchase a drainage system in a store and save on installation. Better yet, make such a device yourself with a little effort and knowledge.
Materials for homemade gutters:
- plastic bottles;
- sewerage pipes;
- tree;
- galvanized metal sheets;
- copper metal sheets;
- profiles for drywall;
- ceramic drainage.
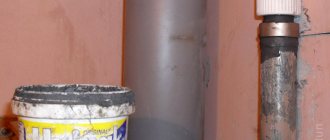
Drainage system from sewer pipes
Sewer pipes are suitable for their price, strength, weight and the availability of various adapters.
Important! Not all types of sewer pipes are suitable for outdoor use.
Their types:
- Gray pipes are afraid of severe frosts.
- Brown pipes are the strongest, tolerant of stress and severe frosts. Under the influence of prolonged sunlight, ultraviolet radiation destroys and the surface begins to crack.
- White pipes are used for home installation work.
Therefore, you should choose pipes for drains according to the weather conditions in your region.
After determining the material for draining, consumables are calculated.
Different pipe diameters are suitable for different roof slope areas:
- S<50 sq. m – pipes with a diameter of 8 cm;
- S< 125 sq. m – pipes with a diameter of 9 cm;
- S > 125 sq. m – pipes with a diameter of 10 cm.
The remaining consumables are selected for these pipes (with the same diameter).
For the drainage diagram you need to know some parameters:
- roof perimeter;
- length and number of gutters, drains;
- places of joints and fastenings.
The perimeter of the roof divided by 2 is the length of the gutters. The pipes will be sawn in half. For example, the roof perimeter is 60 m, you need to buy 30 m of sewer pipe for the gutters.
Drainage risers along the entire perimeter are located at a distance of 5 m. Their length is equal to the distance from the eaves to the ground. By multiplying the number of risers by the length of the risers, we get the number of parts for the gutters.
Parts required for construction:
- drain pipes;
- brackets (18 pcs per 10 m);
- bends and funnels (how many drains);
- plugs;
- angles (depending on the angle of fall of water from the roof);
- connecting for gutters;
- knee;
- adapters.
Required tools:
- screwdriver and screws;
- screwdriver, hacksaw;
- grinder, electric jigsaw;
- tape measure, rope, level.
For ease of installation, scaffolding or trestles are required.
After purchasing the materials, the preparatory stage begins. Pipes prepared for gutters must be cut into 2 parts. To do this you will need a grinder, a jigsaw or a hacksaw.
Attention! Do not cut the parts of the gutter entering the tee!
Installation
The gutter slopes towards the drain. The brackets are attached at a distance of half a meter from each other. The gutters are fastened under a level and with a tensioned thread.
The joints between the individual parts are sealed with sealant or placed on clips. The next stage is the installation of drain pipes, the joints are coated with sealant.
Installation nuances
After all the preparations have been made, let’s take a closer look at how to equip a drainage system with your own hands. Installation of brackets is carried out with the obligatory creation of a slope towards the funnels, when, taking into account the linear meter, a vertical displacement of 5 mm is assumed. If there is a need to accelerate the flow of water, this slope can be increased to 10 mm.
If the length of the pediment does not exceed 10 m, a slope is made to one side. A larger value involves the installation of an additional funnel installed in the middle with a drain pipe connected to it to form a drain. But you can also make two slopes of the gutter going from the middle of the gable.
To install gutters you need:
- fix the first bracket at the point of maximum height of the sewerage system;
- fix the second one, taking into account the fact that it will be lower than the first one, thereby creating the required slope;
- Stretch twine between the installed brackets, which serves as a guide for marking the attachment points for other supporting parts of this type.
The described process of installing storm sewers looks quite simple from the point of view of its implementation, but there are certain nuances. To create a slope, they mainly focus on the horizontal, which is the front board, known as the wind board.
But is it always installed with strict horizontality? It is advisable to verify this, for example, using a hydraulic level or level. You can also use a simple option in the form of a bubble device, but only if its length is 1 m or more.
From plastic bottles
A lightweight and cheap material is plastic. Having a sufficient number of plastic bottles, you can make a drain out of them. Dark beer or kvass bottles are suitable for this so that debris is not visible.
As in the first case, we draw a diagram of the future drain. Find the perimeter of the roof and calculate the number of bottles. From 1 bottle there will be 2 halves of 12-15 cm each.
We cut off the bottom and neck of the bottle, cut the remaining part in half and model the gutter using a stapler.
Overlap the bottles by 2 cm. The gutter is attached to the roof using a screwdriver and wire.
Drainage is made from cut, but not sawn, parts, inserting one into the other. The funnel is made from a bottle with the bottom cut off and inserted into the drain. The drainage pipe can be placed in a container or brought to the ground.
Briefly about the main thing
Do-it-yourself roof gutters can replace a finished structure. The main thing is to follow the technology for installing the drainage system. The reliability and proper operation of drainage systems depends on the accuracy of measurements. A drain made according to all the rules will cope with the task and will last for a long time.
Different materials are used to make roof gutters: PVC, sewer pipes, galvanized steel, wood, plastic bottles. The process of installing the structure is similar in each case. Detailed instructions for installing drainage systems will help you complete the work without the involvement of a specialist.
Ratings 0
Made from galvanized steel
Galvanized steel is considered a durable metal that is resistant to rust, frost and ultraviolet radiation. The only negative is that the fastening seams come apart due to temperature changes.
First you need to prepare galvanized sheets. The workpiece is cut with metal scissors, adding 1.5 cm to the folds in width.
This material can be easily reshaped. For folds, it is enough to attach a ruler or a piece of timber to the sheet and beat it with a hammer. To give it a round shape, the pipe or log is wrapped in a sheet and passed with a hammer or mallet.
The finished structure is attached to brackets. The gutters are overlapped by 10 cm. Funnels are made using scissors, bending the metal according to your ideas. The pipes are fastened with clamps.
Pipe making
To begin with, you should design the funnel and make a rough drawing on a sheet of paper. Then you should start transferring the drawing onto the sheet metal.
A straight line is drawn from the edges with an indent of 0.5 cm from the edge and 1 cm from the other. Having cut out the part, bend the drawn edges at a right angle, an indent of 1 cm, and the other at an acute angle.
When folding the workpiece, the edges of the corners should fit into each other. Use a hammer to add tenacity to the pipe seam. Having special machines for bending metal, the process will take less time.
Funnel
The funnel consists of two different parts. Its diameter should be equal to the diameter of the pipe. The parts of the funnel are drawn separately on a sheet of tin. After cutting with scissors, as in making pipes, leave 1.5 cm from the edge for joining. They should connect outwards.
Funnels at home are difficult to make for a beginner, so if it doesn’t work out, you can buy ready-made ones in the store. It won't hurt your pocket that much.
Brackets
Brackets help support gutters. You can make this important hook-shaped item yourself. It is better to take material of the same width so that the brackets are identical.
To do this, you need steel with a thickness of more than 2 mm, this will allow you to hold the weight. Electrical strips are ideal for workpieces. Dimensions: 40 cm by 2 cm. The workpiece is bent using a pipe and nails driven into wood using a lever.
After manufacturing, two holes are drilled for fastening. Painted brackets, thus protected from rust, last much longer.
Painted metal is protected from rust and corrosion. This means that the service life of the product made from it increases.
For a temporary structure, the brackets are made of wood. Cutting indentations for the gutter in a piece of timber. Some nail them to the rafters on the roof.
Material for gutters
The selected material must be strong, durable and resistant to environmental influences - precipitation, temperature changes and ultraviolet rays.
To one degree or another, these requirements are met by:
- Galvanized sheet steel is a budget option, actively used to create gutters for drainage systems. Its disadvantage is that it is not very strong; the structure can be damaged with a crowbar when cleaning ice.
- Metal with polymer coating. They are excellent for buildings whose roofs are covered with metal tiles, since it is easy to choose a material that matches the color. Resistance to low temperatures and corrosion make steel gutters with a protective polymer film a good choice. The only negative is the noticeable noise that occurs when water passes through the gutters.
- Painted sheet steel. Such structures will require periodic renewal of the coating. Not a very good choice for houses covered with a soft roof - abrasive particles falling into the gutters along with rainwater will gradually destroy the metal.
- Plastic. Durable and corrosion-resistant material, products from which are quite easy to assemble. The design is resistant to ultraviolet radiation and is not destroyed by abrasive particles or acid precipitation. Doesn't make noise.
- Copper and zinc-titanium alloy. They are distinguished by durability, strength and reliability, but are very expensive.
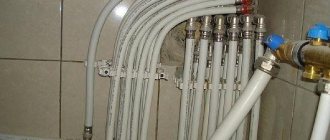
From metal profiles for plasterboard
The lightweight and durable metal profile is perfect for draining water. We find the required amount of material based on the perimeter of the roof of the house.
Profiles around the entire perimeter of the house can be attached to:
- brackets;
- wire;
- bars.
To protect against water pouring out of the gutters, it is cut into 2 parts, the end is left above the funnel and bent to make a semicircle barrier at the corner. The drain pipes and funnel will have to be made from other materials.
Drainage design for a private house
The drainage system consists of different functional elements, each of which serves its purpose.
Drainage design for a cottage or household Source krasivydom.info
To understand how to make a roof drain in a private house, you need to know what parts it consists of :
- A gutter is a semicircular pipe mounted along the roof of a building. It is used to collect wastewater and is installed at an angle to the drain funnels.
- Couplings - used to connect corner and long gutter parts.
- A funnel for receiving water is mounted on a gutter for discharging waste into the drain pipe. A grill is installed in the funnel to protect it from debris.
- The drain is installed vertically to the gutter and collects water coming from the funnel. It must reach the sewer system and end with a hole for the waste to exit.
- The elbow or outlet has a bend so that there is a small distance between the flowing water and the building.
- Clamps or brackets hold the east pipe and gutter in place.
Attention! Components are selected and calculated individually, taking into account the size of the roof and climate conditions.
Made of wood
Having a dacha or country house, it is easy to find this material. For temporary use for a short period, a couple of hours is enough.
Temporary drainage is made from 150x10mm boards. The length of the boards is equal to double the perimeter. For example, the perimeter of the roof overhang is 100 m, which means the sum of the lengths of the boards should be 200 m.
The boards are nailed together at right angles. The resulting corners are overlapped, resulting in long gutters. For temporary construction, temporary hooks are made from boards and iron. Gutters are attached to the resulting brackets.
The bracket can be made of wood. A triangle with a landing for gutters is cut out of a wooden beam. The brackets are nailed or wired to the roof. When installing, the edges of the perpendicular gutters must overlap.
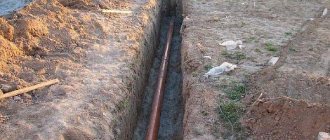
Having adjusted the slope of the gutter, we proceed to the drain. It can be made from pieces of tin or by making another trench that reaches to the ground.
The main task of such a drain is to drain water from the foundation of the house. Next, you can dig a groove to drain the water or take it under a tree. The water should move away from the house by about 1.5 - 2 m.
A temporary gutter looks a little silly, but it can last for over a year.
Until the owners save money or come up with another option. To protect wood from moisture, you can use plastic film secured with tape, a furniture stapler or small nails.
There is another option for making a gutter. Dissolving a small log into 2 parts. Using a chisel, cutting out an oval, you get an excellent gutter. The method of attaching to the roof remains the same.
Tips for using the system:
- Protective nets are installed to get rid of fallen leaves and debris. It's easy to make yourself. To do this, you need a fine mesh, which is cut into strips 6 cm wider than the width of the gutter (3 cm more on each side). You can attach it using clamps or wire.
- Cleaning the drainage system from dirt and debris will prolong its life and protect it from blockages. Clean with a brush or by hand, removing sticks. A clogged drain allows water to leak onto the walls and foundation of your home.
Conclusions and useful video on the topic
You can learn how to properly design a drainage system from the following video:
Assembling a drainage system with your own hands is a solvable task. It is clear that independence primarily pursues the goal of saving. Meanwhile, when planning to install a drain with your own hands, it is advisable to carry out calculations based on such parameters as the total roof area and the average statistical intensity of precipitation in the area.
The calculation results will contribute to additional savings, since they can be used to accurately determine the need for materials and parts for installation.
Do you have any questions about how to install a roof drain yourself? Ask them in the comments section, and we will try to answer them promptly. There you can share your experience or give valuable advice on arranging a drainage system to visitors to our site.
Types of gutters: how to choose them for your project
It is important to choose the optimal dimensions so that the gutter and the dimensions of its pipe cope with their functions most effectively. The concept of choice is that elements that are too narrow will not cope with water flows, and elements that are too wide will cost much more.
Therefore, it is worth considering the following factors:
- Precipitation amount for your area.
- The area and slope of the roof.
- Individual features of the house architecture.
Let's select the sizes
The diameter of modern grooves and pipes ranges from 60 to 216 mm. Most products comply with DIN EN standards; some manufacturers continue to produce products in accordance with GOST 7623-84.
Homeowners who prefer to make their own gutter should note that it should be slightly wider than the pipe. The height of the side should be at least 10-12 mm. The most common ratios of the elements of the groove/pipe system are as follows:
- 100/75 mm.
- 125/87 mm.
- 125/100 mm.
- 150/100 mm.
- 200/150 mm.
As an example, consider a practical example with a roof area of 60 m². A 100 mm groove and a pipe with a diameter of 80 mm are suitable here. For an area of 100 m² you will already need a 100 mm pipe and a 150 mm groove. The parameters are averaged; the individual characteristics of the building influence them directly. The length of the grooves is usually 2-3 meters.
Types of brackets
A bracket is an element designed to fasten a drainage pipe system. The standard option is a long product, which is used if there is no sheathing on the roof. Short products are necessary for installation on the front board or wall of the house. But this option is not the most convenient, since the screws will not be screwed in securely.
In traditional systems, the flow speed is determined only by the angle of inclination of the gutter; in more complex gravity-vacuum systems, when the level of precipitation is high, the siphon is turned on and significantly increases the intensity of drainage
A roof drip line is a strip that is fixed to the gable or eaves of a building and protects the facade of the house from moisture. The principle of operation of the drip is that water from the roof falls onto the plate and then into the gutter. The sediment then goes through the drainage system and ends up in the sewer system.
When installed correctly, the drip line protects the rafters and the entire roof overhang from getting wet.
Unorganized drainage
An unorganized type of drain is just a roof with the correct slope, which allows moisture to flow down freely without affecting the facade of the building. In this case, water falls in close proximity to the foundation, which increases the risk of rotting of the foundation. This drainage option is suitable for pitched roofs with a slope towards the courtyard.
In the absence of a set of gutters, water can fall on the surface of the walls and on the foundation, and in winter form large icicles
Unorganized drainage is not suitable for residential buildings, as it does not provide effective water drainage. When creating this option on other buildings, the features of SNiP should be taken into account:
- unorganized drains are allowed on buildings no higher than 5 floors;
- annual precipitation in the region should not exceed 300 mm/year;
- on the side of the building where the roof slope faces, there should not be balconies, buildings, or a road or pedestrian road;
- The size of the roofing canopy should not be less than 60 cm.
An unorganized type of drain is suitable for outbuildings, as it cannot provide good protection for residential buildings.
Strengths of a flat roof
If you live in a big city, then you are probably familiar with flat roofs.
They can be found on almost every high-rise building. High-rise buildings, as a rule, are equipped with internal drainage so that water falling from above cannot harm the surrounding buildings. Until recently, such roofs could only be found on industrial and multi-story buildings, but with the advent of new roofing products, they began to be erected in private construction.
What is it that attracts developers so much? Most likely, people are simply tired of the image of a standard pitched system. Of course, there is no doubt about its practicality, but such roofs are found absolutely everywhere in private buildings. Therefore, if you want to stand out from the rest, then you still have a chance to do it.
Residents of Western countries have long been using buildings with flat roofs and describe them exclusively in positive terms. And this is no wonder, because for a small price you get additional living space, which you can use at your discretion, the main thing is to create all the conditions for this. The flat surface is reliably protected by modern roofing materials, so you don’t have to think about repairs.
So let's look at the positive qualities of a flat surface:
- Compared to pitched roofs, flat roofs have a smaller area, so the installation will require much less materials. From an economic point of view, this is very profitable.
- You can also save some money by refusing the services of a roofing crew and doing all the work yourself. True, it will be a little difficult without a partner, so invite someone you know.
- It is much more convenient to carry out installation work on a flat surface than in a suspended state, so it will proceed not only easily, but also quickly.
- By servicing your roof at any time of the year, you can be sure that you will not harm your health in any way.
- The additional space created as a result of installation can be used at your discretion. On it you can place a recreation area, place a playground, a workshop, grow a garden and much more.
Often, as I list these properties of a flat roof, many developers have a desire to start construction right away, but it is not as easy as it seems. The whole difficulty lies in designing such a roof, and if any element is installed incorrectly, then such a surface will soon fail.
The drainage system of a flat roof is one of its most important components.
As you already know, it can be equipped with both internal and external methods. If we consider the first, then it represents the installation of a complex system of pipes inside a building, which in a certain way drain precipitation from the surface into the storm sewer. This system allows you to improve the appearance of your comfort and make it more attractive and mysterious. As for the second method, these are the familiar pipes that are visible from the outside of the building. As a rule, external drainage from a flat roof is installed only if your finances are limited or your region experiences harsh winters.
This is interesting: Treating walls before wallpapering: the whole point
How to choose a roof drainage system when installing it yourself
The choice of drainage should be determined at the building design stage, maximum at the beginning of roofing work. The parameters of the drainage system directly depend on the parameters of the roof: its area, angle of inclination, type. The larger the area of the slope, the larger the diameters of the trays and pipes, the greater the throughput and stability. The greater the slope angle, the faster the water flow; accordingly, the pipes must be stronger and the fastenings more reliable.
When choosing, the roof configuration, number of floors of the building, snow and wind loads, and material are also taken into account. Don't forget about maintenance, so it's important to provide access for cleaning.
Drains also depend on the roofing covering: for a roof with corrugated sheets or metal tiles, metal structures are suitable, for a soft or cement-sand roof - plastic and metal.
It is recommended to purchase a system from reliable manufacturers, spending once and avoiding numerous repairs. If components are purchased from several suppliers, check the possibility of combining components.