Aerated concrete is a rather fragile material and can be drilled with any tools without any problems. Moreover, you can get by with a regular hammer and chisel. But in order to make the holes smoother and deeper, various nozzles are used.
It is recommended to drill aerated concrete with a hammerless drill or screwdriver.
So, different tasks require different holes in aerated concrete; this could be a regular hole for a dowel or anchor , or a place for an outlet , or a large cavity for a ventilation pipe.
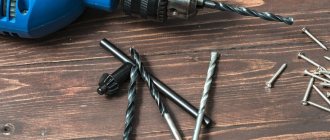
In other words, holes are needed of different diameters and depths, which are made with conventional attachments: a drill, a wood pen and crowns .
If you need to make a deep hole with a crown, then you cannot do without an extension attachment . Having drilled a circle to the thickness of the crown, a piece of aerated concrete must be carefully broken off with a hammer and chisel, then, using the same pattern, drill circle by circle to the depth we need.
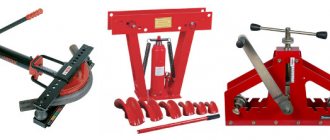
But there are also situations when you need to drill a hole of a very large diameter, and not necessarily a round one, but, for example, a square one. Now we will figure out how to do this.
How to drill aerated concrete
Aerated concrete is a rather fragile material and can be drilled with any tools without any problems. Moreover, you can get by with a regular hammer and chisel. But in order to make the holes smoother and deeper, various nozzles are used.
It is recommended to drill aerated concrete with a hammerless drill or screwdriver.
So, different tasks require different holes in aerated concrete, this could be a regular hole for a dowel or anchor, or a place for an outlet, or a large cavity for a ventilation pipe.
In other words, holes are needed of different diameters and depths, which are made with conventional attachments: a drill, a wood pen and crowns.
If you need to make a deep hole with a crown, you cannot do without an extension attachment. Having drilled a circle to the thickness of the crown, a piece of aerated concrete must be carefully broken off with a hammer and chisel, then, using the same pattern, drill circle by circle to the depth we need.
But there are also situations when you need to drill a hole of a very large diameter, and not necessarily a round one, but, for example, a square one. Now we will figure out how to do this.
How to make a large round hole in aerated concrete
- First you need to plan a place on the wall where there is no reinforcement.
- Draw a circle of the required diameter on the wall.
- Take a drill with a drill bit of the required length.
- Drill holes around the perimeter of the circle.
- Using the side surface of the drill, drill out the partitions between the holes.
- Gradually chip off the aerated concrete, or remove the entire piece if the hole is through.
- Next, simply level the hole using a hammer, sandpaper, and other tools.
How to make a square hole in aerated concrete
A square through hole is made with an aerated concrete saw or a regular wood saw. First, mark the square, drill holes with crowns or drills in the corners of the square so that the saw can fit in, and start sawing. Try to keep the saw perpendicular to the wall, this will make the hole smoother. Clean out small irregularities with sandpaper.
Working with aerated concrete is quite simple, but this advantage becomes a significant disadvantage. The problem is home security. Intruders can make a hole in the wall of a house through which they can penetrate and the consequences will be dire. To avoid such situations, aerated concrete is faced with brick or a thick layer of plaster. Build wisely, and so that everything goes well for you.
Useful videos on drilling and fasteners
Various mounting methods
So, how to attach timber to a foam block? It is recommended to use one of the options:
- tie with metal wire;
- secure with anchors;
- top view of the installation of the harness using metal studs.
Foam block is considered a fragile material and has a porous structure, so it is recommended to use two methods simultaneously to increase the percentage of reliability.
Metal wire
If this method of fixing the timber is chosen, then a thick knitting wire is used. Any stainless steel will do as long as it has sufficient strength and flexibility.
For proper installation, you should place wire on one or two rows after finishing the masonry work. Laying is carried out in such a way that multi-layer wire tails remain on each side of the wall being built. Their length should be sufficient to completely cover the beam through the remaining block rows and twist.
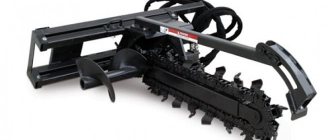
Tool for cutting, gating, drilling foam concrete
Laying masonry from foam blocks is quite easy and anyone can do it. Foam concrete is quite simple to cut, it is easy to groove, drill, mill, and give the desired shape to the entire block or just its individual parts.
However, working with cellular concrete requires certain hand and power tools, which are impossible to do without when creating high-quality masonry.
Hand tools for working with foam concrete
Hand tools are used at the initial stages of work. Required tools:
Hand tools for working with foam concrete - part 1
Selection of fasteners
Foam block has its own special characteristics, the main of which is its fragility. In its porous structure, it is difficult to secure shelves or stands for household appliances with a simple self-tapping screw. A dowel for a foam block is suitable for installing various structural elements on foam concrete.
The use of this type of fastener for foam concrete makes it unnecessary to install special mortgages in places where objects are secured, because at the construction stage it is difficult to determine where and what will be installed in the future.
The technical characteristics of foam blocks include their porous structure, increased hygroscopicity, and low weight. These properties are advantages in the construction of private houses, but have disadvantages when fastening elements into a foam block. To reduce the load on the cellular material, a dowel for foam concrete is used. It is used for attaching shelves for household appliances, furniture, plumbing equipment, paintings, and underfloor heating systems.
When fastening elements are used correctly, heavy objects are firmly fixed, strengthening the structure, while increasing the permissible loads on the cellular material.
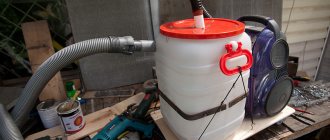
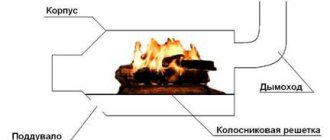
Strobe in aerated concrete. Holes in aerated concrete. Communications
In aerated concrete walls, the laying of internal communications is carried out, as in the case of block reinforcement, by making grooves (grooves) with a special brush cutter, and technological holes are drilled with a hammerless drill.
| After marking the internal communications routes on the wall, grooves are made in the walls using a wall chaser. |
Basic rules for gating for electrical wiring
- Grooving in aerated concrete is carried out strictly horizontally or vertically (grooving at an arbitrary angle is unacceptable).
- The horizontal groove in aerated concrete under the ceiling is made at a distance of at least 150mm -200mm from the plane of the ceiling.
- The vertical groove in aerated concrete should not be closer than 100 mm to the corners of walls, door and window openings.
- The distance between the grooves for electrical wiring and the gas pipeline should not exceed 400 mm.
- The groove parameters (width and depth) should not exceed 25 mm.
- The maximum length of the groove should be no more than 3000 mm
Features of fastening heavy structures to foam blocks
If you need to securely fasten a heavy structure to foam concrete, you must approach the choice of fasteners as responsibly as possible. The best option is through-mounting using metal studs and bolted plates. But this option is not always possible. The second method is to use a chemical anchor for fastening together with a metal anchor bolt or pin more than 15 cm long. This technology will distribute the loads as evenly as possible and prevent internal destruction of the material.
How to make a square hole in aerated concrete
A square through hole is made with an aerated concrete saw , or a regular wood saw. First, mark the square, drill holes with crowns or drills in the corners of the square so that the saw can fit in, and start sawing. Try to keep the saw perpendicular to the wall, this will make the hole smoother. Clean out small irregularities with sandpaper.
Working with aerated concrete is quite simple, but this advantage becomes a significant disadvantage. The problem is home security. Intruders can make a hole in the wall of a house through which they can penetrate and the consequences will be dire. To avoid such situations, aerated concrete is faced with brick or a thick layer of plaster. Build wisely, and so that everything goes well for you.
How to attach timber to a foam block: all the methods and their advantages
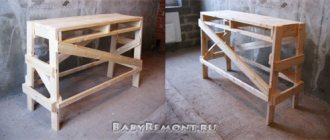
Top frame beam on a foam concrete wall
Foam concrete is a modern material with a lot of advantages that are increasingly attracting individual developers. However, it also has some disadvantages, one of which is insufficient rigidity and strength. Therefore, when it comes to adding a second floor made of wood or installing a mauerlat, the question arises: how to attach the timber to the foam block?
In this article we will look at two mounting methods, each of which has its own advantages.
What you will need
Experienced craftsmen believe that a hammerless drill is most suitable for creating holes in aerated concrete. If you need a small hole, then a screwdriver is enough. But in our case, the hole will still be larger - about 27-32 mm.
You also need to stock up on:
- feather drill;
- crowns (you can take those designed for wood, because drilling aerated concrete is not much more difficult);
- extension nozzle;
- hammer;
- chisel;
- sandpaper.
Some people try to make do with a hammer drill. But the impact mechanism can cause unwanted deformations to the material. If a heated towel rail hangs on such a wall, it’s better not to risk it.
M4 screw
Along with other fasteners, screws combined with metal expansion elements can be used for fastening into a gas block. They are also suitable for dense gas and foam concrete. The installation process is simple. A hole is drilled. The fastener is inserted and tightened. At the moment of tightening, the metal part expands the material. This allows the hardware to be securely fixed in the wall.
Tile, glass
To drill small holes of 4–25 mm, special cone-shaped drills with diamond coating are used. The main task is to go through the surface of the tile and its base. After this, you need to switch to a drill suitable for the wall material and continue drilling with it (a drill for metal or wood will win).
It is especially difficult to start drilling in a strictly defined position. You need to stick tape over the mark or mark a point along the mark, carefully knocking off part of the glaze or polished surface so that the drill does not “walk” along the surface.
Large diameter holes for the socket are drilled with a ballerina drill. It contains a sprayed support cone on the main axis. An adjustable arm with a fixed cutting tip is moved away from it. It is better to start at low speeds until the surface of the tile is passed. When the surface has been covered by 2–3 mm, you need to move on to a crown for the corresponding wall material.
Installing the system
The block installation is the easiest to install. Due to its affordability, this design is used most often.
Using the example of installing a block system, we will consider the step-by-step process:
Step 1 – choose a location. If the bathroom is small, it is better to place the installation in a place with the least traffic, for example, in a corner.
Step 2 – make the markings. First, we measure the dimensions of the system itself, then mark the center of the structure on the wall. From the center we take all the necessary measurements and mark the places of fastenings. We use a dash line to mark the location where the drain tank is attached.
Step 3 - according to the markings, we make holes with a hammer drill or impact drill and hammer in the dowels.
Step 4 – insert the anchors into the prepared dowel-nails and fasten the key structural elements.
Step 5 – level the installation, secure the drain tank using the fasteners included in the kit. We install fittings inside the earthenware container.
Step 6 – connect the system to communications. We connect the drain tank to the water supply system using the flexible hose included in the kit.
Step 7 – we put a corrugation on the sewer outlet and connect it to the installation with a plastic clamp.
Important! At this stage, pay special attention to pipeline joints. Don't forget to use fum tape and silicone sealant to secure the connections.
Step 8 – attach the bowl of the plumbing fixture. We insert pins into the prepared holes, put couplings on the studs, install a shock absorber and install the bowl itself, not forgetting to seal all connections.
When the sealant has hardened, you can open the water and check the installation for tightness, as well as for operability: is the system functioning normally, are there any malfunctions or any deficiencies. When you are completely sure of the reliability of the installation, you can move on to the next stage - decorative finishing of the bathroom.
Installing an installation is a relatively simple process if you have basic installation skills and an understanding of the design of the system itself. Happy installation!
Criterias of choice
The right choice and the ability to correctly use fasteners will not only help you quickly and reliably complete the planned work, but will also make it possible to rationally use the money set aside for repairs.
Features of the choice of fasteners:
- plastic dowels – fixing parts used for fastening light-weight interior items;
- dowel nails - a consumable material intended for through fastening of building materials both indoors and outdoors;
- metric screw – fastening for installing windows, doors and technical equipment;
- metal anchor - a fastener for hanging furniture and equipment that is heavy;
- foundation bolt - a fastening used for work with a high level of load and complexity;
- chemical anchor is a universal consumable material with a wide range of applications.
When choosing a fastening, it is necessary to take into account the planned load. The longer the dowel size, the greater the load it can withstand.
The most popular are metal parts made in Poland, Switzerland, Finland and France. Plastic and metal fasteners from Russian manufacturers are in high demand and have an affordable price and high quality.
When purchasing this type of product, you need to know the parameters that make up the price. These include:
- material;
- size;
- manufacturer;
- availability of special packaging.
Famous brands
Installations are presented on the market by manufacturers from many countries.
The most common are Vitra from Turkey, ROCA from Spain, CERSANIT from Poland, IDDIS from Russia. In first place is the manufacturer GEBERIT from Germany, producing tanks without a single seam. In second place in the ranking are the companies GROhe Viega, followed by TECE. When installing the system, you must remember that the shelf life and strength of the structure can be reduced if installed incorrectly, due to bad water, or by violating the rules of use.
First steps. Slab countertops
Sano published a blog entry in Furniture made from slabs, solids, and various differences, October 6, 2021, blog entry
The first attempts to make something from the brought slabs. Although there may be some attempts, the material costs money and the right to make mistakes is as much as there is money in your pocket. Train at your own expense, as they say.
Therefore, each board is carefully inspected and tried on; the proverb about measure seven times is in action.
The work itself is not tricky, creative, there are several boards and they need to be selected so that they look beautiful and there is no overspending. All sizing and trimming is done with the minimum possible removal of material, simply sawed off a little here, cut a little there with a chisel.
Installation of a wall-hung toilet on an installation
Before starting work, you need to find out what material was used for the wall behind the toilet. If it is concrete or brick, then you can begin installing the toilet with installation. If the wall is made of plaster or drywall, then you will have to find another location for the toilet.
First you need to take all dimensions and mark the installation location of the installation (support frame). Its design allows for height selection. If the installation instructions do not indicate special conditions, it is recommended to fasten the frame in such a way that the drain tank is at a height of 1 m from the floor.
Advice! A drain pipe with a diameter of 110 millimeters must be installed in advance and water supply must be supplied.
Before attaching the installation, it must be adjusted vertically and horizontally. Otherwise, the toilet tank and bowl will be distorted and will not be able to function normally. Adjustment can be made using a regular building level and adjusting pins and rods on the structure itself.
It is best to fasten the frame to the wall and floor with anchor bolts. They make it possible to ensure complete immobility of the entire structure. If the installation of a toilet is carried out in a private house with wooden floors, then it is necessary to use powerful screws and additional fasteners (metal profile).
Particular attention should be paid to the height of the toilet bowl. The optimal height is considered to be 42 - 47 mm. However, it can also be determined experimentally, taking into account the growth of all family members. You also need to take into account the possible covering of the floor with ceramic tiles after installing the toilet - in this case, the distance will change by several centimeters.
There are many wall-hung toilet systems on the market from different manufacturers, which can differ significantly from each other. Therefore, all other actions must be performed in accordance with the recommendations in the attached instructions.
Foam block
Foam block is a material used in construction. It has a durable structure that has porous cells. A foam block is made from sand, cement and water using a foaming agent.
The building material has many advantages:
- lasting;
- durable;
- construction happens much faster.
Since the foam block has high-strength properties, the fastening must be selected accordingly. From the article you will learn what fasteners are used when working with foam blocks.
Types of fastenings for foam blocks
Fastenings when working with foam blocks are divided into two categories:
Using internal fastening, you can install various parts indoors. For example, lamps, sockets, paintings, etc.
Fixing to the outside of a building, larger jobs that require special attention and knowledge. Outside, work is being done to install drains, pipes, awnings, etc.
Foam block fastening can be used in several options:
- plastic mount;
- metal mount.
Such fasteners come in different compositions, and the price is different; better ones will be a little more expensive.
Why is a wall-hung toilet preferable?
The method of attaching the toilet to the wall is simple and effective. This saves quite a lot of space previously occupied by the cistern. The floor under the toilet is free, making it much easier to clean. In terms of reliability, wall-hung plumbing is not much different from floor-standing: most models are designed for a weight of up to 300 kg.
Wall-hung toilets are highly comfortable to use. Firstly, due to the possibility of their height adjustment. Floor-standing plumbing has a height of up to 40 cm, which is not very convenient for tall people. Secondly, wall-hung toilets are a relatively new trend in the plumbing market. In view of this, manufacturers take into account many shortcomings that affect ease of use, but, in their opinion, are too insignificant to recycle old floor-type models. For the same reasons, wall-hung toilets are the first to use all kinds of technical innovations and original design solutions.
Among the disadvantages, one can note a higher cost than floor-mounted ones. And also the impossibility of installing the toilet to the wall at an angle other than straight, for example, in the corner of the room.
Metal
Such dowels are made of galvanized steel, they are for fastening to materials with voids, including foam blocks:
- wall office cabinets and shelves;
- kitchen cabinets and rails;
- cornices and structures for drying clothes;
- chandeliers and sconces;
- paintings and mirrors.
The dowel consists of a galvanized screw, a ring or half-ring, as well as a hollow collet, which has a non-expandable part, the length of which is selected equal to the thickness of the supporting base, and four fixation segments. The screws have a spherical or countersunk head.
Another important detail in the structure of the dowel is the side, which protects it from falling into the drilled hole. And the sharp teeth located around the circumference of the locking edge create a reliable obstacle to turning it around its axis.
Important: The structure of the dowel allows it to be dismantled by unscrewing the fastening screw, and makes it possible to reuse it without reducing the reliability of the fastener.
Frame
They are used for through fastening of slats, window frames, door frames to hollow bricks, foam blocks and gas blocks. Moreover, the frames themselves, which need to be fixed, can be made of wood, metal, or plastic.
The structure of such a dowel:
- a hollow sleeve having a conical spacer zone and a three-sided spacer part;
- screw with metric thread;
- cone-shaped bushing.
This fastener allows you to withstand very high loads, which is important when installing window and door structures.
Chemical anchors
Such anchors are used for large and serious loads. Their installation is not difficult, but this will require a suitable tool and correct sizing.
- Initially, you need to drill a hole slightly larger than the diameter of the chemical anchor.
- The hole must be cleaned and blown out so that there is no dust inside.
- Next, take the adhesive composition, they need to fill the hole by about 70-75%.
- Then a metal pin is screwed in.
- When the glue is completely dry, you can continue working. Depending on the type of stud, different loads are applied.
Mauerlat fastening with chemical anchors
When erecting the roof of a house, it is necessary to arrange the rafters; for this you need to erect a wooden frame - a mauerlat.
It is most reliable to use steel studs that are installed on chemical anchors.
There are quite a few manufacturers, because the cost of chemical anchors is not small. One of the more famous suppliers is Tytan Professional EV-1.
Chemical anchors are also used for other fastenings, for example, poles, frames, etc.
Before you begin installing anchors, it is worth studying the information on the packaging in order to more accurately calculate the dimensions and center of gravity.
Classification and varieties
According to the area of application, all fastenings to foam blocks are divided (albeit very conditionally) into two main groups:
- for outdoor use (fastening thermal insulation, clamps for installing drainpipes, gas pipelines, water pipes, etc.);
- for indoor use (installation of radiators, lamps, shelves, wardrobes, etc.).
Based on the materials used for manufacturing, fasteners are divided into:
- metal (galvanized steel, zinc-aluminum alloys);
- plastic (nylon, polyethylene, polypropylene, polyamide).
According to the installation method in holes drilled in a foam concrete wall: