Construction of a house begins with a project. Canadian technology for building frame houses successfully combines the customer's wishes: lightweight, durable construction, quick assembly, saving money. The implementation of an architectural project, taking into account the connection to the terrain, is also important.
Canadian technology for building frame houses
Canadian technologies - building codes (Code) and methods for connecting house parts, which are used in Canada and America. The project consists of architectural, structural, engineering and economic sections.
Canadian houses: a little history
The first frame buildings were known in Europe during the early Middle Ages. In those days, the structure was based on a system of posts and beams with braces located diagonally. The space between the parts of this frame structure was filled with stone, bricks or clay.
Colonists who came to Canada and the United States from Europe used this technology, which allowed them to create houses at any time of the year in a short time. To protect against the harsh weather conditions of Canada, the walls of the houses were covered with boards on the outside and inside, and the voids were filled with any available material. Most often a mixture of clay, straw, sand and stone was used.
Houses in old European cities are “distant ancestors” of modern frame technology Source nkkconsult.ru
Thus, the basis for creating houses using Canadian technology even in those days was the prototype of insulated panels, with the help of which it was possible to build a high-quality warm house in the shortest possible time. Modern technology of “Canadian houses”, adapted for harsh climatic conditions, has a number of advantages and disadvantages.
House design
The building frame can be constructed using a variety of designs and specifications. Whether using a standard design or a custom design, building codes must be followed while adhering to the principles of quality design that will ensure the strength of the home and also have a positive impact on the health of future residents.
Residential building design
When designing a building, opportunities to provide easy access for people with various physical disabilities, such as barrier-free access for the disabled, should be taken into account.
Advantages of modern Canadian houses
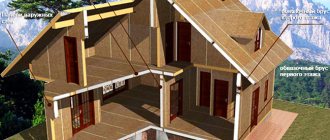
A frame house using this technology is built from panels covered with OSB (a material made from wood chips impregnated with polymer resins) and insulated with polystyrene foam. The dimensions of the panels are selected individually, taking into account the size of the finished building. Insulated panels are ready-made wall elements that are fixed on a pre-built foundation. After this, the installation of floors, roofs, as well as doors and windows occurs.
- The main advantage of the technology is the speed and ease of building a house. Installation work does not require the involvement of specialized equipment and a large team of builders; on average, a house is erected within 2-3 months.
- A frame structure using Canadian technology will cost about half the price of a full-fledged brick house, while the functional characteristics of both buildings are similar.
Facing brick in the design of a frame house Source karkasblog.ru
- Lightweight panels do not require the construction of a powerful foundation, so they can be built on areas with any terrain.
- Expanded polystyrene, filling the space between the panels, has high insulating properties. Therefore, the finished building does not require additional sound insulation and insulation.
Unlike dwellings made from beams or logs, Canadian wooden houses allow installation of utilities inside the panels themselves. Thus, finished living spaces look more aesthetically pleasing, and less time and effort is spent on installation.
- Wooden panels at the base of the frame create a pleasant atmosphere in the house.
- The lightweight wall material allows you to choose various methods of exterior finishing of the finished building: decorative brick, plaster, boards - all this is available to owners of frame houses built using Canadian technology.
- Thanks to the production of custom-made panels, the finished structure can have almost any architectural form.
Stages of building a frame house
The construction site is leveled, the fertile layer of soil is removed, and stored. They dig a pit below the soil freezing zone (for central Russia 1.50-1.80 m ). A monolithic slab is poured around the perimeter of the external walls. Slab section dimensions: height 150 mm width 300 mm . Reinforcement is installed along the entire length of the slab. In the diagram it consists of two rods. Shallow slabs are poured under the internal walls and beam ceilings, then, during the installation of the basement floor, timber columns are installed on them.
Foundation for a residential building
After checking the horizontal level of the base, diagonals and right angles, proceed to tying the beds (board 150x50 mm ). Along the perimeter of the base, in the center, at a distance of 1-2 meters, anchor pins are fixed for fastening the beds. The board is laid out on top of the plinth, cut to size, then the places for drilling holes for the studs are marked. A rolled glass wool gasket is placed between the surface of the plinth and the bed. The beds are secured with nuts and washers to the base (see diagram above).
Even at the stage of construction of the plinth, pockets were made in advance in places where the floor beams were supported. Opposite them, slots are made in the beds to insert the ends of the beams. The cord is pulled along the axis of the beams and the height of each of the intermediate supports is noted. The distances are written down in a notebook, and then support posts are prepared from 100x100 mm and attached to the base of the slabs. The distance between the posts is no more than 2 meters . The racks are fastened with 4 80 mm , 2 on each side.
Attaching the support post to the base of the slab
100x100 mm timber are laid on them . They are attached in the same way, only the nail is driven at an angle into the beam. At this stage, the alignment of the beams is regularly checked. Eliminate defects immediately: before moving on to the next assembly of the frame element, check the location of the parts with the drawing.
Assembling the floor joists
First, a tied beam is nailed around the perimeter of the bed - a 150x50 mm . It is placed on its edge on the edge of the bed and nailed to it with 90 mm , first at the end, and then. every 40 cm . Having completed the external piping, markings are made for the floor joists, which will lie across the floor beams at intervals of 40 cm . Prepare in advance the required number of lags and spacers 40 cm for the rigidity of the structure and the specified interval between the lags. The logs are laid out on the floor beams. The ends of the lags are placed edgewise on the bed and secured with 2 nails at the end and a nail in the bed on both sides. The logs are fastened together with an overlap of at least 10 cm above the floor beam.
Splicing floor joists
First, 2 nails are driven into the lintel, then 2 nails on both sides into the joints and one nail at an angle into the beam. The logs are leveled, and then they begin to lay the sheet material on the rough covering (multilayer plywood, OSB board). But first, they lay utility lines inside the base.
Laying floor sheets
The sheathing is done with 2 cm tongue-and-groove plywood. We mark the first row. Apply glue (liquid nails) in places where they are pressed against the joists. This prevents squeaking when walking. We nail 70 mm the joists at a distance of 10 cm around the perimeter, 15 cm inside the building and 30 cm along the joists. First, apply glue (liquid nails) in places where they are pressed against the joists.
According to technology, this prevents squeaking when walking. In the places where the sheets join, leave a gap equal to the thickness of the nail. The second and subsequent rows are laid in a checkerboard pattern.
Assembling the wall frame
We prepare the frame elements of the external walls according to the dimensions specified in the project.
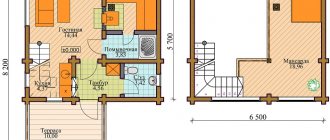
Working drawing of the basement floor
The drawing shows the places where reinforcement of the frame is required: window and door openings. We make markings on the floor of the walls of the first floor, marking the places where the elements meet. Let's start assembling the outer walls. The dimensions are transferred to the floor and assembly begins. You will need knowledge of the technology for assembling openings. The diagram shows window and door openings.
The distance between the frame posts is 40 cm . This gap is necessary for laying insulation between them.
Video - Assembly and lifting of frame walls using Canadian technology (6x8 frame house)
Joining the corners of adjacent walls
Before raising the walls, tie the corners at the junction. The design documentation contains a drawing describing the technological operation. Here are 2 ways of strapping: on the left from 3 boards 150x50 mm , on the right from 3 boards 150x50 mm and one board 100x50 mm .
Docking methods
The second method is preferable, since the cold bridge is insulated with insulation. Internal adjacent walls are connected in three boards; here there is no cold bridge. After raising the walls, they are leveled, then markings are prepared for installing floor beams.
Ceiling and interfloor coverings
One-story frame houses are designed with a cold attic or a warm residential attic. Guided by the project, floor beams are prepared. The pitch of the beams is 40 cm . When drawing up a project, engineers calculate the loads on the beams. The beams are laid on the top frame of the walls, mounted according to the instructions set out in the project. To understand how the unit is arranged: wall, beam, rafters, consider the layout.
Rafter system attachment points
The gable beam is placed flat on the top frame. At the point where it abuts the wall, a groove is cut into the beam for the rafter board. Pay attention to the angle of inclination. In Canada, some departments require a ratio of 4 inches to 12 - 18.5 degrees . In any case, follow the design and cut the corners correctly. In snowy regions, a slope of 40 degrees . It is better to place the rafter spacers perpendicularly, then you will not have to plan the protruding part.
Floor beams are also the floor joists of the attic or attic. Installation in increments of 40 cm is needed for laying thermal insulation. When all the beams are in place, check the fastening locations again using the drawing. Immediately after installing the beams, it is recommended to install a rafter system and mount the roof. So protect the building from bad weather.
Rafter system and roof
This element of the house experiences wind and snow loads , so the roof slope is regulated for each department. Roof shapes may vary. For frame houses, the gable form is the most common because it is easy to manufacture, install, and costs less. An attic room or a cold attic is built underneath it.
We will not consider other forms for now. It is important to understand how to properly sheathe the rafter system so that heat does not escape through the roof and it is not hot in the summer. The rafter boards are prepared at the bottom, then served on top and laid out in marked places. Start installation.
Installation of rafters
A control post is nailed to the center of the façade so that the ridge runs along the central axis of the roof. The stand is auxiliary; it makes it easy to control the vertical plane. First, the rafters are mounted from the front walls, then between them, where the vertex of the triangle is formed, a ridge is laid - a 200x50 mm . Supports are installed every 3 meters. Additionally strengthened with bevels. The remaining rafters are installed.
Note! The attic space is non-residential and is usually used for storing things. Sometimes a ventilation system is installed in the attic. It is necessary for frame buildings.
If the rafters are long, then they will bend under the weight of the snow, so designers recommend installing an additional supporting structure in the place of possible deflection: a long board 100x50 mm is nailed edgewise to the rafters, and then under it, as under a ridge, support posts are placed in increments of 3 m .
Front boards and eaves of a gable roof
The construction of the rafter system is completed with the installation of cornices and frontal boards (finishing boards of the pediment). Let's look at how this is done on the layout.
Installation of cornice and front board
The ends of the rafters are cut along a line with a offset of 30 cm , then a cornice is nailed into the end with a downward shift of 2.5 cm so that the OSB sheets lie freely on the rafter board. The front board is nailed on the gable side. Pay attention to the consoles; they have a projection at the level of the ridge. The front board is nailed to the ridge with two nails, then one nail to each console. You probably noticed the cuts in the rafter board in the previous photo. They are designed for a 50x50 mm , which is a console. The front board and cornice are joined at an angle of 45 degrees .
It's time to lay OSB sheets on the rafters. Lay from the side of the cornice. The principle is the same as for flooring. Mark the edge of the sheet with a cord and lay the first row. The second row is laid in a checkerboard pattern, cutting the first sheet in half. Then the house is covered with metal tiles or other material specified in the project. Now we need to finish the engineering part of the project - piping communications. Then work on insulation and finishing continues.
Disadvantages of building a house using Canadian technology
Despite many obvious advantages, houses using Canadian technology have a number of features and limitations, due to which they are not suitable for all owners of suburban areas. The main feature of the technology is the limitations on the dimensions of the finished building. The height of each floor should not exceed 3 meters, there can be a maximum of 3.
The compactness of Canadian houses does not affect their functionality and pleasant appearance Source avantage-dom.ru
The environmental friendliness of the finished building may raise questions due to the abundance of polymer resins impregnating the product. However, this is a question of the integrity of the manufacturers of such structures - if the panels are made in compliance with the technology, then they comply with all environmental safety standards.
The characteristics of a finished residential building, in addition to the quality of the material, are also determined by the professionalism of the team of workers. If the contractor’s integrity combines with high-quality components and finishing according to all the rules, then a Canadian house is a comfortable and durable home.
Canadian features
Canadian construction legislation is very strictly regulated. The technologies, materials used and their manufacturers are spelled out once and for all. It is possible to prove the suitability of other building materials, but this is a long and unprofitable job. References to the experience of other countries will not work.
Canadian building codes are not universal. Different provinces have different regulations.
In Canada, the construction of wooden houses with 6 floors is allowed.
Not a Canadian project, a US one. Wooden frame 36 meters high. "475 West 18th", New York.
The methodology for calculating the energy efficiency of houses is different from the Russian one. The essential thing is that there are heat conservation criteria that cannot be violated. In Ontario, 100 mm of polystyrene foam on top of 150 mm of mineral wool is the norm.
Canadian SNiPs do not exist in the public domain. This is the intellectual property of the developers. You must pay to access any document.
Foundation
A common option for building frame structures is a strip foundation, which is a concrete structure immersed in the ground by about 50 cm, the height above the ground is 20-30 cm. With correct calculations, a strip foundation allows you to erect a residential building on various types of soil, including swampy and mobile ones. The main disadvantage of such a foundation is the inability to carry out a global redevelopment of the house over time.
Ready-made strip-column foundation “in cross-section” Source emupauto.ru
Screw foundations can be sunk to a considerable depth, which makes it possible to use them to create a foundation for a house on difficult soils. The main disadvantage is that noticeable shrinkage of the structure is likely, especially if there are errors in calculations or violation of technology. As a result, finishing work will have to wait for some time after completion of construction work. In addition, there is no need to think about either the basement or the ground floor in such a house.
Screw foundation made of metal piles Source 72.ru
The most reliable option is a slab foundation, which is a flat reinforced concrete “pillow” on which the structure is erected. Due to its high cost, it is usually not used when building prefabricated houses using Canadian technology, but on sandstone or when there is an abundance of groundwater, this may be the only possible option.
Schematic diagram of creating a slab foundation Source profundamenti.ru
Most often, the cost of the foundation is calculated separately from other work on the construction of a frame house. Experienced specialists will help the customer choose the optimal type of foundation depending on the characteristics of the building and the surface on which it will be built.
Structural design
By convention with the National Building Code, metric spacing between timber frame members is expressed as "soft" conversions from actual English values.
For example, spacing of 12, 16 and 24 inches on center is changed to 300, 400 and 600 mm on center respectively. In order to fit common dimensions such as 1220 × 2440 mm (4 × 8 ft) panel products such as gypsum board, OSB and plywood, the spacing of the framing members must be adjusted to approximately 305, 406 and 610 respectively.
NBC contains provisions for resistance to lateral loads arising from earthquakes and strong winds. The provisions are based on a three-level risk analysis approach, i.e. environmental load. There are no special requirements for areas where the risk is low to moderate. This means that the sheathing, cladding and trim provide adequate resistance.
Most of the new requirements apply to high-risk areas, primarily coastal British Columbia. Along these lines, builders can include adequate resistance to lateral (transverse) loads without the need for further structural design. Measures include the provision of "bonded panels into a 'wall reinforcement' that are continuous horizontally and vertically throughout the building and that extend from the top of the load-bearing foundation, floor or basement to the underside of the floor or ceiling above.
In a few Canadian locations where the risk is extreme, the lateral load resisting support must be designed in accordance with NBC Part 4 or good engineering practice such as that provided in the Engineering Guide for Wood-Frame Construction 2009.
National Building Code of Canada The 2015 National Building Code of Canada (NBC), published by the NRC and developed by the Canadian Building and Fire Code Commission, sets out the technical provisions for the design and construction of new buildings. This also applies to alterations, change of use and demolition of existing buildings. More than 360 technical changes have been included in this new edition.
Book and film by Larry Hohn "The Very Efficient Carpenter"
Reliable and easy-to-install SIP panels, which are easy to install without additional construction equipment, allow you to create a home with your own hands.
The book and film by carpenter Larry Hohn, “The Very Efficient Carpenter,” describes in detail the process of building a frame house using Canadian technology. Each chapter of the book and episode of the film is devoted to the components of the house: floors, walls, roof, as well as self-construction of the stairs. At the beginning of the video, the process of calculating the required amount of building materials is described, the necessary tools are mentioned, and the progress of the work itself is shown in detail.
Eventually
Classic Canadian or American frames are rarely found in domestic designs - why choose one when you can mix. The platform simplifies further work and assembly of walls, but instead of double strapping, a crossbar can be used, and instead of a windproof film, MDVP is increasingly being installed. Also, UVF or USHP becomes an excellent basis for a two-story Canadian frame and the absence of a platform does not bother anyone. But in any embodiment, a detailed design, high-quality materials, sufficient insulation and a wall cake with all membranes are required.
What to assemble the frame from is discussed in one of the thematic articles. For more details on how to avoid RSC, see the material on how not to build frame houses. In the video there is a review of a Finnish frame house.
Subscribe to our Telegram channelExclusive posts every week
Video description
Larry Hohn's film:
The Work of a Master shows that the construction of a durable building requires not only experience and skill, but also the selection of materials with the necessary technical characteristics. Unfortunately, when creating a home, “there are no small details.” For example, an incorrectly created foundation or a violation of roof insulation technology leads to premature destruction of the house.
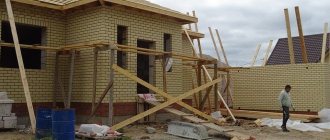
The process of constructing a frame house Source 1asku.ru
Preparation
Wood must be stored properly. To protect the tree from moisture and other precipitation, make a large canopy or allocate a special room. Next, you should decide on the location of future construction and prepare it.
Everything unnecessary must be removed from the site, good lighting must be provided, all necessary building materials must be prepared, and water supply must be taken care of. As soon as all the work has been carried out, the foundation of the future housing can be erected.
Consequences of technological errors during the construction of a building
The main mistake when building a house is inappropriate savings. SIP panels are based on wood, so it is strongly recommended to pay attention to their quality. Damp, improperly dried or rotten wood means future gaps in the walls, drafts and rapid destruction of the house.
All joints in the finished structure must be adjacent to each other as closely as possible; all gaps must be treated with sealant and construction foam. This will avoid unnecessary “cold bridges” (places of penetration of rain and wind), which contribute to the destruction of the house.
A finished house made of SIP panels, treated with sealant: the seams are tightly adjacent to each other Source tutknow.ru
Tightly fitting panels require the installation of additional ventilation, as well as the use of artificial gaps. Before starting work, you should ask the builders exactly how the house will be ventilated.
The quality of the factory-made panels themselves should be checked before installing the building. As a rule, high-quality SIP panels have smooth edges, regular shape and uniform color. It is strongly recommended not to purchase cheap Chinese-made stoves that are not adapted to harsh weather conditions.
Additional buildings
Secondary suites, or accessory dwelling units are intra-corporate apartments - these are self-contained cottages or small residential units that are located on an area that has a separate main entrance, single-family home, duplex or other residential unit.
These can also be called semi-detached houses (two adjacent residential units) and are used, for example, as rental housing or for accommodating family members in a separate area of the house.
To approve the construction of such buildings, a number of conditions must be met:
- The living space and ceiling height must be no less than 1.95 m (6 ft 5 in) and no less than 1.85 m (6 ft 3/4 in);
- Availability of escape routes, stairs, ramp, acceptable door width, security service;
- a barrier consisting of no less than 12.7 mm gypsum board must be provided between apartments;
- A fire warning system connected to each other and to buildings.
Building regulations set a minimum ceiling height for living rooms. Minimum ceiling height 2.1 m (6 ft 11 in). The basement must have ceilings of at least 2.0 m (6 ft 7 in) in any area that will be used for passage.
Popular Canadian house designs
The most common house designs using Canadian technology are one-story, one-story with an attic, standard two-story, and also houses with a garage.
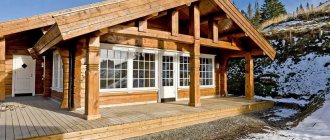
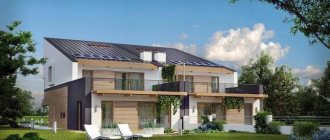
A traditional one-story house with a large porch and a gable roof is the best option for a small family. Finishing with plaster and wood panels, as well as laconic forms create a complete look of the building. The absence of large windows and a glazed veranda will save on heating the building.
One-story house with a porch and large windows Source blog-potolok.ru
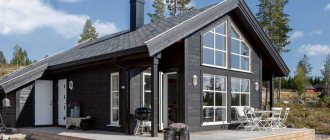
The original architecture of a one-story building with an attic is created thanks to the irregular shape of the windows. The gable roof used in the architectural design prevents moisture accumulation and protects the roof from leaks. A glazed porch is a miniature analogue of a summer veranda.
The porch of a two-story house is adjacent to the end wall Source seattlehelpers.org
The combination of a small terrace, stone finishing and plaster gives the two-story house solidity and good quality. At the same time, the architectural solution is very compact and budget-friendly: the gable roof is easy to install, heating costs are kept to a minimum thanks to the open porch and terrace on the second floor.
A solid two-story house with large windows and a terrace Source ekzo.by
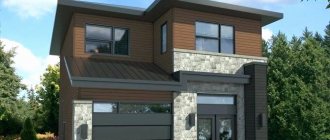
Cladding with natural stone and brick is a sure way to add exclusivity and reliability to an affordable and laconic home. Small attic windows, originally decorated chimneys and a modest porch give the building a complete look. An organically built-in garage with small windows can be used as an outbuilding.
Two-story house with an attic and a built-in garage Source belarusinfo.by
Finnish frame building school
Finnish frame houses, with very rare exceptions, are built on an insulated foundation, which is associated not only with the harsh climate, but also with the assembly technology. If the “Canadian” begins to be assembled from the platform, and only after it they begin to build the walls, then the Scandinavians immediately install the walls and roof on a slab or tape with backfill. Finnish architecture tends towards minimalism and laconicism - a house can be large, but on one floor.
In the original version, Finnish frame houses are factory-made, the only difference is in scale.
- Ready-made wall structures - not only with windows and a door or doors, but also with facade cladding; all that remains is to assemble them at the construction site. Finnish windows are always energy efficient, two-chamber with a combined profile: internal wood, external aluminum. The doors are also only frost-resistant, insulated, and even in the absence of a cold vestibule, freezing and condensation are excluded.
- Small-format panels - sizes vary, but on average they are up to 2.6 meters high and up to two meters wide, each covered on both sides with racks that are joined through a seal. Windows and doors are also already installed, and the final façade covering is installed on site after the frame is assembled. Both in the finished walls and in the panels, the load-bearing racks are made with a thermal break to minimize heat loss. It is unrealistic to repeat this under construction site conditions, and the problem of cold bridges is completely solved by cross-insulation.
It is almost impossible to deliver a house kit consisting of completely finished walls from Finland due to its large dimensions. But it’s quite possible to order wall panels assembled like a kit, if your budget allows, from almost any local company.
If we consider the Finnish frame directly, it is also assembled exclusively from dry planed boards with a cross-section of 190×45 mm. Compared to the Canadian one, the Finnish one is somewhat simplified - instead of double strapping and reinforcing the openings with headers, a crossbar is cut into the racks under the trim.
But if, in order to reduce the cost of construction when assembling a Canadian frame, although it is creaking, it is permissible to use wood with natural moisture content, this will not work with the Finnish one precisely because of the crossbar. When dry, the racks made of damp wood will shrink, and the crossbar embedded in them will stop working, since instead of a stop it will hang on the nails. Whatever the price of a dry planed board, you will have to spend money.
The rigidity of the frame is achieved through the crossbar and the use of MDVP boards (soft wood-fiber boards) as wind protection. Scandinavians do not use OSB outside; instead, they cover the frame with moisture-resistant façade plasterboard. Since the houses are one-story, and together MDVP, plasterboard and finishing sheathing will give the frame sufficient rigidity, the jibs are not a mandatory element, but if desired, they can be embedded for your own peace of mind.
The rafter system in Finnish frame houses is assembled from trusses, factory-fixed on gear plates. The advantage of this design is the possibility of eliminating internal load-bearing partitions and combining space, which is quite popular in country houses. The rest of the roof is standard and necessarily includes a protective membrane and installation of sheathing to form a ventilation gap.
Mineral wool is also used as insulation in the walls, and cellulose insulation – ecowool – is blown or poured into the attic floor. It is poured either directly onto the vapor barrier film, or a layer of slab insulation is pre-laid. The thickness of the insulation in the walls is 200 mm or more, the thickness of the insulation in the attic floor is 300-400 mm.
An important note.
TalovaloFORUMHOUSE Member
It might also be useful to someone. The Finns also have “dacha” and “permanent residence” class houses. A dacha usually differs in its insulation layer, layout, glazing and the windows themselves. And what Russian people often consider to be a “real Finnish house”, made of timber or logs, are usually dachas intended for occasional visits or for rent to Russian tourists.
There are no frames without vapor barrier, and Finnish is no exception in this regard, but both thick film and diffusion membranes are used.
Porcupine Member of FORUMHOUSE, specializes in the construction of Finnish houses
It seems to me that recently, “smart” VCL membranes with limited vapor permeability have become more often used for vapor barrier. They “work” well with the materials that the Finns put on the outside of the frame. The following pie (from the outside in) is very common.
- Facade gypsum plasterboard or MDV or simply windproof film.
- Main frame with insulation.
- Vapor barrier.
- An additional layer of insulation is horizontal lathing, plus insulation.
- GKL (reinforced).
In point 4, all electrical wiring is also laid without damaging the vapor barrier; corrugations are not used.
Another interesting observation.
PorcupineForumHouse Member
I noticed that a fairly popular topic among Finns is one or more heat-intensive partitions inside. I also noticed that the walls of bathrooms are also mainly made of hollow expanded clay concrete blocks. Either because of sound insulation, or because of humidity, but they do it.
Houses using Finnish technology are demanding in terms of facade design style - clad in natural wood, with direct fixation to the sheathing using galvanized nails. The Finns specially “shag” the board by raising the pile so that it absorbs more paint and the façade lasts longer without updating.
Various imitations, be it vinyl or fiber cement siding, are not welcome, but they do occur here.
What to choose - comparison of prices
Houses using Canadian technology, built by qualified specialists using high-quality materials, are an excellent option for suburban housing. Ordering a turnkey frame house ensures that many technical nuances are taken into account, allowing you to create a durable structure. To simplify your choice, below are prices from developers for Canadian turnkey houses:
| Source tr.skopelitissa.com | Source dekardkarkas.ru | Source dekardkarkas.ru |
| 7.5x8.8 from 5.1 million ₽ | 7.5x9.8 from 5.3 million ₽ | 8.4x9.9 from 5.9 million ₽ |
| Source dekardkarkas.ru | Source dekardkarkas.ru | Source sk-domostroi.ru |
| 8.65х9.75 from 5.3 million ₽ | 8x13 from 6.4 million ₽ | 11.8x10 from 7.2 million ₽ |
| Source sk-domostroi.ru | Source sk-domostroi.ru | Source vachdom.ru |
| 6x6 from 2.9 million ₽ | 6x8 from 4.2 million ₽ | 6x8 from 3.7 million ₽ |
| Source www.cottage.ru | Source myfeo.ru | Source dom-expert.by |
| 8x8 from 4.1 million ₽ | 9.5x10 from 4.9 million ₽ | 8x10 from 4.6 million ₽ |
Ratings 0
Read later
Advantages of working with our company
We do it on time or for free. Construction is divided into stages with a specified completion date. "Full construction". All work is done by one company. Possibility of accepting payments in installments or on credit. No hidden fees. The price is final at the contract stage. Quality control is carried out at every stage of house construction by our competent services. Thanks to high-quality construction work. We have more than 300 successfully completed projects. Delivery of materials within 200 km from the Ring Road for freeGet a free estimateHow to make a floor
- To install a floor in a house, logs are first installed. In all places where the logs will be located, it will be necessary to cut out special grooves in the grillage.
- After this, the logs will need to be correctly placed in their places, we should have a lathing for the subsequent laying of the base. Now you need to decide what size of boards or timber is best suited, ideally if it is the following dimensions: 150 by 50 millimeters or 100 by 50 millimeters.
Of course, you can use products of other sizes; everything will depend on the degree of load and on the characteristics of the rooms’ use. To fix the logs, you can use metal “shoes”, corners, dowels, nails, self-tapping screws, and other fasteners.
Frame diagram of floor joists
Important! To avoid rotting of a wooden structure, before installation it must be treated with special means, this will extend its service life.
When the base is ready, you can begin laying plywood or SIP panels. The thickness of the plywood should not be less than 20 mm. To prevent the floor from creaking later, you will need to securely lay the plywood and then screw it well to each laid joist.
In order to make the floor warm (this is very important in winter), you can use SIP panels; inside they have insulation based on polystyrene foam.
The panels are installed as follows:
- The panels are laid on the laid joists. Due to the fact that they have grooves around the perimeter, installation is easy and quick; the tongue-and-groove fastening method helps with this.
- At the next stage, it is necessary to cover the surface of the slabs from the outside with bitumen mastic, which is first melted.
- Next, the slabs are installed around the perimeter of the entire wooden house. To connect one slab to another, a beam is used; it will be a kind of spike. Before connecting SIP panels together, it is necessary to foam their grooves. On one and the other side, the connections are fixed using self-tapping screws. To avoid the formation of “cold bridges” between the joints, it is advisable to treat the grooves with polyurethane foam before joining.
- Along the perimeter, the ends of the laid panels will need to be covered with strapping beams; it will provide better rigidity to the created structure. This is done in this way: they take foam and blow it into the voids and then insert a board of the required width into it. You can fix the board using self-tapping screws.
SIP panel installation diagram
Options for layouts and projects
All such households, starting from the middle of the last century, have been built with complex architecture :
- multi-storey;
- with warm attics and a warm garage;
- verandas;
- terraces and balconies.
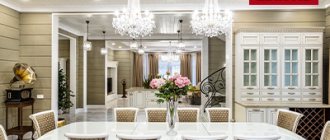
Premises on the 1st floor, as a rule, have high ceilings up to 3 m, large square, rectangular or arched windows. The first floor is a guest floor, there is a spacious hall, living room and dining room. The second floor is used for living rooms, there is also a nursery and an office.
Furnaces are usually located in basements, and air heating is provided throughout the house through a duct system. A general air conditioning and ventilation system is also installed. There is a separate laundry area in the basement or utility room on the first floor.
Exterior finishes in most parts of Canada are imitation brick, a material bonded to the outside of the wood frame. Roofs are often covered with asphalt or cedar shingles; recently, metal tiles have become more popular.
What does the concept mean?
By this term, experts understand a prefabricated structure with a completion period of 2 to 5 months .
The basis of the house is a wooden frame formed from solid wall structures. Houses can be produced both for permanent residence and for seasonal residence in the form of summer country houses.
The difference between them is in the thickness of the insulation; in the first case, a reinforced layer is installed in the wall - from 200 mm, in the second - no higher than 150 mm.
In addition, permanent residential buildings for permanent residence are characterized by a significantly high level of life support . Such a household must have reliable autonomous or centralized sources: electricity, water supply, sewerage and heating.
The issue of mandatory gasification in the regulatory plan for houses with permanent and seasonal residence is not fixed; everything will depend on the availability of main gas pipelines in the development area.
to erect such buildings in any place, on any soil, without fear of subsidence of load-bearing structures. Such buildings do not need a reinforced foundation, since the weight of wall structures and roofs is small compared to stone structures.
Frame houses in Canada are built only by certified teams; the work of each stage of construction is checked by state supervision; without its visa, the house cannot be put into operation. This ensures high quality houses and long standard service life - more than 100 years.
There are two options for constructing Canadian buildings using frame technology - on site, on site and in a factory using modern CNC machining equipment. Canadian developers, according to statistics, build frame houses on the construction site in 89% of cases, and only in 11% of cases are they prefabricated. This is due to the significant difference in cost of these construction options.
Canadian prices for the construction of frame housing construction: assembly of factory-made elements on the construction site - $1,800 per 1 m2; modular frame-panel buildings, houses 18x4.9 m - $2,500 per 1 m2; ready-made factory house with utilities - $3,500 or more per 1 m2.