Building a wooden house with your own hands is not such a difficult task. The main thing is to know and take into account all the subtleties when performing each type of work.
Construction of wooden houses from A to Z includes:
- choice of material;
- drafting;
- foundation construction;
- erection of walls;
- roof installation;
- hanging windows and doors.
So, let's try to figure out how to build a wooden house with your own hands.
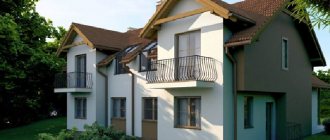
Choosing material for building a wooden house
Construction of a house from laminated veneer lumber
When choosing a building material, the purpose of the building and its size, the cost of consumables, and further finishing costs are taken into account. No less important are the thermal insulation properties and quality of the wood.
timber
For construction, solid, glued and profiled timber is used. The first type is made from a tree trunk by cutting on four sides. In this case, the element receives a rectangular or square cross-section. The surface of the timber is sanded or not treated. Elements with a thickness from 9 cm (for internal partitions) to 25 cm (for load-bearing walls) are suitable for work. During construction, they fit tightly together, ensuring reliability and thermal insulation of the structure.
Profiled timber is characterized by the presence of polished surfaces and locking elements: a tongue-and-groove connection. In this case, additional fasteners are not required. Glued laminated timber is made from dry wooden lamellas, the length of which is 12 m and the thickness is 7.5-35 cm. The elements are treated with glue and pressed. The result is a beam with increased strength and resistance to warping. The structure made of laminated veneer lumber is strong, reliable with a flat, smooth surface. This is what is used most often.
Logs
House made of rounded logs
A debarked or rounded log is suitable for building a house. In the first case, the bark is removed from the trunk with an ax or using a special machine. The length of the element reaches 6 m, and the diameter is 45 cm. A house made of “wild” logs looks impressive, but the presented material is rarely used today.
To make a rounded log, not only the bark, but also the top layer 2 cm thick is removed from the surface of the trunk. The length of the elements is 6 cm, the diameter is 15-30 cm. During construction, the crowns are the same, with a clearly defined texture.
Panels
The panel is based on a frame made of dried boards or timber, inside which insulation is placed. The product has a layer of vapor and waterproofing. A house made of such material costs the same as one made of timber, since the main funds are spent on finishing it.
The advantage of the panels is the speed of construction of the structure, as well as the absence of the need for additional insulation.
Which geometric shape of the structure to choose?
Before you begin the first stages of construction, you should consider the specific size of the gazebo. Based on them, you can decide how best to arrange the furniture inside.
It is recommended to set the height no lower than 2.3 - 2.7 m. The optimal area is from 10 to 20 sq.m.
We’ll talk about popular types of geometry in the design of gazebos next.
Square
Thanks to the equal measurements of the walls, the construction of the gazebo is greatly simplified and reduces time. If it is important for you to save effort and money, purchase ready-made structures that will need to be assembled on site. The assembly process itself is intuitive and takes no more than two to three hours.
When building such a gazebo yourself, it will take you a little more time, but even a beginner can easily cope with it. Feel free to get down to business, but first accurately calculate the dimensions of each structural element.
The frame is preferably made of metal or wood. For the roof, flexible tiles, metal tiles or ondulin are used. The walls can be additionally decorated with forging or carved wood.
Rectangular
The most popular form among gazebos. On average, its area is 10 sq.m. Depending on the budget and the request of the future owner, a stove or barbecue can be installed.
In a rectangular gazebo it is easy to place a large amount of furniture to suit your taste. This is easy to do thanks to the large open space. It is also possible to zone such a gazebo, to separate the kitchen and dining areas.
The most popular materials used for construction: wood, brick, forging, plastic or metal frame with fixed corrugated sheeting. Even taking into account the fact that the gazebo will be filled with furniture, it can comfortably accommodate several people. This is an excellent option not only for a country holiday, but also for magnificent celebrations and celebrations.
Polygonal
Due to the large number of angles (usually from 5 to 12), such a gazebo resembles a circle in shape.
It will not be easy to build this model from scratch on your own. More often, gazebos of this kind are purchased disassembled or in separate segments. It is better to leave its assembly to professionals for the greatest reliability and speed of construction.
Features of building a wooden house
Finnish house made of timber
Before building a wooden house with your own hands, you need to decide on its type. In addition to Russian, there are Canadian, Norwegian and Finnish types of structures. Each of them has its own characteristics:
- Finnish. Such houses are now very popular. Their peculiarity is the simplicity of lines and restraint of color. The building is characterized by a gable roof, a rectangular shape of the structure, and an area of up to 120 square meters. m., simplicity of layout, good sound and heat insulation properties. The building is often one-story, with the minimum length of the roof overhang being 20 cm and the height of the plinth being 40 cm. The Finnish project provides for low ceilings and the presence of a sauna.
- Norwegian. The building is monolithic and proportional. It is characterized by a simple layout, large premises with a minimum of corridors.
- Canadian. The house has a complex fundamental structure, characterized by a high roof, spacious rooms, and terraces. For the work, large diameter logs are used, installed using the “post and beam” technology.
Canadian technology
In Russian style
Norwegian style
In Russian house building, several trends can be distinguished:
- country: the interior contains ancient Russian symbols;
- hut: no unnecessary decorative elements, restrained design, presence of a traditional stove;
- tower: the use of expensive decorations.
When choosing a “Russian estate” project, pay attention to the presence of carvings, shutters, and cladding on the top of the roof.
Photos of gazebos for summer cottages
Sources
- https://stroyday.com/besedka-svoimi-rukami-iz-dereva/
- https://kopilpremudrosti.ru/besedka-svoimi-rukami-iz-dereva.html
- https://tvojdizajn.ru/besedka-svoimi-rukami
- https://besedkibest.ru/vidy/dachnye-besedki/
- https://stroim-dom.net/stroim-besedku-iz-dereva-svoimi-rukami/
- https://stroy-podskazka.ru/besedka/svoimi-rukami-iz-dereva/
- https://stroy-podskazka.ru/besedka/dlya-dachi-svoimi-rukami/
- https://dominafiesta.com/besedka-dlya-dachi-svoimi-rukami-sovety-idei-primery-90-foto/
- https://homius.ru/besedka-dlja-dachi-svoimi-rukami.html
- https://podelki.expert/besedka-svoimi-rukami/
- https://o-remonte.com/besedka-svoimi-rukami-iz-dereva-poshag/
- https://landshaftdesign.info/besedki-dlya-dachi/
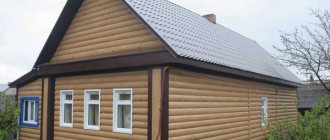
Pros and cons of a wooden house
The mass of a wooden house is small, so a strip foundation is sufficient.
Before you build a wooden house with your own hands, you need to consider its pros and cons. The following design advantages are highlighted:
- high strength of building material;
- light weight of the structure (no need to build a heavy foundation);
- low level of thermal conductivity;
- aesthetic appearance;
- high installation speed.
Wood has some disadvantages:
- The boards or logs may contain knots or other flaws: such elements are prohibited from being used for the construction of permanent walls.
- Untreated material will rot when exposed to moisture.
- Temperature changes lead to deformation and warping of the wood, and uneven shrinkage of the house.
- Timber or log is a fire hazardous material, so it requires additional treatment with protective compounds.
Disadvantages can be easily eliminated using specialized tools.
Screw foundation
This type of foundation is also called pile foundation. It is suitable for mountainous areas, mobile soils (for example, sandy, marshy), with high groundwater levels.
The piles have a drill at the end, which is screwed in to the required depth, then they are filled with concrete. A metal grillage is welded on top of the screws, which allows the structure to be connected.
Designing a wooden house
You can buy a project ready-made or make it yourself.
If you have made a choice about what kind of wood to build a residential building from, you need to start creating its project. First, the location of the building is determined. The distance from the neighbors’ site, the placement of communications, the well, the level of soil freezing, and the risk of flooding of the structure during spring floods are taken into account.
The design stage includes the following sections:
- architectural: information about external decoration, arrangement of rooms, number and type of windows, doors;
- constructive: includes information about the type and technical parameters of the foundation, roof, walls and ceilings;
- engineering: information about communications (heating, water supply, sewerage), electrical wiring, ventilation system.
When planning a house, the following parameters are taken into account:
- building configuration: today preference is given to buildings of complex shapes, which are expensive, but it is worth considering simple projects that can be made no less comfortable;
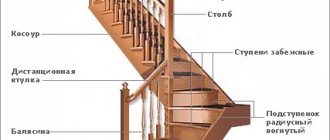
- number of storeys: if the house has more than one level, you need to consider the location and type of stairs;
- foundation type: a shallow strip foundation is suitable for light structures;
- roof shape: the standard option is gable;
- number of residents;
- heating system;
- purpose of the building: for permanent residence, for summer use;
- use of the “warm floor” system;
- features of interior and exterior decoration.
When drawing up the project, additional extensions and financial possibilities are taken into account. At this stage, it is necessary to provide ways to protect wood from the negative influence of external factors. The location of the heating system is determined taking into account the increased fire risk.
Ready-made diagram (drawing) of the gazebo
No matter how much you enjoy relaxing at the dacha, it is not complete without a gazebo. Tea drinking with friends and family in the open air, feasts with barbecue, all this simply requires a roof over your head. Therefore, every summer resident strives to build a gazebo on the site.
Before you start construction, you should have a diagram of the gazebo in your hands.
On Internet sites you can buy ready-made construction plans, with attached calculations and justifications. Then you can start building a gazebo on your own, with friends or family. It will cost less.
But, if neither you nor your assistants understand drawings and diagrams, then it is more advisable to entrust the construction of a gazebo on the site to professionals. They will build the building exactly according to the plan, and good quality of the structure will be guaranteed.
Tools and materials
To lay out the foundation you will need an excavator.
To build a wooden residential house with your own hands, you will need the following equipment:
- shovels (for preparing a trench for the foundation);
- measuring tape, level, level, as well as cord and stakes for marking the territory;
- jigsaw, circular saw;
- concrete mixer;
- hammer.
Also required are components for preparing concrete mortar (for pouring the base), a waterproof and vapor barrier film, and insulation. If necessary, finishing materials are selected. To strengthen the foundation, metal reinforcement is used.
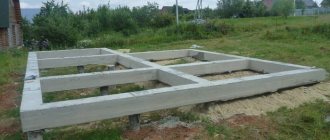
Strip foundation
This type of foundation is poured with concrete along the entire perimeter of the residential structure. Pouring begins after a pit has been dug under it, a sand-cement cushion has been installed, formwork has been installed, and there is the required amount of reinforcement that is needed to bind the concrete.
The width of the concrete pour should exceed the width of the future walls by at least 5 cm. In some places, pipes are laid along the width of the foundation for ventilation and laying communications.
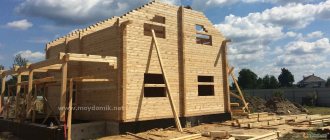
Wooden house installation technology
The work involves erecting a foundation, building a box, installing a roof, and subsequent finishing.
Foundation
For a wooden structure, you do not need to make a very powerful base: it is not very heavy. A shallow, tape-type version is suitable here. The following sequence of actions must be followed:
- Cleaning and marking the area.
- Digging a pit. Its depth is 50-60 cm, and its width is equal to the thickness of the walls with an increase of 15-20 cm. A waterproofing layer is laid at the bottom of the compacted trench, on which a layer of sand (20 cm) is poured. The pillow is compacted.
- Reinforcement and filling. Formwork is made from boards and a reinforcing frame is laid. The boards are pre-coated with moisture-repellent material. Now pour the solution. To prevent air from appearing inside, the concrete is compacted.
- Waterproofing the base. To do this, use roofing felt or coating compounds.
When arranging the foundation, you need to make a drainage system and blind area. Moisture is removed from the foundation and walls, reducing the risk of structural failure.
Walls
The logs for the walls are lifted using a winch.
After the foundation has settled, you can begin to build the walls.
- Laying the floor and the first crown. The first row of timber or logs is placed on a waterproofed base surface. Larch material should be used, as this species is the most resistant to rotting. Jute is placed between the beams for insulation.
- Installation of subsequent rows. The elements are treated with antifungal agents. If natural logs are used for construction, the corners are connected using the “bowl” or “paw” method. Profiled or laminated timber is laid using a tongue-and-groove system.
After the walls are built, a temporary roof is built. Before installing windows and doors, the house must go through a shrinkage process. When using laminated veneer lumber, this time is reduced to 6 months. During work, it is necessary to monitor the level of the walls.
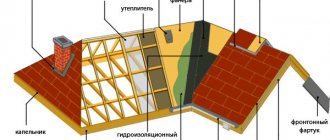
Roof
Gable roof for a wooden house
Before building a wooden house, you need to decide on the type of roof. It is best to use the gable option. The work includes the following stages:
- Floor installation. It is secured using special nails. Temporary flooring is placed on it.
- Installation of rafters. This procedure is carried out directly on the roof. Bolts are used to connect the rafter legs. The lower part of the elements rests on a protruding beam. In the area of the joints they are fixed with nails and tightened with staples. Several layers of waterproofing material are laid on top of the rafters: roofing felt or thick polyethylene film. The material is spread overlapping by 20-25 cm. Counter slats are nailed on top of the waterproofing. They are necessary to create ventilation space.
- Arrangement of sheathing. Screws are used to secure it.
- Roof decking. After this, they begin to attach the roofing material.
There are 2 options for arranging the rafter system: hanging or layered. The first option is used if the structure will rest on the side walls. She is easy. The distance between the walls is 6-14 m. The load on the capital side foundations increases. To reduce it, I use horizontal supporting elements and diagonal connecting bars.
If the house has internal load-bearing walls, you can use a layered rafter system. It has several points of emphasis in addition to the main side structures. The main support area is the ridge. Before building the roof, waterproofing and Mauerlat are laid on the walls. Lastly, the interior and exterior finishing of the structure is carried out.
Preparatory work
House drawing
If you decide to do everything yourself, you should start with a drawing of the future house. It should include the frame diagram, location of partitions, height of the room, type of roof, location of windows and doors. You can draw everything yourself.
If financial capabilities allow, we order a project from an architect or buy a standard ready-made one from contractors or developers.
Wood selection
After the diagram, we decide on the type of wood and its quantity.
For load-bearing structures, experts recommend using hardwood such as
oak or larch . Since they are able to withstand heavy loads and are not subject to rotting. pine for house cladding , since the price-quality ratio meets the needs of the building.
You will need a lot of this material. The most important thing is that all wooden elements must be treated with an antiseptic and fire retardants before installation.
Choosing a foundation
The next stage is marking the site and choosing the type of foundation.
The foundation can be piled, strip or poured with a monolithic slab.
Since a house made of boards is a lightweight building, you can safely use piles. Some, instead of factory piles in the form of a drill, use buried asbestos-cement pipes filled with concrete solution.
But in our case, we will use a strip type of foundation , for this we will need to remove the soil to a depth of 90 cm. Fill in a layer of sand and crushed stone and compact everything.
We set up the formwork from unedged boards without cracks and fasten it with self-tapping screws.
We make two levels of reinforced belt, the reinforcement is connected to each other with knitting wire.
After which everything is filled with a concrete solution, everything should be poured at one time, and then rolled with a metal roller to remove air.
It is required to wait 28 days until the concrete hardens and sets completely.
Main components
The frame of a low-rise wooden structure consists of:
- foundation;
- bottom trim beams;
Scheme of the construction of a wooden frame house
- door frame racks;
- beams above the frame;
- vertical corner posts;
- braces;
- connecting cross bars;
- basement and attic floors of the house.
Vertical posts can be corner or intermediate. The purpose of both is to connect the upper and lower trims. This is usually done using the following methods: using metal corners or using a full cut and dowels. The slopes are used to ensure that the frame does not warp or change its position when exposed to strong winds.
Common mistakes
During design, inexperienced site owners make mistakes:
They start construction without a project - this often ends in unnecessary costs. Without clear planning, it is impossible to calculate how much material will be required to manufacture a particular unit or element. This does not take into account local loads acting on important points of the building. This could end in tragedy - the house will become deformed and collapse.
Incorrect calculation of the overall dimensions in relation to the thickness of the walls and partitions. Many people forget that walls consist of several layers, as a result the diagram turns out to be incorrect.
Inadequate design of structures. Sometimes they plan to install an overly powerful foundation for a small house, and sometimes, on the contrary, a two or three-story building is made from elements that are too thin or of poor quality (metal profiles, boards, bars). In the first case, significant funds are wasted, and in the second, there is a risk of the house collapsing.
Critical components are built from raw wood - after a year, moisture will leave the elements, and then the wood will deform. In the best case, the entire building will be skewed and significant alterations will be required.
Recommendations
Construction from wood materials without preliminary antiseptic treatment is unacceptable - even in the most properly designed frame or ordinary wooden house there will inevitably be a certain amount of condensation at the sections (boundaries) of the media, of which there is much more in frame houses than in buildings made from traditional solid materials. Moistened wood, containing organic elements (polysaccharides) in its structure, becomes an excellent breeding ground for various forms of microflora and microfauna, representatives of which can easily destroy wood fibers in a short (1-2 years) period of time.
Prices for wood preservatives
Impregnation for wood
It is important that materials that can bear loads are used to cover the frame. For example, OSB must be structural and intended specifically for outdoor work.
Insulation of vertical frame walls is allowed only with rigid slabs of building insulation. Due to shrinkage and downward movement over time, fill and roll materials can only be used on horizontal parts or in roofs with a slope of up to a ratio of 1:5.
When using economical versions of low-density insulation slabs, it is recommended to secure each row of slabs with spacers between the slabs to prevent slipping. This solution will make the structure more expensive and increase the thermal conductivity of the walls, so it is beneficial to use high-quality insulation of a higher density. The size of the openings between the frame posts should not exceed the transverse size of the insulation boards - 600 mm. It’s even better if the opening size is reduced to 590 mm to eliminate gaps between the studs and insulation boards. You cannot fill the walls with scraps of insulation - there will be many gaps.