Home » Landscape design » Garden figurines and decor
Garden figurines and decorDo it yourself
Vladimir 03/23/2020
50555 Views 3 comments
SavingSavedRemoved 12
A vacation at the dacha may well replace a week at sea, especially if it is clean, cozy and beautiful. Do-it-yourself garden figures help create a unique design and bright exterior. If you put in a little effort and use your imagination, you can build extraordinary sculptures from the most accessible materials.
Introduction
Cute touches for the garden
For many people, a garden is not just a useful area for growing berries and vegetables. This is a place where the soul can rest after stressful workdays, the bustle of the city and everyday worries. Here you can recharge your batteries, relax properly, and feel relaxed.
A place that was created with love will definitely respond to you with a warm and peaceful atmosphere. Friends and relatives will be happy to come here to sit by the fire in the evening and have a barbecue in the open air. And even weeding the beds in the morning won’t scare anyone.
Of course, ready-made statues can be purchased at garden stores. But it’s much more fun to create your own, unique designs, showing creativity and artistic taste. Moreover, the process brings all participants together very closely; all family members, even the smallest ones, can be involved in it.
Avoid eclecticism
The figures should not be connected chaotically into a composition. A full-length replica of an anaconda hanging on the fence will scare not only your children, but also your neighbors.
Exclusive figurines will decorate any garden, already blooming or just beginning. Below is a selection of interesting stories.
What kind of figures are there?
Phlegmatic Tortilla
You can come up with and implement any ideas. Some people want to “plant” fancy flowers in their yard. Or make original flower beds and flower beds for living plants.
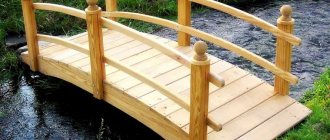
Others want to elegantly design garden paths, hang an unusual swing, create a chic lantern or outdoor washbasin. Some people have magical gnomes and good fairies, forest animals or pets “living” in their dacha.
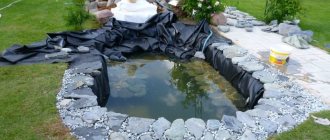
A country yard with a pond is inhabited by frogs, flamingos, fish, and its banks are skillfully decorated. In a corner you can create a funny clearing with porcini mushrooms led by the important fly agaric. Without limiting their imagination, they create entire fairy-tale towns with different characters.
Fans of abstract art will love the options for casting their own unique statues. Working with polyurethane foam helps to build unusual and unique structures.
Even from old iron rods, waste wire and ordinary cobblestones you can create chic things.
Background Definition
The bright background of the area for the composition plays no less a role than the figures themselves. If they are separated from each other even visually, change something.
A small sculpture or craft, say, the family of the old woman Tortilla (turtle) will get lost among the foliage. It is better for them to be in an open place, near paths. Place large items near the pond, among the non-spreading conifers.
Remember where your site is less congested - near the fences. Decorate it, and it will become a wonderful backdrop for a nearby composition or a solitary sculpture, for example, snow-white swans (we’ll tell you how to make them below). Any thing should not stand out from the garden landscape and its style.
Before you start creating
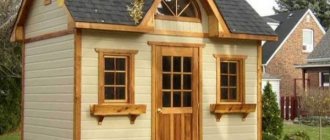
A hut on chicken legs
In any work, even creative work, adherence to general rules and adherence to the concept are required. Garden decoration is no exception. Otherwise, you risk creating a tasteless landscape of chaotic objects, the puzzles of which do not fit into a coherent picture.
So, check out these helpful tips before you start:
- Pre-select the places where the figures will be installed. For some of them it will be necessary to prepare the foundation. This should be taken into account so as not to interfere with the growth of garden crops
- Look around your garden and determine what style its design belongs to. It could be a Japanese design or a simple rustic country style. Or maybe there are romantic accents or elements of the high-tech genre?
- It is necessary to clearly understand that cute colored hearts and balloons will not fit into the world of metal structures, and fairy-tale characters will feel strange in the exterior of the Japanese landscape
- Let the size of the figurines be combined with the size of the rest of the garden items. For example, among large trees you can install a large mushroom. And next to low bushes it is better to place small gnomes or lambs
- All designs must be compatible with each other. If you have chosen the theme of children's fairy tales, you should not add iron lizards made of nails and nuts, abstract geometric spheres made of cement, or wooden bicycles with flower pots.
Practice moderation. Sometimes it's so hard to stop, especially once you get the hang of it. However, several funny figures in different corners of the dacha look much more harmonious than a pile of them over the entire area.
Theoretical preparation
Garden sculptures have had a special meaning for quite some time now. Figurines for the garden or a completed small composition must be in harmony with the green landscape and the chosen style.
A great idea for a garden would be furniture with elements cast from epoxy resin. Such furniture will become a beautiful decoration and functional part of your garden.
Their images are taken from the folklore of different countries: Lesovichki, or goblin, house-elfs, kind Shubin - the joker of miners (Slavic mythology), nymphs (Greek brides, good forces), gnomes (Western European dwarfs, guardians of the subsoil).
The latter had consonant or identical names - Gloin, Balin, Dvalin or Dori, Nori, Ori. Children quickly remember them like nursery rhymes.
And more often than others, it is gnomes who are “settled” in gardens. If you can’t make their own plaster figures, buy them at garden supermarkets.
What are sculptures made of?
Final stage: painting
The most popular materials are:
- Old car tires
- Unnecessary plastic bottles and eggplants
- Gypsum
- Cement
- Polyurethane foam
- Wooden blocks, logs, winding driftwood
In addition to the specified raw materials, be sure to prepare primer and decorative paint, metal rods for frames, construction glue, protective gloves, scissors and pruners, and other auxiliary tools.
Flowerbed made of stone
Its secret is in a harmonious composition and the ability to occupy a currently empty plot of garden territory. Take a 2x2 meter square of land and draw several circles in it, spaced apart from each other. Fill each cone, no more than 20 cm high, with clay and crushed stone, and fill it with thick cement. Before it sets, line the cone with stones.
If there is a lake or sea nearby, it is better to use rounded pebbles. Plant so-called border flowers between the cones so that they do not cover the stones.
Master class on creating decor from plastic bottles
Country crafts made of plastic
Plastic bottles are a favorite material for amateur garden decorators. It has a lot of advantages:
- Long lasting, durable
- Easy to work with and easy to paint
- Can be fixed and installed
- Available and cheap
And also, it allows you to create amazing things: cool animals, luxurious birds, graceful flowers . Let's look at a few simple options.
Pink flamingo
Pink flamingo
Pink flamingo This bird looks graceful and incredibly beautiful. Despite the apparent complexity, creating this miracle is not at all difficult. Flamingo will fit perfectly into the design of your garden, giving it a sophisticated piquancy .
Prepare: 4 plastic eggplants, 1 liter bottle, hose, 1 lid, 3 metal pins, pink paint, brush, large scissors.
- Take a whole bottle with a lid and make a hole in it. This is the body of the bird, and the neck will come out of the hole. At the bottom, make holes for two metal rods that will act as legs.
- Cut the remaining bottles. Cut them into long, narrow feathers. Cut the edges of each feather around the entire perimeter into thin strips
- Make thin cuts in the upper part of the flamingo's body and insert feathers into them. The number of holes should match the number of feathers. Insert shorter specimens closer to the neck; in the tail area, on the contrary, insert long ones.
- Insert the bent rod into the neck area and place the hose on top. Attach the head to the end. It is made from a part with a neck from a cut-off liter bottle
- Attach rods-legs to the bottom
On average, the height of the figure is 1.2-1.5 m. To make it stand steadily, you can pour a cement foundation. Finally, paint the bird with paint, and the leaves, body and head can be painted in advance.
Daisies
Wonderful and bright daisies
Daisies To make these wonderful daisies, prepare metal pins and a hose for the stems, eggplants and paint. Cut even petals and leaves from the walls of the bottles. Use the bottoms as the core.
Glue petals to the inside of each bottom with construction glue. Place the structure on the rods with a pre-attached hose. Attach leaves and paint each flower.
Bells
Delicate bells
Bells Study the picture: it’s easy to repeat the design even without step-by-step instructions. Metal tubes for stems, bottles with caps, wire for securing inflorescences and scissors for cutting will come in handy.
Finished bells (cut, bent and painted) are attached with wire to the stems, which are securely connected to each other in the lower third of the base and dug into the ground
Piggy
Cool family
Pig It's even easier to create pink piglets. Find bottles and eggplants of different sizes and fill them with sand. Cut one and cut out the ears that need to be inserted into the “head” area.
Next, simply paint the pigs pink, including the lid. Draw the eyes. Make a neat patch with nostrils using black varnish.
Choosing a landscape design style (photo examples)
When choosing figures, it is worth remembering the design and following the overall theme, which will be in harmony with the style of the site. If the garden area is decorated in a country style, feel free to place gnomes and figures of domestic animals - roosters and hens, goats, cows, geese, ducks, etc.
The oriental style dictates a limitation in figures, so one large statue of Buddha, a stone lantern, a crane or a dragon will be enough. It can also be almost any creature frozen in meditation. Japanese gardens are designed in the spirit of minimalism, and stones rather than figures should predominate in them.
Provence is similar to a rustic theme, but sculptural elements should not be painted in all the colors of the rainbow; choose white, sand and gray shades. Lavender colors would also be appropriate.
, the high-tech style is the most difficult for the home craftsman. But a couple of concrete balls (cubes, rhombuses, pyramids - other geometric shapes) will successfully emphasize the taste of the owner of the site. Modernism is not very common in Russian regions, but European practice is gradually winning over our owners of private houses. Laconicism, whimsical forms and asymmetry are the main points of this style.
Today there are many fans of the Greek style - to recreate it, sculptures of ancient Greek goddesses, amphoras and fragments of columns are placed on the territory. It is difficult to create such products with your own hands, but it is possible - even a wine bottle can be turned into an amphora.
In English design, garden figurines are practically not used. Lovers of everything British can decorate a flowerbed or lawn with their favorite characters from English fairy tales such as “Alice’s Adventures in Wonderland,” “Harry Potter,” “Winnie the Pooh and All-All-All.”
ECO style does not accept rubber or plastic. Wooden, metal or stone products would be appropriate here. Figurines and garden items with a rustic theme will fit perfectly into the eco-landscape.
Experimenting with wood
Wooden figures
Wood, unfortunately, is not durable. It fades, so the colors of the figures will need to be updated from time to time. It also gets wet from moisture, so the statues should be covered during rain and wrapped securely for the winter.
But such structures fit perfectly into the rustic style and look very cozy and pretty. The parts are connected to each other with ordinary nails, so the structures are quite strong.
Goat
Goat made from birch chocks
Goat To make such a goat, find two birch logs. Make holes into which you will need to drive the neck and 4 legs. Prepare narrow sticks for these body parts.
Connect all the parts and secure with nails and a hammer. Attach horns. If desired, you can draw eyes and a mouth on the “muzzle”.
Other options
By analogy with the previous option, you can make different animals:
Deer
Donkey and wooden men
Pigs
Imagine yourself as a sculptor
The romance of the garden, even with an abundance of flower beds and a gazebo in the center, will be lost if you do not place monochromatic sculptures of people or elegant crafts with subtle contours.
Do you miss country life? Learn how to make figurines for the garden, and arrange wooden homemade livestock and birds.
Plaster creations
Gnomes guard the country Christmas tree
Gypsum is a very convenient material; it is strong, durable and water resistant. Paints fit perfectly on it. Working with such raw materials is a pleasure.
So, the first thing you need to do is go to a hardware store and buy the necessary form for pouring. Silicone ones are best. Let's look at step-by-step instructions using a plaster gnome as an example, but you are free to sculpt any other character.
- If you plan to sculpt a tall statue, more than 1 m in height, you will need to make a metal frame. It’s better not to bother and create a short figure up to 0.7 m. This way it will become lighter in weight, it can be lifted, rearranged, put away in the garage for the winter
- Following the instructions on the plaster packaging exactly, dilute the composition with water. The mass is mixed well until it has a homogeneous mushy consistency. To make the material elastic, PVA glue is poured into it. Approximately 10 g per 1 kg of dry gypsum
- Now fill half the volume of the mold with the prepared solution and let it set. Then fill the container to the top. Lightly tap the sides to release the air.
- The form is removed only after the gnome has completely dried. Give him at least two days
- The painting stage begins. First, prime the entire surface. After this, you can apply colored paints, and after they dry, varnish for better color preservation.
Romantic swans
You need two tires with a diameter of up to 80 cm. Mark half the circle, cut out a long neck and an elegant head from its chassis. From the rest of the sides, cut out like leaves, this is an imitation of feathers.
Place two swans, painted with white acrylic, one after the other on a green lawn. It is better and easier to make cuts using a grinder.
Decorative flower pots (plant pots)
Unusual cement pots
In addition to heroes from fairy tales, animals or little people, unusual flower beds, flower beds and pots organically fit into the country decor.
- Prepare cement mortar. Take an empty waste bucket and a large rag. Thoroughly rinse the material in the cement and place it on top of the bucket, evenly distributing the folds. When the structure is dry, the bucket is removed. To do this, you need to carefully tap it with a hammer. In front of you will be an unusual vessel made of a frozen rag.
- Old tires are used under the flowerbed. If desired, they are simply decorated and flowers are planted inside. And also, the inner circle can be cut into cloves and turned outward - it will turn out beautiful and elegant
- Cut large 20L plastic bottles and paint them a bright color. Arrange them in an interesting ensemble and plant them inside the plant. Just don’t forget to make holes in the bottom so that water doesn’t stagnate after watering.
- Make a cement cast of the head of an unwanted children's doll. Coat it with the composition, leaving the top untouched, and when the substance dries, remove the plastic. The stone head needs to be painted for aesthetics. The soil is filled inside and flowers are planted.
- Vessels are made from balloons in the same way.
Scales in the wind
The wind can be a “composer” if you create an instrument for it. Find plastic flower pots at home, larger ones in the center, smaller ones around.
Paint it with bright colors, and wrap at least one with food foil - the sun will shimmer on it, and the thief birds of your harvest are afraid of this. Hang it all on a hook at a height of up to 2 meters. The wind itself will create music, shaking the pots and rattling them.
How to insulate a balcony?Vertical gardening of an apartment: how to do it right
- Dwarf conifers: types and benefits
Country ideas made from cement
Mushrooms for the garden made of cement
Mix the cement mortar.
The mass should be thick and homogeneous. Remember simple proportions: 1 part sand to 1 part cement. Water is poured in portions, checking the consistency and constantly mixing the raw materials.
Openwork ball made of ropes
Braided rope sphere
Openwork ball made of ropes Dip a thick rope into cement. You can tear old clothes into strips and sew the ends together. Wrap them around a large balloon, wait for the composition to harden, and pop the balloon.
Gnomes
Cement gnomes
Gnomes Here we will tell you how to make a gnome without buying a special silicone mold.
What you will need:
- Solution
- Metal pin
- Ropes
- Nylon stocking
Stages of work:
- Pour cement into the stocking and insert an iron rod there for stability.
- Select the area of the nose with your hands and twist the rope there. It should be a round ball.
- Make round legs, similar to how you made the nose.
- Under your nose, place a piece of thin rag folded in half, previously dipped in cement. It will be a beard
- Pull the stocking over the pin, secure it and hang its end to the side to create a sharp cap with a tassel.
- When the structure is completely dry, it is coated with a cement-gypsum mixture. This way the colors will fall on the surface better and brighter.
- Color the new dacha resident
It is necessary to work with the cement mixture wearing gloves. Make sure that it does not get into your eyes or mucous membranes. In case of contact, immediately rinse the area with plenty of running water.
Dragon eggs
The mystical beauty of dragon eggs
Dragon eggs Add a little mysticism and mysterious paraphernalia to your garden design. How do you like the idea of placing real dragon eggs in a thicket?
- Take regular balloons and spread them with cement mixed with plaster until about the middle of the mold
- Let the edges of future eggs be jagged
- Remove the ball when the shell is dry
- Now paint the inside of the egg with yellow paint with reflective or glare particles. This will create the impression that the shell is emitting a fiery light from inside.
In the evenings, you can place lit candles inside.
Vegetation
Stone leaves
Vegetation Look for large, thick leaves with a raised vein pattern. Plantain or burdock will do. Carefully apply a thin layer of cement on them. Make sure that the mass exactly follows the outline of the leaf.
When the substance dries, you will get nice stone sheets that can be intricately laid out near a pond, around a fire, or to decorate a gazebo. Use your imagination and create a whole composition from different crafts made from cement.
From toys
Fairytale fairy statue
From toys Elegant garden statues can be made from ordinary toys. Take, for example, a Barbie doll, put it in an interesting pose, put on a fluffy dress, and dip it in a cement composition. Shake off excess, wait until dry and cover with white paint or lime in several layers.
If you want a garden fairy, first attach fairy wings from a plastic bottle to the toy. Place cement hares, cats, and dogs next to it. Any animals that have taken a cement bath in the same way.
Other interesting ideas from scrap materials
Let's look at a few more ideas for making figurines for garden decoration from simple scrap materials.
Pebble figurines
All you need is pebbles and paints. Select stones of different sizes, degrease them and coat them with paint, following the color scheme of the ladybug - in a black and red palette. The designs can be anything from cats to entire paintings: such stones always look stylish and appropriate.
Vegetable sculptures for Halloween
The most short-lived, but such a bright and seasonal option for decorating your own garden.
It’s a good idea to spend part of the pumpkin harvest preparing for Halloween and carving fancy creatures out of them. The most popular figure is the Jack-O-Lantern. What you need: pumpkin, knife, candle.
Instructions:
- Wash the pumpkin thoroughly and rub with a soft cloth until shiny.
- Cut off the top and remove the seeds with pulp. Don't throw away the hat with the ponytail - it will come in handy.
- Using a marker, draw holes - mouth, nose, eyes.
- Use a knife to cut holes along the outline.
- Place the candle inside the pumpkin, set it on fire and cover the melon with a “lid”. Jack Lantern is ready!
You can create absolutely any face from a pumpkin.
Ice sculptures
During the cold season, it’s easy to decorate your yard with more than just a snowman! Make spectacular ice balls.
You need balloons, empty bottles, water, a funnel, food coloring (experienced craftsmen suggest gouache) ... well, you need frost. If you have a freezer, freeze in it, and when there are severe frosts outside the window, about -20, feel free to use natural temperatures.
It is better to make balls with a diameter of 10-15 cm per 1.5 liters, because large 3-liter balls may not withstand frost and burst (although then you will get hemispheres, which are also useful).
Manufacturing process:
- Dissolve a standard jar of gouache from a regular children's paint set in 0.5 liters of water. This way you will get a bright concentrate.
- Pour the solution through the funnel into the ball “to the brim.”
- Place the ball on the water tap and get the required amount of water if there is not enough water.
- Tie the ball and freeze it. If there are a lot of balls, it is better to freeze them in their natural environment - by spreading the balls in the snow.
- Leave it overnight. In the morning, remove the “wrapper” and decorate the area with balloons!
If there are no paints, then inside the balls you can put glitter, New Year's tinsel, dried flower petals, berries and fruit slices, spruce branches and small cones, and grain. Fill the balloons with water and freeze. You can also use medical gloves, silicone muffin tins, plastic cups, etc. instead of balls.
We work with old tires
Fence made from car wheels
Car tires are a universal material. They are used to make figures, country furniture, flower beds, borders, steps, and swings. Rubber is cut, painted, bent and twisted.
We offer 5 cool ideas for using tires in the garden exterior:
- Bright border. Cut each tire in half and plant the cut sides into the ground. Paint it in cheerful shades
- Picturesque hedge. When there are a lot of tires, you can use them to lay out a wall, stacking them in a checkerboard pattern on top of each other. Fill the soil inside and plant grass - you will get an amazing flowering fence
- Wall flower beds. Just hang the tire on the wall, fill it with soil and plant flowers
- Swing . First, the wheel is painted and a board is nailed to the bottom to cover the hole. It is then suspended from a tree by a chain or rope
- Animals . Two small tires are dug horizontally into the ground. One large one is installed vertically on them and another smaller one on top: the torso and head
Bear made from car tires
One wheel is cut separately and cut into strips, from which paws, ears, and a tail are formed. A muzzle is drawn on the top tire. The animal is decorated and, if necessary, supplemented with tails, horns, and different paws.
Features of decorating a site with garden figures
The main purpose of garden figurines is decorative, but they can perform a practical function and serve:
- flashlights;
- stands for hanging and climbing plants and flowers;
- bird feeders and drinkers;
- decoration of artificial reservoirs;
- seats - these can be all kinds of original stones or stumps on which you can rest, etc.
The decor should be in harmony with the landscape design and buildings on the site - a country house or a permanent house.
In a good, solid yard with a house made of modern materials, products made from car tires or bottles will look out of place - more noble materials are needed: stone, wood, metal. And on a modest summer cottage, all kinds of “handicrafts” from whatever comes to hand will be quite appropriate.
The main thing is to feel the style and not create bad taste. It’s enough to love your site, feel its beauty, use detailed instructions, and you won’t need a landscape designer.
How to properly decorate a site with figures?
When decorating a site, follow these important rules:
- Compliance with landscape style . Choosing a rustic design means forgetting about plastic and giving preference to natural materials.
- Amount of decor. Don’t overdo it and use the golden rule – it’s better not quantity, but quality. It’s better to have one large, well-executed element than a dozen small, botched items.
- Choosing a location. If you are not sure whether a garden figure will look good in a certain place, use cardboard models that can be made, for example, from boxes of household appliances. It’s a good idea to draw up a diagram of the site on paper with an accurate drawing of future elements.
- Size. This plays a role in landscape design. Place miniature figurines on a low, trimmed lawn, and place larger elements next to bushes or in areas with tall grass.
- Create compositions . It’s not a good idea to place decorations alone around the area. Use it to decorate and create a flower bed, garden path, fountain or pond.
When is decorating with shapes a bad idea?
Homemade products do not always look organic. The worst thing is when the decor is made of poor quality, from the cheapest materials and according to the most “ancient” instructions. If your grandmother decorated her dacha or yard with rubber tires, simply laying (digging) them around the area, it is not necessary to repeat the experience of generations - it is better to take a modern approach to the issue.
If there is already purchased decor on the territory, but you are “pushed” for creativity, remember that homemade and purchased figures will be different, therefore, it is better not to mix them in one composition.
If you bought gnomes in a store and decided to build them a house, “brothers”, Snow White or precious stones, it will go together beautifully.
Foam sculptures
Curly sheep
When working with a spray can, follow safety precautions and carefully read the instructions. Wear protective gloves and do not work near fire. This material is very popular in the independent decoration of summer cottages.
Firstly, it is practical, inexpensive and lightweight. Secondly, after drying, the foam is easy to cut and give the figure the desired shape. Thirdly, it is not afraid of weather conditions, does not get wet, does not freeze, and does not deteriorate from the heat.
To create figures from polyurethane foam, a frame must be prepared. In essence, the foam helps to present the statue's shell beautifully. The foundation ensures the strength and stability of the structure.
We'll tell you step by step how to make a cute sheep:
- Make a base from plastic bottles: stick 4 legs from one and a half sheets into the body from an eggplant. Attach a can of cans to the place of the head
- Shake the can and start spraying foam. Make sure that the “wool” lies evenly. After the material has dried, it will become clear where it needs to be added.
- Dry foam is cut with a stationery knife. Give the sheep a round shape. Sand it with sandpaper to make it smooth
- Paint the animal with soft yellow paint, draw eyes, and color the hooves
Character for a fairytale atmosphere
As you can see, garden figurines are very easy to make with your own hands. A minimum of skill and special skills are required. You spend virtually no money, while creating a unique and unique design for your site.
No design project, no complex installation, no huge list of materials is required. If desired, you can use any construction waste, cement residues, old bottles and unnecessary tires. Add a little paint, a little imagination and a pinch of enthusiasm.
Surprise your guests with your site and enjoy it yourself. Free your patio from boredom and monotony, protect it from a banal, albeit newfangled, landscape style. Let fancy flowers grow here, fairy-tale characters appear and funny animals from the magical forest settle here.
DIY garden figurines
Watch the video, the author of which gives summer residents and gardeners fresh and original ideas for creatively decorating a country plot with their own hands:
Decorating the garden with tires
Do you think that decorating a garden with car tires is bad manners? But no! Take a look at these works of art and you will change your mind. True, not everyone can do this, but creative people are capable of this, if only they had patience and inspiration.
We will teach you how to make simpler figures, but anyone can make such products.
What will you need?
First of all, you will need to take car tires (tires) that have already served their purpose. Winter, summer, studded, universal tires, from a car or truck - it doesn’t matter.
You can even make a swimming pool out of a large tractor wheel. And small but very interesting designs are made from old bicycle tires. Tires from wheels from a car or a children's bicycle will also find their use.
You can cut tires with a grinder (the thickest ones), with a sharp knife, but best of all, with a jigsaw. Fasten with self-tapping screws, bolts, staples - it all depends on your tools, experience and the type of figure chosen.
"Swan": step-by-step instructions
A tire swan is one of the easiest figures to make yourself.
You will need for work:
- tire (one tire per swan);
- electric jigsaw or other sawing tool;
- wire for frame;
- chalk;
- colors - red for the beak and black/white for the eyes and plumage.
Manufacturing scheme:
Procedure:
- Using chalk or a white rubber marker, draw a sketch on the tire. You can work even without a stencil - apply the pattern directly to the tire.
- Cut along the contour with a jigsaw to get the outline of the swan's body in a spread, as shown in the picture above.
- Turn the tenderloin wings side up.
- Insert a wire frame into the body to help the swan hold its shape.
- The swan's beak should be red. If desired, paint the body white. Choose paint for exterior use. Dry the product.
- You can also use a tire as a stand.
The process of creating a swan from a tire with your own hands is shown in the video below:
Rubber and plastic
The use of plastic and rubber is considered by many environmentalists to be a violation of boundaries. After all, instead of being recycled, bottles and rubber tires decorate vegetable gardens.
On the one hand, they are right, but on the other hand, the industry in the country is not yet fully developed to cope with such volumes.Creating new useful products in the form of plastic shovels, watering systems, fencing is a good opportunity to give life to this material.
After all, this is much more humane than leaving it to rot in the ground for several centuries.