In a private household or on a summer cottage, an area is always allocated for placing vegetable gardens, flower beds, beds, greenhouses and other areas for growing crops and ornamental plants. To cultivate this farm, a large amount of gardening tools is required, as well as bulky equipment for field work. All these items need to be stored somewhere. It is inconvenient to place such equipment in a residential building. Therefore, the best option for storage would be an outbuilding.
Purpose of the utility unit
So, what is a utility unit and what is it for? Basically, a utility block is a building used to store various types of gardening equipment and tools. But this is not the only purpose of this building. After all, with the help of the additional space you receive, you will be able to unload the house from things that seem to be no longer needed, but it would be a pity to throw them away. Also in the utility room at the dacha you can install a summer shower, a summer kitchen and even keep livestock or poultry in it.
In our review today, especially for you, we will describe in detail one of the options for constructing a building measuring 5x2.5 meters. And the most important thing is that you yourself can implement all this with your own hands. Below we will provide several drawings with dimensions, photos and videos of buildings.
You will need: choose a location for the structure, the necessary tools and, of course, materials.
Projects
In order to make a utility unit for your dacha, it is not necessary to develop the project yourself. It is enough to go to the manufacturers’ websites and select the desired option for the required layout and functionality. There will even be basic dimensions and drawings - all that remains is to finalize the detailing and fastening points. But this is not difficult, given the simplicity of the design.
Here is an example of the most popular options:
- Economy class.
- With a canopy.
- With a woodcutter.
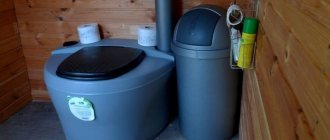
- With toilet.
- With shower.
- With toilet and shower.
- With a veranda.
- Insulated with a rest room.
dizlandshafta
Location
You choose the place for construction at your personal discretion, the main thing is that it is convenient for you. But there are still limitations. They are prescribed in the Construction Norms and Rules (SNiP 30-02-97) and Sanitary Rules SanPiN (SP 53.13330.2011). The diagram shows the distances that must be observed when installing buildings, depending on their purpose.
Objects layout diagram
To avoid future problems with disgruntled neighbors, it is better not to neglect these rules.
Materials
The choice of material must be taken very carefully. You will need:
- lumber (edged pine board with a section of 150x50mm and a section of 100x20mm);
- Pine beam with a section of 150x150 mm;
- screw piles with a pipe head with a diameter of 89 mm;
- door block with a door (you can make it yourself);
- OSB panels for frame cladding;
- Wind and waterproof membrane (can be replaced with polyethylene film);
- Extruded polystyrene foam in slabs with a thickness of 30 to 50 mm (not necessary, it is only needed to insulate the building);
- galvanized corrugated sheet;
- metal corners, wood screws, nails and staples for a stapler;
- exterior paint;
- dry cement-sand mixture;
Options for rapid construction of outbuildings
More often than others, frame outbuildings are built or made from blocks.
Budget designs
You can build a frame shed with your own hands cheaply and quickly, and very simply in a week; no construction skills are needed.
The wooden frame is installed on the base. It is filled with insulation and sheathed with decorative material.
Pros:
- the frame is lightweight, which does not require a powerful foundation;
- the structure is quickly erected and does not depend on fixing the mortar;
- finishing material is used at the request of the owners;
- heat is retained inside if the seams are joined correctly.
Minus:
- there is a fire hazard. Treatment with fire retardants and non-flammable insulation reduce the risk.
Outbuilding made of blocks
Build a garden shed with your own hands from expanded clay blocks, foam blocks, cinder blocks, if it will be used in winter.
A strip shallow foundation is being prepared. An element of its strengthening is reinforcement. The walls are laid with bandaging of the seams.
Advice: to increase the frost resistance of the structure and reduce moisture absorption by the blocks, exterior finishing is required.
Foundation
One of the options for constructing a foundation for a utility block, which we will describe here, is a foundation made of screw piles. It is ideal for frame buildings, can be installed on any type of soil (except rocky) and will only take one day to install.
We start by marking the area for the building using a tape measure, nylon cord and pegs made of reinforcement or wood. For our utility block at the dacha measuring 5x2.5 meters, we will need to install six piles: four corner and two in the center. We take a step between them of two and a half meters. In order not to waste time, before marking we paint the piles with quick-drying paint.
Marking
After the markings have been made, in the places where the piles will be installed, we dig a recess the width of the screw blade and a depth of about 20 cm. We place the pile in the prepared recess and screw it in to the depth required for self-fixation vertically. Measuring its vertical position with a building level, we align it to the desired zero mark.
Screw pile installation process
Next, we screw in the screw pile clockwise until it screws in. You will feel this moment when the pile seems to hit the stone.
During the screwing process, do not forget to check the vertical position with a level. The ideal ratio is two people screwing, one directing.
So we tighten all six piles one by one. According to the vertical position of the ground level, we measure 20 cm from the highest point. We make a mark at this place and cut off part of the pile with a grinder. We align the remaining piles relative to this cut, cutting them off as well.
Trimming a screw pile
The horizontal mark between the piles can be measured using a hydraulic level and a flat board or pipe.
When all the piles are cut, we fill them with a cement-sand mixture and install metal caps on which pieces of roofing material or waterproofing will need to be laid.
You might be interested in: How to build a gazebo at your dacha with your own hands
Where to put the utility unit
We will talk more about those that are built for more than one season to service the construction of a residential building. Do not place sheds in the lower part of your site, otherwise you will have to drain storm or melt runoff from it using drainage methods.
As a rule, sheds are built remotely from your home and the neighboring property. Here you need to study the standards for the neighborhood and placement of your buildings.The roof is sheathed with boards, and if necessary, it is insulated with special heat-saving boards, and then covered with metal sheets - on a single or double slope.
Frame
We will make the frame of our utility unit from edged pine boards with a cross-section of 150x50mm.
So, we cut boards to the following sizes:
- 5 meters – 6 pieces;
- 3 meters – 8 pieces;
- 2.5 meters – 25 pieces;
- 0.5 meters – 8 pieces;
We treat them with fire bioprotection. To do this, simply apply the liquid with a brush or roller to the surface of the wood in two layers with an interval of one hour.
Wood processing products
We make the supporting frame from 50x150 boards. Sizes of blanks: 5 meters – 6 pieces, 2.5 meters – 9 pieces. We cut out the landing grooves.
We fasten the blanks together using corners, screws and nails.
If you fasten the structure only with corners, then there is a risk that the screws may break when the parts are displaced. It is in order to minimize these risks that we additionally fix the structure with galvanized nails 100-150 mm long.
We assemble the lower frame and subfloor beams from 50x150 mm boards. It is recommended to set the pitch of beams, as well as vertical posts, from 550 to 600 mm.
Next, we install vertical posts. For fixation, we use temporary guides, having previously aligned the racks to the level.
We assemble the upper harness in a mirror image of the lower one. We fix all structural components with corners, screws and nails.
Next, we assemble the frame of the pitched roof. The slope of the slope should be directed away from the facade.
Roof rafter assembly diagram
We install door and window blocks.
If you use raw or overdried lumber during assembly, then deformation of some components is inevitable.
Therefore, it is very important to know the following:
- lumber with a high level of humidity will shrink in size when dried;
- overdried lumber will expand as humidity increases.
Be sure to take this into account when assembling the frame!
As a result, we should get a box like this.
The frame is sheathed around the perimeter and on top with a wind- and moisture-proof membrane. Using a stapler, we fix the material with staples to wooden beams and posts.
You might be interested in: How to build a summer shower for your dacha yourself
Step-by-step instructions for making a utility block on the site with your own hands
The construction of the frame structure of an outbuilding is carried out in several stages, which are conventionally divided into:
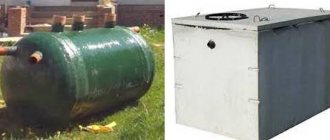
- Preparing the foundation for future construction. This stage consists of studying the soil in order to select the right type of foundation, as well as carrying out excavation work and pouring a concrete foundation. If the utility block combines a toilet and shower, then you will need to dig a pit and make trenches for sewer pipes.
- Manufacturing of frame structures. At this stage, the upper and lower trim, support posts and cross beams will be designed.
- Installation of flooring. This stage includes strengthening the joists and laying the subfloor.
- Construction of building walls, external and internal coverings, as well as installation of insulation, waterproofing and vapor barrier layers.
- Making a roof. At this stage, floor beams are installed and the rafter system is manufactured.
- Roof installation. These works include fastening the roofing material using modern technologies.
Sheathing
External cladding is made with OSB panels using self-tapping screws or nails. They can be replaced with clapboard, moisture-resistant plywood or the same corrugated sheet. If you have chosen OSB, we recommend painting the panels with façade paint after installation.
Insulation
If you plan to use the utility unit for garden tools, then you can skip this section. But, if you use it for other purposes during the cold season, we recommend that you insulate the building. To do this, use slabs of extruded polystyrene foam measuring 600x1000x50. Fixation is done with glue or self-tapping screws. Fill the corners and joints with polyurethane foam and seal the top with reinforced tape.
Additional features
The shed itself is a convenient and useful building, but it can be used not only for storing equipment and garden supplies.
You can combine this building with a woodshed. To do this, part of the building is sheathed not with continuous cladding, but with gaps - for better ventilation of firewood. The roof and foundation remain the same.
You can place pumping equipment for a well in a common or separately built shed.
Allocate part of the room or use it entirely as a poultry house.