The essence of the problem
What is a shower cabin essentially? This is a small isolated room in which you can take a shower directly in your own home, without worrying about pouring out and splashing water. To perform its functions, the shower cabin must be equipped with:
- water supply system;
- plumbing devices that allow you to regulate water pressure and temperature;
- a tray for collecting water and ensuring its flow into the sewer;
- walls to prevent splashing.
To decide how to make a shower stall, it is necessary to consider the basic requirements for such a design:
- Area and volume. The dimensions of the cabin are selected based on the convenience of a person taking a shower, taking into account his body type, as well as the desire to place additional equipment inside (for example, a washing machine).
- Water leakage protection. When installing shower cabins with your own hands in a wooden house, it is especially important to prevent moisture from the wood on the floor and walls. To do this, they must have walls that eliminate the danger of water splashing outside the cabin, and its entire volume must be collected in a tray and sent to the sewage system. Reliable waterproofing of a shower is the most important requirement for its installation in a wooden structure.
- Compliance with sanitary standards. A shower stall in a private home must fully comply with sanitary and hygienic requirements: the absence of drafts, the elimination of unpleasant odors and stagnation of wastewater, ensuring good drainage, eliminating constant standing in water, the use of environmentally friendly materials and preventing the appearance of mold, fungi and pathogenic microorganisms. An important condition is the presence of ventilation.
- Eliminates the risk of falling due to bare feet slipping.
- Aesthetic factor. Naturally, the shower cabin should fit optimally and harmoniously into the overall interior of the house.
- Isolation. It is better to take a shower if the person inside the cabin feels completely protected from prying eyes.
Choosing a place for a shower in the country
Before you start building a summer shower, you need to determine exactly where it will be located. Basic selection rules:
- Place the shower stall in a sunny location. It is advisable to find an area where the sun penetrates throughout the day. Then you can rinse off with refreshing water at any time.
- The shower stall should be located on a hill for the best drainage of water. When using a shower, you will use a large amount of water. Stagnation of water under the cabin is fraught with erosion of the soil and, as a result, loss of stability of the structure. Also, stagnant water will lead to unpleasant odors.
- No drafts or visibility. Despite the fact that the wind is warm in summer, the presence of airflow can bring you a lot of trouble.
It is worth considering that the location of the shower in the most visible place is not desirable from an aesthetic point of view.
Shower room layout and plumbing layout
Of course, it is much easier to plan a future shower room in a house under construction. In this case, imagination is almost unlimited:
- construction of a shower room with a sloping floor;
- device for a tray “recessed” into the floor;
- installation of a monolithic pallet with a side;
- installation of a finished pallet;
- connection of a modern shower cabin.
So, to organize a sloping floor, even at the construction stage, its level must be made lower than the floors in the remaining rooms by at least 10-15 cm. The same applies to a shower with a tray, the edges of which are located at floor level - so that you do not have to make a threshold into the bathroom.
If you need to re-equip a shower room in a finished house, but it is not possible to dismantle the floors, you will have to limit yourself to only the last three “floor” options. Their advantage is undoubtedly - such a shower can be made with your own hands, even without professional skills.
There are two types of pipe routing - tee, or series, and manifold.
In the first case, all water points are connected to the main pipe using tees. This is the simplest wiring option that does not require a lot of materials.
The second method is much more complicated - first the water enters the collector, and from it separate pipes go to each object - sink, shower, toilet and other appliances. This solves the problem of pressure drop when several water intake points are turned on simultaneously.
Without special skills, it will not be possible to make a collector system correctly, so in houses built with your own hands, they use a series connection. And to prevent boiling water from pouring out of the shower when filling the washing machine, it is enough to use pipes of different diameters - 3/4" for the common pipe and 1/2" for connecting appliances.
Another important point is the organization of drainage from the shower. When choosing a siphon, you need to decide in advance:
- With the type of siphon - pipe, bottle or siphon-trap. Pipe siphons often become clogged due to the corrugated inner surface, and bottle siphons require a lot of space under the tray. The drains are universal and can be mounted directly into the floor - their height is about 8 cm.
- With the type of pan - monolithic or with access to the drain. In the first case, only drains with a diameter of 90 mm are suitable - they can be cleaned directly through the hole. If you have access to a siphon, you can even choose ones with 52 mm holes.
- With the number of connections - the more there are, the higher the chance of leakage in the future.
When choosing a place for a shower, the distance of the sewer connection is important - if it is more than 3 m, you will have to do deaeration to remove the air coming with the water.
Capacity: tank, barrel or water tank
The minimum volume of the water tank should be 100 l, the maximum – 500 l. A heated shower container is installed on support posts above the shower. Please note that the material from which the summer shower tank is made should not be susceptible to corrosion. The best option would be plastic or stainless steel. If you choose the plastic option, you need to not only install it on the supports, but also tie it to them. Because in the event of strong gusts of wind, the empty container may fall.
It is best to purchase a flat tank with a mounting thread for screwing in the tap. If you don’t find one, make a hole for the faucet yourself.
A slot is made in a plastic barrel using a drill with a feather drill. If the water container is metal, use a metal crown. After cutting the faucet into the tank, install a water diffuser on it.
Principles for choosing a shower
How to install a shower cabin in a private house? Its installation is carried out taking into account the specified requirements, and the place is selected in close proximity to the water supply and sewerage system in an area where one person’s shower will not interfere with other family members. The design of this room begins with solving the mandatory conditions: the source of water supply and the presence of sewerage.
Shower cabin in a wooden house
Structurally, there are 2 main types: open and closed booths. In the first option, a floor system for water drainage and a shower panel are permanently installed. The walls are made in the form of curtains, which are retracted only during the procedure.
The closed version involves the installation of a stationary wall with a door. As a rule, it has its own ceiling and a separate floor covering. In other words, an isolated, sealed, stationary room is provided.
When designing a shower stall, special attention is paid to its dimensions:
- Perimeter. Taking into account the placement of an adult inside the booth, it is believed that its minimum size should be 80x80 cm. Designs of standard sizes are more attractive: 90x90, 90x100 and 100x100 cm. When planning the placement of other equipment or to increase comfort, the length of the booth is often ensured within 1.2 -1.8 m. Of course, the issue of size is interconnected with cost - large structures have a fairly high price.
- Height. This parameter should be set taking into account the ceiling height in a wooden house. Of course, a person should be able to stand upright under the shower, but at the same time it is easy to reach the sprayer with his hands, and flying splashes should not reach the wooden ceiling. Usually the gap between the ceiling and the shower spray is about 30-35 cm.
- Form. The aesthetics of a shower stall is largely determined by its shape. However, this parameter is important not only from this side - the configuration of the structure allows for optimal placement of it in the room. In particular, the corner option is most often used. In general, shower stalls can be round, rectangular (square), polygonal or asymmetrical in shape. The corner design with a projection in the form of a quarter circle is widely popular. When placing the shower along the wall, a rectangular shape is used. In principle, it is possible to use original varieties, for example, a cylinder or even a spiral version.
Materials
Typically, the design of the structure takes into account the material required for installation work. A heated winter shower for a summer cottage is often built of brick. But it will cost a lot. Cheaper wooden models.
The shower plan sometimes includes a dressing room, the dimensions of which are determined by each project separately.
The sheathing of the frame is made of wooden beams, metal pipes or profiles. For the upper part of the building, a deck is used, on which a water barrel is mounted. Sheet plastic is distinguished by its moisture resistance. A durable material with a high anti-corrosion index is corrugated sheeting. It is structurally simple and quickly installed.
Waterproofing and ventilation of the shower - what to pay attention to
Organizing a shower even in a wooden house is not a problem thanks to modern materials and solutions. So, you can level and protect the walls with moisture-resistant plasterboard with mandatory gluing and puttying of the joints. The sheets should not reach 0.5-1 cm from the floor. If the walls are concrete or brick, you can immediately begin finishing them.
The waterproofing is applied to the screed and should cover the entire floor, extending onto the walls at least 15 cm. The walls in contact with the shower are also covered with waterproofing.
It can be either mastic or built-up roofing material. Special attention should be paid to the outlets of pipes and electrical appliances. At the junction of the walls and floor, as well as at the corners, an additional sealing tape is glued, the edges of which are also rubbed with mastic.
But proper organization of waterproofing in the shower is only half the battle. Constant high humidity, even if it has no effect on the facing material, can ruin the most modern bathroom. Therefore, forced ventilation should be provided at the planning stage.
The direction of air in the ventilation shaft, if it also affects living rooms, should be from “dry” rooms to “wet” ones - the bathroom and kitchen. Otherwise, constant dampness in the bedroom will be ensured. At the same time, it is advisable to do the hood even if there is a window - in the cold season it is hardly rational to constantly ventilate the shower room.
Laying the foundation
The building being erected will rest on a foundation of bored piles. Such supports are very easy to construct:
- Using a garden auger, you need to drill a well, the bottom of which is located 30 cm below the freezing depth of the soil. The diameter of the well should be 100 - 150 mm.
- At the bottom of the well, a 30-centimeter sand or gravel-sand cushion is made. It needs to be compacted, pouring generously with water.
- We lower a plastic pipe of the appropriate diameter into the well. It will simultaneously play the role of formwork and waterproofing for the concrete pile.
- Inside the pipe, it is necessary to secure a reinforcing frame made of 3 vertical rods with a diameter of 8 - 12 mm, equally spaced from each other, connected by crossbars made of rods with a diameter of 6 mm. All frame elements must be connected with annealed wire - welding is not allowed.
- All that remains is to fill the pile with concrete. At the final stage of pouring into concrete, you need to monolith the anchor bolt (in the center), on which the grillage beam will be placed.
Shower foundation
In soft soil, instead of bored piles, you can use driven piles made from a steel pipe with a diameter of 60 - 150 mm with a flattened end. In this case, the anchor bolt for fastening the grillage beam should be welded to the pile.
Accounting for technical requirements
A shower cabin installed in a wooden house must have reliable waterproofing and good ventilation. Waterproofing work begins with the formation of the floor covering. The most reliable method is to make a concrete screed by adding liquid glass to the solution.
Concrete screed in a wooden house
If it is impossible to apply a concrete layer, the wooden floor is covered with a waterproofing slab. You can use cement bonded particle boards or ACEID panels.
Installation procedure
Often, buyers are worried that they will have to carry out complex procedures (including preparatory ones) to install the cabin. We hasten to assure you that this is absolutely not the case. And this is another advantage of our designs.
By and large, no serious action is required from you. The most important thing is to choose an extremely flat surface for installing the shower stall. It doesn’t matter what kind of material it will be: sand, asphalt, earth, wood, paving stones or something else. The only important thing is that the coating is as smooth as possible.
Otherwise, the structure will tilt, which can cause its deformation and the impossibility of comfortable operation. For convenience, you can use a stable wooden pallet as a kind of stand.
Note! If you choose an autonomous model without a connection to a water supply system, you need to take into account a few more nuances . Firstly, the tank will need to be filled with water regularly. For your convenience, it is advisable that the cabin be installed close to its “source” - a water hose or some container.
The same applies to heating liquids. In cabins without an electrical connection, this procedure is carried out by exposing the tank to direct sunlight. Install the cabin in an open area so that shadows from trees, buildings, etc. do not fall on it.
If you opted for a network model with electric heating and liquid supply from a water supply system, the booth must be installed where it will be possible to connect to these networks. Otherwise, you are completely free to choose the location!
Shower with a ready-made tray - a simple and aesthetic solution
Installing the tray is extremely simple - just follow the instructions. Steel and acrylic pallets, in most cases, are equipped with special legs. But even in this case, it is better to place the pallet on a monolithic base with a support in the center - so that it does not sag or move.
The installation process includes five steps:
- Preliminary fitting of the pallet and leveling. In no case should you make a slope towards the drain - the design of the pallet already provides for this.
- Connecting the assembled siphon to the drain hole and sewer system. The higher the siphon is from the drain hole, the faster the water will drain from the shower.
- Installing the pallet in place, fixing it with mounting adhesive to the walls and base (if there is one).
- Attaching a decorative panel to a pallet if it stands on legs and requires access to communications.
- Filling joints with sealant to ensure watertightness.
To simplify installation, instead of installing glass screens, you can attach a curtain bracket. To add originality to your shower, you can use non-standard brackets - oval, semicircular or even spiral.
A shower without a tray looks very stylish. Such a shower in the house is convenient for children and the elderly, as well as for bathing pets. The absence of a curb is compensated by the correct slope for draining water, so you don’t have to worry about complete flooding of the bathroom.
The process of organizing such a shower is also quite simple, although it takes a lot of time:
- Polystyrene foam boards are laid around the entire perimeter of the bathroom on a finished base with pipes already laid out. The lower part of the siphon-trap is assembled and connected to the sewer.
- A layer of concrete screed is applied along the installed siphon. After the screed has dried, waterproofing is applied to the floor and walls adjacent to the shower.
- A ladder grate is installed and slanting formwork is made to organize a drain with a slope of at least 2 cm per 1 m of length. The entire perimeter of the bathroom is filled with concrete screed.
- The visible edges of the formwork are rubbed with waterproofing mastic, and the corners are closed with sealing tape.
- After this, you can lay tiles throughout the bathroom. Next, if desired, you can mount glass doors or attach a bracket for a curtain.
To avoid screeding the entire floor twice, you can make a shower with a border. To do this, bricks are laid along the desired contour, and the whole process is repeated, but only in the space limited by the curb.
Step-by-step construction technology
- After the drainage pit has been prepared, cinder blocks are laid in the corners, leveling the horizontal line, and a frame is built. It will require a beam of 100x70 mm. It is important to make the top dressing strong, since it must withstand a tank with an optimal volume of 100 liters.
- The frame is sheathed with clapboard. You can use false timber or boards 30 mm thick and 150 mm wide. Provide gaps between the grooves, since the wooden material expands when wet.
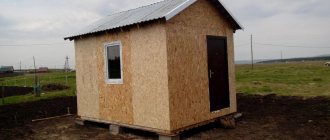
- All wood parts are primed using antifungal impregnation, and acrylic water-based varnish is applied in three layers. You can paint the building by choosing a shade that is in harmony with the surrounding landscape and the main buildings in the dacha area.
When designing a cabin, it is important that it harmonizes well with the appearance of the house and garden
Arrangement of communications
To ensure the normal functioning of a shower in a private home or country house, it is necessary to solve 2 main technical problems: water supply and drainage.
If the house is connected to a central water supply and sewer system, then the issue is resolved simply - a tie-in is made into the existing mains. In the absence of centralized amenities, the problem will have to be solved independently.
Water supply in a wooden house
Water supply can be provided in two ways:
- Own water supply from a well or borehole. In this case, water is supplied using a pump. A mandatory element is a hydraulic accumulator or storage tank, which provides a certain supply of water to eliminate the need for the pump to depend on the use of the shower mixer.
- Tank installation. The shower can also operate when water is supplied from a storage tank located in the attic. Filling such a container can even be done manually. Water is supplied to the shower by gravity.
Sewerage in a wooden house
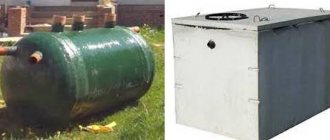
Your own sewerage system must ensure the removal of wastewater. Such a system can be configured in two ways:
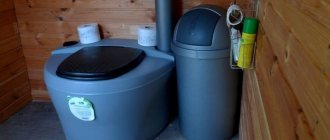
- Storage tank under the shower. Water from the shower tray directly flows into a storage tank located under the floor. Next, water from the tank can enter the filter system or be removed by vacuum cleaners. It is important to ensure that there is no odor from the tank, for which shut-off elements (drain, siphon, etc.) are installed.
- Own sewer system. Water from the shower enters a pipe mounted with a slope, through which it is directed by gravity to special septic tanks (wells) located outside the house.
Preparatory stage
It’s easy to build a heated shower in the country. But first it is important to order a project that includes drawings and estimates. This will make it possible to calculate the amount of material, the volume of work to be done and the deadline for its completion. For such a structure there is no need to use too expensive materials. It is important that they are practical and durable. Construction of this type will require a poured foundation.