It is difficult for a modern person to imagine his life without household appliances. There are devices that we could do without, and there are those that we simply cannot do without. One of these vital items is the refrigerator. Do you agree?
Repairing household appliances yourself is a good help for the family budget. If desired, you can master even quite complex repair operations. For example, replacing a refrigerator thermostat is not that difficult. You just have to understand the operating features and design of this device.
In this article we will tell you how to detect a faulty thermostat. Also, we will talk in detail about replacing the thermostat using the example of a Stinol refrigerator. The material contains a thematic selection of photo and video materials with advice from experienced experts.
Design features and operating principle
The thermostat or thermostat is one of the main elements without which normal operation of the refrigerator is impossible. It records the readings of temperature sensors in the refrigerator and freezer compartments and sends a signal to the compressor start relay.
In accordance with these signals, the compressor turns on if the chamber is not cold enough and turns off when the temperature reaches a set level.
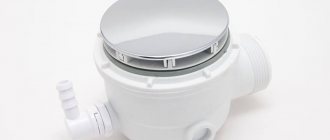
Technically, the thermostat is a relay, at one end of which there is a sealed tube filled with freon.
On the other side there are contacts, the opening and connection of which sends a signal to the compressor. The end of the tube with freon, also called a capillary tube, is fixed to the evaporator.
The refrigerant placed inside reacts sensitively to heating and cooling. When the temperature decreases or increases, the pressure level inside the tube changes, causing the relay contacts to connect or open.
The movement of the contacts is controlled by a small spring. It is used to set the temperature level that should be inside the refrigerator compartment.
A temperature adjustment knob is attached to the spring. Turning this knob changes the tension of the spring.
As a result, more or less force must be applied to close and open the contacts. This affects the level of pressure in the capillary tube at which the contacts are triggered.
A thermostat is a small device that is equipped with a sealed tube with a sensor filled with refrigerant. Based on changes in evaporator temperature, the relay turns the compressor on or off
This regulates the degree of cooling of the air in the refrigerator. When using an electronic regulator, this process is carried out slightly differently, but the principle remains approximately the same: the desired temperature level is set based on the actual indicators recorded by the capillary tube.
But such models use an electronic control module that can simultaneously manage data from several sensors.
It is not always possible to repair or replace such a thermostat at home. Handling complex electronics requires knowledge and special equipment.
Typically, the thermostat is installed inside or outside the refrigerator compartment. Before starting repairs, it would not hurt to study the technical data sheet and instructions of the device; there may be a lot of useful information on the design of a specific thermostat model, as well as on its location.
Usually the thermostat is located next to the handle for setting the temperature. The internal arrangement is typical for relatively old models. Inside the camera, the element is usually enclosed in a plastic protective housing.
The adjustment knob is located directly on it. To remove the thermal relay, you need to remove this handle and unscrew the mounting screws to remove the housing.
In more modern models, the thermal relay is placed outside the chamber in order to save precious cubic centimeters of internal space and not spoil the design with additional elements
But you also need to look for the thermostat near the control knob, usually under the refrigerator body somewhere at the top. The handle is removed in the same way, the fasteners are unscrewed and what you are looking for is found behind the protective panel.
The principle of operation of a household mixer with a thermostat
Changes in pressure and temperature in water supply pipes are an unpleasant situation faced by residents of both apartment buildings and private cottages. This is especially annoying in the mornings, when the stream from the faucet in the washbasin becomes either too hot or too cold. This is due to the fact that everyone in the house at this time begins to intensively use water for washing and bathing. Its consumption increases sharply, causing pressure drops.
The main task of a thermostatic mixer is to obtain a constant temperature flow of water from the spout for consumption in the washbasin or shower. According to domestic standards, the temperature of hot water in a centralized system can be in the range from 50 to 70 degrees. The spread is large. This is a good thing for utility companies; they don’t have to worry too much about going beyond the standards. And consumers are forced to suffer from inconvenience. It is necessary to install special control devices or constantly adjust the water supply to the tap.
This is where thermostat mixers come to the rescue, all models of which are divided into three categories:
- Mechanical.
- Electronic.
- Contactless.
The first ones are the simplest and least expensive. Adjustment of the required temperature and water pressure in them is carried out using a lever or valve, and maintaining the specified parameters is due to pure mechanics and changes in the physical properties of the internal elements of the device. The second and third already have electronic components that require constant power supply.
A thermostatic mixer is a device that is sensitive to changes in the temperature of the flow supplied by a centralized hot water system. The inclusion of a thermostat mixer in the water supply system allows you to reduce costs by almost instantly setting the required temperature regime. The thermostat mixers we offer for sale are designed for the location of water supply pipes specified in building standards. The device will refuse to work if the DHW and cold water inputs are swapped. When cold or hot water is turned off, the thermostatic mixer will supply a thin stream because the device will not be able to create the temperature specified by the settings. Thermostatic bathroom faucet. Device for economical water consumption. Subtleties of installing thermostatic fittings. Thermostat operation in case of water outage
Type #1 – devices with mechanical adjustment
The operation of mixers of this type is based on the movement of a movable valve inside the device, which reacts to changes in the parameters of the mixed water jet. If the pressure in one pipe increases, the cartridge simply moves and reduces the flow of water entering for mixing from the other. As a result, the temperature in the spout remains the same.
The mechanical mixer has two control heads: the right one with a red-blue stripe for setting the temperature and the left one with the designation “ON/OFF” for controlling the pressure. The internal moving valve contains a material that sensitively and quickly reacts to all changes in the temperature of the water entering the mixing device. In most cases, synthetic wax is used as a sensitive thermoelement sensor. Under the influence of temperature, it contracts and expands, which leads to displacement of the locking cartridge.
Many mechanical models have a fuse on the control valve that limits the maximum temperature to 38 °C. For a person, such indicators are comfortable. But even in the absence of a fuse, water hotter than 60–65 degrees will not flow from the thermostatic mixer. Everything is designed so that when the specified temperatures are reached, the wax expands to its maximum, and the valve closes the hot water pipe completely. Burns from boiling water are excluded here by definition. Using a mixer with a thermostat guarantees comfortable bathing for even the smallest children; its surface is never hot. Valve displacement occurs internally almost instantly. Any change in the temperature of the incoming water or its pressure leads to immediate expansion/constriction of the thermoelement. As a result, even strong fluctuations in flow parameters in DHW and cold water pipes do not affect the overall flow in the spout. Water will flow from it exclusively at the parameters set by the user. Some models use bimetallic strips instead of wax. The principle of their operation is similar. Under the influence of temperature, they bend and move the valve to the desired depth.
Let's look at the Grohtherm 800 thermostatic mixer, typical for the segment; it is designed for use in the bathroom, the connection is reversible. The device is equipped with a thermostatic cartridge, which is used for water return connection. There is a button to switch to economical flow, while maintaining a pleasant pressure and quality of the stream for the user. The level of comfort is significantly increased with the automatic switch from shower to spout. For hygiene procedures there are two safety stops at 38º and 43º. To protect the device, there is a backflow valve and a dirt filter system. Thermostatic mixer Grohtherm 800. Handle for controlling the thermostat. Automatic bath/shower switch. Bathroom Thermostat Protections
Type #2 – devices with electronic filling
Faucets with electronic thermostats are more expensive, technically more complex and require power. They are connected to an outlet via a power adapter or contain a battery that must be replaced regularly.
Control of the electronic thermostat using:
- remote buttons or on the mixer body;
- sensors;
- remote control.
The water levels in this device are monitored using electronic sensors. In this case, all numbers are displayed on a special liquid crystal screen. The display often shows both temperature and pressure. But an option with only one value is also possible.
The external panel is very convenient for controlling the device: a small screen allows you to see the exact parameters of the water flowing from the thermostatic mixer. Often in everyday life, an electronic thermostat mixer with a display is a device with excessive functionality. Such equipment is more intended for installation in medical institutions. It is much more common in showers and toilets in office buildings than in kitchens or bathrooms of private cottages. However, if you plan to build a “smart home” with all sorts of gadgets that make life easier, then a mixer with an electronic thermostat is just what you need. It definitely wouldn’t hurt in such a home. In addition to automatically controlling the water temperature, for greater comfort in the bathroom, you can install a heated floor so as not to depend on the mood of the heating supply organizations during the cold season. Thermostatic mixers are produced for arranging kitchen sinks, showers, bathtubs and sinks in hygienic areas. The range of electronic thermostats includes devices with a handle for adjusting the jet pressure.
There are models without valves or levers at all; they are completely controlled using the Touch Panel. The presence of a touch panel greatly facilitates setting the required water temperature and increases comfort in hygienic rooms. The touch panel can be literally primitive, providing the ability to only determine the temperature. New thermostats allow you to select the required pressure and temperature level from a distance using a specialized program downloaded to your smartphone. Thermostatic mixers are available for hidden and open installation. In showers, it is more convenient to use modifications built into the walls. Plumbing fixtures with infrared sensors are very popular. The stream appears when your hands approach the spout; the temperature and pressure are regulated by the position of the hands relative to the reading device.
Electronic thermostat in the kitchen. Single lever device for mixing water. A device with a touch panel for control. Touch control option. The simplest version of the touch panel. Selecting a mode using a smartphone. Hidden way to install a thermostat. Faucet with infrared sensor
Ways to detect the problem
If the thermostat breaks, this does not mean that the entire refrigeration unit will immediately stop working. But the lack of correct information about the current temperature will affect its operation.
Option #1 - check the functioning of the equipment
Symptoms of incorrect operation of refrigeration equipment may be as follows:
- the compressor operates without interruptions or with very short and rare interruptions;
- the temperature inside the refrigerator chamber drops to zero, and sometimes even lower;
- a large amount of frost or even ice appears on the walls;
- It's too warm inside the refrigerator;
- The refrigerator does not turn on after being turned off, etc.
Of course, these signs can be associated not only with breakdowns of the thermal relay, but also with malfunctions of other elements.
In order to correctly determine the cause of problems identified during the operation of a household refrigerator, you will need to carry out a little diagnostics. You can do this yourself
Option #2 - diagnostics using a thermometer
To do this, you need to completely disconnect the refrigerator from the power supply, and then completely defrost it in accordance with the instructions. Of course, the contents will have to be removed.
After this, you need to turn on the device and move the thermostat knob to the position that will allow you to get the lowest possible temperature. If your refrigerator model has a freezing mode, it is recommended to use it.
To test the operation of the thermostat, you need to empty the refrigerator of all food, place a thermometer inside the chamber and check its readings after a few hours
In the refrigerator compartment, approximately in the middle, you need to place a thermometer designed to measure air temperature.
It is better to use a device that allows you to take measurements below zero. The refrigerator is left in this mode for about two hours. After this, you need to check the thermometer readings.
If the temperature in the refrigerator compartment has dropped to about six degrees by this time, there is no problem with the thermostat. But when the inside becomes noticeably warmer or colder than this level, the thermostat will have to be replaced.
Option #3 - visual inspection of the refrigerator chamber
If, after defrosting, a so-called snow cap forms inside the chamber very quickly, the initial diagnosis of the health of the thermostat can be performed very simply.
The appearance of a snow coat in the refrigerator compartment almost always means that the thermostat is not working correctly; you need to diagnose its condition
To do this, when the compressor is operating, the adjustment knob begins to be turned in the direction of increasing the temperature inside the chamber.
If the relay is working properly, at a certain moment the sensors will record the desired temperature level, after which the compressor motor will turn off. If the engine continues to run, the thermostat needs to be changed.
After such diagnostics and if the thermal relay is working, it is recommended to remove all contents from the chamber and allow the device to run idle for about six hours. During this period, you need to pay attention to the duration of breaks in the operation of the compressor.
If it is about 40 minutes, everything is fine, you can use the refrigerator as usual.
When the compressor turns on too often or infrequently, you need to try to regulate this moment using the relay settings. If this fails, you will most likely have to install a new thermostat.
Advantages and disadvantages of a thermostatic mixer
In the kitchen, this mixer is not always appropriate and convenient. This is due to the frequent need to use only cold water for cooking. In such cases, the problem is solved by installing a special tap for drinking water with a filter.
A bathroom faucet with a thermostat is a convenient, necessary thing and has no drawbacks from a technical point of view. The main disadvantages are the higher price and possible additional hassle during installation. However, they are more than offset by the advantages:
- safety: any likelihood of any unpleasant sensations when taking a shower, and most importantly, burns, is eliminated. This is important in a house where old people and children live. This is convenient when arranging showers and cramped bathtubs, when even jumping away from the hot jet will not be possible.
- efficiency: the mechanism does not need to be adjusted each time, passing streams of water until the desired pressure and temperature are found. In addition, the device is initially configured for water saving mode.
- convenience and comfort: one press of the lever turns the water on and off, using two hands, which is important when washing yourself, and when caring for children, and when performing any other multifunctional actions in the bathroom.
Thermostatic electronic mixer with touch sensors
Where is the best place to install the thermostat?
A thermostat can be equipped with a kitchen sink, sink, and bidet. In the kitchen, a thermostat is not necessary - the water temperature has to be constantly changed. It is not recommended to frequently reconfigure the thermocouple. It is most important to use a thermostat in a bath/shower or in a shower stall. Especially when there are outlets from the same supply pipe to the shower, washing machine and kitchen. And if the washing machine or dishwasher turns on the cold water intake and the pressure in the pipe drops, the thermostat will respond to the temperature change and equalize the flow ratio.
Thermostats are produced in different modifications. The thermostat model for the shower cabin is distinguished by the absence of a spout.
Photo: Roca Shower thermostat: model AquaHeat SS3 (RUB 11,042).
Rules for dismantling the thermal relay
If the refrigerator does not turn on at all, it will be impossible to carry out the diagnostics described above. The probable cause of the breakdown is an electrical failure of this element.
But a problem can also be a compressor malfunction, for example, a burnt out motor winding. To determine whether the thermostat needs to be replaced, it will have to be removed from the refrigerator for examination.
Typically, the thermostat is located next to the control knob, which is used to set the air temperature in the refrigerator compartment. Double-chamber models are equipped with a set of two such handles
First you need to unplug the refrigerator. Now you should find the place where it is located, as described earlier. Usually you need to remove the adjustment knob, remove the fasteners and remove the protective elements.
Then you need to carefully inspect the device, paying close attention to the wires through which the power is supplied.
All of them have different color markings depending on their purpose. Typically, a yellow wire with a green stripe is used for grounding. This cable should be left alone, but all the others should be disconnected and shorted together.
Now the refrigerator is plugged in again. If the device still does not turn on, the thermostat is probably working properly, but there are serious problems with the compressor.
If the refrigerator does not turn on at all, the cause may be not only a malfunction of the thermostat, but also a breakdown of the compressor, for example, a burnt-out motor winding
If the engine starts working, we can clearly conclude that the relay needs to be replaced. Before starting work, it doesn’t hurt to arm yourself with a smartphone or camera in order to consistently record all operations.
When installing a new thermostat, these pictures can be very helpful, especially for beginners.
You need to clearly remember which cable core was used for what purpose. Typically, a black, orange or red wire is used to connect the thermal relay to the electric motor.
A brown wire leads to zero, a yellow-green wire provides grounding, and a pure yellow, white or green wire is connected to an indicator light.
To connect the thermal relay, wires with different color markings are used; you need to remember the purpose of each wire so as not to get confused during reassembly
Sometimes removing a damaged regulator can be difficult, especially when it is placed outdoors. For example, in some Atlant refrigerator models you have to completely remove the chamber door from its hinges.
To do this, you need to remove the trim that is installed above the top hinge and unscrew the bolts hidden under it.
Before removing the adjustment knob, you also have to remove the plugs and unscrew the fasteners. All these operations must be done carefully.
It is better to store fasteners and linings in a small container so that they do not get lost. The thermostat itself is usually screwed to the bracket; it must be carefully removed, unfastened and removed.
If the thermostat is located inside the refrigerator compartment, it is usually hidden under a plastic casing, where a lamp for illumination can also be mounted
A new thermostat is installed in its place, following the reverse assembly order. Sometimes the breakdown of the thermostat is associated with a malfunction of the so-called capillary tube or bellows. If you replace only this element, the relay can be left.
To perform this procedure, you will have to remove the thermal relay, following the method described above. The bellows must be disconnected from the evaporator and carefully removed from the device body.
Now a new capillary tube is installed, connected to the evaporator, and the relay is mounted in its original place, and the disconnected wires are connected.
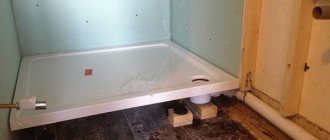
Rules for installing a mixer with a thermostat in the bathroom body
The decision to install a thermostatic mixer in this way has several advantages:
- The ability to completely mask all the details of the eyeliner in the space under the sink or behind the bathtub.
- Having more free space when arranging a bathroom.
- There is no need to take into account the location of the pipes, since the connection is made with flexible hoses.
Installation of a mixer with a thermostat above the bath
Most bathtub manufacturers today already have holes for installing such a mixer. However, if your bathtub does not have such holes, then cutting them is quite easy.
Rules for connecting a mixer with a thermostat to the bathroom body:
- Carefully remove all old parts.
- Clean and treat rusty surfaces.
- Carefully install the new faucet.
Replacement using the example of a Stinol refrigerator
For Stinol-101/103 refrigerators, relay failure is a fairly common occurrence, especially after five to seven years of operation.
Most often, the bellows tube fails here, since this is the resource provided by the manufacturer of this element. The Stinol-101 model has only one compressor, but the Stinol-103 has two: separately for the refrigeration and freezer compartments.
This is a contact diagram for a K-59 type thermal relay, which allows you to get an idea of which wires should be connected where. Color markings may vary; a photo on your phone will help you save the information; you can also draw a similar diagram yourself
The automation of different models is slightly different, which is reflected in the corresponding electrical diagrams, but otherwise these refrigerators are very similar, so it makes sense to consider the procedure for repairing them at the same time.
To understand that the Stinol refrigerator needs repair or replacement of the thermostat, you need to pay attention to the following signs:
- the compressor runs non-stop and does not respond when the regulator is set to OFF;
- when moving the adjustment knob to the OFF mark, there is no characteristic click;
- the temperature in the refrigerator chambers noticeably exceeds the parameters set during adjustment.
The Stinol-103 refrigeration chamber uses a K-59 thermal relay; it is easy to check the markings, they are indicated on the body.
To remove the adjustment knobs, you need to use a thin awl. You just need to pry them up and remove them. The Stinol-101 model has only one adjustment knob, while the Stinol-103 has two, one for each compressor.
To remove the adjustment knob of the Stinol refrigerator (1), you need to use some sharp object, for example an awl. Then remove the decorative trim (2), which is held in place by four protrusions
After the handle is removed, you need to remove the decorative trim, which has six protrusions. This is a fragile item and must be handled with care to avoid damaging it.
There are nuts under the cover that need to be unscrewed. After this, you need to unscrew the screws that secure the control panel.
Under the decorative trim there are mounting screws (1) that hold the thermal relay in the correct position; they must be unscrewed to continue dismantling the element
It is best to remove the screws holding the refrigerator door hinge last. To avoid possible damage, the door must be held. Now you can lift the panel and remove the door from its hinges.
The next step is to remove the top cover of the refrigerator.
The fasteners that secure the control panel and door hinge (1) of the Stinol refrigerator must be unscrewed, moving towards the door, and not away from it
The necessary fasteners are located on the rear side. They are unscrewed and the cover is removed. This will give you free access to the thermostat.
First you need to disconnect the relay contact connectors, after which you can remove the element from the refrigerator control panel.
After the doors and top panel of the Stinol refrigerator have been removed, you can carefully remove the thermal relay for inspection and diagnostics
At this stage, you need to remember or write down the color coding of the individual wires. To remove a worn capillary tube, remove the plastic cover.
Now you need to unscrew the fixing screw and remove the lighting unit. The tube is removed through the hole provided for this purpose.
To continue replacing the thermostat in the Stinol refrigerator, you need to remove the cover (1) in the refrigerator compartment and remove the capillary tube (2)
The new element is installed in such a way that the uninsulated area in its lower part is securely hidden under the overlay. The hole is closed with a plastic plug to restore the seal of the chamber.
Typically the capillary tube protrudes beyond the thermostat. It must be carefully placed under the top lid of the refrigerator; there is enough space there.
To remove the capillary tube (2) and replace it, you first need to disconnect the lighting unit, which is secured with a screw recessed into its housing
Now you need to reassemble the thermostat and the refrigerator: connect all the necessary connections, install and secure the refrigerator lid, and hang the door.
And again, screwing the door hinge fasteners is done last, when other similar screws are already installed.
The hole that appears on the rear panel during repair work should be sealed with plastic to restore the tightness of the refrigerator compartment
To check the condition of the Stinol refrigerator thermostat at home, you can use simple diagnostics. Contacts 3 and 4 of such a device should remain closed at room temperature.
If, after connecting them with a jumper, the compressor turns on, the thermal relay is faulty and needs to be replaced.
If the thermostat settings are lost, they can be corrected by turning the adjusting screws, but this should be done in a service center that has the necessary equipment.
The process of replacing the thermostat is clearly demonstrated in the following video, where the master shares the nuances of repairing Stinol-type refrigeration equipment:
Technology for connecting a mixer with a thermostat
Manufacturers of the latest water heater taps and heated mixers take into account the possibility of installing them by non-specialists. Therefore, installing most of the models is not particularly difficult. Regardless of the design features, any model is installed according to one of the standard installation instructions.
Wall-mounted thermostatic mixer
There are three ways to install a mixer with a thermostat:
1) Fixing on the wall.
2) Installation in the bathroom body.
3) Installation of a special shelf or a separate rack.
Conclusions and useful video on the topic
The process of replacing a thermostat using the example of an ATLANT refrigerator is shown here in detail:
Interesting tips for diagnosing the condition of the relay and replacing it using the example of two models of refrigerators are contained in this video:
The procedure for replacing a thermostat cannot be called too complicated. However, if you mishandle this element, you can only worsen the situation. A detailed study of the repair procedure and attention to detail will help restore the functionality of the refrigerator .
When replacing the thermostat in the refrigerator, minor changes may occur in the operation of the thermostat, namely, the refrigerator or freezer may produce insufficient cold . The reason for the poor operation of the refrigerator here can be only one thing - the thermostat is not adjusted.
Refrigerator thermostat operation
The principle of operation of thermostats for outdated models of refrigerators and improved, modern refrigerators remains the same. That is, any master can answer you that the essence itself has not changed, both in the regulation itself and in the principle of the design of thermostats.
But such a problem with insufficient cold can arise not only when replacing the thermostat, but during the operation of the refrigerator itself. Of course, you should adjust the thermostat after the warranty period for your refrigerator.
Adjusting the refrigerator thermostat itself is labor-intensive and time-consuming. This is explained by the fact that the cycle between turning the thermostat on and off takes a certain time and the gradual stabilization of the temperature in the chamber occurs slowly.
Adjusting the refrigerator thermostat
To achieve quick results, the thermostat must be adjusted while measuring the temperature on the evaporator shelf of the freezer. Any need to adjust for ambient temperature during adjustment is eliminated and eliminated.
To establish the required temperature on the evaporator shelf, it is necessary to adjust the power spring of the thermostat - by tightening or loosening the tension.
What do you need to know when adjusting the thermostat? To do this, you need to know:
- location of the power spring adjusting screw;
- direction of rotation of the adjusting screw in order to increase or decrease the temperature;
- the relationship between the speed of the adjusting screw and what change occurs with the temperature on the evaporator shelf.
How to properly adjust the refrigerator
But before proceeding with such an adjustment, you first need to make sure that the doorway of the refrigerator cabinet is well sealed. That is, the door seal must be in proper condition in order to prevent heat from penetrating into the refrigerator chambers.
Also, you need to make sure that the bellows tube is pressed against the evaporator wall. If there is a gasket between the tube and the evaporator wall, this gasket must be saved and installed in the same position when replacing the thermostat.
In former modifications of refrigerators, condensate flowed into the pan; when defrosting or cleaning the refrigerator, the water was removed from the refrigerator along with the pan. The window in the tray for such refrigerators had to be open or closed, as indicated in the instructions for using the refrigerator. In modern modifications of refrigerators, liquid drains and then evaporates.
How to properly adjust the thermostat.
Measuring the temperature in the refrigerator
When adjusting the thermostat, the temperature is measured with a thermometer in the freezer compartment. The thermometer, as already mentioned, is placed on the evaporator shelf, the motor-compressor is turned on, and the thermostat knob is set to the middle position.
After three to four hours of operation of the motor-compressor, the temperature is measured and, after comparison with the required temperature, the thermostat is adjusted. But here we should not forget that before making adjustments, you need to turn off the power to the refrigerator and disconnect the refrigerator plug from the socket.
To adjust the TPX-2K thermostat, for example, outdated modifications of refrigerators, it was necessary to remove the housing cover from the side opposite the output terminals. The lid is pryed off with the blade of a penknife. To lower the temperature, the adjusting screw is rotated counterclockwise with a screwdriver; to increase the temperature, the screw is rotated in the opposite direction. A full turn of the adjusting screw in one direction or another corresponds to a temperature of approximately two degrees Celsius.
To adjust the ART-2 thermostat, adjustment is carried out with a screw, access to which is possible through the central hole located in the axis of the handle. This hole is closed with a pin and for adjustment this pin is removed. The thermostat of this model is regulated as follows:
- the handle is initially removed;
- if there is a pin, the pin is removed; adjustment is made with a screwdriver with a diameter of 2.5 mm;
- The screwdriver is inserted into the screw slot, the position of the screwdriver handle is remembered, and then the screw rotates.
By rotating the screw clockwise, the temperature will increase; by rotating the screw counterclockwise, the temperature will decrease. The temperature with one full revolution of the screw corresponds to approximately 5-6 degrees Celsius on the evaporator shelf.
The photographs show modern modifications of temperature regulators of the K 59 type, the difference of which is the length of the capillary tube, the length of the tube is designated by the letter “L”
Types of thermostats - for refrigerators
thermostat K 59 - L 1037
K 59 - L 1275
Adjustment of the given thermostats for modern models of refrigerators is carried out in the same way as in the description of this topic. The external device of the thermostat is shown in the following photograph.
Before attaching the handle to the axle, make sure that the handle is properly mated with the limit spring and the shank of the moving contact lever. The “Melting” mode is adjusted after adjusting the operating modes; the thermostat device is first removed for free access to the adjustment screw.
The temperature of the “Melting” mode is measured when the motor-compressor is turned on after the third, fourth cycle for this mode.
Quite a lot of questions arise when repairing refrigerators, and the next topic will contain a detailed description of:
- replacing the start-protection relay;
- connecting a start-protection relay;
- connecting wires coming from feed-through contacts to relay sockets
and questions regarding the relay connection diagram will be directly addressed.
Not every user knows that repairs to home appliances, including refrigerators, can be done with their own hands, without turning to a service center for help. Even a novice master can cope with simple breakdowns. Today we will try to understand the question of how to repair a refrigerator thermostat, as well as what kind of device it is, what its purpose and parameters are.
What is a thermostat and why is it needed?
First, let's figure out what it is. A thermostat, or thermostat, is a device that controls the temperature in your refrigerator and then sends signals to the compressor, causing it to turn on and off depending on the level of cooling inside the refrigerator.
It works quite simply. The thermostat is a relay:
- On one of its sides there is a special hermetically sealed tube, which is filled with freon.
- On the other hand, there are electrical circuit contacts, and with the help of them the compressor is controlled.
Thermostat device for a heating battery.
The automatic thermostat for a heating radiator has a fairly simple device. All elements of these devices are assembled in a compact housing, which is screwed onto the radiator valve. The external temperature is monitored by a built-in or remote sensor. It transmits readings to a thermostat or electronic thermal head, after which the shut-off valves are controlled. Human participation in this temperature adjustment process is not required.
Thermostats for the heating battery have a convenient electronic display. It displays detailed information about the selected settings, the current temperature indicator - both external and coolant temperature. To control the device, use the buttons on its front panel. Devices with remote control capabilities using a remote control are also available for sale.
Operating principle
It all works quite simply:
- The end of the capillary tube is attached to the evaporator. Based on the fact that it is filled with freon refrigerant, as the temperature inside the refrigeration chamber increases, the pressure in it increases.
- Thanks to this, the corresponding relay contacts are closed and the compressor is turned on.
- After some time, the temperature in the refrigeration compartment drops, the pressure in the tube drops, and the contacts open, then the compressor turns off.
Another fairly important component of the thermostat is the spring, which compresses and releases its contacts. It depends on her how and at what time they will work. For example, to open contacts with low pressure in the system, less effort is required, for high pressure - more. The spring tension is adjusted using the thermostat switch knob.
Sometimes an electronic thermostat is installed in refrigerators, which consists of a control module and a temperature sensor. In new models, several sensors may well be installed at once, for each of the cooling zones. If your refrigerator has an electronic temperature control mode, it may require special knowledge to repair it.
Features and functions of electronic models
A bathroom faucet with an electronic thermostat is a more expensive and technically complex model that requires batteries or an AC adapter. When choosing water temperature and pressure, there are electronic temperature and pressure sensors that not only regulate the water supply automatically, but also display the indicators on special screens. They can have push-button, touch, or remote control. But in everyday life such equipment is unnecessary.
Mixer with electronic thermostat
Where should I look for a refrigerator thermostat?
The thermostat is always connected to the temperature setting button or knob in the chamber. Depending on the refrigerator, the thermostat may be located:
- inside the refrigeration chamber itself;
- outside the refrigerator.
Inside
This arrangement is typical for earlier models of refrigerators of the “Nord” brand and others. If you open the refrigerator compartment, you will be able to see a small plastic box located on one of the panels. This is exactly what a thermostat is.
Outside
New refrigeration units are designed slightly differently. In them, the device you need is located outside the refrigerator compartments; as a rule, it is located in the upper section of the refrigerator, above the door itself. But it can also be located in another place.
Important! In any case, the principle is the same: the temperature regulator is located where the switch handle is. To get to it, you need to remove all protective elements.
Buy a thermostat for radiators.
Buying electronic regulators for radiators is a smart decision that will lead you to saving energy and creating a comfortable home atmosphere. The devices are easy to install without the help of specialists, and are also characterized by a very reasonable price for their functionality. The price for a temperature controller on a heating radiator in our online store is current and will please you.
Buying a thermostat for radiators is easy. Call us, place an order, and we provide discounts on equipment sets for the entire apartment!
Signs of a broken temperature relay:
- The refrigerator runs continuously and does not turn off on its own.
- The unit begins to freeze quite strongly inside the refrigeration compartment - where in normal mode there should be a low, but still above-zero temperature.
- The refrigerator turns off spontaneously and then no longer makes sounds.
Important! Any compartment of the refrigerator compartment must be in good condition and perform its functions well. If you notice a malfunction, then follow the link to understand how to solve the problem when the top chamber does not work in a Samsung refrigerator.
Let us now consider each of these situations separately to understand how the refrigerator thermostat is repaired.
The refrigerator does not turn off on its own
To make sure that the cause of the refrigerator breakdown is the temperature controller itself, do this:
- Disconnect the refrigerator from the power supply.
- Remove food from it and defrost thoroughly.
- Move the thermostat knob to the “Max” position or turn on the freeze, if available.
- Place a thermometer on the middle shelf of the refrigerator, but not the freezer - it will be better if it also has a negative measurement scale.
- Turn on the refrigeration unit, empty, without food.
- Wait approximately 2 hours, then quickly remove the thermometer and evaluate its readings.
Blacked out and fell silent
There could be as many as 3 reasons:
- The thermostat is broken;
- the engine start relay is burned out;
- The refrigeration unit motor has burnt out.
The last two reasons are, of course, incredibly serious. But at the moment we are interested in the first one. In order to make sure that you need to replace the thermal relay itself, you need to check it:
- Turn off the refrigerator's power supply.
- Locate the thermostat and then remove the protective covers.
- Inspect the device carefully.
Important! As a standard, the temperature controller has three to four multi-colored wires. One of them is usually yellow along with a longitudinal green stripe. This is the ground wire. We won't need it, so put it aside so you don't accidentally catch it. Absolutely all wires that supply the thermal relay are connected directly to each other. If, after connecting the refrigerator to power, you hear a smooth sound (humming) of the engine, this means that the temperature controller itself has failed, and you will be forced to replace it with a new one.
Procedure for replacing the temperature relay
Repairing the refrigerator thermostat yourself will not take much time. For example, let’s take the “Nord” refrigerator:
- Remove the top hinge cover and unscrew the existing bolts.
- Remove the refrigerator door.
- After this, remove the plug directly in the roof of the refrigerator and unscrew one screw - as a rule, it has a built-in hexagon.
- Unscrew the screws that hold the roof in place and remove it.
- Remove the temperature control knob.
- Pull out the temperature regulator, first unscrewing the 2 screws that secure the bracket.
- Replace the unit with a new one and perform all the steps, but in reverse order.
Important! Sometimes the freezer can malfunction and the operation of the entire system is disrupted, which leads to food spoilage. Find out some useful tips on how to get out of the situation if the upper chamber of the Indesit No Frost refrigerator does not freeze.
By and large, no matter where the thermostat is located, its repair looks approximately the same:
- Get right down to the detail itself.
- Disconnect the capillary tube from the evaporator body itself.
- Carefully pull it directly out of the housing.
- Disconnect the relay.
- Repairs: Carefully insert the new bellows tube, and then securely fasten it to the evaporator itself.
- Connect all the necessary wires and attach the relay in place.
After the replacement repair work is completed, it is necessary to check the serviceability of the equipment. Read on our website about how to set the temperature in a Samsung No Frost refrigerator.
Main selection criteria
A huge assortment of faucets with thermostats creates a lot of problems for the unprepared buyer. After all, choosing the right model from this variety is quite difficult.
What to look for before buying?
To find a device that will allow you to shower comfortably, will last at least several years and will not stand out too much in the bathroom design, you need to pay attention to a number of parameters.
Important characteristics:
- body material;
- valve type;
- presence of a fuse;
- connection method;
- minimum possible working pressure;
- manufacturer.
Housing material
The service life of the mixer largely depends on the reliability of the housing. The most reliable and, accordingly, expensive materials are considered to be brass, bronze, and copper. If the appearance of the faucet, and not its strength, comes first, then you can choose a ceramic product.
Manufacturers also offer models made of plastic and aluminum-silicon alloy (silumin). Yes, these devices are quite cheap, but they will not last very long.
Which valve is better?
An important component of any thermostatic faucet is the valve. This element is often made of ceramic, rubber or leather. The last two materials are used to produce cheap models, which is why many problems arise.
A leather or rubber valve wears out very quickly. This can cause many unpleasant situations in the future. But replacing such a part is not difficult. The procedure is similar to the process of replacing the gasket in a regular faucet without a thermostat.
Leather and rubber are soft and short-lived materials. It is because of this that the problem of valve seat damage often arises. If solid particles get under the element from the water, the part is damaged, which leads to a flood. Therefore, if you find any problems, you need to contact a specialist.
A ceramic valve is more reliable and durable. In this case, a special design prevents debris from getting under the element and, accordingly, the saddle remains intact.
The ceramic valve pushes out all solid particles trapped under it. Moreover, the element has a graphite coating on top, which significantly extends the service life of the mixer. When operating thermostatic equipment with a ceramic valve, do not use brute force when closing the valve. Failure to comply with this rule will result in the faucet head breaking. Therefore, to shut off the water flow, you should turn the valve all the way, and the ceramics, precisely adjusted to size, will do the rest.
Why is a safety button needed?
Every more or less well-known manufacturer of thermostatic mixers installs a fuse in their products. This element prevents accidental changes in water temperature. After all, there is always a risk that with one awkward movement you can turn on boiling water and get severe burns. Most often, the element is made in the form of a button, painted red. In this case, to change the water temperature, you need to release the fuse. This useful feature will be especially relevant for parents with young children.
Mixer connection diagram
When choosing plumbing equipment with a thermostat, you need to ask the seller about the connection diagram for water pipes to the device. After all, if you connect everything incorrectly, the mixer will break and will need to be repaired.
To connect a thermostatic mixer in a bathroom or shower, you can use flexible hoses
Check that the equipment is adapted to Russian standards.
Minimum operating pressure
An important characteristic is the presence of sufficient water pressure in an apartment or private house. The vast majority of devices operate at a pressure of 0.5 bar. If in fact it is lower, the equipment will not function properly. Accordingly, there is simply no point in installing it in your bathroom.
Which manufacturer is better?
The plumbing equipment market is regularly updated with new products. But if you need to purchase a thermostatic mixer of the highest quality, then the best solution would be products from Oras , Jacob Delafon , Grohe , and Hansgrohe . Oras brand products are suitable . The company always tries to maintain the most favorable ratio between product quality and price. In production, the company primarily uses plastic or brass.
The cost of thermostatic mixers from Oras is relatively low and amounts to about 180-200 dollars
Since its founding, the French manufacturer Jacob Delafon has established itself as a reliable supplier of brass plumbing equipment. Its distinctive feature is the provision of a five-year warranty on all faucet models.
The appearance of Jacob Delafon products has a classic design. Equipment costs typically range from $150 to $450. Grohe boasts the largest range of faucets . Grohe uses brass in production. Therefore, it is not surprising that faucets last at least 10 years.
Although Grohe products differ from their analogues in quality and reliability, they are quite expensive.
On average, the price of mixers is $300-700. Hansgrohe , also deserves respect .
Their thermostatic mixers are distinguished by their sleek design and high durability. Chrome plated steel is used for the manufacture of products. Hansgrohe faucets are suitable for small bathrooms. After all, the equipment is compact and relatively inexpensive - around $200. The Hansgrohe company provides a 5-year warranty on all its products, which is quite good considering the stated price. Almost all manufacturers offer the buyer several lines of mixers with thermostats.