- Build the foundation.
- While the concrete gains at least half strength, you complete site preparation. If at the bottom of the pit (the fertile layer has been removed) the soil allows water to pass through well (sandy, sandy loam), add crushed stone to the bottom. It can be compacted, or you can do without it. If there is loam or clay under the fertile layer, you will have to fill the pit either with the same soil (but not fertile) or with clean clay. It must be compacted well to avoid creating voids in which water will accumulate (it is better to lay it soaked to a paste in layers).
- A layer of waterproofing is laid on the finished foundation.
- Support posts for the roof are installed and secured.
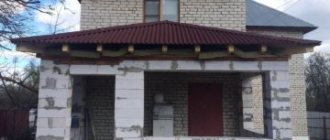
- They tie the racks: they nail a beam 100*150 mm thick around the perimeter. It can be nailed to the outside of the studs or between them. Sometimes the racks are nailed after the floor has been laid. This is not the best option: the floor will most quickly become unusable. With such a structure, in order to replace it, you will have to dismantle everything, right down to the roof. If you install the racks first and then the floor, it can be repaired without problems. This is what the assembled frame of a veranda attached to the house looks like. Intermediate racks are needed only if the width of the veranda is more than 3 meters.
- Floor beams (beam 100*150 mm) are attached to the foundation and support beam. The step of their installation corresponds to the step of installing piles or columns.
- Assemble the rafter system.
- Side railings (for open ones) or walls (for glazed ones) are installed. At this stage, the general technology ends. Further, for indoor ones it is longer; an open veranda is easier to attach to the house:
- For open ones, floor boards are nailed onto the beams.
- For glazed ones, an insulated floor is made. The subfloor is nailed to the beams. There are joists on top, insulation between them, and a finished floor on top.
These are just general steps. To have a more complete idea of how to make a veranda for a house, we will next consider the most problematic aspects of construction in more detail.
Foundation
If a veranda is attached to a house, the foundations are very rarely made coherent. Firstly, the house has already settled, the shrinkage has passed. If a “fresh” building is rigidly attached to it, problems will inevitably arise. If it is possible to tie them, then only on stable, reliable soils, on which no movement occurs. Secondly, heavy foundations are rarely made for extensions of this type. The building itself turns out to be light - especially an open one made of wood or frame - and the load-bearing capacity of a pile or columnar foundation is sufficient.
In general, verandas are placed on the same foundations as houses. Another thing is that most of them are on columnar foundations: the costs are small and the time required is short. And although all architects and designers claim that it is much more difficult to install a correct columnar foundation than a strip foundation (though a strip foundation is much more expensive), people install exactly the pillars.
Column and pile foundation
If you decide to attach a veranda to a wooden house, you can install a columnar foundation. To make it yourself, you need to find out at what depth and at what distance the supports are placed. The distance between the columns depends on the material from which the extension will be built. If these are lightweight materials - wood or a light frame structure - you can place them in increments of 1.5 meters. For heavier ones, the distance should be from 1 meter.
Columnar foundation for the veranda - the columns are made of bricks
When choosing the depth of columns, there are two approaches:
What is good about this option for the foundation for the veranda of the house? It is quickly built, the cost of work and building materials is low.
The veranda is attached to a brick house on a strip foundation
Disadvantages: difficult to predict his behavior. Moreover, both deep and shallow. With a shallow foundation, everything depends on winter and the degree of soil saturation with water, which is impossible to predict and calculate. When buried deep, there is also a problem: it is not known what is under each of the piles. After all, geological surveys cannot be done at all points. And in those areas where the soil has a complex layered structure, it is quite possible to get into some kind of pocket, due to which the pile will not behave as expected. Also in the case of piles or deeply buried columns, it is necessary to remember about lateral heaving forces. They may well break long and thin piles or pillars. Therefore, on problematic soils, strong formwork (metal, asbestos) is used for piles and they are also reinforced: when making pillars, a steel pipe coated with a primer is inserted inside, around which the masonry is laid. It is also possible to lay reinforcing belts. When making bored piles, three or four reinforcement rods must be inserted inside, which add strength to them. Building a veranda with your own hands on a pile foundation can be done quickly and inexpensively, but the risks on heaving soils are great.
Monolithic: strip and slab
If you are going to build a veranda from brick, rubble or other similar heavy materials, and even with heavy cladding, you need a monolithic foundation. You will have to either cast a tape or make a slab. They are made according to all the rules without any exceptions: with formwork, reinforcement, vibration, etc. Completely based on technology.
When building such a foundation, it can already be connected to the main one: you will have to build it to the same depth and, most likely, it will behave stably.
Advantages: high reliability and stability. Disadvantages: significant cost and lengthy construction process.
Bedding
If the house is located on dry soils or in a region where frost heaving is just a horror story, if it does not have a base, a veranda attached to the house can do without a foundation. In this case, the fertile layer is removed along with the vegetation, the bottom of the pit is compacted, then crushed stone is filled in, compacted, then sand, which is also compacted. On this base you can already lay a flooring: wooden, paving slabs or slabs.
A veranda attached to a house can be without a foundation
One “but”: the racks on which the roof will rest still need to be strengthened in some way. Small piles are made for them or columns are laid (from approximately the same depth where they began laying crushed stone under the flooring).
How thick should I make the bedding? It depends, firstly, on the thickness of the fertile layer, and secondly, on the choice of floor covering. If these are wooden panels (as in the photo), you need to choose the layers so that they lie flush with the ground. If you are planning to lay paving slabs, you will have to consider their thickness. Although, it can be raised slightly above ground level to separate it from the yard. But then they put a border along the edge.
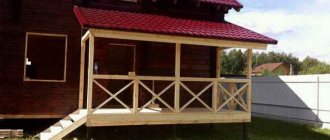
In this photo, the open veranda is attached to the house without a foundation - it’s more like a summer shed with a polycarbonate roof and an open wooden fence
Basic rules for adding a veranda to a house and its exterior design
When preparing for construction, remember four important points:
- For heavy construction, choose a strip foundation; for light construction, choose a pile foundation. In both cases, its height must coincide with the height of the housing foundation.
- An additional room must be built close to a large building to prevent drafts and excess moisture from getting between them.
- Maintain proportions between objects. A large house will be decorated with a spacious room, a small one - vice versa.
- Reconstruction is best carried out after the main building has settled, that is, two or three years after its construction.
Exterior finishing and decor
In addition to the materials listed above, basement and facade vinyl siding is often used for finishing. At the moment, many varieties of it are sold, including those designed to look like wood or brick. Siding is durable and lightweight, is not afraid of exposure to water, and is easy to cover walls with.
- Decoration Materials
Fiber cement siding: material features and installation nuances
Glazing with plastic double-glazed windows from top to bottom looks beautiful. Another type of PVC windows are soft, removable panels. This is a thick and transparent film. It is attached to the frame of the object and is convenient because it can be easily removed at any time.
To decorate wooden and brick houses, forged and carved elements are used on the roof, balcony, and porch. Landscaping adds special comfort and beauty to the building. Trees planted nearby will provide protection from the sun on a hot day. Lush, hanging plants in hanging pots and large, decorative pots look beautiful, as well as ivy hanging around walls and columns.
Photo: Instagram @elit_panorama_lumon
Photo: Instagram @ricdesignbuild
How to attach the stand and bottom trim
Work on the construction of the veranda frame begins after the foundation concrete (if used) has gained some strength. 50% of the calculated value is enough, and this at a temperature of +20° C will happen in 4-5 days. Then, on top of the concrete, in those places where the posts or trim will be attached, two layers of waterproofing are laid. It can be roofing felt, roofing felt, folded in half. You can coat it twice with bitumen mastic or use other modern materials.
Then there are two ways:
- secure the racks and then the harness;
- first the strapping, there are stands for them.
If the first option is chosen, special holders are inserted into the foundation when pouring. These can be different devices (see photo), but the most convenient is a metal plate in the form of an inverted letter “P”, to the bottom of which a pin is welded, which is walled up in the foundation. A stand is inserted into this plate (the end must be treated with an antiseptic), its level is checked, and secured with bolts or nails.
How to attach posts to the foundation
After all the posts have been positioned and secured, the framing bars are nailed between them.
With the second option, the situation is different: the racks will have to be attached to the harness. The strapping beam is attached first. It is more convenient to do this if studs are embedded into the concrete at some intervals. Then holes are made in the beam in the right places, it is put on studs and secured with bolts. Then, using one of the methods suggested in the photo, the racks are installed.
Options for attaching racks to strapping beams
Any of these methods does not exclude the use of metal corners. They make the fastening more reliable, which is very important in this case. After all, the racks will support the roof, as well as the walls or fence.
Installation of wooden guides
Bolt temporary wood tracks around the perimeter of the house. Use your spirit level to make sure they are level. Mark on the timber where the end of the veranda is and draw a rope across it. To check that your porch is square, use the 3-4-5 rule. This means you measure three meters from the edge of the window sill and four meters along the front edge of the veranda. It is square when the diagonal line connecting these two points is five meters in length.
Attaching the joist to the harness
They can be mounted on top of the harness, or at the same level with its top edge. You need to decide exactly how you will do this at the very beginning of the work: this will determine at what level it will be necessary to attach the support beam to the wall of the house (the height of the joists is taken into account or not). Methods for attaching floor joists are shown in the photo below.
How to attach floor joists to the frame
Position marking
Refer to your specifications to find out how far apart the supports should be. For this veranda it is every 1500 mm. Measure and mark every 1500mm from the window sill (entrance to the house) to the edge of the deck. Then mark every 1500mm and along the edge. Draw rope lines to create a grid, each intersection point on the grid marks where your supports should go. Use spray paint to mark these spots on the ground.
Attaching the roof of the veranda
The porch attached to the house is usually covered with the same type of roofing as the crowbar. There may be several options, and the organization of the roof connection depends on how and to which wall you attach it. If the roof is a continuation of the roof slope of the house, you need to join two rafter systems. In this case, they say that the roof of the veranda is adjacent to the roof of the house.
Then the procedure is as follows:
- The top trims are attached to the veranda posts.
- Transverse ceiling beams are nailed to the frame. The ceiling is then sewn to them.
- The long rafter legs of the house are shortened. They should not protrude beyond the wall.
- Veranda rafters are made from planed boards, which are cut at an angle from the roof side so that they adjoin the existing ones (see photo below). To make it easier to work, you can make a template, according to which you can then prepare the rafters on the ground. The rafter legs are attached to the house system through nails; metal reinforcing pads can be placed on the sides.
- To increase the rigidity of the structure, spacers (anti-snow supports) are installed between the rafters of the house and the extension. They are shown in the photo explaining the design.
Connecting the roof truss system of the veranda to the roof of the house
If the width of the veranda is more than 2 meters or heavy roofing material will be used, spacers are installed to prevent the support beam from sagging. It is better not to nail them on the side, but rather to insert them between the ceiling beam and the rafter leg.
In order to prevent the roof from sagging, spacers are installed between the ceiling beams and rafters
More often it turns out that the roof of the veranda attached to the house is adjacent to the wall. In this case, a groove is made in the wall, a special wall profile is placed in it, the other side of which is laid on the roof covering. The place where it joins the wall is sealed with sealant.
How to attach a veranda roof to the wall of a house
The second option differs only in the shape of the wall profile: it can be made independently from a sheet of roofing iron. This design is distinguished by the presence of a beam, which allows you to move the bend away from the wall of the house and cover possible errors when laying roofing material at the junction. Also, in this option, the apron is not attached directly to the wall material, but to a beam with a beveled edge, mounted in the groove.
The second option for connecting the roof of the extension to the wall of the house
Some questions may arise about how to attach the rafters to the outer top frame, because its dimensions do not allow making cuts, as on the mauerlat. The solution is the usual: using corners (see photo). Instead of corners, you can use small cross-section bars.
Method of attaching veranda rafters to the top frame
Maybe not the most elegant solution, but reliable. After everything is covered with roofing on top, clapboards will be added underneath, they will not be visible.
Make a plan
Before you pick up a hammer, there are a few things you need to consider before building your new deck. Checking underground cables and pipes and deciding on the overall design of your deck are just some of the things you'll need to do before starting construction.
Timber extension: walls
An extension made of timber has one common wall with the house, and the rest are made on the basis of a frame or without it. In the first option, the wooden frame is covered with OSB boards or boards, and insulation is pre-attached inside.
This option will be cheaper since the material is used only for making the frame. On the outside, a special cladding is used to imitate timber. You can cover the walls of your house with your own hands. To do this, you need to fix the sheathing on the facade, to which the external finishing is nailed.
If you want a house made of timber with a warm veranda, bathhouse or additional living space to look like a single whole, then choose a frameless assembly.
Marking for wall beam
On the wooden wall form board, measure and mark the length of the support beam. Then use a circular saw to cut the wall beam to size.
You will need to make a notch at one end of the wall beam so that it sits flush with the brickwork. Use a square to mark the recess, then use a circular saw, hacksaw and chisel to make the cut.
Note!
Do-it-yourself gazebos for a summer residence - 300 photos of exclusive ideas. Instructions for building a beautiful gazebo (diagrams, drawings, foundation, roof)
How to insulate a veranda for winter living: floor, ceiling, walls. Examples of insulation from the inside and outside (instructions + photos)
Do-it-yourself wooden veranda: step-by-step instructions with photos and descriptions. Open and closed options + new designs
Mooring cord tension
Drive a nail into the end of the first beam and another nail into the wall beam. Pass the string between these two nails. This will ensure that the beam is straight when installing it. Secure the beam to each support, if possible on both sides of the beam.
Using the first beam as a guide, measure and mark on the support beam the required distance to where the next beam will go. Mark each support so that your second beam lines up with the first beam.
Installation of all beams
Use a nail gun to secure a second beam to each support on both sides of the beam. Now secure all the beams to the supports.
When you finish attaching the beams, measure the distance between them. Then cut pieces of wood long enough to fit between every other beam. This will provide the deck with additional support. Use a nail gun to secure the timber between every other joist. Your porch is now ready to be installed.
Roof installation
The roof is installed using standard technology, taking into account the characteristics of the building materials used. The roof can be gable or single-pitch. In both cases, the rafter system is made simply: the sheathing is installed along the load-bearing elements, and then the roofing material is attached.
note
In order for a house made of timber to look harmonious, the roofing material must match or be identical to the roof covering of the main building.
Among modern materials there are the following popular varieties: soft roofing, ondulin (Euro slate), metal tiles (in the form of profiled metal plates imitating tiles).
The roof of the extension can be made separately or be shared with the house. The second option is carried out during the reconstruction process, when, for example, an attic room (bedroom, children's room) is built and the configuration and size of the roof of the old house is changed entirely. It is difficult to do such a volume with your own hands; it is better to hire professionals.
Selecting a door type
The types of mechanisms used in the manufacture of veranda doors are divided into three types:
- sliding;
- swing;
- harmonic.
Doors to the terrace can swing inward or outward - this is the standard method and is used most often. It is easy to install and also has a relatively low installation cost. This view allows you to choose the threshold height option - high, low, or without it. Hinged doors require additional space to open, and the door width should not be more than 1.1 meters.
If you need to save space, or swing doors create inconvenience, then it is better to use sliding doors. Such structures have a tight fit to each other and, accordingly, have good thermal insulation properties.
Exit sliding doors to the veranda
Sliding doors can provide high noise insulation and are easy to operate due to their smooth sliding. The main disadvantage is the higher cost, as well as the ability to open only half of the glazed area at a time.
Accordions are another option for decorating doorways on verandas. They are more ergonomic compared to swing doors, but have a more complex design, so they are rarely used in practice. But such doors are able to open up the veranda as much as possible compared to sliding doors, without losing any space.
Folding door increases door opening
Peculiarities
Usually there is no heating in the veranda. Entrance doors are located inside. The timber structure looks great, is durable and does not require complex maintenance.
A timber veranda will be a successful addition to a private home.
Classification of terraces is carried out according to different criteria. Depending on the type of extension, they can be corner, end and façade. It is important to choose the right place for the extension so that wind and precipitation do not spoil your vacation.
Also, the veranda can be:
- open - mainly used in summer, with the arrival of spring;
- closed with glazing - polycarbonate or special curtains are best for finishing;
- combined – the presence of sliding partitions is noted.
Sometimes the room is insulated. Due to this, you will be able to use the veranda even in the cold season. When filled, the structure can turn into a full-fledged part of the house. In most cases, verandas are made with a minimum number of interior components.
Timber is an excellent material for constructing a building. Its advantages:
- good appearance;
- low cost;
- ease of work;
- strength.
Having chosen what type of room you like, you can begin drawing up drawings.