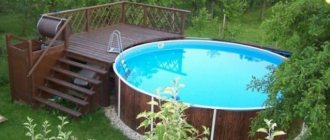
An artificial waterfall in a modern landscape is considered one of the most spectacular elements of aquatic design. It brings the same dynamics as a fountain, but the water in it does not rush upward, but flows down from above in one or several streams along a prepared base. And before you start arranging an artificial waterfall on the site, you need to choose a place, shape and size for it, decide on the composition - the relative position and relationship of all the constituent elements.
Pond at the dacha
Today, creating ponds with your own hands has become a popular trend in landscape design, and there are many reasons for this.
Having decided to create such a masterpiece with your own hands, you should calculate all the details, or in other words, create a project for the future oasis.
It will be much easier to make a waterfall if there is already a pond on the site. If the situation looks the opposite, then you will need to carve out a place for him.
Material
In order for an artificial waterfall to look beautiful and not be subject to natural disasters, you need to use high-quality materials when assembling it.
By the way, this applies not only to internal communications, but also to cladding. By exploring fresh ideas, you can come to the conclusion that the basic foundation is almost the same for everyone. You will need:
- Sand.
- Pebbles.
- Cement.
- Mixtures for creating waterproofing.
- High quality pump.
- Stone for facing.
- Set of tools - shovel, rake, spatula, brushes.
- Primer.
- High-quality water supply system.
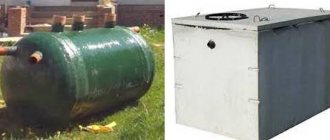
The basis of any artificial waterfall is the presence of at least 2 containers. If there is no natural storage facility on the territory, an artificial one will have to be created.
The main nuance of such a construction is a high-quality foundation pit. It must be cleared of roots and unnecessary living creatures in advance, so that in the future the roots do not damage the seal.
Deciding on the shape and depth
As for the shape of the pond where the water will flow, then everything is at the will of the master. The bowl can take on the most unimaginable shape according to the design, taste preferences, and its capabilities.
The only thing I would like to focus on is the difficulty of carrying out construction work with highly complex outlines.
If you have confidence in your own abilities, or this is not the first similar work, then there should be no problems.
If you plan to have livestock or abundant vegetation in the pond, then it is better to give preference to a greater depth of the pit; in all other cases, “shallow water” is allowed.
Required Tools
You will need the following tools:
- screwdriver;
— construction pistol;
- drill;
— a set of drill bits;
Russian schoolchildren named their heroes
When you want to go camping, but there’s snow outside: Maggie organizes a movie night for the kids
10 unique items that were invented specifically for filming (photos)
— dust-proof construction mask;
- garden rake;
- protective glasses;
- shovel;
- roulette;
- utility knife.
Waterproofing from PVC film
Almost the most important stage of work, on which the operational life of the waterfall will depend.
For waterproofing work, it is better to choose PVC film. Thanks to its properties, it will increase the service life of the object for several decades to come.
- A DIY mailbox is a beautiful decoration and a useful addition to a suburban area
A house for children is a place where a fairy tale becomes reality, we create it ourselves
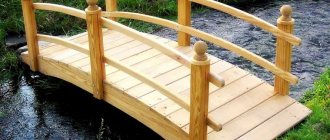
Bridges for a dacha - a picturesque element of the landscape in a suburban area
We lay the film so that the edges protruding above the pit are at least one and a half meters. This is necessary so that the film itself can be properly attached in the future.
Important! If film is chosen as waterproofing, then the water will have to be released for the winter period. This need is dictated by an increase in the volume of liquid during freezing, which will consequently damage the integrity of the film.
Internal system
Experts recommend taking care of the inside of the waterfall in advance. If a water filter is not installed, the risk of pump failure and the death of living organisms will be inevitable.
In order to avoid having to scoop up water in buckets in the event of a pump breakdown or draining water for the winter, it is advisable to think about a water disposal system, which will ultimately pay for itself in a few years.
For the internal skeleton of the structure, you can use an affordable and stable option with PVC pipes. They are not subject to corrosion and can withstand sudden temperature drops.
Waterproofing with concrete
One of the most popular waterproofing options is concrete. In this case, the bottom of the pit is lined with film, as in the first case, with the only difference being that a wire frame is installed on top.
The bottom of the future waterfall at the dacha is filled with concrete mortar, firmly securing the bottom of the frame in it. In this form, everything should stand for at least a day, and only after the concrete has completely dried should the walls be filled with mortar.
Stage 2 – digging a pit
You have decided on the size and shape of the bowl, now you need to drive in pegs along the intended contour and pull the rope. The soil formed during the work should be cleared of stones, roots and other debris. Store the soil in a separate place, it will be useful when arranging a waterfall and pond. The earth from the walls of the bowl will crumble, this is inevitable. Therefore, they need to be periodically moistened and compacted. When the pit is ready, add a layer of sand (10-12 cm) to the bottom and compact it thoroughly.
The pit for the pond is of regular oval shape, the walls and bottom are carefully compacted. The depth of just over a meter will allow it to breed fish and aquatic flora.
Waterproofing with plastic
To simplify the task as much as possible, you can purchase a ready-made plastic bowl in the store.
The advantage of this option is also the absence of a waterproofing layer. Not to mention that cleaning such a pond is a pleasure.
Loggia location: how to choose plants for the winter garden
Plants are different: some love a dry climate, others need moisture and coolness. The location of the balcony plays a big role in the choice.
If you're a fan of evergreen islands, choose plants that don't lose their leaves. They are usually low maintenance and always in fashion.
Green pot dwellers are great friends of the Provence style
The romantic mood on warm, cozy evenings will take you to the French countryside
Balcony on the north side. There is practically no constant heat here, and the sun's rays provide diffused lighting. If for some reason you have not yet had time to buy phytolamps, you can choose from green friends that do not require constant light: gardenia, begonia, adiantum, ficus.
The “northern” balcony does not get much natural light, so you need to take special care of this
Hanging flowers receive more daylight
Balcony on the south side. Almost until winter it is always warm here, the plants receive maximum natural light. You can organize a real tropical corner: with cacti, palm trees, tangerine trees. But remember: no matter how much plants love heat, the greenhouse effect has a detrimental effect on their roots and leaves. If you have not provided a split system, and regular ventilation cannot reduce the temperature, close the windows with thick curtains during the peak of solar activity (from 11 a.m. to 4 p.m.). Don't forget to spray or turn on the humidifier.
A piece of wild nature on your balcony - what could be more beautiful?
Balcony on the east side. Open the windows for ventilation - in the first half of the day, “oriental” plants will receive the right amount of light. And in the afternoon, when the sun's rays become more intense, shade the loggia. Ginger, coffee tree, and hanging flowers feel comfortable in a temperate climate.
Balcony on the west side. Fuchsia, groundsel and monstera love the constant warmth of the “west”, but they also need shading. You can create a romantic Provence in the winter garden with the help of climbing plants: morning glory, wild grapes, hops.
Several options for creating a waterfall
In practice, two methods are used to obtain the desired result. Let's look at them.
Using a ready-made bowl (mold). There are no fundamental requirements for parameters; even various sculptural compositions are allowed.
Massive cascading waterfall. Quite painstaking work awaits those who choose this option. Please note that here you will need exclusively natural stone, which will certainly take a toll on time and effort.
Sandstone or even boulders are more suitable for these purposes. For the smoothest flow of water, you should choose flat stones.
In the same case, if, according to the idea, the stream of water should break against the stones below, creating a fountain of spray, then in the upper part you need to pass the stream between the stones that fit tightly to each other, and the lower tier itself should be placed further away so that the water can foam.
If the surface is made uneven, then several “rivulets” can easily be achieved.
Decoration methods
As mentioned above, the waterfall itself can be decorated with any types of artificial and natural stone, but preference is given to sandstone, marble and granite. Of course, you can take any beautifully shaped cobblestone on the road and use it to create a composition. The stones can lie freely. In this case, they are moved over time and the design is changed at will. The structure can also be strengthened with cement mortar, which will firmly adhere the monumental structure. A wide variety of materials are used for decoration:
- Pebbles (pebbles);
- Sand;
- Shells;
- Seaweed;
- Coins;
- Ceramic figurines of frogs, snails and other aquatic inhabitants.
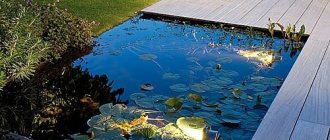
The bottom of the tank is covered with all this decorative splendor to give it a natural texture. When choosing algae, focus on those that feel great in the local climate. The waterfall itself is lined with stones and their imitation. Rare tufts of greenery visible in the crevices add naturalness to this “interior”. In more expensive options, lighting is installed directly under the steps of the cascades. The wiring is properly insulated, and the lamps are moisture-resistant. This design looks charming especially at night.
Plants for decoration
First of all, the adjacent area is decorated, since the “edging” creates a panoramic view. A corner with murmuring water should calm and set you in a positive mood, so soft, lawn grass is planted under your feet. It will be pleasant to walk on this surface barefoot. Flowering shrubs are planted around the artificial pond and waterfall. The idea of a “Linnaeus clock” would be original, when each species opens its bud petals at a certain time, and these periods do not overlap. This way you will have an ever-blooming garden. Among the bushes, preference is given to those who like high humidity:
- Daylilies;
- Manniku;
- Arrowhead;
- Irises;
- Azorelle;
- Saxifraga;
- Kaluzhnitsa;
- Ferns.
In addition, colorful reeds are planted, which are associated with quiet backwaters. If you decide to decorate your house with a waterfall, then the highlight of the program is furnished with indoor plants in pots. In rooms decorated in minimalism or with Japanese motifs, water structures framed by miniature bonsai trees look beautiful. Such an interior object is suitable for decorating a living room, a winter garden or a “corner of peace” in any other room. Decorating waterfalls also has styles. They are conventionally divided into three broad groups:
- Natural. They try to bring the waterfall as close as possible to the natural original.
- Ethnic. Clay pots, amphorae, ceramic tiles, and an abundance of ornaments and patterns are often used here. The entire structure gives the impression of being handmade.
- Modern. They use simplicity of shape, straight lines and cool lighting. Water flowing in streams on glass (mirror type) is one of the brightest representatives of the style.
What could a waterfall be like?
When all the difficulties associated with the technical side of the issue are already far behind us, it’s time to start the pleasant part - decorating.
There are absolutely no design rules here, except perhaps for securing decorative elements. Only a creative approach and creative thinking will allow you to create an exclusive item that will delight you for many years.
Alternatively, you can look at a photo of a waterfall on the site and choose the idea you like, recreating it in your dacha.
In practice, the most common ways to design a waterfall with your own hands are:
Cascade. It involves the descent of water along stone “steps” made of characteristic elements of a more angular shape. Granite or slate will do the job perfectly.
Mountain Creek. River or even sea boulders of all sizes would look appropriate in this design. It is along them that the water will descend; the main thing is to form the correct slope. The idea allows for permutations and other experiments.
Straight waterfall. Already from the name itself it becomes clear what this creation is. This design requires a very powerful pump, since the amount of water involved is greater than in other options.
Artificial waterfall. It is a sculpture that resembles a waterfall only with water. In all other respects, it is a deliberate technique that fits perfectly into different stylistic directions: loft, hi-tech.
The peculiarity is severity, pretentious lines and not the slightest pretension to Mother Nature.
From all this it turns out that making a waterfall on the site will not be difficult or costly, because most of the materials used are quite affordable.
As additional decorative elements, you can use plants (aquatic or terrestrial), fish and much more. There is no doubt that the result will make you proud and will be the envy of all your neighbors.
Water source
Site selection, overview and composition are not the only planning issues that need to be addressed. Even before building a waterfall, you need to decide on the source of water. There are three options:
- Water intake from the water supply system. This is the most common option for swimming pools, fountains, and artificial reservoirs. And the waterfall is no exception. Essentially, this is a closed cycle water circulation system, with periodic replenishment to compensate for natural loss due to evaporation, less than ideal waterproofing, and splashes.
Even in technical equipment, such a waterfall is very close to a pool or fountain - the main technical elements of the system: pump, filter, pipes. But in this case, you can use not only a surface pump, but also a submersible one. A submersible pump is installed in a reservoir at the foot of a waterfall, a surface pump is installed at the mouth of a stream on a hill.
It is easiest to organize such a system for compact options, small cascades, modest-sized artificial reservoirs and streams. Although for a stream through the entire site it is possible to organize a closed water supply cycle - it is a matter of pump power, pumped volume of water and the capabilities of the electrical network. - Water intake from an external reservoir. If the site is located on the shore of a lake, river or stake, then they can be used as a source of water supply.
In this case, the water also moves through the cycle. Although, of course, this cycle cannot be called completely closed - it’s just that a natural reservoir is also used to discharge water. - Water intake from a natural source on the site. The option is extremely rare, non-standard - after all, we are talking about a spring or stream. If it is a stream, then you will still have to make a lot of effort to create a system of cascades on a separate section of the riverbed. With a spring it is even more difficult - as a rule, they do not have a high flow rate, and they are not located on a hill. Therefore, you will have to organize a water supply to the source of the waterfall, and literally select a pump that would not drain the spring and would not “catch” air.
Fountain pump - manufacturing technology
A homemade pump for an indoor or portable fountain is made on the basis of a fan with lighting for the system unit. Operates from a 12 V DC network and is connected to a household network via a power supply. The portable fountain can be powered from a car battery.
Pump complete set
To make a fountain pump with your own hands you will need:
- computer fan;
- power supply 12 V, 350 mA;
- plastic container with lid;
- plastic bowl;
- aquarium hose;
- studs M3 and M4, nuts and washers for them;
- M3 screw;
- used gel pen;
- plexiglass S=1.5 mm;
- aluminum sheet S=0.2 mm;
- Janet syringe 150 ml.
Pump configuration - auxiliary elements
Step 1. The main element of the pump is the water pump. In order to cut out its parts as accurately as possible and center them during assembly, it is necessary to make templates. They are made of sheet aluminum, quantity - 2 templates of each type. The size of the templates is 50x50 mm, the holes in the bottom plate are Ø10 mm, in the top plate – Ø4.5 mm. The holes for Ø3 mm pins in the corners are made symmetrically, the distance from the edges of the plate to the center of the holes is 12 mm.
Templates for pump plates
Step 2. Plexiglas 1.5 mm thick is drilled with a Ø3 mm drill heated over a flame. Clamp a sheet of glass between two identical templates and secure it with a bolt and nut. Align the templates and drill a hole in the opposite corner. Secure with a second bolt through the resulting hole. Drill the remaining holes with a heated drill of the required diameter. The bottom plate is made in the same way.
Holes in plate
Step 3. The edges of the plates are cut according to the template using a heated stationery knife. If necessary, clean with fine sandpaper.
Making plates for the pump
Step 4. Using a template, make a hole in the lid of a plastic container - a water tank.
Holes in the cover
Step 5. A piece of rod for a gel pen 40-50 cm long is inserted into the central hole of the upper plate. It plays the role of a bearing and an oil seal at the same time.
Bearing in the top plate
Step 6. The pump body is made from a 150 ml Janet syringe. It must be cut to obtain a ring with a diameter of 40 mm and a height of 13 mm. For smooth cutting, use a device: a stationery knife blade is attached to a flat piece of board using two bolts and nuts at a height of 13 mm from the plane of the board. Heat the blade with a soldering iron and apply it to the syringe along the entire circumference. At risk, cut the syringe using a utility knife.
Syringe cutting device
Step 7. The gel pen core is cut at an angle using a knife. A hole is drilled in the body of the syringe according to the size of the cut.
Manufacturing of body parts
Step 8. Using a hot glue gun, connect the prepared parts.
Connection of body parts
Step 9. Blanks for making an impeller are cut out of sheet aluminum - 2 disks Ø38.5 mm and strips 6 mm wide. Holes Ø4.5 mm and Ø10 mm are made in the center of the circles.
Impeller blanks
Step 10. The strips for making blades are slightly bent and applied to the disks according to the diagram. The diagram shows four blades, but for greater efficiency it is recommended to make five or six.
Blade mounting diagram
Determine the length of the blades locally and cut them to size.
Manufacturing of blades
Step 11. The blades are installed on the lower disk and glued according to the diagram.
Gluing the blades
Super glue gel is used for gluing.
Glue for gluing blades
Step 12. Apply glue to the upper edges of the blades and place a plastic casing on top.
Applying glue to the blades
Place the upper disk on top, place the unit under the load and wait about half an hour. After the glue has dried, process the edges with a file to eliminate irregularities and burrs.
Impeller bonding
Step 13. Cut the M3 studs to size - they should be slightly longer than the height of the water container. Screw the nuts onto them and put on the washers.
Preparing the studs
Step 14. It is more convenient to assemble the knot upside down. Place a top plexiglass plate with a bearing made from a gel pen refill onto the studs. Secure with nuts and washers at a distance of about 60 mm from the edge of the studs.
Top plate attachment
Step 15. Install the impeller on top with the large hole facing up. An M3 screw is inserted into the small hole in the impeller and secured with a nut on the bearing side.
Impeller installation
Step 16. Apply silicone sealant to the lower end of the plastic housing, place it (the housing) on the impeller and press it tightly to the plate. After the sealant has set, check the rotation of the impeller - it should not touch the walls of the housing.
Fastening the pump body
Step 17. Apply sealant to the end of the plastic housing and install the bottom plate by threading the pins through the holes. Secure with nuts and washers.
Bottom Plate Attachment
Step 18. Connect the fan to the computer and check its functionality.
Checking the fan's functionality
Step 19. Cut off the fan blades with a sharp knife and clean the cut area.
Fan blades are cut off
Step 20. Cut out a square measuring 12x12 mm from plexiglass, drill a Ø3 mm hole in the center and insert an M3 screw. Fuse the screw with a soldering iron so that the head is flush with the plane of the plexiglass.
Shaft manufacturing
Step 21. Place the shaft on the fan and center it by rotating the fan by hand. Secure with a nut.
Shaft installation
Step 22. Secure the shaft with a hot glue gun. The glue is applied evenly to avoid wobbling during operation.
Shaft mounting
Step 23. After the glue has dried, check the operation of the fan and measure the rotation speed.
Checking the motor operation
Step 24. Place a piece of gel pen rod on the bolt and secure it with super glue.
Seal fastening
Step 25. The pump is attached to the container lid with studs. The impeller bolt with a nut screwed onto it is also threaded into the hole in the cover, the lock nut is tightened and a piece of a rod from a gel pen is attached to its free end with super glue.
Installing the cover
The rod from the handle, placed on the impeller bolt, is cut along the circumference. This is necessary so that water under pressure flows out of the rod into the container and not onto the lid.
Rod cutting
Step 26. To attach the fan, cut off 4 M4 studs.
Cutting M4 studs
Attach the fan to the standard holes to the studs, and the studs to the cover using nuts and washers. Connect the motor shaft and the pump shaft with a flexible aquarium hose. Place an aquarium hose 0.7-0.8 m long onto the rod extending from the pump body.
Pump assembly
Step 27. Conduct initial tests without water. Connect the fan to the computer's power supply and turn on the pump. Check for the absence of beating, strong noise, grinding, and monitor the rotation speed.
Initial pump tests
Step 28. Test with water. The pump is turned over into its operating position and placed on a container filled with water. The hose coming from the pump is raised as high as possible and secured. Turn on the pump and determine the height of the water column by the water level in the hose - it shows the capabilities of the pump. When using the elements specified in the specification, the height of the water column will be approximately 0.5 m.
Filling a container with water
Step 29. The second check is the performance of the pump; this parameter is important when using complex nozzles or constructing a waterfall. Productivity is measured as follows: turn on the pump and drain water from it into a separate container for a minute. Measure the volume of drained water in liters and multiply the result by 60. The resulting value will show the pump performance in liters per hour.
Checking the volume of water dispensed
Note! To use the pump in fountains with a waterfall, it is necessary to increase the volume of the container or ensure a continuous supply of water into it!
Step 30. The fountain bowl is made from any available container of a suitable size. Drill holes in it for the studs and fountain nozzle, as well as for draining the water back into the container. The nozzle and drain are equipped with seals made from scraps of a gel pen refill.
Making a bowl
Step 31. The studs are generously lubricated with transparent silicone sealant before fastening.
Applying sealant to studs
Place the bowl on them and secure them with nuts, also with sealant. A nozzle is made from the tip of a gel pen with the writing unit removed.
Bowl fastening
Step 32. Connect the hose from the pump to the nozzle, cutting off its excess. A drain hose is attached to the drain and lowered into the container. To avoid gurgling when draining, the lower end of the hose is equipped with a tee and the tubes are spread in different directions as close as possible to the walls of the container.
Drain tee
Step 33 Fill the container with water by pouring it through the bowl. Check the tightness of the bowl and drain system.
Filling the container
Use a syringe to pump out air bubbles from the pump.
Pumping out air bubbles
Step 34. Connect the motor to a 12 V and 350 mA power supply. Connect the red wire of the fan to the positive of the power supply, the black wire to the negative. The white signal wire is insulated.
Connecting the power supply
Step 35. Turn on the pump and check its performance. Pay attention to the absence of leaks, beating and extraneous sounds.
Checking the pump operation
Turn off the light and check the operation of the backlight.
Checking the operation of the pump illumination
The detailed manufacturing technology of such a pump is shown in the video.