There is nothing more important in designing saunas than a correctly drawn up, competent and thoughtful plan for the bath. The insulation of the walls can be shifted - no big deal. If necessary, even re-lay the floor and sew new cladding on the walls. But if the layout of the steam room is made without reference to real needs, then the result can be sad. We will have to move communications and, perhaps, even walls inside the bathhouse.
If you have no ideas in drawing up a plan for a steam room, then you can use a ready-made layout
Subtleties of bath planning
Designers and planners who are professionally involved in developing plans for private houses, apartments, and country cottages argue that the layout of residential and service premises of a bathhouse is often a continuation of the habits and preferences of future owners. That is, most do-it-yourselfers, when drawing up a plan for a future bathhouse, simply transfer their desires to paper. If this is a steam room or sauna for one person, this also happens, then you can agree with a similar approach. When friends or guests appear in the bathhouse, the individual layout can cause criticism and even discomfort.
Steam room plan with external shelves
The bathhouse is still not a living space, but a place for relaxation, equipped with a stove, heater, and a boiler for hot water. All this hardware can be unsafe if the communications are not planned correctly.
Therefore, the floor plan is drawn up according to the following rules:
- The layout of the room should include a place to relax. The purpose of visiting a sauna is relaxation, therefore, a free area must be allocated in the bathhouse, which should comfortably accommodate all visitors at the same time;
- The passages and doors in the plan should be wide, and most importantly, clear, so that you can move between the steam room, washing room and relaxation room without disturbing others;
- The bathhouse should not be cluttered with excess property, otherwise normal air movement will not work and it will be difficult to breathe.
The presence of a red-hot stove, heater, and chimney create an additional threat, therefore, when arranging the main objects inside the steam room, functional zones and safety islands should be highlighted. That is, visitors should be able to move between islands without getting into the area of a stove or a hot chimney, without stepping over an armful of firewood or sitting next to a tank of boiling water.
It is best to take a diagram of a bathhouse with a relaxation room and a sink from a standard project and link it to your requirements for the size of the steam room, the location of the heater and shelves.
What you should immediately consider
Everyone’s needs are different, so it’s worth starting to design a bathhouse with a steam room, sink, relaxation room, bathroom, terrace, swimming pool, etc., with how exactly you are going to use this bathhouse in the future.
The second point is what
the climatic conditions are like where your bathhouse will be - there are specifics for areas with particularly harsh winters, for example.
The third point is what opportunities you have, from budget to the geology of the site.
And if there is certainty at least on the points:
- number of persons;
- frequency and seasonality of use;
- type of bath (Russian or Finnish, iron or brick stove);
- wall material (logs, beams, bricks, blocks, frame);
- dimensions of a geologically suitable area;
- allowable costs,
- then you can start designing.
We will show you options for what a bathhouse can look like given certain given dimensions - these are not the only options for plans, you can build on them and make any necessary adjustments.
Let's put it this way: our article is for those who have already figured out in their minds what size of bath they are expecting and would like to get acquainted with ready-made plans so that in the end they can either choose a ready-made one or make their own based on the existing ones.
IMPORTANT! When looking at the plans, take into account the fact that we did not take into account the thickness of the walls and insulation, and this can significantly reduce the area of the room from the inside.
Therefore, calculate in advance the thickness of the walls and the insulation cake, and then subtract it from your plan (or, conversely, add it if you want to maintain the dimension inside). You will learn how to calculate the power of the stove for a given cubic capacity of a steam room here, and you will learn the dependence of the size of the steam room on the number of people here; we will calculate the optimal size of the steam room in this article.
Optimal bath layout
There are several approaches to optimizing the floor plan. For example, in commercial and public baths the main emphasis is on the possibility of relaxation by the company, including during a feast in the first case, and maximum throughput in the second case. In the first option, the main attention is paid to the layout of the recreation room; it turns out to be huge, often with billiards, a bar and a home theater. In the second, the layout of the bathhouse, including the steam room, resembles a carriage. Huge doors and high ceilings, a dressing room, a steam room, a shower and a relaxation room are located sequentially so that visitors do not disturb each other.
Both options are clearly not suitable for a home bath, so the optimization criteria are aimed at improving the quality of the process. For a home project, the layout of a traditional Russian bathhouse is usually carried out according to the following criteria:
- Maximum oven efficiency and reduced heat loss. In this case, the stove or heater is located in the center of the steam room, and the room itself is planned in the center of the bathhouse. Combination with a sink or dressing room is not allowed;
- Providing the maximum level of comfort for relaxation in the bathhouse with a group of several people. Typically, the layout and size of the rooms in the bathhouse are designed in such a way that a company of 3-4 people can easily enter the steam room, wash room or pool at the same time. Accordingly, the layout and arrangement of furniture implied a long stay in the rest room.
In addition, it matters how exactly the bathhouse is built. If the sauna is built inside a private house, then the owners simply give the right or left wing of the house for a bathhouse. Accordingly, the plan most often turns out to be of a carriage or walk-through type. Since both the steam room and the sink are located inside a permanent structure, energy efficiency is most often neglected.
Classic walk-through layout
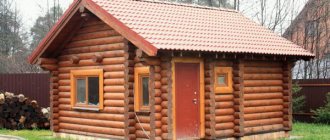
In free-standing small baths made of timber, a walk-through type room layout is also often used. This is not due to the desire for an optimal plan, but to a simple desire to save money on expensive cedar beams.
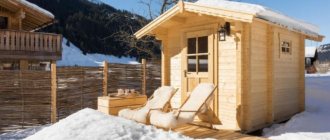
If a sauna box is placed on a summer cottage where there are no other buildings, then the best option will most often be an apartment bathhouse layout with a separate relaxation room and sink.
Important! In this case, such a plan is considered optimal from the point of view of using the premises. Often the construction of a bathhouse is used as temporary housing, so the rest room turns out to be very large, and the washing area is reduced to the extreme.
If you build a house only for use as a bathhouse, then the best option would be the plan given below. Such a sauna will be economical, warm and at the same time comfortable, even if you are steaming with a large group.
In any case, the location for installing the stove should be chosen in the center of the floor plan.
conclusions
Designing a bathhouse is a very important process, on which the quality of the structure, its functionality and cozy atmosphere will depend.
Only a high-quality drawing and project will allow the bathhouse to serve its owner for a long time.
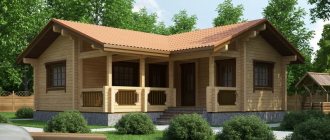
As we found out, baths with dimensions of 6x6 are an excellent option for organizing quality rest for a small family. All the necessary premises will fit perfectly here, allowing you to relax your soul and body.
6x6 bathhouse with attic sectional view
Despite the huge number of ready-made design solutions in the construction of 6x6 bathhouses, you can do their planning yourself. This step allows you to provide individual moments that will help the owners create the bathhouse of their dreams. For example, you can equip it with a veranda or attic floor according to your own design. These rooms allow you to expand the functionality of a standard bathhouse and make it even more comfortable.
Functional areas in the bathhouse
It is clear that any, even the smallest bathhouse with a plan of 2x2 m, is always divided into zones or separate rooms. You can plan the construction as one room, but in this case the steam room loses a lot in terms of comfort and temperature. This steam room layout was often used in traditional log cabins for saunas, in which people steamed “black and white.”
This was required by the washing process itself. But even with a one-room layout, the bathhouse was divided into functional zones:
- For the stove and prepared firewood;
- For shelves that were located between the stove and the entrance;
- For storing equipment, preparing boiling water and steaming brooms.
In modern baths, the premises are divided into separate rooms. There is no other way, the air temperature and humidity in the steam room, in the sink and in the rest room are too different. In Russian and Turkish baths you can remove the partition between the steam room and the sink, but this cannot be done in a sauna.
If the plan of the bathhouse includes a rest room and a locker room, then these rooms can be combined into one to increase the usable volume. But only in terms of a summer bath. For a winter sauna, the relaxation room can be combined with a dressing room. In any case, according to the plan, there should be a warm vestibule between the entrance to the bathhouse and the room that will be used for relaxation and as a locker room.
In addition, you will need to think over a plan for the furnishings in the dressing room and steam room; the washing room, if necessary, can be replaced with a shower.
You need to start drawing up a plan by choosing a place for the stove, then attach the steam room and the remaining rooms of the bathhouse
Waiting room
The simplest sauna room, so much so that it is often not even included in the layout if the sauna plan is less than 3x4 m or even 4x4 m. The functions of the dressing room are to reduce heat loss, reduce air humidity in the rest room and maintain the furnace firebox.
From the point of view of comfort, a dressing room should be present on the plan of any sauna, as this significantly simplifies the maintenance of the stove, increases fire safety and makes it possible to free up space in the steam room from firewood and the furnace. A dressing room is required if heating the bathhouse and heating water for washing are provided using an electric boiler. Without a dressing room, the fire inspectorate will not approve the plan of the bathhouse.
The dressing room is most often planned in the form of a small corridor adjacent to the steam room with a side wall. Next to the front door there is a tunnel with a fireplace, and here a supply of firewood is stored on a rack. In this case, part of the wall separating the corridor and the rest room is removed so that the fireplace heat warms up the rest room.
In a winter bath, an emergency entrance from the street is often made into the dressing room for bringing in firewood and water, through which hardening lovers run out of the steam room for swimming or dousing them with ice water on the street. Here, in the dressing room, according to the rules, there is an exit from the washing department. It turns out that the corridor also performs sanitary functions, collecting water and dirt, preventing them from entering the rest room.
Shower room
The most technically difficult part of the bathhouse. The shower room must be provided with hot water, a drainage system and heating. And all the same, until the walls of the steam room and the entire bathhouse warm up, the air and floor in the shower room remain cold. You have to wait until the sink warms up and you have the opportunity to wash before entering the steam room for the first time.
Therefore, a sink in a bath plan is always designed with an adjacent wall with a steam compartment. Moreover, the wall is made of natural stone to ensure heat flow.
In large log baths, washing is done right in the steam room. If the dimensions of the steam compartment are more than 2x3 m, then part of the sink space is separated by a small partition made of stone or timber. This way, the shower room will always be warm, and it will be easier to clean the room.
The shower room is often made into a walk-through room, the entrance is from the steam room, the exit is the dressing room or directly into the rest room.
If there is not enough space for a shower, the problem is solved by installing a washing cabin inside the rest room.
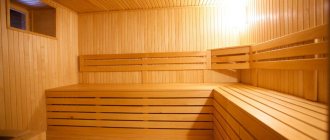
Steam room in the bath
The most important requirement for arranging a steam room is a high level of comfort. If the sauna's steam room, stove and heater are built wisely, then the conditions inside the steam room will be simply hellishly hot, but quite tolerable. The layout of the steam room should be designed so that visitors can be accommodated comfortably.
What needs to be included in the layout of the bathhouse:
- Shelves in a steam room are always installed in gradations according to the degree of air heating. The largest shelves are installed at the bottom, the middle row is smaller, and the last, top, as a rule, is made very small, for a couple of people, no more;
- The benches are installed so that the distance between those sitting on the shelves and the heater is at least 1.5-1.8 m; if closer, you can get burned;
- Between the benches it is necessary to provide a passage along wooden steps without railings. This could be a classic oak staircase or stone steps lined with linden. Those wishing to warm up in the hellishly hot air should be able to go upstairs without stepping on the lower shelves.
There are no railings in the steam room for aesthetic reasons. Firstly, they are useless in the steam room, as they heat up to such an extent that it is simply impossible to grasp them with your hand, and secondly, they are very annoying and often cause burns to the back and neck.
Important! According to the plan, a good steam room should have a window with an opening transom. Under the window and further towards the entrance to the steam room, the floor is made of wood, often with a soft synthetic covering, the rest is covered with tiles. If you suddenly feel bad, your eyes can’t see anything, go to the light in the window, then along the wooden floor you can easily exit the steam room.
The place in the steam room by the window is usually not occupied. It is reserved for those who are in a real steam room for the first time. It is clear that with such a layout, the heater or stove should be on the opposite side, where there is also a tank with boiling water and a heater.
Furnace location
Any instructions for designing a bathhouse must contain information about the location of the heating structure. Specific information is reflected in SNiP 41-01-2003, which clearly states that such structures should be protected with thermally resistant materials, especially when it comes to wood. Regarding efficiency issues, the stove must be installed so that it heats several rooms at once.
Heat flows from the stove in different directions.
Bathhouse with separate steam room and sink: projects and photos
The first step is to decide on the size of the bath. If a separate building is planned for a sauna, then it is better to choose projects with a square or almost square layout. The size of the building is determined based on the expected number of visitors. If you plan to spend long periods of time in the bathhouse, then you can choose a 4x6 m project; most of the space will be used as a relaxation room. For a family holiday, perhaps a 5x5 m plan would be optimal.
If nothing is known about the future number of visitors, then it is best to stay with the classic 4x5 m version.
The advantage of a 4x5 bath layout
Clear advantages in favor of a project with five-meter walls are not so easy to see. To better understand the benefits of the 4x5 plan, consider the plan shown in the diagram below.
The building is standardly divided by a wall into two wings. On the left there is a shower room and a relaxation room, on the right there is a steam room and a terrace. Ideally, in order to be able to steam in comfort, the dimensions of any room, be it a relaxation room, a steam room or a sink, should not be less than 2x2 m. For a relaxation room, it is best to take a layout of 2x3 m or even 2x4 m.
For the sake of curiosity, try to reduce the steam room or sink by a meter, and imagine how comfortable it will be to be in such a room. For one person it is still tolerable, but for a company of 2-4 people the bathhouse plan will seem small.
In addition, the additional meters included in the rest room plan make it possible to install normal furniture. In general, with a 4x5m layout, the result is not a bathhouse, but a plan for a small residential house.
4x5 sauna plan, separate sink and steam room
The small dimensions of the future house limit the possibilities for arranging a large steam room. Most customers and owners of their own baths express the opinion that the steam room should be made as large as possible, and all other rooms should be “squeezed” to a minimum.
It is clear that according to the plan, in any case, the bathroom needs to be moved to a separate room. Only combining a sink and a steam room is allowed, but only if there is a desire to equip a sauna in a ready-made house or even in an apartment. The result will be a home sauna for family use; you won’t be able to invite guests or friends to take a steam bath.
In practice, a 4x5 bathhouse layout with a separate sink and steam room is considered the optimal solution, so there is no point in saving on material.
4x4 sauna layout, separate sink and steam room
The option of building a separate bathhouse next to an existing residential building or summer kitchen on the site is considered very good. In this case, there is no need to arrange open terraces or verandas, which has always been considered an essential element of all country baths.
As a result, a 4x5 m plan can be easily “shrinked” to a 4x4 m plan. In terms of comfort, this layout is practically not inferior to buildings with a five-meter side wall. The steam room and sink are the same in size, as is the rest room.
The only nuance is the transfer of the oven with the loading hatch from the washing compartment.
Advantages of the 4x4 plan:
- You can build from aerated concrete blocks, the load on the walls is distributed evenly;
- Moving the stove speeds up the heating of the interior of the bathhouse, especially the sink.
As a result, the rest room is free from burning and smoke, which allows it to be used for overnight guests or long gatherings.
Bathhouse 4x5 m with vestibule and toilet
Plans with direct entrance from the street have one significant drawback. Usually these are large heat losses, freezing or swelling of the front door. No matter how tight the sealing silicone cord on the door leaf is, moisture will still seep in and freeze it to the door. With metal doors the situation is even worse.
Therefore, the plan of the bathhouse needs to include a vestibule at the entrance. This is a great way to reduce heat loss, get rid of condensation on the doors, and at the same time get rid of dust and dirt that gets into the rest room with visitors’ shoes.
Bathhouse 4x5 m with porch and attic floor
Another advantage of this type of layout is the good balancing of the building box. The strength of the walls of 4 m is enough so that a second attic floor can be built over the bathhouse. At the same time, longitudinal walls of 5 m will provide quite a lot of free space on the upper level, and at the same time it will be possible to arrange a staircase upstairs inside the bathhouse, from the recreation room to the bedroom in the attic.
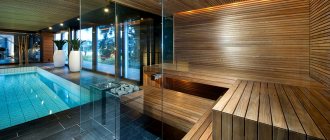
The result is a plan for a full-fledged residential building with a bathhouse on the first floor and living space on the second. At the same time, the relaxation room and sink can be used for cooking; in winter, the steam room is often used for drying things and clothes.
Interior decoration, design of bath rooms
The choice of materials for finishing bath rooms is limited due to constant high humidity. First of all, this concerns the steam room. Deciduous wood predominates here. The walls and ceiling are covered with lining. The shelves are assembled from timber, boards, and thick slats.
For shelves, lumber is taken from linden, aspen, alder, and oak. The wood does not heat up, smells pleasant, and is resistant to moisture.
A combination of wood and ceramic tiles that imitate stone looks good. The shower room and steam room are separated by a transparent wall and a door made of impact-resistant glass.
It is better to decorate the area of the room with the stove with fire-resistant materials (stone, metal) and do not forget to leave a gap between the stove and the shelves.
When decorating a rest room or dressing room, there are no strict restrictions in the selection of materials. Always relevant:
- tree;
- stone;
- ceramic tile;
- glass;
- metal, forging.
The dominant design styles in Russian baths are:
- chalet;
- country;
- half-timbered;
- modern
Finishing with clapboard, block house, slats looks very original. It is better to leave a log bath without any interior decoration at all. If desired, you can paint the wood in the desired color or varnish it.
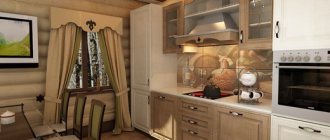
The photo above is an example of modern dressing room decoration. The floor is made of multi-colored tiles. In the center of the ceiling is a metal chandelier on chains with 8 lights. There is a niche in the wall for towels and other bath accessories.
- A classic Russian bathhouse is a round font with cold water. Located in a separate room next to the steam room. Wood predominates in interior decoration.
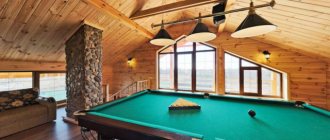
You can turn a bathhouse into a hunting lodge with the help of trophies hanging on the walls or their successful imitation. The photo shows an example of the design of a relaxation room in the attic. In the center? billiard table, on the right – a dining table with chairs.
Decorative plaster on the walls looks very elegant and goes well with wood or plastic.
Video description
Watch a detailed review of a 6x6 bathhouse made of timber in the video:
See also: Contacts of construction companies that offer bathhouse construction services.
Among the disadvantages that a 6x6 bathhouse may have (the layout of the photo example below), it is worth noting the absence of a vestibule, which reduces protection from cold air in winter, which means that heating costs and maintaining an appropriate temperature in the premises increase.
Layout of a 6x6 bathhouse with an attic and a terrace Source 9ban.ru
What will we build from?
Considering the use of all possible material options for the construction of a 4x5 meter bathhouse, it is difficult to give preference to any one type. The average dimensions allow the construction of buildings on a frame basis, but you will have to spend money on additional insulation and finishing. A brick bathhouse, provided it is laid with ceramic stone, does not require additional decor, but such buildings also do not have a high degree of thermal savings.
The best option would be to assemble a log frame, but good wood is not cheap and therefore additional finishing will be required, both outside and inside. Treated wood eliminates this. High natural thermal insulation values make it possible to avoid the need for additional wall insulation. But for such privileges, you will have to pay an amount almost equal in cost to building a brick bathhouse.
Structural features
Despite the choice of material, a 4x5 bathhouse requires a reliable foundation. Whether it is a strip base or a pile version - they must be capital, made in accordance with all standard indicators. Preliminary soil reconnaissance is required to determine the depth of the foundation. Even the most reliable strip foundation poured with reinforcement in several layers, provided that groundwater passes through it, will collapse in literally 2 years.
Having given preference to laying a log frame from untreated wood, after erecting the walls under the roof, it is necessary to allow the structure to stand for at least six months. Shrinkage processes occurring during this period of time minimize minor flaws. Insulation work will be easier to carry out, and besides, after shrinkage, the risk of breaking door structures and window openings is minimal.
Particular attention is paid to insulation, because, unlike small bathhouses, a structure with dimensions of 4x5 will be more difficult to warm up if the walls, floor and ceiling are poorly insulated. Provided that a recreation room will be installed in the attic, additionally insulate the rafter system. Heating inside the attic and temperature changes contribute to the accumulation of condensation, which can subsequently cause fungal deposits to appear on the wood.
The option of building a 4x5 bathhouse allows you to experiment with the layout of the premises. But this needs to be done thoughtfully so as not to harm the overall microclimate necessary to create comfort inside.
Self-harvesting
If you decide to independently prepare all the materials for such work, the instructions for you will be as follows.
This should be done in advance, and all the wood necessary for interior decoration is obtained in winter. At this time, it contains a minimum of moisture, and the wood will not be difficult to dry.
Important! Do not use dead wood for construction - you only need to extract living wood and dry it under a canopy.
The top and butt are not used in the work; only the middle stem part is needed. In addition, you should not take wood with rot, cavities or beetles. The coniferous tree must be free of leaking resin.
For the lower crowns and floors, it is better to find oak - it will ensure durability. After all, all 4x5 bathhouse projects involve the construction of a serious structure that will last for years and decades.
Next, you should use white spruce or linden - these materials perfectly remove moisture and therefore become ideal for baths.