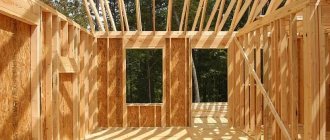
A stove in a frame house allows you to recreate the traditional method of heating private residential buildings. Any house intended for permanent residence of a family requires the organization of a heating system. Frame buildings are no exception. As a rule, owners of country cottages located at a distance from general gas communications most often resort to stove heating.
Stove heating
Heating a frame house with a stove is also possible.
This heating method is one of the most affordable. The presence of a stove implies a constant fire inside the house. And this is additional dirt in winter. The stove must be constantly cleaned, as it tends to clog. Plus, there is a high probability of a fire, especially in a frame house.
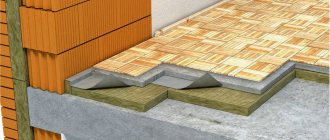
Many people realized the advantage of frame houses over stone and brick ones. The system of erecting walls (frames) during construction speaks about the conservation of heat in a frame house. The fact is that during construction, thermal insulation material is laid between the two wall skins. In the future, such a scheme will create convenience for owners in the winter. But given the temperatures in our regions, it makes sense to think about insulating the house more reliably.
Each private house, taking into account its climatic location, requires heating during the cold period. Frame houses, in which the heating system is mainly water-based, are no exception. For heating equipment, boilers of different types are used: electric, gas, solid or liquid fuel. is developed by the developer at the design stage of the structure.
For any type of heating system, the project provides a separate room - a boiler room
. Equipment that generates heat energy carries risks of emergency and force majeure situations, therefore access to such devices should be limited to children and untrained people. Typically, in the range of heating systems there are many control tools that prevent fire or direct contact with current. But it's still better to be safe.
Boiler room and requirements for it
A separate room for the boiler is not a complete solution to the problem. Frame houses, as everyone knows, are built from walls that cannot withstand high temperatures. To install the boiler, it is necessary to make additional masonry of at least one brick in the room, and equip the boiler itself at a distance from the wall, taking into account calculations. Residents of Western countries, when building houses, install safer heating systems - air
. Thus, the heating of a frame house occurs due to the operation of a heater into which cold air enters. Once in the heating unit, the heated air exits through the upper blinds. A heating device of this type consists of a diesel or gas heater, an air filtration system and an air handling unit.
Air heating
The process is that cold air from the street, entering the heat exchanger, changes its temperature and, after filtering, enters the coolants - pipes or radiators. In turn, from them, warm air enters special grilles located at floor level. All components and components of this equipment are hidden in the underground. The safety of the heating device is that all contact points are closed
, the heater works only 1-2 hours a day, taking into account the air temperature in the room. The only drawback is the high cost of such a device.
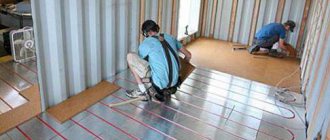
Warm floor for a frame house
It is also possible to heat a frame house by installing a heated floor
" Heating a frame house using underfloor heating is becoming increasingly common. The reason lies in cost savings when purchasing and installing equipment and a high heat transfer coefficient from the floor. The installation of thin metal-plastic pipes in a room takes up little space; installation is allowed without preliminary screeding with cement. It is enough to lay any solid insulating building material over the structure of the heated floor system, and you can lay tiles, parquet or other covering to your liking.
– the question is relevant. Insufficient thickness of walls and roof on cold days takes a lot of heat energy
Taking into account the installation of heating systems, it is important to insulate the house and install good windows
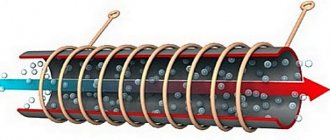
Oil radiators
Heating a frame house using oil radiators is not fundamentally different from heating with convectors. The device consists of spirals located in a tank with oil. During operation of the radiator, the coils heat up very much, but the surface of the device remains warm (about 50 degrees). This eliminates the burning of oxygen and the formation of soot from dust.
It is impossible to set the exact room heating temperature when using a radiator, even despite the presence of a thermostat. However, due to the large amount of oil, the device accumulates heat and continues to heat the rooms after being turned off.
Since oil radiators are not equipped with fans, natural air movement occurs. Therefore, an overheating zone forms around the device, and as you move away from it, the air temperature drops sharply.
Electric heating for a frame house
Let's start with electricity. Let us immediately outline the pros and cons of this method:
- Quite a technologically advanced product that produces excellent heat. Some models are capable of “accelerating” to 150-170 degrees Celsius
- Usually consists of several different elements that can be replaced if they fail, without losing the overall circuit
- Suitable for both small and large spaces
- High level of security. There are no obvious hazardous elements that could become a source of fire or smoke.
- The main disadvantage is the cost. The price of such devices is quite high, but the electricity bill hits the budget even more. If you plan to connect to a public network and not to your own generator, then planning a budget will be very difficult
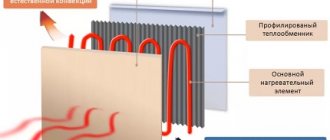
The main element is the convector. Heating with convectors is an analogue of traditional “batteries”, which are installed under the windows of the room. They are supplied with voltage, which heats the air. Warm currents go upward, and cold ones are attracted from below. The result is a good cycle and microclimate.
Modern models have the ability to adjust the temperature. This gives you a reason to save by reducing the temperature and power consumption on warm days, which is sometimes so lacking in heating in apartments. In addition to convectors, a whole range of equipment can be used, including heating with an electric boiler.
Decorative finishing
The most creative aspect of making a fireplace is its decorative finish.
How to imitate fire
To create a picture of a fake flame, you can use 3D holograms with stereo effects, LCD technologies and digital panels.
Can be applied:
- an ordinary dummy painted on the back wall;
- LCD TV;
- Christmas tree garland with control of light transmission against the background of a 3D image;
- salt electric lamp;
- decorative firewood made of plastic or ceramics with or without internal lighting.
The listed materials are perfectly combined into a single composition and can both complement each other and create accents.
How to clad the roof
The cladding option depends on the material from which the portal is made. For strong structures made of brick, plywood, plasterboard or chipboard, you can use something heavier.
Such as:
- boards;
- artificial stone floor tiles;
- plywood scraps lined with laminate, porcelain stoneware or glass mosaic.
For more fragile structures, you can use the same material as for the false fireplace, painted in the same or contrasting color.
What to put in the firebox and how to decorate the back wall
If you need to decorate an electric fireplace, then the depth of the niche for it should be at least 40 cm, and it needs an outlet. In other options, a depth of 20 cm is sufficient.
A wide variety of elements can be placed in the firebox:
- candles with and without scent;
- real or artificial logs;
- large pebbles mixed with other colorful pebbles;
- diode tape along the contour of the bottom of the fireplace under transparent plexiglass, on which pebbles can be laid;
- cover the back wall with a photograph or draw the composition yourself;
- vases with flowers, figurines of different sizes and even soft toys.
Decorations for the back wall are selected depending on what will be in the firebox itself.
Finish options:
- continuation of the portal;
- cladding with plastic or gypsum “brick”;
- a painted or pasted picture;
- mirror tiles of different sizes or solid panels;
- mosaic tiles or small tiles with ornaments.
Even without a live flame, a false fireplace can bring a touch of calm and tranquility to an everyday evening.
Heating a frame house with gas
Gas boiler for heating
This is perhaps the most popular heating method among owners of frame houses. Especially if the house is intended for permanent residence.
To install a heating system using this method, you will need to install a gas boiler and related equipment; a special room will need to be allocated for all this.
A gas boiler is a reliable and inexpensive source of heat for a country house; the cost of gas itself is also low.
However, there are some nuances here. Very often, sites for cottage and country house construction are located far from main gas pipelines. In such cases, extending the pipe to the village is either impossible in principle or very expensive. In addition, you will need to obtain permits. We can say that heating with gas, in the absence of a gas pipeline originally connected to the village, is the most expensive way to heat a country house.
Installation of a cassette fireplace
Installation of a cassette fireplace can take place both in a country house and in an apartment. Before installation, it is necessary to prepare the area where the future stove will be located:
- A cassette fireplace cannot be installed on wooden surfaces; also, such common coatings as laminate and parquet are not suitable as a base. They should be removed in the area where the future fireplace will be located. It is best to use a concrete slab as the base. To level the floor surface, a waterproof membrane is used and a screed is poured. The minimum layer thickness is 15 mm.
- The finishing on the wall adjacent to the fireplace should be completely removed. Afterwards it is necessary to install a layer of thermal insulation over the entire surface of the wall. It is best to use mineral wool for these purposes, as it does not burn. Thermal insulation is fixed with a metal profile, which is screwed with screws.
- The air duct that will connect to the fireplace chimney should first be cleared of blockages.
After all dismantling work has been carried out, you can proceed directly to installing the cassette fireplace. The installation must be carried out in stages. First of all, a pedestal for the future fireplace is installed. Afterwards the firebox is installed. Next comes the installation of the “cassette”. And the last stage is the installation of the chimney.
Installing a pedestal for a cassette fireplace
At the beginning of the work, a pedestal is installed. Any durable material is suitable for it. If you make a cassette fireplace with your own hands, then the material used is brickwork or concrete blocks. The height of the pedestal should be approximately three rows of bricks.
When installing a pedestal, you need to make a camera in the center of the building
The size of the chamber should reach the wall. In the place where the chamber comes into contact with the wall, a hole is made through which cold air will be drawn from the room. Further movement of air flows will occur between the fireplace and the wall.
Installation of a cassette fireplace insert
The insert of a cassette fireplace must be installed strictly according to the instructions indicated in the selected model. The gaps between the wall and the fireplace, as well as between the firebox and the “cassette”, are specified in the instruction manual.
Before installing the combustion chamber on the fireplace, you need to put a sheet of metal and several wooden blocks. With their help, the firebox structure is leveled. After installation, the bars are carefully removed.
Installation of the "cassette"
The fireplace body must be installed in such a way that there are gaps between the firebox and the walls of the fireplace for proper air circulation. The size of the gaps varies depending on the firebox model used.
Brick walls are laid close to the wall, but at the required distance from the combustion chamber. Another fire-resistant material can be taken for the construction of walls. A cornice is installed on top of the walls. It should be located above the glass ceramic door.
If a wooden cornice is used in the work, it is necessary to lay a layer of thermal insulation before installation, since wood is a flammable material.
Installation of a cassette fireplace chimney
The installation of a chimney depends on whether a ready-made air duct will be used or a new one will be installed. If there is already a chimney in the room, there are several installation methods:
A metal pipe for ventilation is installed in an existing chimney. This method is suitable if the air duct is a wide structure. For example, a rectangular brick chimney from an old dismantled stove. The steel pipe is connected to an existing chimney. This method should be chosen if the ventilation hole is quite narrow
It is necessary to pay special attention to the tightness of pipe joints, since the slightest gap can disrupt traction.
You can make a chimney yourself. A metal pipe is used for this. It is installed on the smoke opening of the fireplace and is discharged through the ceiling to the roof. It is worth noting that according to fire regulations, the pipe must have additional thermal insulation.
A cassette fireplace is easy to install indoors. This is an excellent option not only for an interesting piece of furniture, but also for a heating device with a high level of efficiency.
https://youtube.com/watch?v=MBP60RvaGHw
Stove and solid fuel
The stove is a traditional part of the Russian home. It is located in its place, on the prepared foundation. Gives its own warmth. But many models allow you to install a water heating tank behind it, from which water will flow through the pipes according to the contour. Hot water becomes part of home heating.
A solid fuel boiler can also be installed. This is a special stove that burns wood and coal inside itself and heats the water released through the pipes. The rest of the principle is the same. The boiler is usually placed in a separate room, say, in the basement. It must be periodically refilled with firewood and coal.
This method is considered perhaps the main one in areas where it is not possible to connect a gas main. In terms of cost, it is also one of the cheapest, inferior to the same gas. It provides a number of additional functions, including the ability to heat a bathhouse, as well as cook food over a fire, if we are talking about stoves.
Masonry
Scheme for laying rows for a corner fireplaceOrdering an English fireplace
Cover the dried foundation with a double layer of roofing material. This will provide the necessary protection for the base.
Prepare mortar for brickwork. Traditionally, fireplaces are laid using a solution based on pre-soaked clay.
Laying the first row is best done using mortar with a small addition of cement (approximately 10-20% of the total mass of the mixture).
Calibrate the bricks in advance, selecting the most suitable sized products for laying each row.
Before starting laying, immerse the bricks in water for a while. This will allow the products to become saturated with moisture. Otherwise, the bricks will take water from the clay mortar, which will lead to a significant deterioration in the quality of the masonry.
Lay out the first row of bricks edgewise. Check that the row is laid out correctly with a square and level. Make sure the opposite sides and diagonals of the base are the same length.
The recommended thickness of seams is up to 0.5 cm.
The masonry is carried out in accordance with the order. The following will be a procedure that is relevant for most existing types of fireplaces. For the rest, rely on the drawings you have.
Laying a fireplace, step-by-step instructions
Lay out three continuous rows of the base.
Laying a fireplace, step-by-step instructions
Second step
Lay out 4-5 rows with an ash pan.
Fireplace laying, step-by-step instructionsFireplace laying, step-by-step instructions
Third step
Lay out 6-7 rows with the arrangement of the bottom and frame of the brick fireplace.
Laying a fireplace, step-by-step instructions Laying a fireplace, step-by-step instructions Laying a fireplace, step-by-step instructions Laying a fireplace, step-by-step instructions Laying a fireplace, step-by-step instructions Laying a fireplace, step-by-step instructions Circle and formwork for laying an arch subfloor Laying a fireplace, step-by-step instructions Laying a fireplace, step-by-step instructions Laying a fireplace, step-by-step instructions
Fifth step
Lay out rows 14-19 with a smoke collector.
Laying a fireplace, step-by-step instructions Laying a fireplace, step-by-step instructions Laying a fireplace, step-by-step instructions Laying a fireplace, step-by-step instructions Laying a fireplace, step-by-step instructions
Sixth step
Lay out 20-25 rows of the fireplace with a chimney arrangement.
Arrange the base and continuous rows of masonry using a trowel or trowel. The chimney and fuel chamber are laid out manually, because
at these stages it is very important to control the quality of the solution used
Apply fireplace mortar to the middle of the bricks. The edges of the elements must remain free.
When laying out each row, adhere to the chosen order. For greater convenience, you can number the products.
Pay special attention to the quality of the masonry of the fuel compartment and smoke exhaust ducts - these elements must be laid out as evenly as possible and as airtight as possible. Laying a fireplace, step-by-step instructions Laying a fireplace, step-by-step instructions Laying a fireplace, step-by-step instructions Laying a fireplace, step-by-step instructions Laying a fireplace, step-by-step instructions
Laying a fireplace, step-by-step instructions Laying a fireplace, step-by-step instructions Laying a fireplace, step-by-step instructions Laying a fireplace, step-by-step instructions Laying a fireplace, step-by-step instructions
To form a beautiful curved fireplace vault, apply a gradual overlap of masonry elements
It is important that the overlap size does not exceed 50-60 mm in each row
The construction of curved lintels is carried out using temporary formwork - circles. To fix such formwork, use supports under the fireplace vault being installed.
Start laying from the brick installed in the center, and then carry out symmetrical laying in both directions.
Periodically check the verticality of the smoke exhaust pipe. Even the slightest deviations from the vertical can lead to smoke in the room.
Laying a fireplace, step-by-step instructions
To lay the chimney, use a mortar with added cement, similar to the mixture used when laying out the fireplace base.
The smoke exhaust pipe must be covered with a layer of fire-resistant insulation to increase fire safety. Insulation is installed where pipes pass through the structure of the house (floors, roofing, etc.). The most commonly used insulation materials are asbestos based.
Stoves for heating a frame house
The stove heating method has many advantages: ease of maintenance, the ability to use different types of fuel, etc.
The design of modern stoves allows you to regulate the combustion process and optimally retain and use the heat generated by the fuel.
The oven can be hermetically sealed, and properly positioned dampers allow precise adjustment of air supply and exhaust.
At any outside temperature, the stove is able to provide heat to the entire room.
A modern wood or coal stove can have an efficiency of up to 60%.
In a frame house you can use: heating stoves, heating and cooking stoves, household stoves and fireplace stoves.
Alternative energy sources
The industry has long been offering alternative sources of electricity for use. Some of them are common, others are known, but require conditions, the lack of which will affect the feasibility of the acquisition. Read more about them.
A system assembled in series allows you to directly receive free current sufficient to heat rooms, but the use of household appliances is excluded, since the efficiency of solar panels is only 25%. It is good to use them in conjunction with another source if the owner urgently needs to have a well-organized life. The operation of the system is available only if the following conditions are met:
- The area should have sunny days - at least 20 per month. Otherwise, there is no point in installing the system. She simply will have nothing to eat, and she will not be able to accumulate energy. Such systems are mostly common in the southern regions.
- The roof area must be at least 40 m². In addition, there should be no tall trees nearby that could create shadows.
- The rafter system must withstand the considerable weight of the set of elements.
Installation is expensive, but by paying just once, owners can feel the advantage that electric heating of a house made from sip panels has thanks to this installation over other sources, already in the first year of operation. The costs are fully recouped in 5-6 years. The durability of the system allows you not to think about replacement for several decades. Only a master can install the unit.
Wind activity
Areas with this feature can use wind energy in unlimited quantities. However, the low efficiency of the system will not be able to provide the house with electricity in the required volumes - several generators will be required. In addition, the installation produces a lot of noise and is located at a considerable distance from the house.
Which device to choose from those offered to the consumer? From what has been written it is clear that the best option for electric heating of a frame house is a boiler.
It will not only provide a comfortable temperature in the house, but will also allow owners to use hot water and household appliances at any time convenient for them.
It is important to carefully calculate all the nuances and choose the most economical model.
Tatiana Polyakova
Author of publications on 1Drevo.ru with the topics: Wooden Euro-windows | Sealing cracks in a log house | Calculation of house construction | Choosing a roof | Two-story houses | Houses made of cylinders | Heating Plan | Electric heating | Frame verandas | House made of timber 7 by 9 | House lining with bricks | Decorating the house outside | Facade insulation and others.
Collections of publications on topics:
House 6 to 7 Electricity in the house
Was this publication useful to you?
Bookmark it on social networks!
Total score: 0Votes: 0
GOST 8242-88. Profile parts made of wood and wood materials for construction
Using electric convectors to heat a house
We recommend! — Encyclopedia Wooden Houses — NEW
You can find out detailed and expanded information on the topic of the article from the book “Wooden Houses,” which reflects all stages of building a house, from laying the foundation to installing the roof. Book price = 77 rubles.
You may also be interested in other BOOKS on building houses from wood with your own hands.
We recommend other posts on this topic:
How to make electric heating in a private house
Infrared heating system PLEN - heating of the 21st century
Plan home heating - energy-saving heating
Long-burning pyrolysis boilers with a water circuit
Installation of a boiler and installation of electric heating in a private house
Hydrogen generators for heating residential buildings
Features of frames
Before considering options, it is necessary to identify the main features associated specifically with this type of structure. What is a frame? This is a house made using the so-called Canadian technology. Its popularity in the CIS is due to several factors:
- Similar climatic conditions in Canada with Russia, Belarus and neighboring countries
- Low cost of construction, which is more economical than traditional construction methods
- High speed. So, for example, good companies can build such a home within a month
- Quite a good set of walls and ceilings that retain heat indoors
- Manufacturability coupled with durability. The estimated lifespan of such buildings can reach 100 years.
- Possibility of free planning, allowing owners to choose the number of rooms and their size at the design stage
It is the last factor that does not allow us to give any exact recipes for heating. After all, different areas require different approaches to heating the air. But the basic method remains the same. Let's move on to them.
Beginning of work
Before starting installation, it was necessary to decide on the chimney. The following varieties exist:
- brick;
- ceramic;
- sandwich
On the advice of the master, we took a sandwich type chimney, manufactured by the Research Institute of KM. Russian manufacturer, reliable, steel 1 mm thick. Having purchased the necessary elements in two steps, we took everything to the house.
The first unpleasant moment was that the diameter of the outlet from the firebox to the chimney was too small. This problem was solved with the help of an adapter. Still, it is better when the chimney has a larger diameter.
The second nuance was the lack of a stand for installing the firebox flush with the portal opening. Most likely they simply forgot to put it down during loading from the exhibition, but since a lot of time had passed, it was too late to look for it. Our master was not at a loss, and in a couple of hours he built a stand from metal profiles by welding and painted it with a special black paint.
Before the construction of the box began, a “fitting” was carried out, when, using a simple addition of elements, they looked at the finished portal with a firebox and chose the shape of the structure around the pipes.