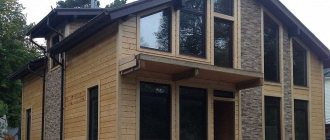
Forum member Livadi and her husband lived in a rented apartment for a long time and could only dream of owning their own home. But everything comes to an end. Thanks to the advice of their friend, they purchased a small plot of land, where they decided to build a house on their own. We independently developed the design and drawing of the house. The building was planned to be used for temporary housing, and in the future - as a bathhouse or guest house. The construction plan was developed in detail and the interior was designed. As a result, we managed to build a small 6x4 house with a budget of $6,000 in a little more than a month.
Roofing material
The step-by-step instructions end at the stage of installing the roof cladding. You can choose soft tiles, corrugated sheets or metal tiles. All of these materials are easy to work with, affordable, and look decent. After the facing work, all that remains is to install drainpipes and a drainage system, which will be responsible for draining precipitation outside the site.
Now you can imagine the whole process of building a frame house with your own hands, so that the structure is durable and warm. If you do not ignore the rules of construction and assembly technology, you will become the happy owner of your own home, which you can only dream of.
Construction of the foundation of the house
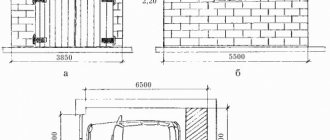
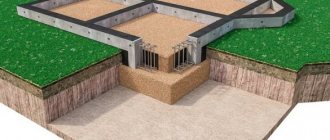
The entire construction process was planned to be completed on our own, but the construction of the foundation was still entrusted to a construction company. It had to be built quickly. They decided to make the frame on screw piles, since they have a number of advantages:
- Such a foundation is made on any type of soil, in this case the area is unkempt, unplowed, with turf growing;
- Construction takes little time - the foundation was laid in one day;
- Construction on screw piles will cost much less than a traditional foundation;
- Piles can be screwed close to utilities;
- Such a foundation will last more than 80 years, and if it is filled with concrete, much longer.
The company's employees delivered the material and installed screw piles. The price for the foundation with work was $1100.
Note: Even if you are absolutely confident in the quality of the materials that were used to build the foundation, you should not leave it unloaded for the winter. There is a possibility that the piles will be displaced from the ground and the foundation may bend.
Design
"Framework" is light in weight. Therefore, when developing projects, they usually provide for the installation of a columnar or strip foundation, which is quite capable of coping with this kind of load and does not require too much construction costs.
The structure of the base depends on the internal layout - the location of partitions and walls. Therefore, the development of a drawing of a future home must be taken very seriously.
Also at the project stage, it is necessary to consider the structure of the frame and walls, roof and exterior decoration of the building.
A one-story house 4 x 6 can be made in the simplest layout, including an entrance hall, one room, a kitchen and a bathroom. If the project involves the construction of an attic, the room on the first floor serves as a living room, and on the second there is a bedroom.
Such a structure can be made of timber measuring 100 by 100 millimeters. Projects often include oriented strand board exterior sheathing. For waterproofing, for example, Izospan is chosen, and for insulation, basalt wool. The inside of the building can be clad with clapboard. This is especially appropriate if the house is a country house.
Basement of a house
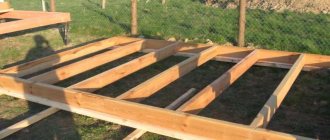
Do-it-yourself frame construction, as is known, is usually carried out using the “platform” technology. However, it was decided not to follow this advice, since there was a possibility that the insulation would get wet if it rained. That's what we decided to do.
After the foundation was prepared, it was time to install the frame and joists of the house. We carefully laid out boards for strapping measuring 150x50 cm and treated the wood with an antiseptic (in this case, Senezh red ognebio). The harness was assembled according to the drawing. We attached it using a nailer with rough, glue-coated nails 0.9 cm long. We did everything according to the level, the diagonals met perfectly. As a result, the result was a harness with a height of 15 cm. The entire process of creating the harness took about two days.
A load-bearing beam was placed strictly in the center of the frame (along the building). Its function is to support the sexual lags. After this, an antiseptic should be applied to the entire beam.
Boards were nailed on top of the strapping at a distance of 60 cm from each other. A beam of 150x50x600 cm was filled, acting as a subfloor. Two layers of polystyrene foam were laid in the formed cells - the first layer was 5 cm wide, the second was 10 cm wide, which was foamed around the edges and covered with 50x300 cm boards.
Advice: You should make the holes in the harness slightly larger, otherwise you will have to flare it.
Bottom harness
Seven days after the work of pouring concrete, a lower frame made of wooden beams with a cross-section of 15x15 cm is laid over the entire surface of the foundation. The wood is pre-treated with antiseptic agents, and two layers of roofing material are laid along the bottom, which acts as horizontal waterproofing.
The timber can be fixed with anchor bolts or foundation studs. If bolts are used, then technological holes up to 10 cm deep must be drilled for them.
Scheme of the lower trim of the house
Installation of frame walls
Tip: Wood for building walls should be chosen with no more than 15% humidity.
They assembled and raised the walls quite quickly. We decided to assemble the frame walls in a horizontal position on the prepared floor, since there is a possibility of encountering the problem of inaccurate calculations in the drawings.
The future walls of the house were assembled right on the floor. It is necessary to take into account that the slab must overlap the upper and lower frames by at least 5 cm, so the stand height should be selected from 2.6 meters.
When the installation of the walls is completed, it is recommended to check their level using a cord; this can be done as follows: pull the cord from one corner to the other. If there are still deviations, the walls must be pressed in from the side from which it is necessary to align. After final leveling of the walls, the jibs should be nailed.
Note: In order not to waste valuable time on leveling walls and filing posts of different lengths, you should carefully measure everything several times.
Glulam beams were used for the floors. They can withstand higher loads, which makes it possible to increase the pitch between the lags. Spacers were inserted between the floor joists.
Constructing a ceiling
The ceiling is attached to the floor beams, which in turn are fixed with nails or steel brackets on the top frame beam. Where interior partitions are installed, you need to install support beams, in the place of which a wooden ceiling panel is nailed.
Attic floor insulation scheme
A vapor barrier film should be laid on top of the shield, and mineral wool or foam plastic should be laid flush with it. The insulation is covered with a windproof membrane on top, and boards are laid on top of it. Read more about insulating attic floors.
Frame wall cladding
External cladding was used with 9 mm OSB sheets, this is sufficient to provide the necessary rigidity. The bottom sheets were installed from the ground, and sometimes homemade sawhorses were used, and scaffolding was used to install the top sheets. The sheets were fastened using screw nails 50-60 mm long at a distance of 1.5 cm.
Tip: In order not to constantly count the required gap between the OSB sheets, you need to install two nails into the frame posts and place the sheet on top. Thus, a gap of the required size, 3 mm, is obtained.
After covering, we painted the edges to prevent them from swelling due to rain.
Tip: OSB sheets are an excellent wind barrier, but you should still be careful about minimal waterproofing to prevent the material from swelling.
The facade was wrapped with windproof film, and doors purchased in advance were installed.
Window installation
Windows, like doors, were installed after wrapping the façade of the house with film. No cutouts were made in advance for window and door openings. The following technology was used: the film must be carefully cut and the ends bent inside the opening, secured with a stapler. Next, insert the window block level and foam the seams. After the polyurethane foam has dried, carefully remove the excess. This eliminates the possibility of moisture getting between the opening and the window frame.
Roof, rafter system
Installation of the rafter system
The next stage of building a frame house with your own hands is the roof. The roof model was carefully worked out, and it was taken as the basis for construction. For this house, a frame with a load-bearing ridge truss was chosen. At this stage, the most important thing is to install the ridge correctly, then it will be easy to mount the rafters made according to the template. It is important to note that the width of the ridge must be no less than the length of the rafter support.
Rafters 150x50 were installed at a slope of 20 degrees. It is better to attach the rafters to the ridge beam using metal corners.
Note: One rafter sample should be made and each subsequent piece should be measured only according to this sample to avoid errors.
Roof installation
To improve the ventilation of the room, vents were made under the ridge and an upper ventilation gap measuring 50x50 mm in the roof structure (concrete lattice).
Tip: Regardless of whether you insulate the roof or not, you must install waterproofing and install two ventilation gaps 2-4 cm high.
Since the attic was not intended as a living space, insulation and heating were not particularly dealt with. A wind- and moisture-proof film was used instead of a membrane, so a mandatory gap was created. We decided to insulate the roof with 1.5 cm rockwool.
When fastening the sheathing, you should ensure that it extends beyond the outer rafter by approximately 20-50 cm. When the sheathing is secured, the excess must be cut off.
Tip: To avoid unforeseen situations, you should immediately fasten all roof parts as securely as possible. Thus, the strength and rigidity of the entire structure will be ensured, regardless of unforeseen weather conditions.
The roof of the house was covered with metal tiles, since it is ideal for a gable roof - minimal material consumption is provided.
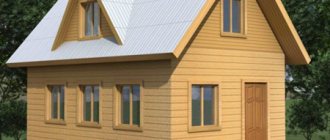
Projects and plans
The building can be one or two storeys. Most people prefer a two-story house 6 by 4, which allows them to create a cozy and comfortable space. Most often, the second floor is an attic. Its main advantage is the high ceilings. A staircase of one or two flights leads to the second floor. A terrace can be added to the house, which will increase the comfort of using the building. To fence the terrace, planed timber, solid lining, balusters and the like are used. The terrace can have its own roof or be located under the attic.
The total area of the house will be at least 35 square meters. On the ground floor you can plan a kitchen, a bathroom and a room, for example a living room. You can implement the option without a bathroom, then it will be possible to increase the help of other rooms. In addition, there will be a staircase on the ground floor and a hall next to it.
The bedroom is usually located in the attic. The attic floor can be divided into two rooms, thus organizing bedrooms. A space is created near the stairs that will serve as a corridor.
There are many ways to organize the space of a two-story house. By using your imagination, you can create a home that is comfortable for all members of your family.
To build a house, you can use standard designs. However, the best option would be to draw up a drawing for a 6x4 frame house to suit your needs and financial capabilities. An individual project, compiled for a frame house measuring 4 by 6, makes it possible to arrange comfortable housing according to the customer’s tastes.
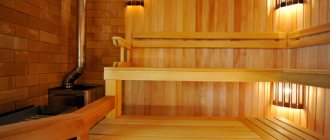
The final stage: interior decoration of the house
For maximum vapor barrier of the house and hermetic entry of communications, a film was used, which is designed to prevent moisture from entering the house, and steam should easily escape from the house. It is also assumed that the film will protect the house from blowing, especially where the frames and racks are connected. The standard film is 1.5 m wide, easily stapled and very tear-resistant. However, they attached it with tape.
Tip: It is better to seal joints and holes in the film vapor barrier with bitumen-rubber roofing sealant, since the tape is not attached firmly.
They laid floors, insulated the walls and ceiling.
We made a partition for the vestibule, brought electricity into the house, made internal sheathing and laid drywall. We laid OSB-3 9mm linoleum on the floor to support the insulation from below.
Insulation
Insulation of frame houses is a very important procedure for those who decide to build a house with their own hands. How seriously to approach this process depends on what function the house will perform.
Insulation scheme for a frame cottage
If the project or drawing stipulates that a house with an attic will be used only as a place for summer recreation, then the insulation can be done very mediocrely. For year-round use, insulation must be approached more responsibly.
A frame house consists of vertical posts, between which horizontal bars are attached; insulation will be placed in these cells.
After this, the walls are covered, as indicated by the project or drawing of the building. What thermal insulation material will be used depends on where construction is planned. If the climate in the region is harsh, then more serious requirements are placed on insulation, and the design must reflect this.
On the Internet you can find special tables that describe the thermal conductivity of a particular thermal insulation material. For example, polystyrene foam compositions with a thickness of 40 millimeters are similar to 14 centimeters of wood or 86 centimeters of brickwork.
Basic materials and tools used in the construction process
- Screw piles;
- Rockwool 1.5 cm for roof insulation;
- Boards 150x50 m;
- Antiseptic for treating all wooden coatings Senezh red ognebio;
- Rough nails 90 mm;
- Screw nails 50-60 mm;
- Sheathing paint;
- Metal tiles;
- Film for the facade and vapor barrier of the house;
- Windows and doors;
- Drywall;
- Workers from a construction company were hired to install the façade;
- OSB 18.3 mm (subfloor) and 9 mm (wall and roof cladding);
- Foam plastic for subfloor;
Auxiliary structures for house construction
When building a frame house, it is necessary to have various temporary structures. To secure the films and cover the frame with OSB sheets, homemade scaffolding, a trestle, and a wooden ladder were used. Scaffolding, trestles and making a ladder with your own hands is not at all difficult.
Bottom line
In just a month and a half, we managed to build a foundation, make a full-fledged frame of the house, and insulate the walls and floor. At the same time, all work (except for the facade) was carried out on our own, without the involvement of hired workers. Using similar technology, it is easy to build other buildings, for example, a do-it-yourself outbuilding. About $6,000 was spent on building a 6x4 frame house with your own hands, excluding the exterior cladding of the house.
Based on materials from Forumhouse
Floors
When all the wooden beams are laid and connected to each other and to the foundation, grooves are formed in them and floor joists are placed (board 50x150 mm). The upper part of the logs is aligned horizontally, and boards are nailed along the bottom - they will serve as the basis for constructing the subfloor. Membrane insulation is laid on the resulting board base (prevents the insulation from weathering and getting wet, and does not prevent water vapor from escaping outside). In the gaps between the lags you need to press in insulation (mineral wool or polystyrene foam) and cover it with a vapor barrier. An edged board (40x15 mm) is laid on top.
Floor arrangement diagram