We are talking about the best beach villas in the Maldives for a family holiday - the most convenient places for a trip to the Maldives with children or a vacation in the company of good friends. Located just a few steps from the turquoise water lagoon, the villas on the white sand beaches of paradise islands are considered the most suitable for carefree relaxation in the shade of tall palm trees and the rustling waves on the shores of the warm sea. We have selected the best hotels in the Maldives with family villas on the beach based on ratings and reviews, which we recommend that you book yourself.
Finishing methods and materials
Walls
Traditionally, wood is used to decorate the walls of bathhouses. Cedar and larch are those species that contain a large amount of resins, which is a natural and durable antiseptic. High humidity negatively affects the condition of walls and ceilings. Therefore, these places are generously protected from moisture by waterproofing and treated against rot, mildew and mold.
Important! To maintain humidity at the required level – 50%, experts recommend installing dehumidifiers.
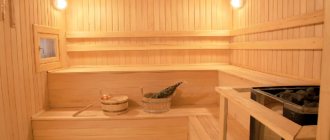
Wooden panels – reliable protection against mold and good thermal insulation
Floor
The floor in the sauna, and especially around the pool, should be made of special tiles that do not become slippery and sticky when exposed to water. Granite, marble, tuff - these are expensive, beautiful and durable types of coatings. Plastic is a less expensive material, but also a suitable material. Manufacturers also offer finishing materials with universal properties - waterproof artificial stone and porcelain stoneware. The composite material is highly durable and is ideal if the owners decide to install heated floors in the bathhouse.
Stylish sauna house with a swimming pool, decorated with mosaics
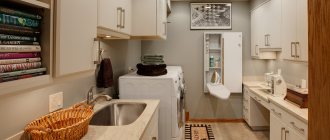
Plumbing
You should start choosing plumbing for a bath at the construction stage.
If you are going to install a shower, then the most suitable options would be:
— column shower . A regular shower panel or column is mounted on the wall. A column shower is a separate metal structure: water is supplied inside, a stationary shower head is installed, and a hand shower is additionally installed;
Stainless steel shower column - a practical solution for a bath
- floor-standing shower mixer , which is a rigid tube-rod through which water is supplied from the mixer to the watering can. Manufacturers today offer a set: a floor shower together with a hand shower. The main structure is mounted both on the floor and on the wall;
This shower model saves a lot of space
— rotary shower . A rotary shower is a propeller whose blades are pierced with many micro-holes. True, this option is more suitable for relaxation; efficiency in terms of hygiene will be enhanced by a manual shower head, which can be installed additionally;
A shower with a “propeller” is great for relaxing after a sauna.
- cascade shower. It looks nice, but the water consumption will increase significantly.
The model looks aesthetically pleasing and decorates the shower room
As for mixers, the best ones for baths are:
— single-command mixers . Imitation of a waterfall, which results in an incredibly beautiful aesthetic appearance. Water pressure and temperature are regulated by moving the handle sideways and up and down;
— thermostatic mixers .
They are equipped with a pressure compensator and maintain a constant, preset water temperature.
The most important thing is capacity
When constructing such artificial reservoirs, the main element is a waterproof container. It can be purchased ready-made (for example, a round container with a diameter of about 3 m will cost 14...16 thousand rubles, including the frame and everything necessary for installation) or made independently.
Basic requirements for the bowl:
- high density and strength of the material. Recommended films and fabrics made of polyvinyl chloride with a density of 650 g/m2;
- smooth surface, especially facing the inside of the pool. Glossy fabric is easier to clean from any dirt and disinfect;
- completely waterproof. Since the container cannot be solid, special attention is paid to the tightness of the joints of the panels;
- good resistance to ultraviolet radiation, frost, high temperatures, mechanical strength (resistance to puncture, tearing).
Industrially produced containers meet the requirements listed above; when creating a bowl yourself, you should choose high-quality awning fabric with the smoothest possible surface.
To connect panels of fabric, use a hair dryer with a temperature range of 70...600 degrees. The temperature is selected according to the recommendations of the fabric manufacturer; a crevice nozzle is used for directed action. An overlap of 20...30 mm is required.
The cut bowl is assembled on a large, flat surface. Heat the overlapped edges of the panels to the recommended temperature and carefully roll them with a special roller to seal the seams.
The upper edge of the bowl (it is cut out in advance with a reserve) is folded twice, heated again and rolled. Next, grommets are mounted on the canvas - metal double-sided ring-holes. To install them, you need a special press or available tools. The pitch of the eyelets is no more than 50 cm.
Types of pools suitable for baths
The design of a swimming pool in a private house depends on the availability of free space and the budget of the cottage owners. During the construction of baths, swimming pools are installed, which, according to the type of construction, are:
- stationary . Reinforced concrete, waterproofed, acrylic structures;
A pool made of composite materials is strong and durable
- mobile . Frame, inflatable, prefabricated, made of wood and polymer materials;
You can take a break from the hustle and bustle in a mobile swimming pool under a canopy and with a relaxation area
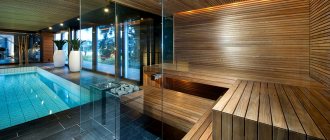
- hydromassage . These are spa pools that are equipped with: a filtration system, heating, and seats for water treatments. There are often a number of additional options: lighting, music system and even monitors for watching movies;
A Jacuzzi with hydromassage for country relaxation goes well with a sauna
By depth
- recessed . Classic pools that are dug into the ground. Length, width and depth can be any;
The rectangular pool with a sunken open-air structure will also be pleasant for sunbathing in summer
- ground . Installed at floor level in the sauna. Take up a lot of space, but are easy to maintain;
A small swimming pool will complement the sauna building
By water filtration method
- skimmers . Pools have edges so water doesn't splash out. Along the edge of the pool there are water intakes into which dirty contents seep. The water passes through several stages of purification, is chlorinated and flows back into the bowl;
The in-ground skimmer pool is located in a continuous water purification system
- overflow . Bowls with gutters are located around the perimeter. Water passes through them into the purification system.
The round bathing bowl fits seamlessly into the spacious room
Lighting
Another problem is the lighting of the indoor pool. Modern lighting devices, of course, can create the complete illusion of natural light. But still, natural light penetrating through translucent structures is much better. Especially when there is a blizzard and snowdrifts outside the windows, and you enjoy swimming in warm and clean water. At the same time, it is advisable to provide good heating, since heat is comfort, and heat losses through large windows will be large.
Maintaining a well-built pool is not a difficult task. Even a non-specialist can handle it. Cleaning systems will come to the rescue in caring for your artificial pond.
Bathhouse with a swimming pool: photo, interior design, arrangement
Finishing materials are presented on the market in such a wide palette that their choice will allow you to realize the most daring idea in any style. The main thing is to combine the originality of the interior with ease of use and not clutter the space with unnecessary details.
Decorating the sauna in a modern style, with lighting adds originality to everyday life
Furniture
Bathroom furniture is selected depending on its size. So, if there is not a lot of space, then the locker room can be marked with a wooden hanger, and a small closet is enough to store detergents and accessories. Of course, don’t forget about the bench for easy changing.
Wood is a natural, environmentally friendly material that fits into the bath space. A wooden table and chairs are an option for placing furniture items in a relaxation room. It is easy to install shelves on the walls for storing dishes and bath accessories. A soft sofa and armchairs can complement the space. Wooden objects are also suitable as decor: ladles, brooms, wicker rugs.
Light and brown shades of wood in sauna design
Sun loungers and rattan chairs are also suitable for spa treatments, sauna relaxation and gatherings after the pool.
Hidden Water Pools transform into a patio
Patios are open courtyards enclosed by fences, building walls, or gates. They are adored for their homely atmosphere of comfort. Fountains, pools, small gazebos, and openwork paths add special beauty to the patio. A small courtyard of a private house is decorated with paving stones.
The round platform, by pressing a button, is transformed into a swimming pool, and a fountain is placed in the middle. Everything is beautifully illuminated and looks mesmerizing in the evening.
The bottom of the pool can be raised to create either a level floor or a picnic patio with the optional extension of the table.
Example:
The mechanism and design of this pool were developed by Hidden Water Pools. This option is very suitable for families with small children. You don't have to worry about letting them go outside. Let them play quietly in the yard alone. And if children want to swim, the depth of the pool can be adjusted.
A short visual overview of this technology:
Styles
High tech
Baths in a modern style are not loaded with furniture and have clear shapes. The pool traditionally has an irregular shape and lighting. The bathhouse is finished from moisture-resistant materials using contrasting colors. Sensors for monitoring the temperature of the pool water and air are controlled remotely through a program. High ceilings and accent lighting complement the modern style.
A small high-tech style bathhouse takes up a minimum of space, but at the same time is adapted for ideal relaxation
Provence
A bathhouse with a swimming pool in the style of the south of France looks as if the furniture and interior items are slightly shabby and worn out. The style is characterized by: wooden furniture, complemented by forged elements, light colors in the design of the space. Rough plaster with stone trim, linen, wrought iron fixtures and lamps, while the pool is built in a rectangular classic shape. If the bath complex has a veranda or terrace, then in order to emphasize Provencal sophistication, flowers and plants are placed in pots.
A Provence style bathhouse with stained glass windows adds natural light, expanding the space
Chalet
Stone and wood are the two main materials when arranging a bathhouse and a swimming pool in a style with a pronounced spirit of wild nature and the environment. The cladding of walls, ceilings, and floors adds massiveness and majesty to the interior. The style of the chalet will additionally be recreated by bouquets of fragrant herbs, tablecloths, tea sets, and hunter’s attributes. The simplicity of the form and the absence of decorations, patterns, and decorative elements creates the feeling that the location is in an Alpine castle.
An open-air swimming pool and a small sauna using natural materials create the feeling of being in the Alps
Country
Countryside style looks great in a Russian bathhouse. A lot of wood, both in the decoration and in the choice of furniture, creates air, comfort and a special atmosphere for relaxation. Natural shades predominate, without sharp contrasts and transitions. Tiles are laid on the floor. The walls of the room are decorated with paintings with carved patterns.
A country-style bathhouse, decorated with wooden materials and a small plunge pool, is a good choice for a country project
Loft
When arranging a bathhouse in the loft style, wood, metal, and porcelain stoneware are used. Nothing superfluous, just what is necessary. Imitation of premises of a factory or plant. A rectangular pool with a descent ladder made of metal - and here you are, enjoying the industrial style to the fullest.
A gray loft-style interior, trimmed with tiles imitating stone, looks bold and noble
Half-timbered
In this style, everything is decided by the ceiling wooden beams, which protrude noticeably. They are painted dark so that, against the background of a light ceiling, all attention would be focused on them. Simple wooden furniture is matched to match. A light-colored tile floor complements the space.
A sauna with a swimming pool in the courtyard of the house - as close as possible to nature
Calculate the size
To calculate the optimal parameters of the pool, you need to know the maximum number of swimmers at the same time. One person will need at least 2 m2 of water surface. It is believed that the ideal depth for swimming for adults is about 1.5 m. If there are children, then it would be wiser to additionally make a shallow part of 0.80.9 m. For jumping, you can create a depression of 2.5 m.
Building a swimming pool is a long and painstaking job. It is necessary to take into account many points in order not to make a mistake, because a stationary pool is being built for decades. What steps should you take?
First of all, we coordinate our decision with the architect of the house. During the construction of the premises, we take into account the technical requirements, including in terms of the location of the pool and the choice of materials. We select the optimal parameters of the reservoir (length, width, depth). We decide on additional functions of the pool (fountains, “sea waves”, Jacuzzi elements). We draw up a design project for the decor of the room and, accordingly, select materials. Together with specialists, we select a filter system and calculate the cost of the necessary equipment. We order pool installation from specialized companies.
Text: Ekaterina Ivanova Consultant: "SiM.ROS"
“Landowner of the North-West” No. 4 (64), 2011
Bath complex
A small bath complex, in addition to a swimming pool and sauna, includes the following areas:
- veranda/terrace;
- dining room;
- sports zone;
- children's playroom;
- rest room (attic floor);
- SPA, where care treatments are carried out;
- billiard room
A bathhouse with sliding doors and access to the courtyard is a successful idea from the designers
As an extension
The pool is attached to the bathhouse, with the outside sheathed, for example, with polycarbonate sheets. You can swim in the pool all year round. If you decide to build a full-size panoramic glazing from metal-plastic bags, you will have a beautiful view of the world around you. In another case, the walls are erected from the same materials from which the bathhouse is built: brick, foam blocks, sandwich panels, laminated veneer lumber.
A swimming pool with panoramic glazing attached to the house not only looks beautiful, but also allows you to freely exit the room
Two-story
They save a lot of space, since a two-story building according to the plan takes up the same amount of space as a one-story building, but it is possible to build a house with a sauna in height. On the ground floor there is a bath complex and a bathroom, a shower room, and a dining room. On the second floor it is possible to arrange a leisure and recreation area - a billiard room, a home cinema or guest rooms - a bedroom, a bathroom. In the case where there is a lot of free space, it is possible to build both options.
A full second floor allows you to accommodate many more areas, unlike the attic. The significant difference between the under-roof option is that the roof does not occupy the bulk of the space; the height available for arrangement remains only in the center of the area.
A chalet-style sauna with a small spa area will help you relax
Single-story
If there is sufficient free space on the site, the design of a one-story house with a sauna involves the construction of several recreation areas: a sauna, a shower and a plunge pool, a locker room, a bathroom (or two). On the other side there is a living room and a billiard room. Spaces have also been allocated for the kitchen, dining room, vestibule, and terraces. And in the center there is a spacious hall connecting all the rooms.
The plan of a house with a swimming pool is quite interesting in that there are three separate entrances: from the side of the bathhouse and the pool, the kitchen and the terrace with two entrances to the living room and the billiard room. In the billiard room you can put several folding beds where friends and relatives can stay overnight if necessary.
The sauna building made of laminated veneer lumber is quite spacious
With seating area
The design of a bathhouse with a swimming pool and a relaxation area is a complex combination. At the stage of laying the foundation, communications are planned - water supply, sewerage, ventilation, electrical systems.
The relaxation area in the spa complex includes comfortable sofas, armchairs, TV and even a fireplace
Important! Particular attention is paid to insulating electrical wiring from areas with high humidity inside the bathhouse complex. It is also necessary to provide a fence for the furnace to prevent burns.
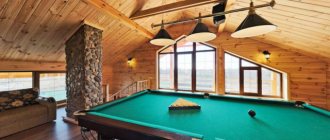
Bath complex with billiards
If you build a two-story building of a bathhouse complex on a site, then on the ground floor you can build a dressing room, a sauna itself, and a shower room. And on the second floor, plan a gaming area and a place to relax with billiards, for example. Here the font is located inside the building and during the construction stage it is important to think through the heating system of the entire building and the sewage system for draining wastewater.
The space in the bath house, equipped for relaxation and games, can also, if desired, be transformed into a sleeping area
To create a bath complex with a swimming pool at your summer cottage, where you can relax with friends and family, under ideal conditions, you need to consciously approach the choice of tank design and correctly develop a project for its installation. Advice from professionals, a wide range of the modern market and catalogs of construction companies allow you to accurately plan the design of a bathhouse with a swimming pool and implement the project according to calculations, without errors, trying to stay within the budget.
A video for those who are planning to build a dream bathhouse clearly illustrates all stages of construction:
Frame options
In addition to the described wooden frame made of timber and boards, you can use a homemade welded or prefabricated frame made of rolled metal. It is best to use a rectangular pipe with a cross-section of 20x40 mm for racks, a corner or strip for piping and struts.
By raising the posts 1.5...2 m above the pool level, you can stretch an awning over it or install a polycarbonate canopy.
Another practical and inexpensive option is a pool made from pallets.
Pallets installed along the contour are tied into a single structure with boards or timber; metal plates can also be used. In this case, there is no need to install racks buried in the ground - the connection between the enclosing elements is sufficient. Installation inside the fence of an additional protective layer of thick plastic or rolled material (roofing felt, old linoleum, any other flexible flooring) is not necessary, but it significantly increases the strength of the structure.
Preparatory stage of construction
To begin with, it is best to make a sketch of the structure that will need to be built. The plan will help calculate the amount of materials, visualize the final material and take into account various important details of the construction.
The first illustration shows a sketch of the pool around which the wooden deck will be built. Since in this particular case the pool is not immersed in the ground, but is located above the surface of the earth, the platform around it will be quite high, and there will be steps leading to the terrace. Fencing structures will be installed along the entire perimeter of the wooden terrace:
- railings (they are shown in green in Figure 1);
- the fence, or Privacy Screen, is what this structure is called in the west (shown in red in Figure 1). The purpose of this element is to create a closed recreation area from prying eyes.
Figure 1. Plan of the terrace around the pool
Privacy Screen - Curly carved wood panels
Consider the direction of the boards.
Features of combined construction
It is not always possible to equip a large and reliable swimming pool in a finished bathhouse. This point should be taken into account at the planning stage in order to clearly determine the type of suitable base, the method of connecting communications, and choose a moisture-resistant finish for the room.
Let's look at the nuances of each of these parameters in more detail.
Choosing a foundation
Popular materials for building a bathhouse:
- foam block;
- beam;
- log.
The raw materials do not carry a large load, so a columnar foundation or a shallow reinforced concrete strip will suffice. The same applies to frame-type baths.
For comparison, a pool measuring 3*4 m, 1.4 m deep, completely filled with water, creates a load on the soil of 17 tons. And if you take into account the weight of construction, finishing materials, and plumbing equipment, the figure will increase even more.
The greater the depth of the reservoir, the higher the pressure on the soil.
Craftsmen recommend separately pouring a powerful monolithic reinforced concrete foundation under the pool, which can withstand heavy loads.
Proper ventilation and dehumidification
Due to the constant presence of water, there will be high humidity in the room. Therefore, not every type of finish is suitable. If these are wooden elements, then it is better to take species with increased moisture resistance - cedar, larch. It is good to saturate the material with antiseptics.
The recommended humidity level should be between 50-60%.
To achieve it, use:
- Special tank coating. Regular thick polyethylene film will do. When the pool is not in use, it is simply covered with film.
- Forced ventilation. It is effective in spring and summer, but in winter it will reduce the temperature in the room and increase heating costs.
- Dehumidifiers are the best option. They perfectly reduce humidity in the room, while heating the air. In combination with properly equipped ventilation, they will give maximum effect. There are budget models on sale.
Using an air conditioner to dehumidify the air is not the best solution, since along with the humidity of the air, its temperature will also begin to decrease. Another disadvantage is that it cannot be used in winter.
Heating a room with a swimming pool
The room is heated from a common system with a gas, electric or solid fuel (wood, coal) boiler. There are combined heating options. Radiators are fixed to the walls. The degree of heating is controlled by a regulator on each battery.
Infrared heaters that are attached to the ceiling are popular.
For bath complexes, a heated floor system always remains relevant.
The water temperature in the pool is considered comfortable for procedures from +24 to +28 degrees. Heating is carried out from a common, autonomous heating system.
Sewerage
Only central sewerage is suitable for water drainage. A standard cesspool in a country house will not handle such a volume of water. Sewerage with related components (drain pipe, valves) is calculated in advance.
Don't neglect installing a good filtration system. This will reduce the replacement of water in the pool to 1-2 times a year.
And provided there are no chemicals in the water, it can be used to water plants on the estate.
Deck board
Now you can proceed directly to laying the deck boards on the surface of the terrace, as well as sheathing the steps. Under no circumstances should the board be installed without gaps. When the boards swell from moisture, they will increase in volume, and if there is no gap between them, they will float on top of each other. It's like if you lay laminate flooring close to the walls, leaving no gap or room for expansion.
Installation diagram for decking boards
Boards can be fastened with screws or nails, depending on how convenient it is for you and what tools are available. If you are planning to nail a deck board, an automatic nail gun will make this task easier. They will work much faster, and most importantly, your fingers will remain safe and sound.
Do-it-yourself deck board installation
When laying deck boards, it is not necessary to measure each one to the nearest inch. Along the edge of the terrace, the board may overhang a little, just after the entire terrace is covered, you will need to go with a saw along the contour and cut off the excess. The result of laying the deck board is shown in Figure 9.
Figure 9. Terrace cladding
The same deck board as on the terrace is laid on the surface of the steps. You can also cover the steps with vertical boards so that the internal frame is not visible. Such steps are called closed type, and these are the ones made in this project (Figure 10).
Figure 10. Step cladding
Beams. Longitudinal location
Next, according to the project, it is necessary to install beams on vertically located supports. This is the next step in building a deck around the pool.
Triple or double beams are installed according to the load. In the case where there is no more than 12 feet between adjacent beams located in one row, then double beams are installed, as in this project under consideration, where between each two nearest beams there is no more than ten feet.
The cross-section of the longitudinal beams can vary, ranging from 2x4 inches to 2x12 inches. This choice will depend on the number and distance between adjacent lines of longitudinal beams. It is best to use as few supports as possible; accordingly, there will also be fewer beam lines, and the distance between them will be greater. But then you won’t have to dig a lot of holes for supports, which are not so easy to build.
The fourth picture is a diagram of the beams. The dimensions of these items are 2 x 10 inches.
Figure 4. Beam diagram
Hidden under the lawn
A swimming pool helps the owner of a house or cottage cope with the summer heat. But sometimes you have to choose between a green lawn and a pond, because... The area of the site is small.
A sliding deck lined with artificial grass helps solve the choice problem. It looks like a lawn, but when pulled back, it reveals a pool hidden underneath. When no one is swimming, the platform closes it, again forming a lawn. Everything is done with one click of a button.
The closed platform can be used for relaxation, games, etc.
A visual overview of this technology:
Supports
We are considering a terrace project on supports, each of which needs an individual foundation.
Consider the option of arranging concrete supports with a diameter of 12 inches each.
| Feet | Centimeters | Inches | Centimeters |
| 1 | 30,48 | 1 | 2,54 |
| 2 | 60,96 | 2 | 5,08 |
| 3 | 60,96 | 3 | 7,62 |
| 3,5 | 106,68 | 3,5 | 8,89 |
| 4 | 121,92 | 4 | 10,16 |
| 5 | 152,4 | 5 | 12,7 |
| 10 | 304,8 | 12,7 | 32,258 |
| 11 | 335,28 | 11 | 27,94 |
| 12 | 365,76 | 12 | 30,48 |
| 15 | 457,2 | 15 | 38,1 |
| 20 | 609,6 | 20 | 50,8 |
- According to the project, holes are dug of the appropriate diameter and a depth of about 4 feet.
The holes should be the same depth when preparing - 4 feet or approximately 123 cm - Afterwards, so-called “sleeves” made of roofing material secured with adhesive tape are inserted into these holes. They should protrude approximately 1 foot above the ground surface.
Roofing felt is installed and a frame of three reinforcing rods connected with wire is placed inside - Concrete is poured into these “sleeves”, and metal connectors are installed on top, to which wooden supports will be attached.
The solution is transported by wheelbarrow and poured into the formwork with a shovel, compacting or piercing the mixture with an in-depth vibrator
An example of attaching timber to concrete supports
To avoid digging holes again, make a sketch with dimensions that will show the coordinates of each support. It’s better, of course, to do this on a site plan, especially if there are plants in the construction area or there are communications, then you won’t have to uproot a tree or repair the water supply.
Figure 2 shows the location of concrete supports (Footings), as well as their coordinates. If the support ends up on a water pipe, or if there is a tree growing nearby, simply move the support slightly to the side. It is better to calculate everything and draw it on paper rather than face unpleasant surprises during the construction process.
Figure 2. Location of supports
Having marked the location of the supports on the site, dig holes for them and concrete them. Don't forget to install post connectors into the wet concrete supports. After the concrete has hardened, secure the vertical supports in metal connectors. Use 4" x 4" cross-section posts for supports since the deck is less than 6 feet high. If the height exceeds 6 feet, posts with a cross section of 6x6 inches should be used for supports. Metal connectors should be installed in the appropriate size.
The third picture shows a diagram of the concrete supports used in this project.
Figure 3. Scheme of concrete supports