What do you need for work?
In order to quickly and accurately carry out all installation processes, it is necessary to prepare the tools in advance:
- Drill. If the device has the ability to adjust the speed, then it can be used not only to create holes, but also to screw in screws. As an alternative, use a screwdriver.
- Drywall drill bits with centering drill. These attachments are the optimal solution for quickly obtaining seats in which mounting boxes for sockets and switches are placed.
- Set of screwdrivers and bits. Used to screw in screws of different sizes. It is taken into account that hand tools are more convenient when connecting wires to terminals.
- Pliers or wire cutters. Used to quickly remove excess cable sections.
- Electric jigsaw or hacksaw for gypsum board. For creating complex holes.
- Construction knife. Used for cutting out plugs in the body of the socket box, since cheap products are often heavily sealed.
- Screwdriver indicator. A simple device for determining voltage. The principle of operation is that when there is power in the handle, a light comes on.
- Level, ruler and tape measure. For marking and alignment.
Although any actions with electrical wiring involve disconnecting the voltage, according to safety standards, all tools must have insulated handles and tips
Standard installation technology requires the following materials:
- Landing boxes for sockets and switches. For gypsum boards, special plastic varieties are used that have passed fire certification. Their main difference is in the fixing tabs. Diameter and depth are selected individually. The following options are available: Single modules. This is the cheapest variation, it is easy to install, but there is no possibility of docking with similar devices.
- Boxes with additional connector. A modern type with an extension connector on the body. The socket boxes are assembled using a special part, which is not always included in the kit.
- Blocks. Most often there are double and triple structures that do not require additional joining.
As practice shows, the most convenient models are those with the ability to be connected in a chain. It is recommended to select all elements from the same manufacturer. This will avoid adjustments, which often happens when joining fragments from different manufacturers.
On a note! For some rooms there are certain types of sockets. For example, rooms with high humidity need special products that prevent water from getting inside.
Safety precautions when working with electric current
The first thing you should know when starting any electrical installation work, even something as simple as installing an outlet in a plasterboard wall, is safety precautions.
The electric current supplied to our electrical networks is quite dangerous for humans. For domestic needs, a current of 0.2 A and a voltage of about 220 V is supplied. Safety rules will help you not to feel the effects of electric current.
In fact there are few of them:
- Never begin electrical installation work until you are sure that the network is de-energized.
- Use tools with insulated handles (plastic, rubber, wood). If this is not the case, wrap the handle of the existing one with several layers of electrical tape.
- Have an indicator screwdriver with you. Before reaching into the outlet, check it for voltage with an indicator.
- Do not use broken, repaired, or soldered sockets or their parts. Materials must be new and of proper quality.
- Select the correct wire cross-section.
If you follow these basic rules, your work will be safe.
Option No. 1. Connection to a two-wire cable
In the first case, it is difficult to make a mistake: having checked the presence of voltage with the tester probes, we turn off the circuit breaker responsible for the zone to which our future outlet belongs.
Important! In no case do not forget about de-energizing the wiring! Electric shock can cause death.
We strip about 8–10 mm of insulation for each core and lead them into equidistant terminals of the socket. The design of sockets can be very different, but there is one thing in common - the power terminals are always equidistant from each other, so locating them will not be difficult.
Remember that next to one terminal there may be a hole immediately leading from it, used for further parallel connection of electrical installation products. Do not connect there, it will cause a short circuit. The holes for different terminals should be at a respectful distance: 1.5 cm from each other.
Polarity will not play a role in this case, since the current is alternating.
USEFUL INFORMATION: Self-tapping screws for attaching drywall to the profile (calculator)
Place for socket
There are certain standards that specialists prefer to work by when installing sockets. They concern the gap from devices to the surfaces of the room:
- The distance between the floor and the socket is 30 cm.
- The distance between the floor switch and the switch is 90 cm.
- The distance between the socket and the wall is 18 cm.
If possible, such standards should be applied. They can be changed individually. The socket must be placed so that it is convenient to use the product. For example, kitchen devices are made on an “apron”, approximately at a height of 1.2 meters - household appliances will be connected there. In the bathroom, devices are usually installed at a height of a meter in order to comfortably turn on the washing machine.
In other rooms it is also worth focusing on the available equipment. It may be better to mount the socket in the drywall at a higher height than the recommended 30 cm. It is necessary to take into account the flow of wiring in the room, so it is better to identify the areas where the sockets are located at the renovation stage.
If a place for the product is found, you need to mark it with a construction marker using a level. The first hole will then be made in the center of the mark - the beginning of the future hole for the socket box.
Marking walls for electrical equipment
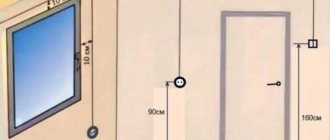
Based on a pre-compiled wiring diagram, the location of the sockets is determined. According to building codes and regulations, sockets are installed at a height of 30 cm from the floor, switches - 90 cm. It is also recommended that switches be placed approximately 15-20 cm away from the doorway.
However, these norms are not mandatory. Photos of sockets in plasterboard offer possible options for their placement in rooms different from the type of purpose. You can arrange the sockets so that they can be used as conveniently as possible.
For example, in the kitchen, sockets are located taking into account convenient connection of kitchen equipment and local lighting, installation of exhaust equipment. As a rule, this is slightly above the countertop of the work surface, away from the open flame of the burners.
The socket for the washing machine is placed at a height of at least 100 cm from the floor. The main criterion is a convenient approach to the outlet, the absence of long wires or extension cords lying on the floor and interfering with movement.
Making a hole
Having completed all the necessary marking work, you can begin cutting out the holes.
There is nothing complicated in this operation:
- We install the prepared attachment on the drill or hammer drill;
- Before starting drilling, you need to correctly position the “crown” relative to the place where the hole will be (to make it easier, you can drill the center of the future hole with a regular drill);
- Using a crown, we cut a through hole in a sheet of drywall. When working with a drill and hammer drill, you should not create strong pressure, otherwise this may lead to the formation of torn edges of the hole, which will subsequently affect the installation work;
Note that you can make a hole without a crown, although it will be more difficult. To do this, you can use two methods - cut it with a knife or use a drill with a regular drill. But no matter which method is chosen, you first need to make additional markings to determine the dimensions.
Required Tool
To carry out installation work, you will not need many tools:
- Drill or hammer drill;
- A special nozzle - “crown”, for making holes in drywall (diameter 68 mm);
- Screwdrivers;
- Pliers;
- Measuring tool (tape measure, ruler, level);
- Marker.
In some cases, you may need tools for cutting metal - a thin chisel, a hammer.
Read on the topic - what tool is recommended to have at home.
Difficulties that may arise and their solutions
One of the most common problems that arise when making a seat for a socket box is getting into the profile to which the plasterboard sheet is attached. In this case, it will not be possible to install the mounting box, since its height is much greater than the thickness of the drywall. That is, for installation you need additional space under the sheet so that the socket box goes all the way.
This problem can be solved very simply - using a chisel (chisel, screwdriver) and a hammer, we cut out the interfering section of the profile. This will not affect the bearing capacity of the profile in any way. The situation is worse if the drywall is glued to the wall without using a frame made of a metal profile (such installation also occurs, although it is rare).
In this case, you will have to make a recess in the wall using a hammer drill with a chisel or a hammer with a chisel. Another situation concerns the installation of a block of sockets (several of them are located in a row, one next to the other). For reliable fastening of each socket box, it is necessary that there are jumpers between the holes for them.
And this is where correctly executed markings will help. It's done like this:
- We select the location for installing the outermost socket and mark the center of the hole.
- Then draw a straight horizontal line through the marked point.
- Next, measure 72 mm from the center of the first hole and make a mark (this will be the center of the second hole).
- We make a few more marks on the line (according to the number of sockets in the block), observing the specified length between the points.
It's simple - the diameter of the hole is 68 mm, and between the centers we have 72 mm, and after cutting the holes we will get jumpers 4 mm thick in the thinnest place.
Adviсe
Tips from experts on installing a socket box in a gypsum board:
- You cannot install points near the floor; you must raise the markings up the wall by at least 20-50 cm.
- The size of the crown for a standard socket box is 68 mm.
- If, having created a hole, there is a metal or wooden profile, it is “cut down” and drilled out.
- Before installing the box, you need to insert the cable into it. It can come out from the top of the plasterboard structure or from the side. Accordingly, remove the plugs on the box (top or side, bottom).
- If several holes fall on the profile. It is “exposed” with the same crown. Finally cut with metal scissors.
Installing a firebox into a plasterboard surface does not take much time and effort if the markings are done correctly, you have power tools and high-quality materials (crowns, boxes) at hand. Socket boxes are made from plastic by various companies. It is worth paying attention to the quality of the plastic used and the thickness of the socket box.
Choosing the right place
Often the choice of location depends on how the wiring is done. By the way, all power cables must be routed throughout the apartment before installing the drywall. Therefore, you first need to route the wires to certain places, and then think about how to install the socket in the drywall.
There is a European standard regarding the installation of sockets:
- the distance from the floor should be at least 30 cm (regular rooms);
- for a washing machine, the socket should be at a level of 1 meter from the floor;
- in the bathroom, installation should be carried out at a distance of at least 60 cm from the floor;
- the distance from the laid cables to window and door openings should not be less than 10 cm.
This standard is advisory in nature and is not mandatory. It is also worth considering existing profiles so that they do not interfere with installation work. If this is not provided for, then during installation you will have to cut off a piece of the profile so that a glass can be installed in its place.
Typical recommendations for socket installation and wiring.
Laying additional wiring for ready-made gypsum board finishing
How to stretch the wire and install a socket box under the mounted drywall? It all depends on what is between the wall and the sheets.
- If the drywall is glued to the wall, you will have to cut through the finishing surface and make shallow grooves. In this case, it will be necessary to restore the front layer (paint or glue a strip of wallpaper).
- When mounted on a profile, the task is simplified. Of course, you need to know the layout of the metal guides. In order not to spoil the upper part of the wall, the power cable can be routed from below, from under the baseboard. First, a hole is drilled for the socket box. Then, the plumb line determines the location of the cable entry (the plinth in this place is temporarily dismantled). A rope with a plumb line is lowered into the prepared hole, which is pulled out from the lower hole for entering the cable. The wire is attached to a rope and pulled up.
Next is the usual scheme: installing the box in any way. The input cable is pulled under the baseboard to the distribution panel.
If there is soft insulation between the drywall and the wall, you can use steel wire instead of rope (which remains after installing the corrugation). This method does not work with rigid insulation boards.
Considering the uncontrolled position of the cable under the plasterboard, it is recommended to use corrugation. As a last resort, a wire with three layers of insulation.
After installing additional wiring, be sure to make changes to the current power supply circuit. Otherwise, during repairs you will damage the new cable.
How and when to make holes in gypsum boards
It is necessary to know in advance exactly where the power cables are connected. You can make marks on a sheet of drywall in advance so that you later know where to make the hole. It is best to put a cross, which will mark the center of the future hole.
Before installing a block of sockets in drywall, you need to learn an important rule - between the centers of the holes for them you need to make a distance of 72 mm. The sockets will be installed in a row so that they fit snugly against each other.
A drill with a special bit will quickly and accurately drill the required hole. You need to keep the tool level and perpendicular to the plasterboard wall. However, there are some nuances. This scheme is good when it comes to interior partitions, because due to the frame, they have enough space to fit a socket box.
There should not be a profile at the socket level. Typically, the installation depth for a socket box is considered to be 45 mm. If the frame made for drywall is very small, then installation will be impossible without drilling the wall. I’m glad that most often people already make the right frames from metal profiles so that they don’t have to hammer into the wall.
If profiles were not used (glue or foam was used to install gypsum boards), then you will have to cut drywall to install the wires. In this case, the process will be no different from installing an outlet in a regular wall.
Here's how to make a hole in drywall for an outlet.
A hole can be made not only with a crown. Using a compass, a circle is drawn on the sheet to indicate the location for the hole. Then, using a drill with a regular drill bit, holes are made along the inner border of the circle. Next, the core is carefully cut out with a knife, and the protrusions are trimmed with the same knife. The hole will come out a little clumsy. However, you do not need to buy a crown, and all the irregularities will be hidden by the rosette.
Hole cutting
After marking, in the marked centers of the circle it is necessary to make a hole using a drill with a slightly larger diameter than the crown drill (for example, an 8-10mm drill). We drill a hole with a margin, taking into account the length of the drill bit of the crown itself (but do not forget about neighbors and thin walls). This method is also suitable when working with a diamond core bit in drilling mode.
The process of gating. After drilling holes in the center of the future circle, you need to use a crown to go deeper into the wall a few millimeters (this only applies to the method of working with a hammer drill!). Along the intended circle, you need to drill the maximum possible number of holes to make it easier for the crown to “gnaw” the concrete.
With a diamond crown, you just need to drill - without chiselling, periodically letting the crown cool. It is worth noting that if a diamond bit gets on the reinforcement, its service life is significantly reduced.
When working with an angle grinder, the whole task comes down to making cuts in the wall to the required depth and hollowing out the area where the socket boxes will be located.
Marking the installation location of the socket box block
Let's move on to my example. I need to install a block of three socket boxes in this plasterboard partition.
The socket block is installed above the cabinet and is intended exclusively for sockets. They are planned to include a decorative lamp and phone chargers. In my case, the height of the cabinet is 45-50 (cm). We need to install socket boxes at a height of approximately 62-63 (cm) from the floor level.
Soon I will publish several articles where I will tell you in great detail about the options for the location of sockets and switches in different rooms (bathroom, bedroom, kitchen). So don’t miss the release of new articles - subscribe to the site’s newsletter.
So let's get back to the markup. Using a self-leveling laser level LD-SL-01, I mark a horizontal line at a height of 63 (cm) from the floor.
I really like the LD-SL-01 level, but sometimes I use the simpler and more compact Black Deсker LZR-310 laser level, although its beam is projected in only one plane and the level is adjusted manually using bubbles.
It doesn’t take much longer with the markings, but nevertheless it’s also convenient. I will write a separate review about it.
Then along the laser line using a ruler (you can use a flat block or profile) we draw a horizontal line with a pencil. After this, we no longer need the level and can turn it off.
We hope that the block looks symmetrical on the wall and mark the first center of the socket box on the line.
Then, using a ruler or tape measure, set aside 71 (mm) from the first center and mark the center of the second socket. Then from the center of the second socket box we set aside 71 (mm) to the center of the third socket box.
The distance between the centers of the socket boxes is exactly 71 (mm) and it must be measured as accurately as possible, otherwise the overhead frame may fit either tightly or with gaps, depending on your “miss”.
Yes, I forgot to mention that when marking, take into account where and in what place your profiles are located, otherwise such a ridiculous incident may arise (I took the photo from the Internet).
Which socket outlet is best to choose?
For gypsum boards, socket boxes are produced by manufacturers: Schneider Electric, Tuso and others. Boxes are classified by size:
- outer diameter (d2);
- box depth.
Standard sizes d2 (mm): 60, 64, 68, 70.75. There is also a non-standard diameter.
Box depth (mm): 40, 42, 45, 60, 62.
How deep to mount the box depends on its location. If this is a partition, then a box with a depth of 60, 62 mm cannot be installed. Install 40, 42 mm. For plasterboard walls, Hegel KU 1201, 1202 socket boxes are used. Dimensions: d2-68 mm, depth H-45 mm. Made of non-flammable plastic that can withstand 850ºС. For a plasterboard surface, install a box with a diameter of 68 mm.
Differences in shape:
- round – standard;
- oval - mounted for several switches or sockets.
The socket boxes for plasterboard are fixed in the wall using metal spacer tabs.
Under a wooden profile
The metal body of the socket box protects the wooden frame from fire. It will prevent contact of the spark from a short circuit with the wooden base. The plastic case will not withstand 1500 0C - it will melt.
Advantages of a metal case:
- Some boxes are made of 1mm steel, which can withstand high temperature during short circuit.
- When conducting electrical wiring in a wooden case, the cables are hidden in a metal corrugation. The metal body is able to withstand the load of corrugation.
- Installation. The box has a size of D2-68 mm, which is convenient for installation.
- Housing tightness. The seams on the box are welded.
- No extra holes. To feed the wires you need to drill holes.
- Threaded holes are provided for installation of the socket.
- Box depth 65 mm. This makes it possible to leave 10 cm of excess cable for subsequent repair work (replacing the socket, the switch broke, shorted the cord and melted the socket and wires).
For safety from fire, metal socket boxes are installed in wooden houses and places where wooden guides for drywall are installed. Before purchasing, you need to look at the thickness of the metal and the quality of the product.
Under metal profile
Under the metal frame, only plastic boxes are used to install switches. Let's say schneider electric IMT35150. The body of the product is made of plastic, which does not burn. The model is distinguished by its durability and wide front edge. There are plugs with different diameters. They are designed for wires with different cross-sections.
There are 2 metal “claws” in the box for fastening to the plasterboard surface. They provide strong adhesion, in which the back side of the gypsum board remains intact. The “legs” hold the screws; when tightened, their fasteners are pressed against the surface.
The socket box should not coincide with the location of the metal frame elements.
Device tasks
The socket box is made of plastic, which does not burn, or metal. This item is fixed in the gypsum board surface. A switch (socket) is mounted in it and covered with a frame. Therefore, the socket box is not visible.
Why install a socket box in the gypsum board:
- The box holds the socket or switch itself. The mechanism is mounted in plastic.
- In some cases this acts as a junction box.
- Fire protection.
When turning off electrical appliances from sockets, take out the plug, and not the entire socket (if there is no socket).
Installing a socket box in drywall
To install a socket on a plasterboard wall, you need to choose the right socket and install it. First, find out how a special installation box for drywall differs from a standard installation box for concrete. After this, you should install it correctly.
Installing a socket in a plasterboard wall involves a number of standard steps:
- Having selected a crown that matches the type of material and the diameter of the future hole, we drill it in the plasterboard partition;
- Through the drilled hole we pull out the cable to which we will connect the plug socket;
- We try on the socket at the installation site, making sure that 10-15 cm of all conductors fit freely in the socket box;
- We place a socket box in the drilled hole. After checking the horizontal position with a building level, we fix it with mounting screws or spacer tabs;
- Using a multimeter, we determine the phase and zero of the conductors inserted into the socket box, so as not to confuse them when connecting;
- We connect the wiring mechanism located in the caliper to the wiring. We fix it in the way provided by the device manufacturer;
- We fix the support with the device mechanism in the socket. We tighten it with screws, trying not to overtighten, so as not to damage the thread;
- We close the electrical installation device with the front panel.
Installation box design
Drywall is a universal building material for finishing walls and building partitions. It can be moisture resistant (for the kitchen and bathroom) and ordinary wall - for other rooms. Sheets of plasterboard are thin and cannot be compared with concrete or brick walls. Because of this, a reasonable question arises: how is the socket installed in such a thin material?
The location of fasteners may vary. Some models of socket boxes have bolts on all four sides, in other variations the bolts are located in pairs on both sides.
This is done using an installation box. For drywall, special socket boxes are produced with a special method of fixation. They look like a plastic glass. There are 4 screws on the front side. Two of them are located above the others. They are needed to directly fix the metal frame of the socket itself.
The feet can be metal or plastic. The first ones are a little more expensive, but accidentally tearing such an outlet out of the wall through negligence will be much more difficult. Those that are slightly lower are responsible for installing the socket boxes in the drywall. At the bottom of the installation box there are special fixing mounting tabs. Their position is adjusted by these two screws.
When you turn the screw, the foot is pressed more and more against the sheet of drywall. This mechanism ensures that the socket box is firmly installed and ensures that the socket will not fall out of the wall at the first opportunity.
Installation and connection of sockets and switches
The devices must be fastened carefully so that all connections are correct and extremely reliable. House wiring is most often divided into two or three main wires:
- working zero – N (mostly blue);
- phase – L (brown);
- grounding (protective zero) – PE (yellow-green).
But you can rely on color only if the distribution was initially carried out according to this rule. To do everything without errors, each device has its own connection sequence.
If the switch is built in series with the light bulb, then the sockets are usually connected in parallel. It is also necessary to first determine the type of wiring. The fact is that in old apartment buildings there is no separate outlet for grounding, but there is a ground connection. In such a situation, the PE connection terminal remains free, and the green-yellow core (if any) is bent and insulated.
The easiest way to install sockets. Standard technology:
- The wires removed from the box are cut to the required size, and the ends are stripped. It is taken into account that everything must fit freely inside the module.
- The outer plastic cover is removed; to do this, the central screw is unscrewed.
- The internal base most often combines a metal plate and an element with contacts. To connect the cores, screws are unscrewed, which release the connectors.
- Phase and zero are connected in any order and attract well.
- Next, you need to attach and align the frame and fix the overlay with openings for the fork on top.
Before connecting the outlet, all 3 wires should be checked for voltage with an indicator. Switches on plasterboard walls should be installed slightly differently. The main difference is that it is the phase that is supplied to the break (to the contacts). The device will also work when the zero is connected, but in this case the lamp will always be energized.
When installing the switch, a phase wire is placed on the break; it can be detected using an indicator; under voltage, the indicator light should light up
Important! All processes are carried out with the power off. If a large number of electrical devices are expected in the room, then a separate machine is provided.
